2015 Hyundai Genesis Coupe ABS
[x] Cancel search: ABSPage 396 of 438

Maintenance
64 7
Engine compartment main fuse panel
Description Fuse rating Protected component
MULTI
FUSEC/FAN 60A Cooling Fan (High) Relay, Cooling Fan (Low) Relay
B+1 60ASmart Junction Box ((Fuse : S/HEATER, AMP, SAFETY POWER WINDOW LH/RH),
IPS 2, IPS Control Module)
BLOWER 40A Smart Junction Box (Blower Relay)
ABS2 40A Multipurpose Check Connector, ESC Module
ABS1 40A Multipurpose Check Connector, ESC Module
ALT 150AAlternator, Multi Fuse (ABS1, ABS2, BLOWER, B+1, C/FAN),
Fuse (S/ROOF FRT, DEICER, VACUUM PUMP)
RR HTD 40A RR HTD Relay
B+260ASmart Junction Box ((Fuse : HAZARD, PDM1, MODULE5, STOP LP, TRUNK, PDM2), IPS 1,
ARISU 2, IPS Control Module)
B+360ASmart Junction Box ((Fuse : AUDIO, DRV P/SEAT, ROOM LP, MEMORY1, MEMORY2), ARISU 1,
IPS Control Module, Leak Current Autocut Device Switch, Leak Current Autocut Device Relay)
FUSEIG2 30A Start Relay, IG2 Relay, Ignition Switch
IG140AIG1 Relay, ACC Relay, Ignition Switch
S/ROOF FRT 20A Sunroof Control Module
DEICER 15A Deicer Relay
VACUUM PUMP 15A Vacuum Pump Relay (G4KF A/T)
DR LOCK 10A Smart Junction Box (Door Lock Relay, Door Unlock Relay), ICM Relay Box (Two Turn Unlock Relay)
BRAKE SW 10A Stop Lamp Switch
HORN 15A Horn Relay
DEDICATED DRL 10A Dedicated DRL Relay
B/UP LP 10AM/T - Back-Up Lamp Switch
A/T - Rear Combination Lamp LH/RH, Electro Chromic Mirror, A/V & Navigation Head Unit
Page 402 of 438
Maintenance
70 7
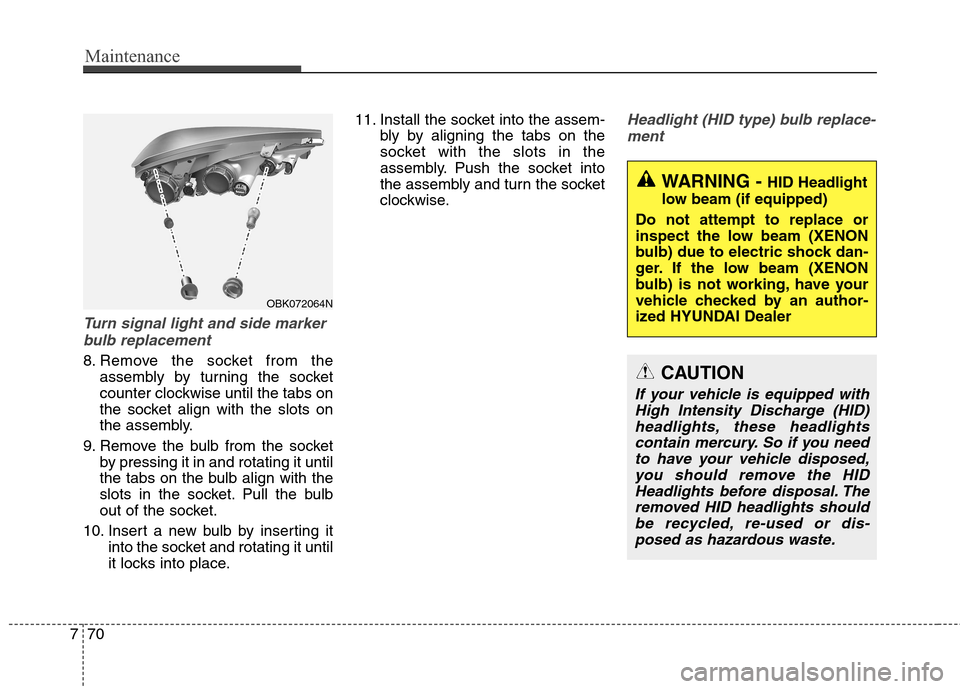
Turn signal light and side marker
bulb replacement
8. Remove the socket from the
assembly by turning the socket
counter clockwise until the tabs on
the socket align with the slots on
the assembly.
9. Remove the bulb from the socket
by pressing it in and rotating it until
the tabs on the bulb align with the
slots in the socket. Pull the bulb
out of the socket.
10. Insert a new bulb by inserting it
into the socket and rotating it until
it locks into place.11. Install the socket into the assem-
bly by aligning the tabs on the
socket with the slots in the
assembly. Push the socket into
the assembly and turn the socket
clockwise.
Headlight (HID type) bulb replace-
ment
WARNING - HID Headlight
low beam (if equipped)
Do not attempt to replace or
inspect the low beam (XENON
bulb) due to electric shock dan-
ger. If the low beam (XENON
bulb) is not working, have your
vehicle checked by an author-
ized HYUNDAI Dealer
OBK072064N
CAUTION
If your vehicle is equipped with
High Intensity Discharge (HID)
headlights, these headlights
contain mercury. So if you need
to have your vehicle disposed,
you should remove the HID
Headlights before disposal. The
removed HID headlights should
be recycled, re-used or dis-
posed as hazardous waste.
Page 403 of 438
771
Maintenance
✽ ✽
NOTICE
HID lamps have superior perform-
ance vs. halogen bulbs. HID lamps
are estimated by the manufacturer to
last twice as long or longer than halo-
gen bulbs depending on their fre-
quency of use. They will probably
require replacement at some point in
the life of the vehicle. Cycling the
headlamps on and off more than typ-
ical use will shorten HID lamps life.
HID lamps do not fail in the same
manner as halogen incandescent
lamps. If a headlamp goes out after a
period of operation but will immedi-
ately relight when the headlamp
switch is cycled it is likely the HID
lamp needs to be replaced. HID light-
ing components are more complex
than conventional halogen bulbs thus
have higher replacement cost.
If the light bulb is not operating, have
the vehicle checked by an authorized
HYUNDAI dealer.
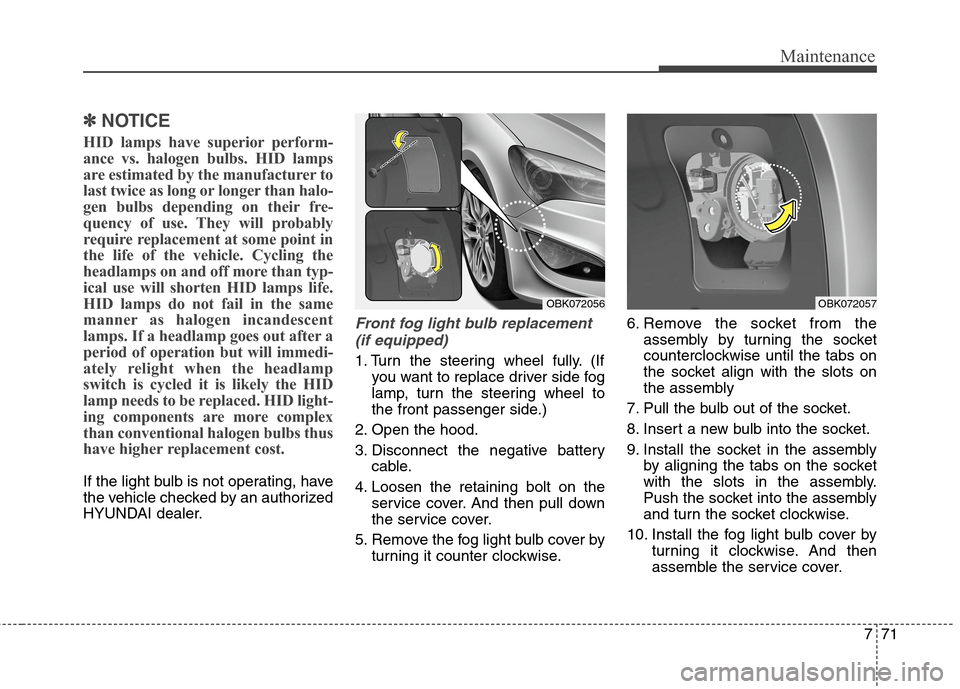
Front fog light bulb replacement
(if equipped)
1. Turn the steering wheel fully. (If
you want to replace driver side fog
lamp, turn the steering wheel to
the front passenger side.)
2. Open the hood.
3. Disconnect the negative battery
cable.
4. Loosen the retaining bolt on the
service cover. And then pull down
the service cover.
5. Remove the fog light bulb cover by
turning it counter clockwise.6. Remove the socket from the
assembly by turning the socket
counterclockwise until the tabs on
the socket align with the slots on
the assembly
7. Pull the bulb out of the socket.
8. Insert a new bulb into the socket.
9. Install the socket in the assembly
by aligning the tabs on the socket
with the slots in the assembly.
Push the socket into the assembly
and turn the socket clockwise.
10. Install the fog light bulb cover by
turning it clockwise. And then
assemble the service cover.
OBK072056OBK072057
Page 405 of 438
773
Maintenance
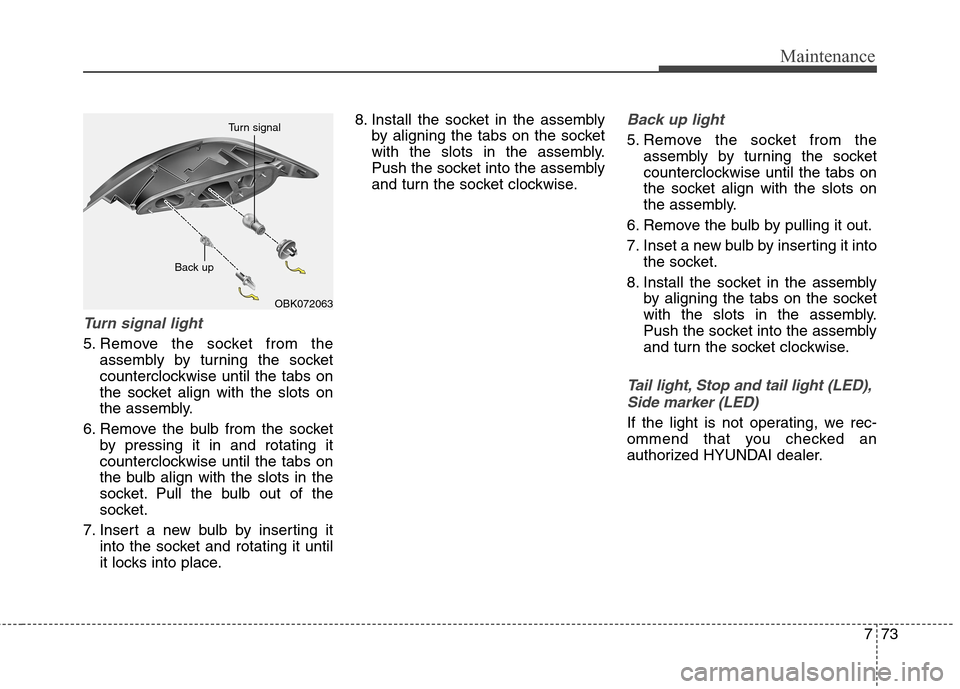
Turn signal light
5. Remove the socket from the
assembly by turning the socket
counterclockwise until the tabs on
the socket align with the slots on
the assembly.
6. Remove the bulb from the socket
by pressing it in and rotating it
counterclockwise until the tabs on
the bulb align with the slots in the
socket. Pull the bulb out of the
socket.
7. Insert a new bulb by inserting it
into the socket and rotating it until
it locks into place.8. Install the socket in the assembly
by aligning the tabs on the socket
with the slots in the assembly.
Push the socket into the assembly
and turn the socket clockwise.
Back up light
5. Remove the socket from the
assembly by turning the socket
counterclockwise until the tabs on
the socket align with the slots on
the assembly.
6. Remove the bulb by pulling it out.
7. Inset a new bulb by inserting it into
the socket.
8. Install the socket in the assembly
by aligning the tabs on the socket
with the slots in the assembly.
Push the socket into the assembly
and turn the socket clockwise.
Tail light, Stop and tail light (LED),
Side marker (LED)
If the light is not operating, we rec-
ommend that you checked an
authorized HYUNDAI dealer.
OBK072063 Back up Turn signal
Page 406 of 438
Maintenance
74 7
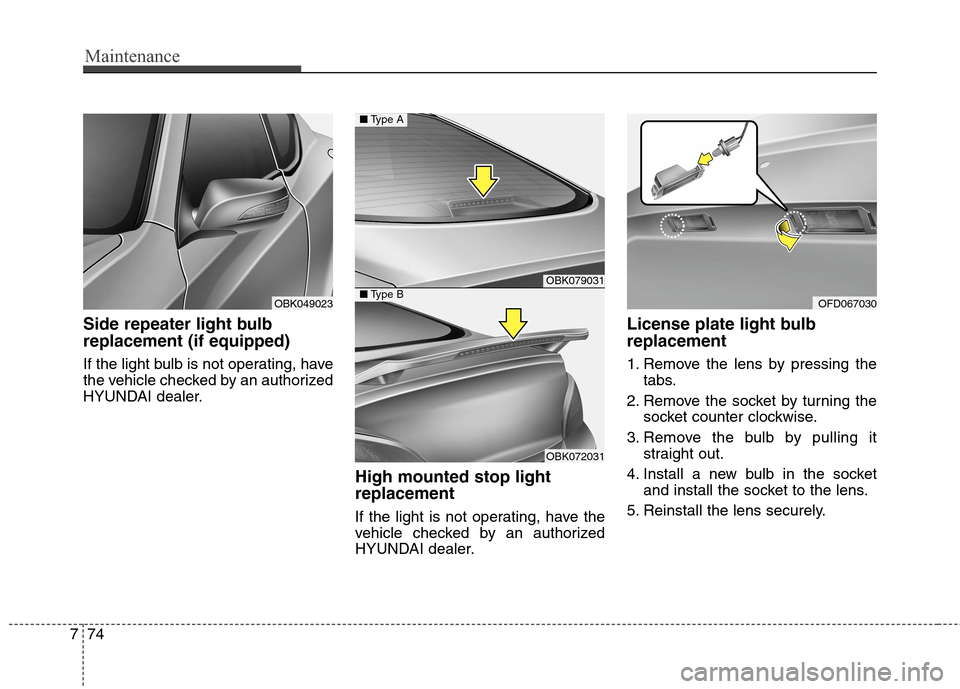
Side repeater light bulb
replacement (if equipped)
If the light bulb is not operating, have
the vehicle checked by an authorized
HYUNDAI dealer.
High mounted stop light
replacement
If the light is not operating, have the
vehicle checked by an authorized
HYUNDAI dealer.
License plate light bulb
replacement
1. Remove the lens by pressing the
tabs.
2. Remove the socket by turning the
socket counter clockwise.
3. Remove the bulb by pulling it
straight out.
4. Install a new bulb in the socket
and install the socket to the lens.
5. Reinstall the lens securely.
OBK049023
OBK079031
OBK072031
■Type A
■Type BOFD067030
Page 407 of 438
775
Maintenance
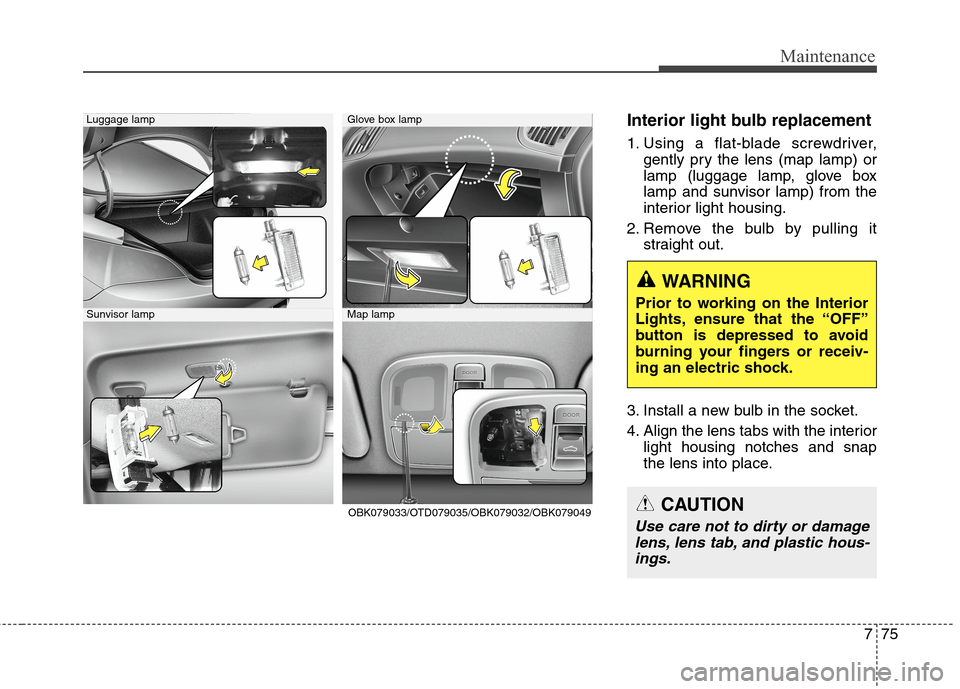
Interior light bulb replacement
1. Using a flat-blade screwdriver,
gently pry the lens (map lamp) or
lamp (luggage lamp, glove box
lamp and sunvisor lamp) from the
interior light housing.
2. Remove the bulb by pulling it
straight out.
3. Install a new bulb in the socket.
4. Align the lens tabs with the interior
light housing notches and snap
the lens into place.
CAUTION
Use care not to dirty or damage
lens, lens tab, and plastic hous-
ings.
WARNING
Prior to working on the Interior
Lights, ensure that the “OFF”
button is depressed to avoid
burning your fingers or receiv-
ing an electric shock.Sunvisor lamp
Luggage lamp
Map lamp
Glove box lamp
OBK079033/OTD079035/OBK079032/OBK079049
Page 416 of 438
Maintenance
84 7
Canister
Fuel vapors generated inside the fuel
tank are absorbed and stored in the
onboard canister. When the engine is
running, the fuel vapors absorbed in
the canister are drawn into the surge
tank through the purge control sole-
noid valve.
Purge Control Solenoid Valve
(PCSV)
The purge control solenoid valve is
controlled by the Engine Control
Module (ECM); when the engine
coolant temperature is low during
idling, the PCSV closes so that evap-
orated fuel is not taken into the
engine. After the engine warms-up
during ordinary driving, the PCSV
opens to introduce evaporated fuel to
the engine.
3. Exhaust emission control
system
The Exhaust Emission Control
System is a highly effective system
which controls exhaust emissions
while maintaining good vehicle per-
formance.
Vehicle modifications
This vehicle should not be modified.
Modification of your vehicle could
affect its performance, safety or
durability and may even violate gov-
ernmental safety and emissions reg-
ulations.
In addition, damage or performance
problems resulting from any modifi-
cation may not be covered under
warranty.
If you use unauthorized electronic
devices, it may cause the vehicle to
operate abnormally, wire damage,
battery discharge and fire. For your
safety, do not use unauthorized
electronic devices.
Engine exhaust gas precautions
(carbon monoxide)
Carbon monoxide can be present
with other exhaust fumes.
Therefore, if you smell exhaust
fumes of any kind inside your vehi-
cle, have it inspected and repaired
immediately. If you ever suspect
exhaust fumes are coming into
your vehicle, drive it only with all
the windows fully open. Have your
vehicle checked and repaired
immediately.
Do not operate the engine in con-
fined or closed areas (such as
garages) any more than what is
necessary to move the vehicle in or
out of the area.
When the vehicle is stopped in an
open area for more than a short
time with the engine running,
adjust the ventilation system (as
needed) to draw outside air into the
vehicle.
Never sit in a parked or stopped
vehicle for any extended time with
the engine running.
Page 429 of 438

Index
2I
ABS (Anti-lock brake system)·····························5-29
Active headrest················································3-9
Air bag warning labels······································3-63
Air bag warning light·······································3-40
Air bags·······················································3-36
Air bag warning labels··································3-63
Air bag warning light····································3-40
Collision sensors·········································3-55
Curtain air bag············································3-54
Driver's and passenger's front air bag·················3-48
Occupant classification system·························3-43
Side impact air bag·······································3-52
SRS components and functions························3-39
Air cleaner····················································7-32
Alarm system(see the Theft-alarm system)··············4-14
alcohol and methanol·········································1-4
Antenna (Glass)············································4-128
Anti-lock brake system (ABS)·····························5-29
Appearance care
Exterior care··············································7-76
Interior care···············································7-82
Appearance care·············································7-76
Ashtray······················································4-122
Audio control···············································4-138
Audio system···············································4-128
Audio control············································4-138Bluetooth Hands free···································4-155
Bluetooth
®Wireless Technology·····················4-155
Glass antenna············································4-128
IPOD······················································4-149
Steering wheel audio control··························4-129
USB device··············································4-145
XM satellite Radio······································4-150
Auto Cruise (see the cruise control system)·············5-37
Automatic climate control system·······················4-102
Air conditioning·········································4-111
Climate control air filter · · ·······················4-100, 112
Automatic tranmission······································5-17
Shift lock··················································5-22
Sports mode···············································5-20
Automatic tranmission fluid·······························7-31
Aux, USB and iPod port··································4-127
Base curb weight·············································5-57
Battery·························································7-39
Battery saver function·······································4-82
Before driving·················································5-3
Bluetooth Hands free······································4-155
Bluetooth
®Wireless Technology························4-155
Bottle holders, see cup holders···························4-122
A
B