Page 218 of 438
Features of your vehicle
134 4
CAUTION
Operating the device while
driving could lead to acci-
dents due to a lack of atten-
tion to external surroundings.
First park the vehicle before
operating the device.
Adjust the volume to levels
that allow the driver to hear
sounds from outside of the
vehicle. Driving in a state
where external sounds cannot
be heard may lead to acci-
dents.
Pay attention to the volume
setting when turning the
device on. A sudden output of
extreme volume upon turning
the device on could lead to
hearing impairment. (Adjust
the volume to a suitable levels
before turning off the device.)
(Continued)
WARNING
Do not stare at the screen while
driving. Staring at the screen
for prolonged periods of time
could lead to traffic accidents.
Do not disassemble, assemble,
or modify the audio system.
Such acts could result in acci-
dents, fire, or electric shock.
Using the phone while driving
may lead to a lack of attention
of traffic conditions and
increase the likelihood of acci-
dents. Use the phone feature
after parking the vehicle.
Heed caution not to spill water
or introduce foreign objects
into the device. Such acts
could lead to smoke, fire, or
product malfunction.
(Continued)
(Continued)
Please refrain from use if the
screen is blank or no sound
can be heard as these signs
may indicate product malfunc-
tion. Continued use in such
conditions could lead to acci-
dents(fires, electric shock) or
product malfunctions.
Do not touch the antenna dur-
ing thunder or lightening as
such acts may lead to light-
ning induced electric shock.
Do not stop or park in parking-
restricted areas to operate the
product. Such acts could lead
to traffic accidents.
Use the system with the vehi-
cle ignition turned on.
Prolonged use with the igni-
tion turned off could result in
battery discharge.
Page 219 of 438
4135
Features of your vehicle
(Continued)
Turn on the car ignition before
using this device. Do not oper-
ate the audio system for long
periods of time with the igni-
tion turned off as such opera-
tions may lead to battery dis-
charge.
Do not subject the device to
severe shock or impact. Direct
pressure onto the front side of
the monitor may cause dam-
age to the LCD or touch
screen.
When cleaning the device,
make sure to turn off the
device and use a dry and
smooth cloth. Never use
tough materials, chemical
cloths, or solvents (alcohol,
benzene, thinners, etc.) as
such materials may damage
the device panel or cause
color/quality deterioration
(Continued)(Continued)
When cleaning the device,
make sure to turn off the
device and use a dry and
smooth cloth. Never use
tough materials, chemical
cloths, or solvents (alcohol,
benzene, thinners, etc.) as
such materials may damage
the device panel or cause
color/quality deterioration
Do not place beverages close
to the audio system. Spilling
beverages may lead to system
malfunction.
In case of product malfunc-
tion, please contact your place
of purchase or After Service
center.
Placing the audio system
within an electromagnetic
environment may result in
noise interference.
(Continued)(Continued)
If the air freshener gets on to
audio system or plastics, then
it could cause the crack due to
its chemical reaction. Please
be careful when you use air
fresheners near those prod-
ucts. Especially be careful
when you have attached air
freshener on the air vents. The
liquid can be flow down.
Page 222 of 438
Features of your vehicle
138 4
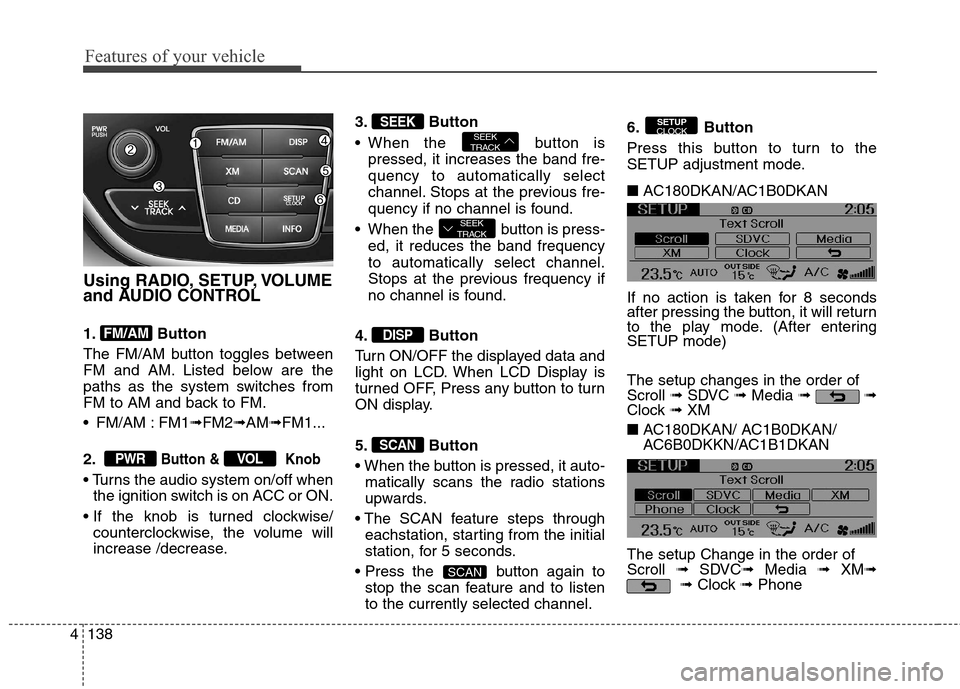
Using RADIO, SETUP, VOLUME
and AUDIO CONTROL
1. Button
The FM/AM button toggles between
FM and AM. Listed below are the
paths as the system switches from
FM to AM and back to FM.
FM/AM : FM1➟FM2➟AM➟FM1...
2.
Button & Knob
the ignition switch is on ACC or ON.
counterclockwise, the volume will
increase /decrease.3. Button
When the button is
pressed, it increases the band fre-
quency to automatically select
channel. Stops at the previous fre-
quency if no channel is found.
When the button is press-
ed, it reduces the band frequency
to automatically select channel.
Stops at the previous frequency if
no channel is found.
4. Button
Turn ON/OFF the displayed data and
light on LCD. When LCD Display is
turned OFF, Press any button to turn
ON display.
5. Button
matically scans the radio stations
upwards.
eachstation, starting from the initial
station, for 5 seconds.
button again to
stop the scan feature and to listen
to the currently selected channel.6. Button
Press this button to turn to the
SETUP adjustment mode.
■ AC180DKAN/AC1B0DKAN
If no action is taken for 8 seconds
after pressing the button, it will return
to the play mode. (After entering
SETUP mode)
The setup changes in the order of
Scroll ➟SDVC ➟Media ➟ ➟
Clock ➟ XM
■ AC180DKAN/ AC1B0DKAN/
AC6B0DKKN/AC1B1DKAN
The setup Change in the order of
Scroll ➟SDVC➟Media ➟ XM➟
➟Clock ➟Phone
SETUP
CLOCK
SCAN
SCAN
DISP
SEEK
TRACK
SEEK
TRACKSEEK
VOLPWR
FM/AM
Page 223 of 438
4139
Features of your vehicle
Select whether long file names are
scrolled continuously (On) or just
once (Off).
Control)
Select this item to turn the SDVC fea-
ture On or Off. If it is turned ON, vol-
ume level is adjusted automatically
according to the vehicle speed.
Select default display of MP3 play
information. “Folder/File” or
“Artist/Title” can be selected.
Select default display of XM mode.
“Cat./Ch.” or “Artist/Title” can be
selected
Select this item to enter SETUP
mode. Refer to “PHONE OPERA-
TION” section for detailed information.
❈“PHONE” menu is not available if
the audio does not support
Bluetooth®Wireless Technology
features.
Select this item to enter Clock setup
mode. Adjust the hour and press the
button to set. Adjust the
minute and press the button
to complete and exit from clock
adjustment mode.
Pressing the button while in
power off, screen will allow the user
to make immediately adjustments to
the clock.
SETUPCLOCK
ENTER
ENTER
Page 224 of 438
Features of your vehicle
140 4
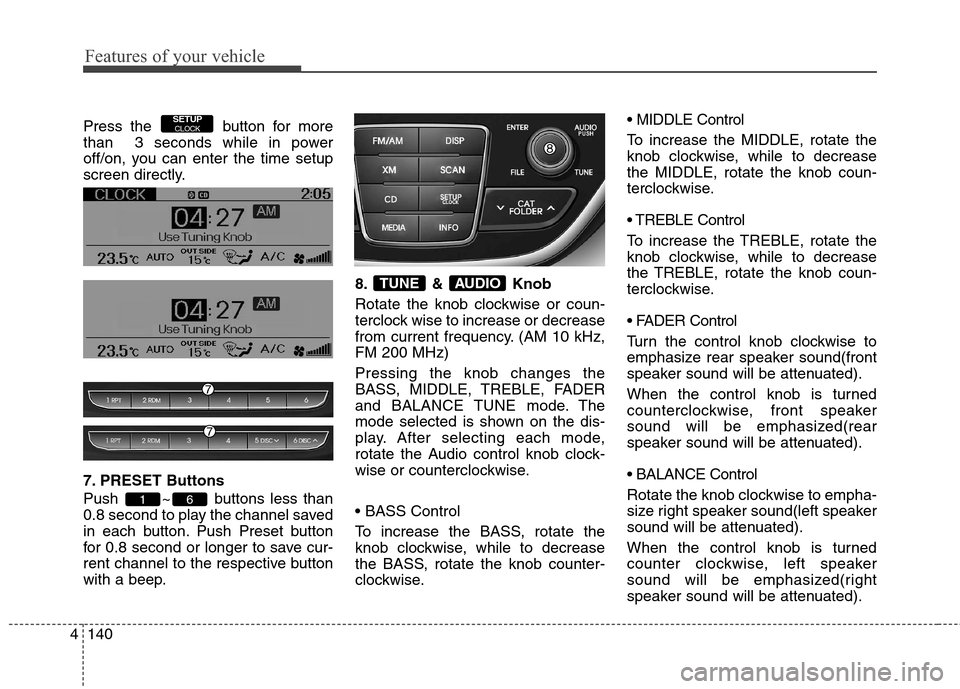
Press the button for more
than 3 seconds while in power
off/on, you can enter the time setup
screen directly.
7. PRESET Buttons
Push ~ buttons less than
0.8 second to play the channel saved
in each button. Push Preset button
for 0.8 second or longer to save cur-
rent channel to the respective button
with a beep.8. & Knob
Rotate the knob clockwise or coun-
terclock wise to increase or decrease
from current frequency. (AM 10 kHz,
FM 200 MHz)
Pressing the knob changes the
BASS, MIDDLE, TREBLE, FADER
and BALANCE TUNE mode. The
mode selected is shown on the dis-
play. After selecting each mode,
rotate the Audio control knob clock-
wise or counterclockwise.
To increase the BASS, rotate the
knob clockwise, while to decrease
the BASS, rotate the knob counter-
clockwise. MIDDLE Control
To increase the MIDDLE, rotate the
knob clockwise, while to decrease
the MIDDLE, rotate the knob coun-
terclockwise.
Control
To increase the TREBLE, rotate the
knob clockwise, while to decrease
the TREBLE, rotate the knob coun-
terclockwise.
Turn the control knob clockwise to
emphasize rear speaker sound(front
speaker sound will be attenuated).
When the control knob is turned
counterclockwise, front speaker
sound will be emphasized(rear
speaker sound will be attenuated).
Rotate the knob clockwise to empha-
size right speaker sound(left speaker
sound will be attenuated).
When the control knob is turned
counter clockwise, left speaker
sound will be emphasized(right
speaker sound will be attenuated).
AUDIOTUNE
61
SETUPCLOCK
Page 225 of 438
4141
Features of your vehicle
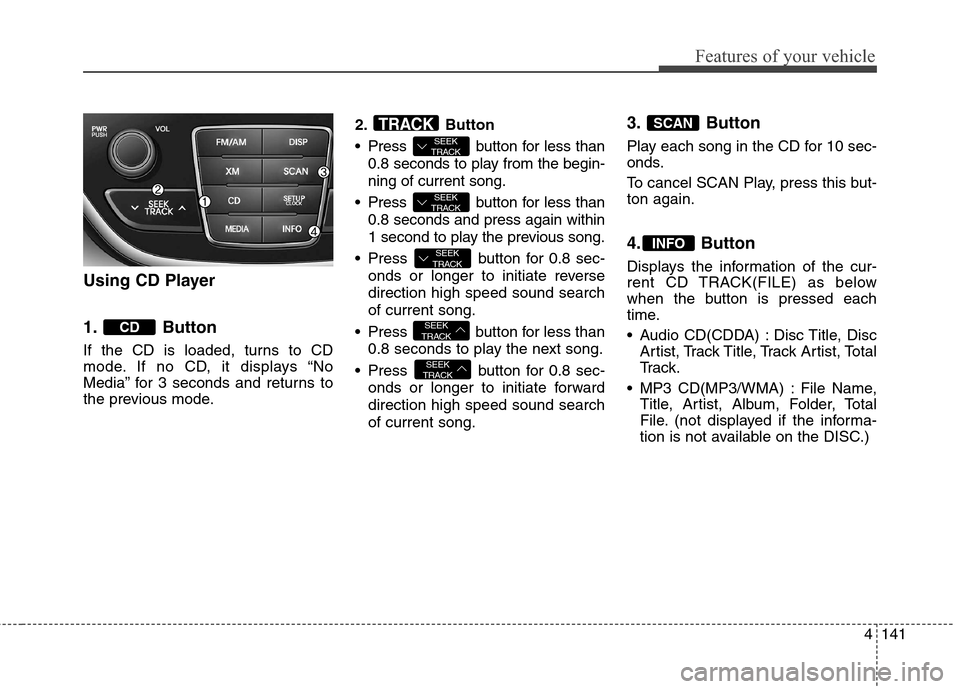
Using CD Player
1. Button
If the CD is loaded, turns to CD
mode. If no CD, it displays “No
Media” for 3 seconds and returns to
the previous mode.2. Button
Press button for less than
0.8 seconds to play from the begin-
ning of current song.
Press button for less than
0.8 seconds and press again within
1 second to play the previous song.
Press button for 0.8 sec-
onds or longer to initiate reverse
direction high speed sound search
of current song.
Press button for less than
0.8 seconds to play the next song.
Press button for 0.8 sec-
onds or longer to initiate forward
direction high speed sound search
of current song.
3. Button
Play each song in the CD for 10 sec-
onds.
To cancel SCAN Play, press this but-
ton again.
4. Button
Displays the information of the cur-
rent CD TRACK(FILE) as below
when the button is pressed each
time.
Audio CD(CDDA) : Disc Title, Disc
Artist, Track Title, Track Artist, Total
Tr a c k .
MP3 CD(MP3/WMA) : File Name,
Title, Artist, Album, Folder, Total
File. (not displayed if the informa-
tion is not available on the DISC.)
INFO
SCAN
SEEK
TRACK
SEEK
TRACK
SEEK
TRACK
SEEK
TRACK
SEEK
TRACKTRACK
CD
Page 228 of 438
Features of your vehicle
144 4
13.& Knob
Turn this knob clockwise to browse
songs after current song, or coun-
terclockwise to browse songs
before current song. To play the
displayed song, press the knob.
Pressing this knob without turning
enters to AUDIO CONTROL mode.NOTE:
Order of playing files (folders) :
1. Song playing order : to
sequentially.2. Folder playing order :
❋If no song file is contained in
the folder, that folder is not dis-
played.
ENTERTUNE
Page 229 of 438

4145
Features of your vehicle
CAUTION IN USING
USB DEVICE
To use an external USB
device, make sure the device
is not connected when start-
ing up the vehicle. Connect
the device after starting up.
If you start the engine when
the USB device is connected,
it may damage the USB
device. (USB flashdrives are
very sensitive to electric
shock.)
If the engine is started up or
turned off while the external
USB device is connected, the
external USB device may not
work.
It may not play inauthentic
MP3 or WMA files.
1) It can only play MP3 files
with the compression rate
between 8Kbps~320Kbps.
2) It can only play WMA music
files with the compression
rate between 8Kbps ~
320Kbps.
(Continued)
(Continued)
Take precautions for static
electricity when connecting or
disconnecting the external
USB device.
An encrypted MP3 PLAYER is
not recognizable.
Depending on the condition of
the external USB device, the
connected external USB
device can be unrecognizable.
When the formatted byte/sec-
tor setting of External USB
device is not either 512BYTE
or 2048BYTE, then the device
will not be recognized.
Use only a USB device format-
ted to FAT 12/16/32.
USB devices without USB I/F
authentication may not be rec-
ognizable.
Make sure the USB connec-
tion terminal does not come in
contact with the human body
or other objects.
(Continued)(Continued)
If you repeatedly connect or
disconnect the USB device in
a short period of time, it may
break the device.
You may hear a strange noise
when connecting or discon-
necting a USB device.
If you disconnect the external
USB device during playback in
USB mode, the external USB
device can be damaged or may
malfunction. Therefore, discon-
nect the external USB device
when the audio is turned off or
in another mode. (e.g, Radio or
CD)
Depending on the type and
capacity of the external USB
device or the type of the files
stored in the device, there is a
difference in the time taken for
recognition of the device.
Do not use the USB device for
purposes other than playing
music files.
(Continued)