Page 244 of 498
Features of your vehicle
164 4
✽NOTICE - USING THE
Bluetooth®Wireless Technology
MOBILE PHONE
• Do not use a mobile phone or per-
form Bluetooth®Wireless
Technology settings (e.g. pairing a
phone) whilst driving.
• Some Bluetooth
®Wireless
Technology -enabled phones may
not be recognised by the system or
fully compatible with the system.
• Before using Bluetooth
®Wireless
Technology related features of the
audio system, refer to your
phone’s User’s Manual for phone-
side Bluetooth
®Wireless
Technology operations.
• The phone must be paired to the
audio system to use Bluetooth
®
Wireless Technology related fea-
tures.
• You will not be able to use the
hands-free feature when your
phone (in the vehicle) is outside of
the mobile service area (e.g. in a
tunnel, underground, mountain-
ous area, etc.).
(Continued)(Continued)
• If the mobile phone signal is poor
or the vehicle's interior noise is too
loud, it may be difficult to hear the
other person’s voice during a call.
• Do not place the phone near or
inside metallic objects, otherwise
communications with Bluetooth
®
Wireless Technology system or
mobile service stations can be dis-
turbed.
• Whilst a phone is connected
through Bluetooth
®Wireless
Technology your phone may dis-
charge quicker than usual for
additional Bluetooth
®Wireless
Technology-related operations.
• Some mobile phones or other
devices may cause interference,
noise or a malfunction to the audio
system. If this occurs, store the
device in a different location. This
may resolve the problem.
• Phone contact names should be
saved in English or they may not
be displayed correctly.
(Continued)(Continued)
• If activated, upon vehicle igni-
tion(IGN/ACC ON), the
Bluetooth
®Wireless Technology
phone will be automatically con-
nected. Even if you are outside, the
Bluetooth
®Wireless Technology
phone will be automatically con-
nected once you are in the vicinity
of the vehicle.
If you do not want automatic
Bluetooth
®Wireless Technology
connection, turn the Bluetooth®
Wireless Technology feature off.
• The hands-free call volume and
quality may differ depending on
the mobile phone type.
•Bluetooth
®Wireless Technology
features can be used only when the
mobile phone has been paired and
connected with the device. For
more information on pairing and
connecting Bluetooth
®Wireless
Technology enabled mobile
phones, refer to the “Phone Setup”
section.
(Continued)
Page 372 of 498
Driving your vehicle
68 5
Reversing
Hold the bottom of the steering
wheel with one hand. Then, to move
the trailer to the left, move your hand
to the left. To move the trailer to the
right, move your hand to the right.
Always reverse slowly and, if possi-
ble, have someone guide you.
Making turns
When you’re turning with a trailer,
make wider turns than normal. Do
this so your trailer won’t strike soft
shoulders, curbs, road signs, trees,
or other objects. Avoid jerky or sud-
den manoeuvres. Signal well in
advance.
Turn signals
When you tow a trailer, your vehicle
has to have a different turn signal
flasher and extra wiring. The green
arrows on your instrument panel will
flash whenever you signal a turn or
lane change. Properly connected,
the trailer lights will also flash to alert
other drivers you’re about to turn,
change lanes, or stop.
When towing a trailer, the green
arrows on your instrument cluster will
flash for turns even if the bulbs on
the trailer are burned out. Thus, you
may think drivers behind you are
seeing your signals when, in fact,
they are not. It’s important to check
occasionally to be sure the trailer
bulbs are still working. You must also
check the lights every time you dis-
connect and then reconnect the
wires.WARNING
Do not connect a trailer lighting
system directly to your vehi-
cle’s lighting system. Use an
approved trailer wiring harness.
Failure to do so could result in
damage to the vehicle electrical
system and/or personal injury.
Consult an authorised
HYUNDAI dealer for assistance.
Page 378 of 498
The hazard warning flasher serves
as a warning to other drivers to exer-
cise extreme caution when
approaching, overtaking, or passing
your vehicle.
It should be used whenever emer-
gency repairs are being made or
when the vehicle is stopped near the
edge of a roadway.
To turn the hazard warning flasher
on or off, press the hazard warning
flasher button with the ignition switch
in any position. The button is located
in the centre console.All turn signal lights will flash simul-
taneously.
• The hazard warning flasher oper-
ates whether your vehicle is run-
ning or not.
• The turn signals do not work when
the hazard flasher is on.
HAZARD WARNING FLASHER
What to do in an emergency
2 6
OMD064013
Page 397 of 498
Light bulbs . . . . . . . . . . . . . . . . . . . . . . . . . . . . . . . 7-66
• Headlight, position light, turn signal light,
front fog light bulb replacement . . . . . . . . . . . . . . . 7-67
• Headlight and front fog light aiming . . . . . . . . . . . . . 7-72
• Side repeater light bulb replacement . . . . . . . . . . . . 7-77
• Rear combination light bulb replacement . . . . . . . . 7-77
• High mounted stop light replacement . . . . . . . . . . . 7-81
• Licence plate light bulb replacement . . . . . . . . . . . . 7-82
• Interior light bulb replacement . . . . . . . . . . . . . . . . . 7-83
Appearance care . . . . . . . . . . . . . . . . . . . . . . . . . . . 7-84
• Exterior care . . . . . . . . . . . . . . . . . . . . . . . . . . . . . . . . 7-84
• Interior care . . . . . . . . . . . . . . . . . . . . . . . . . . . . . . . . . 7-89
Emission control system . . . . . . . . . . . . . . . . . . . . 7-91
• Crankcase emission control system . . . . . . . . . . . . . . 7-91
• Evaporative emission control system. . . . . . . . . . . . . 7-92
• Exhaust emission control system . . . . . . . . . . . . . . . . 7-92
7
Page 403 of 498
Maintenance
8 7
At least monthly:
• Check the coolant level in the
engine coolant reservoir.
• Check the operation of all exterior
lights, including the stoplights, turn
signals and hazard warning flash-
ers.
• Check the inflation pressures of all
tyres including the spare.
At least twice a year
(i.e., every Spring and Autumn):
• Check the radiator, heater and air
conditioning hoses for leaks or
damage.
• Check the windscreen washer
spray and wiper operation. Clean
wiper blades with clean cloth
dampened with washer fluid.
• Check the headlight alignment.
• Check the muffler, exhaust pipes,
shields and clamps.
• Check the lap/shoulder belts for
wear and function.
• Check for worn tyres and loose
wheel nuts.
At least once a year:
• Clean the body and door drain
holes.
• Lubricate the door hinges and
checks, and bonnet hinges.
• Lubricate the door and bonnet
locks and latches.
• Lubricate the door rubber weather-
strips.
• Check the air conditioning system.
• Inspect and lubricate automatic
transaxle linkage and controls.
• Clean the battery and terminals.
• Check the brake/clutch fluid level.
Page 458 of 498
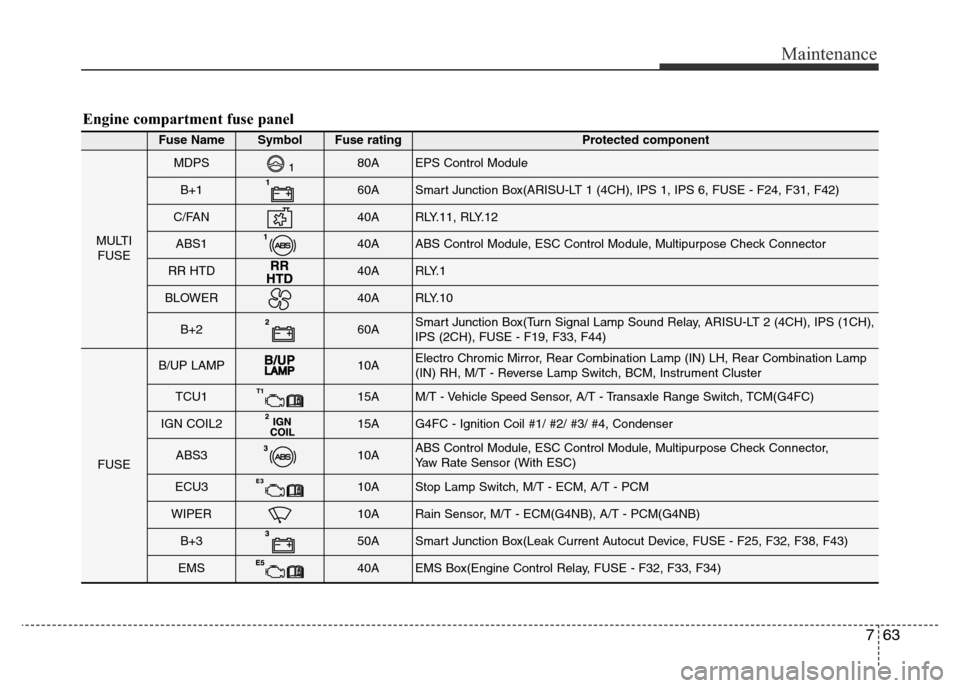
763
Maintenance
Engine compartment fuse panel
Fuse NameSymbol Fuse ratingProtected component
MULTI
FUSE
MDPS80AEPS Control Module
B+160ASmart Junction Box(ARISU-LT 1 (4CH), IPS 1, IPS 6, FUSE - F24, F31, F42)
C/FAN40ARLY.11, RLY.12
ABS140AABS Control Module, ESC Control Module, Multipurpose Check Connector
RR HTD40AR LY. 1
BLOWER40ARLY.10
B+260ASmart Junction Box(Turn Signal Lamp Sound Relay, ARISU-LT 2 (4CH), IPS (1CH),
IPS (2CH), FUSE - F19, F33, F44)
FUSE
B/UP LAMP10AElectro Chromic Mirror, Rear Combination Lamp (IN) LH, Rear Combination Lamp
(IN) RH, M/T - Reverse Lamp Switch, BCM, Instrument Cluster
TCU115AM/T - Vehicle Speed Sensor, A/T - Transaxle Range Switch, TCM(G4FC)
IGN COIL215AG4FC - Ignition Coil #1/ #2/ #3/ #4, Condenser
ABS310AABS Control Module, ESC Control Module, Multipurpose Check Connector,
Yaw Rate Sensor (With ESC)
ECU310AStop Lamp Switch, M/T - ECM, A/T - PCM
WIPER10ARain Sensor, M/T - ECM(G4NB), A/T - PCM(G4NB)
B+350ASmart Junction Box(Leak Current Autocut Device, FUSE - F25, F32, F38, F43)
EMS40AEMS Box(Engine Control Relay, FUSE - F32, F33, F34)
Page 462 of 498
767
Maintenance
✽NOTICE
After heavy, driving rain or washing,
headlight and taillight lenses could
appear frosty. This condition is
caused by the temperature difference
between the lamp inside and outside.
This is similar to the condensation on
your windows inside your vehicle
when it is raining and doesn’t indi-
cate a problem with your vehicle. If
the water leaks into the lamp bulb
circuitry, we recommend that the
system be checked by an authorised
HYUNDAI dealer.
Headlight, position light, turn
signal light, front fog light bulb
replacement
(1) Headlight (High) / Position light
(2) Headlight (Low)
(3) Front turn signal light
(4) Daytime running light (DRL)
(if equipped)
(5) Front fog light (if equipped)
OMD074101 ■Type A
OMD074102 ■Type B
OMD074026E ■Type C
Page 466 of 498
771
Maintenance
Front turn signal bulb
Follow steps 1 to 4 from the previous
page.
5. Remove the socket from the
assembly by turning the socket
anticlockwise until the tabs on the
socket align with the slots on the
assembly.
6. Remove the bulb from the socket
by pressing it in and rotating it
anticlockwise until the tabs on the
bulb align with the slots in the
socket. Pull the bulb out of the
socket.7. Insert a new bulb by inserting it
into the socket and rotating it until
it locks into place.
8. Install the socket in the assembly
by aligning the tabs on the socket
with the slots in the assembly.
Push the socket into the assembly
and turn the socket clockwise.
9. Reinstall the light assembly to the
body of the vehicle.
Front fog light and Dedicated
light (if equipped)
1. Disconnect the negative battery
cable.
2. Remove the screws under the
front bumper.
3. Disconnect the power connector
from the socket.
OMD074104
OMD074029 Turn signal