Page 99 of 473

Features of your vehicle
22 4
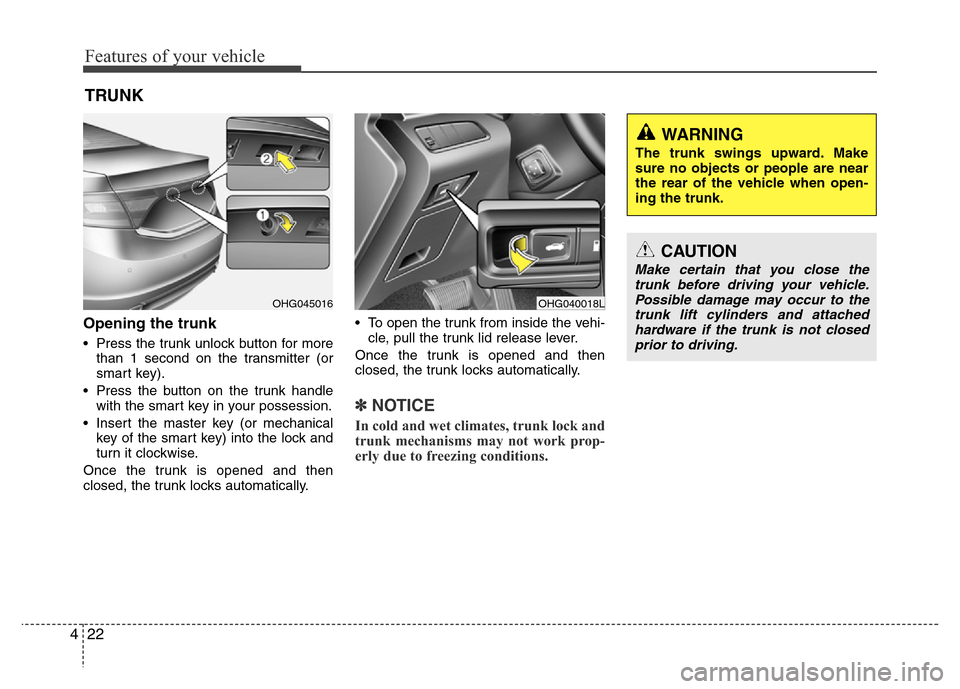
Opening the trunk
• Press the trunk unlock button for more
than 1 second on the transmitter (or
smart key).
• Press the button on the trunk handle
with the smart key in your possession.
• Insert the master key (or mechanical
key of the smart key) into the lock and
turn it clockwise.
Once the trunk is opened and then
closed, the trunk locks automatically.• To open the trunk from inside the vehi-
cle, pull the trunk lid release lever.
Once the trunk is opened and then
closed, the trunk locks automatically.
✽NOTICE
In cold and wet climates, trunk lock and
trunk mechanisms may not work prop-
erly due to freezing conditions.
TRUNK
OHG040018LOHG045016
CAUTION
Make certain that you close the
trunk before driving your vehicle.
Possible damage may occur to the
trunk lift cylinders and attached
hardware if the trunk is not closed
prior to driving.
WARNING
The trunk swings upward. Make
sure no objects or people are near
the rear of the vehicle when open-
ing the trunk.
Page 111 of 473

Features of your vehicle
34 4
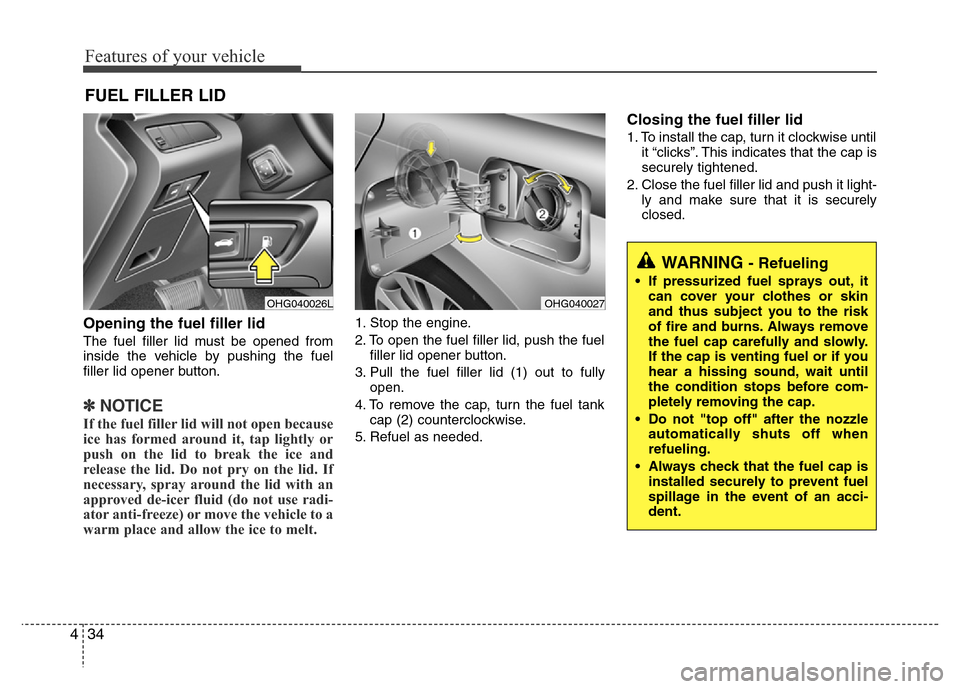
Opening the fuel filler lid
The fuel filler lid must be opened from
inside the vehicle by pushing the fuel
filler lid opener button.
✽NOTICE
If the fuel filler lid will not open because
ice has formed around it, tap lightly or
push on the lid to break the ice and
release the lid. Do not pry on the lid. If
necessary, spray around the lid with an
approved de-icer fluid (do not use radi-
ator anti-freeze) or move the vehicle to a
warm place and allow the ice to melt.
1. Stop the engine.
2. To open the fuel filler lid, push the fuel
filler lid opener button.
3. Pull the fuel filler lid (1) out to fully
open.
4. To remove the cap, turn the fuel tank
cap (2) counterclockwise.
5. Refuel as needed.
Closing the fuel filler lid
1. To install the cap, turn it clockwise until
it “clicks”. This indicates that the cap is
securely tightened.
2. Close the fuel filler lid and push it light-
ly and make sure that it is securely
closed.
FUEL FILLER LID
OHG040026LOHG040027
WARNING - Refueling
• If pressurized fuel sprays out, it
can cover your clothes or skin
and thus subject you to the risk
of fire and burns. Always remove
the fuel cap carefully and slowly.
If the cap is venting fuel or if you
hear a hissing sound, wait until
the condition stops before com-
pletely removing the cap.
• Do not "top off" after the nozzle
automatically shuts off when
refueling.
• Always check that the fuel cap is
installed securely to prevent fuel
spillage in the event of an acci-
dent.
Page 216 of 473
4139
Features of your vehicle
Digital clock
Whenever the battery terminals or relat-
ed fuses are disconnected, you must
reset the time.
Detailed information on setting the clock
is described in Audio system section 4.
Clock with AVN system (if equipped)
You can set the clock by using the Audio
or Navigation.
OHG045222L
WARNING
Do not adjust the clock while driv-
ing. You may lose your steering
control and cause an accident that
results in severe personal injury or
death.
WARNING
Do not put a finger or a foreign ele-
ment (pin, etc.) into a power outlet
and do not touch with a wet hand.
You may get electrocuted or fire
may occur.
Page 217 of 473
Features of your vehicle
140 4
GPS Time check
The clock is automatically updated
through the navigation system.
GPS Time non-check
The clock can be manually adjusted.
1. Select the "Setup" key on the H/Unit.
2. Select the "Clock".
3. Select the "Date/Time Settings".
For more details, please refer to the
manual that was supplied with your
vehicle.
Clothes hanger (if equipped)
To use the hanger, pull down the upper
portion of hanger.
Floor mat anchor(s) (if equipped)
When using a floor mat on the front floor
carpet, make sure it attaches to the floor
mat anchor(s) in your vehicle. This keeps
the floor mat from sliding forward.
OCM039200N
CAUTION
Do not hang heavy clothes, since
those may damage the hook.
OUN026348
WARNING
Do not hang other objects except
clothes. In an accident it may cause
vehicle damage or personal injury.
Page 238 of 473
(9)
Displays the time/date/day.
Press and hold the key (over 0.8 sec-
onds)to setting the Clock/Calendar
screen.
(10) ,
CD MP3, USB mode : Folder Search
(11)
Turns the monitor display on/off.(12)
Displays supported menus within each
mode.
(13) TUNE knob
FM, AM mode : turn to change broadcast
frequencies.
CD, USB, iPod
®mode : turn to search
tracks/channels/files.
(14) ~ (Preset)
Radio mode : saves a frequency or
receives saved frequencies.
MEDIA mode : press the key to
repeat and key to play in random
order (shuffle).
2 RDM1 RPT
61
MENU
DISP
FOLDERFOLDER
CLOCK
Features of your vehicle
161 4
Page 275 of 473
![Hyundai Azera 2015 Owners Manual Features of your vehicle
198 4
USING SETUP
Starting Mode
Press the key to display the
Setup screen.
You can select and control options related
to [Display], [Sound], [Clock / Calendar],
[Phone] and [ Hyundai Azera 2015 Owners Manual Features of your vehicle
198 4
USING SETUP
Starting Mode
Press the key to display the
Setup screen.
You can select and control options related
to [Display], [Sound], [Clock / Calendar],
[Phone] and [](/manual-img/35/14466/w960_14466-274.png)
Features of your vehicle
198 4
USING SETUP
Starting Mode
Press the key to display the
Setup screen.
You can select and control options related
to [Display], [Sound], [Clock / Calendar],
[Phone] and [System].
✽NOTICE
Once settings have been changed, press
the key to return to the previ-
ous menu.
Display Settings
Adjusting the Brightness
Press the key Select [Display]
Select [Brightness]
Use the
TUNE knobto adjust the
screen brightness or set the Brightness
on Automatic, Daylight, or Nightmode.
select the button to reset.
(1) Automatic : Adjusts the brightness
automatically
(2) Day : Always maintains the bright-
ness on high
(3) Night : Always maintains the bright-
ness on low
Mode Pop-up
Press the key Select [Display]
Select [Mode Pop up]
This feature is used to display the Mode
Pop-up screen when entering radio and
media modes.
When this feature is turned on, pressing
the or key will display
the Mode Pop-up screen.
✽NOTICE
The media Mode Pop-up screen can be
displayed only when two or more media
modes have been connected.
MEDIA RADIO
SETUP
Default
SETUP
MENU
SETUP
Page 277 of 473
Features of your vehicle
200 4
After selecting the Bass / Middle / Treble,
use the TUNE knob to adjust the set-
ting.
After selecting the Fader / Balance, use
TUNE knob to move the cursor on the
control screen to the desired position.
Select the button to reset.
Surround Settings(if equipped)
Press the key Select [Sound]
Select [Surround]
• Innocente (Normal) : Natural sonud
optimized for front seats
• Forza (Dynamic) : Strong sound with
enhanced bass and stereo
• Concerto (Concert) : Surround sound
with concert hall ambience
SDVC (Speed Dependent Volume
Control)
Press the key Select [Sound]
Select [Speed Dependent Vol.]
The volume level is controlled automati-
cally according to the vehicle speed.
Use the TUNE knob to select from
On/Off.
Clock/Calendar Setting
Clock Setting
Press the key Select [Clock/
Calendar] Select [Clock Settings]
Use the TUNE knob to select the
Hour, Minutes and AM/PM setting and
press the TUNE knob to change set-
tings.SETUP
SETUP
SETUP
Default
Page 278 of 473
4201
Features of your vehicle
Calendar Setting
Press the key Select [Clock/
Calendar] Select [Calendar Settings]
Use the TUNE knob to select the
Month, Day, and Year and press the knob
to change settings.
Clock Display
Press the key Select [Clock/
Calendar] Select [Clock Display (Power
off)]
This feature is used to display a clock on
the screen when the audio system is
turned off.SETUP SETUP