Page 324 of 473
541
Driving your vehicle
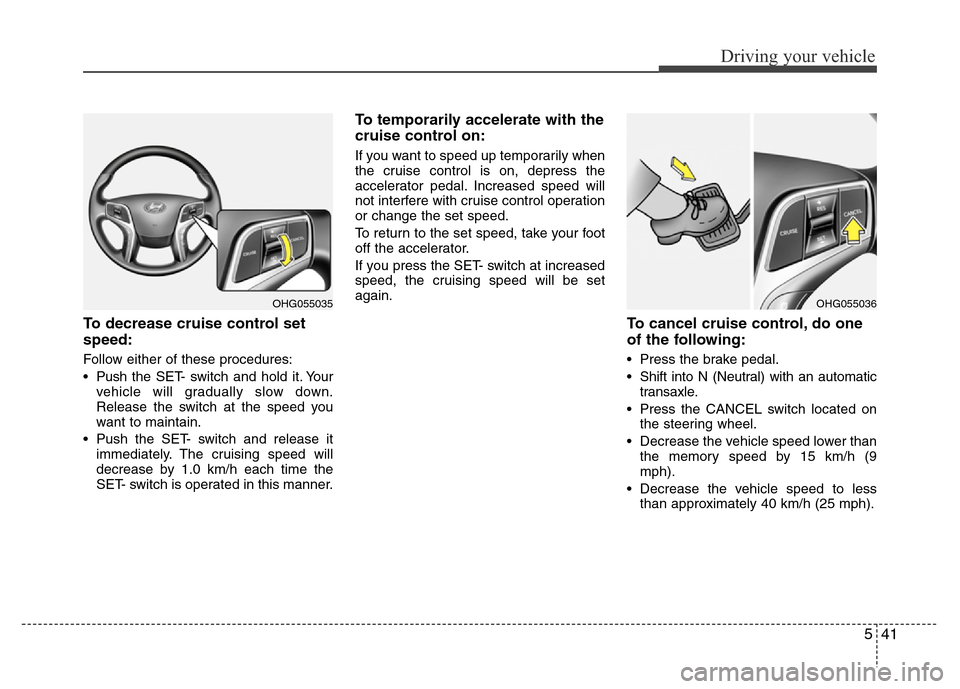
To decrease cruise control set
speed:
Follow either of these procedures:
• Pushthe SET- switch and hold it. Your
vehicle will gradually slow down.
Release the switch at the speed you
want to maintain.
• Push the SET- switch and release it
immediately. The cruising speed will
decrease by 1.0 km/h each time the
SET- switch is operated in this manner.
To temporarily accelerate with the
cruise control on:
If you want to speed up temporarily when
the cruise control is on, depress the
accelerator pedal. Increased speed will
not interfere with cruise control operation
or change the set speed.
To return to the set speed, take your foot
off the accelerator.
If you press the SET- switch at increased
speed, the cruising speed will be set
again.
To cancel cruise control, do one
of the following:
• Press the brake pedal.
• Shift into N (Neutral) with an automatic
transaxle.
• Press the CANCEL switch located on
the steering wheel.
• Decrease the vehicle speed lower than
the memory speed by 15 km/h (9
mph).
• Decrease the vehicle speed to less
than approximately 40 km/h (25 mph).
OHG055036OHG055035
Page 348 of 473
565
Driving your vehicle
Hazardous driving conditions
When hazardous driving conditions are
encountered such as water, snow, ice,
mud, sand, or similar hazards, follow
these suggestions:
• Drive cautiously and allow extra dis-
tance for braking.
• Avoid sudden movements in braking or
steering.
• When braking with non-ABS brakes
pump the brake pedal with a light up-
and-down motion until the vehicle is
stopped.• If stalled in snow, mud, or sand, use
second gear. Accelerate slowly to
avoid spinning the drive wheels.
• Use sand, rock salt, tire chains, or
other non-slip material under the drive
wheels to provide traction when stalled
in ice, snow, or mud.
Rocking the vehicle
If it is necessary to rock the vehicle to
free it from snow, sand, or mud, first turn
the steering wheel right and left to clear
the area around your front wheels. Then,
shift back and forth between R (Reverse)
and any forward gear in vehicles
equipped with an automatic transaxle.
Do not race the engine, and spin the
wheels as little as possible. If you are still
stuck after a few tries, have the vehicle
pulled out by a tow vehicle to avoid
engine overheating and possible dam-
age to the transaxle.
SPECIAL DRIVING CONDITIONS
1JBB3302
WARNING - ABS
Do not pump the brake pedal on a
vehicle equipped with ABS.
WARNING - Downshifting
Downshifting with an automatic
transaxle, while driving on slippery
surfaces can cause an accident.
The sudden change in tire speed
could cause the tires to skid. Be
careful when downshifting on slip-
pery surfaces.CAUTION
Prolonged rocking may cause
engine over-heating, transaxle dam-
age or failure, and tire damage.
Page 356 of 473
573
Driving your vehicle
This section will guide you in the proper
loading of your vehicle, to keep your
loaded vehicle weight within its design
rating capability. Properly loading your
vehicle will provide maximum return of
the vehicle design performance. Before
loading your vehicle, familiarize yourself
with the following terms for determining
your vehicle's weight ratings, from the
vehicle's specifications and the certifica-
tion label:
Base curb weight
This is the weight of the vehicle including
a full tank of fuel and all standard equip-
ment. It does not include passengers,
cargo, or optional equipment.
Vehicle curb weight
This is the weight of your new vehicle
when you picked it up from your dealer
plus any aftermarket equipment.
Cargo weight
This figure includes all weight added to
the Base Curb Weight, including cargo
and optional equipment.
GAW (Gross axle weight)
This is the total weight placed on each
axle (front and rear) - including vehicle
curb weight and all payload.
GAWR (Gross axle weight rating)
This is the maximum allowable weight
that can be carried by a single axle (front
or rear). These numbers are shown on
the certification label.
The total load on each axle must never
exceed its GAWR.
GVW (Gross vehicle weight)
This is the Base Curb Weight plus actual
Cargo Weight plus passengers.
GVWR (Gross vehicle weight rat-
ing)
This is the maximum allowable weight of
the fully loaded vehicle (including all
options, equipment, passengers and
cargo). The GVWR is shown on the cer-
tification label located on the driver’s (or
front passenger’s) door sill.
Overloading
VEHICLE WEIGHT
WARNING - Vehicle weight
The gross axle weight rating
(GAWR) and the gross vehicle
weight rating (GVWR) for your vehi-
cle are on the certification label
attached to the driver's (or front
passenger’s) door. Exceeding
these ratings can cause an acci-
dent or vehicle damage. You can
calculate the weight of your load by
weighing the items (and people)
before putting them in the vehicle.
Be careful not to overload your
vehicle.
Page 360 of 473
63
What to do in an emergency
IN CASE OF AN EMERGENCY WHILE DRIVING
If the engine stalls at a crossroad
or crossing
If the engine stalls at a crossroad or
crossing, set the shift lever in the N
(Neutral) position and then push the vehi-
cle to a safe place.
If you have a flat tire while driving
If a tire goes flat while you are driving:
1. Take your foot off the accelerator pedal
and let the car slow down while driving
straight ahead. Do not apply the brakes
immediately or attempt to pull off the
road as this may cause a loss of con-
trol. When the car has slowed to such
a speed that it is safe to do so, brake
carefully and pull off the road. Drive off
the road as far as possible and park on
firm, level ground. If you are on a divid-
ed highway, do not park in the median
area between the two traffic lanes.
2. When the vehicle is stopped, turn on
your emergency hazard flashers, set
the parking brake and put the transaxle
in P (Park).
3. Have all passengers get out of the car.
Be sure they all get out on the side of
the car that is away from traffic.
4. When changing a flat tire, follow the
instruction provided later in this sec-
tion.
If engine stalls while driving
1. Reduce your speed gradually, keeping
a straight line. Move cautiously off the
road to a safe place.
2. Turn on your emergency flashers.
3. Try to start the engine again. If your
vehicle will not start, we recommend
that you consult an authorized
HYUNDAI dealer.
Page 361 of 473
What to do in an emergency
4 6
IF THE ENGINE WILL NOT START
If engine doesn't turn over or
turns over slowly
1. If your vehicle has an automatic
transaxle, be sure the shift lever is in N
(Neutral) or P (Park) and the emer-
gency brake is set.
2. Check the battery connections to be
sure they are clean and tight.
3. Turn on the interior light. If the light
dims or goes out when you operate the
starter, the battery is discharged.
4. Check the starter connections to be
sure they are securely tightened.
5. Do not push or pull the vehicle to start
it. See instructions for "Jump starting".
If engine turns over normally but
does not start
1. Check fuel level.
2. With the ignition switch in the LOCK
/OFF position, check all connectors at
the ignition coils and spark plugs.
Reconnect any that may be discon-
nected or loose.
3. If the engine still does not start, we
recommend that you call an author-
ized HYUNDAI dealer.
WARNING
If the engine will not start, do not
push or pull the car to start it. This
could result in a collision or cause
other damage.
Page 363 of 473
What to do in an emergency
6 6
Jump starting procedure
1. Make sure the booster battery is 12-
volt and that its negative terminal is
grounded.
2. If the booster battery is in another
vehicle, do not allow the vehicles to
touch.
3. Turn off all unnecessary electrical
loads.
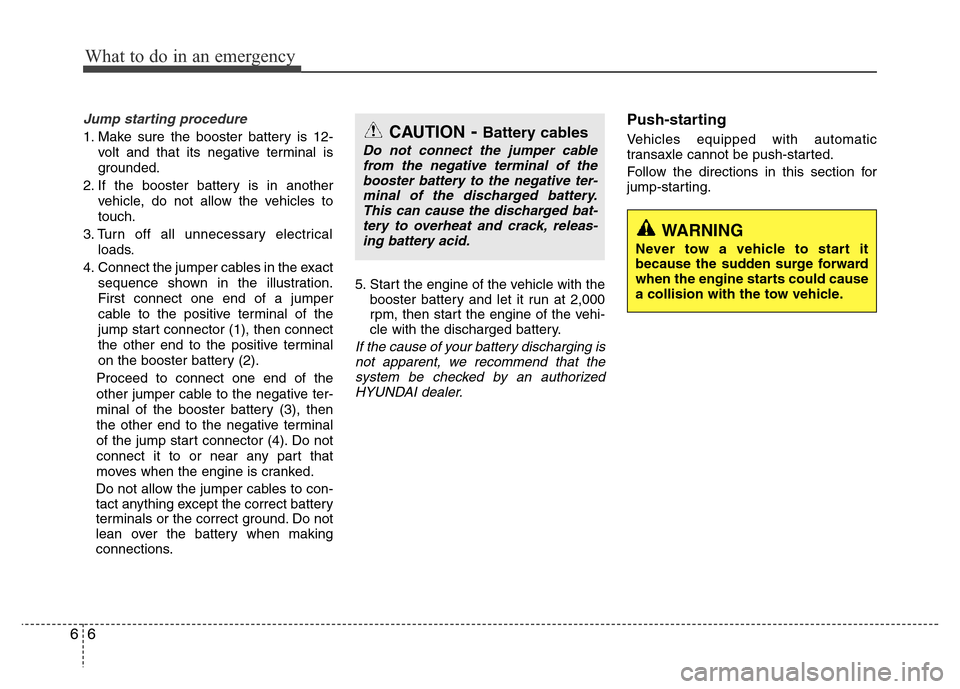
4. Connect the jumper cables in the exact
sequence shown in the illustration.
First connect one end of a jumper
cable to the positive terminal of the
jump start connector (1), then connect
the other end to the positive terminal
on the booster battery (2).
Proceed to connect one end of the
other jumper cable to the negative ter-
minal of the booster battery (3), then
the other end to the negative terminal
of the jump start connector (4). Do not
connect it to or near any part that
moves when the engine is cranked.
Do not allow the jumper cables to con-
tact anything except the correct battery
terminals or the correct ground. Do not
lean over the battery when making
connections.5. Start the engine of the vehicle with the
booster battery and let it run at 2,000
rpm, then start the engine of the vehi-
cle with the discharged battery.
If the cause of your battery discharging is
not apparent, we recommend that the
system be checked by an authorized
HYUNDAI dealer.
Push-starting
Vehicles equipped with automatic
transaxle cannot be push-started.
Follow the directions in this section for
jump-starting.CAUTION- Battery cables
Do not connect the jumper cable
from the negative terminal of the
booster battery to the negative ter-
minal of the discharged battery.
This can cause the discharged bat-
tery to overheat and crack, releas-
ing battery acid.
WARNING
Never tow a vehicle to start it
because the sudden surge forward
when the engine starts could cause
a collision with the tow vehicle.
Page 371 of 473
What to do in an emergency
14 6
Jack label1. Model Name
2. Maximum allowable load
3. When using the jack, set your
parking brake.
4. When using the jack, stop the
engine.
5. Do not get under a vehicle that is
supported by a jack.
6. The designated locations under
the frame
7. When supporting the vehicle, the
base plate of jack must be vertical
under the lifting point.
8. Shift into Reverse gear on vehicles
with manual transaxle or move the
shift lever to the P position on
vehicles with automatic transaxle.
9. The jack should be used on firm
level ground.
10. Jack manufacture
11. Production date
12. Representative company and
address
• Type A■Example
• Type B
OHYK064001/OHYK064005/OHYK064002 • Type C
❈The actual Jack label in the vehicle may differ from the illustration.
For more detailed specifications, refer to the label attached to the jack.
Page 379 of 473
What to do in an emergency
22 6
When towing your vehicle in an emer-
gency without wheel dollies :
1. Set the ignition switch in the ACC posi-
tion.
2. Place the shift lever in N (Neutral).
3. Release the parking brake.
Removable towing hook
(front, if equipped)
1. Open the trunk, and remove the tow-
ing hook from the tool case.
2. Remove the hole cover pressing the
lower part of the cover on the front
bumper.
3. Install the towing hook by turning it
clockwise into the hole until it is fully
secured.
4. Remove the towing hook and install
the cover after use.
Emergency towing
If towing is necessary, we recommend
you to have it done by an authorized
HYUNDAI dealer or a commercial tow
truck service.
OHG065008
OHG065009■Rear
CAUTION
Failure to place the shift lever in N
(Neutral) may cause internal dam-
age to the transaxle.
■Front
OHG065010