Page 436 of 473

Maintenance
54 7
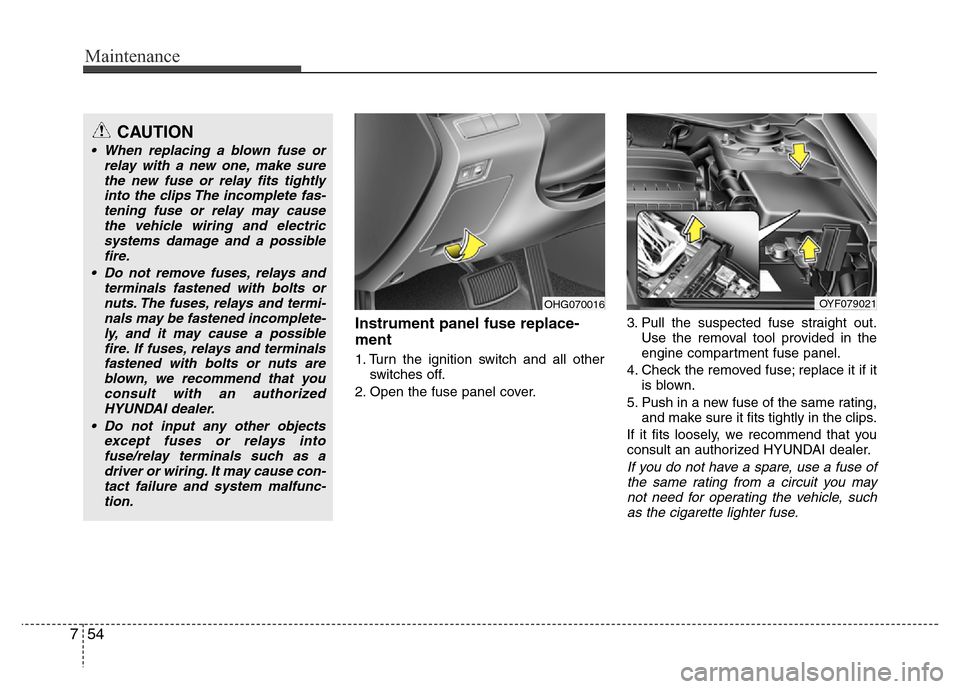
Instrument panel fuse replace-
ment
1. Turn the ignition switch and all other
switches off.
2. Open the fuse panel cover.3. Pull the suspected fuse straight out.
Use the removal tool provided in the
engine compartment fuse panel.
4. Check the removed fuse; replace it if it
is blown.
5. Push in a new fuse of the same rating,
and make sure it fits tightly in the clips.
If it fits loosely, we recommend that you
consult an authorized HYUNDAI dealer.
If you do not have a spare, use a fuse of
the same rating from a circuit you may
not need for operating the vehicle, such
as the cigarette lighter fuse.
OHG070016OYF079021
CAUTION
• When replacing a blown fuse or
relay with a new one, make sure
the new fuse or relay fits tightly
into the clips The incomplete fas-
tening fuse or relay may cause
the vehicle wiring and electric
systems damage and a possible
fire.
• Do not remove fuses, relays and
terminals fastened with bolts or
nuts. The fuses, relays and termi-
nals may be fastened incomplete-
ly, and it may cause a possible
fire. If fuses, relays and terminals
fastened with bolts or nuts are
blown, we recommend that you
consult with an authorized
HYUNDAI dealer.
• Do not input any other objects
except fuses or relays into
fuse/relay terminals such as a
driver or wiring. It may cause con-
tact failure and system malfunc-
tion.
Page 437 of 473
755
Maintenance
If the headlights or other electrical com-
ponents do not work and the fuses are
OK, check the fuse panel in the engine
compartment. If a fuse is blown, it must
be replaced.
Fuse switch
Always, put the fuse switch at the ON
position.
If you move the switch to the OFF posi-
tion, some items such as audio and digi-
tal clock must be reset and transmitter
(or smart key) may not work properly.
Engine compartment fuse
replacement
1. Turn the ignition switch and all other
switches off.
2. Remove the fuse panel cover by
pressing the tab and pulling up.
3. Check the removed fuse; replace it if it
is blown. To remove or insert the fuse,
use the fuse puller in the engine com-
partment fuse panel.
4. Push in a new fuse of the same rating,
and make sure it fits tightly in the clips.
If it fits loosely, we recommend that
you consult an authorized HYUNDAI
dealer.
OHG070018OHG070019
CAUTION
Always place the fuse switch in the
ON position while driving the vehi-
cle.
Page 438 of 473
Maintenance
56 7
Main fuse
If the main fuse is blown, it must be
removed as follows:
1. Turn off the engine.
2. Disconnect the negative battery cable.
3. Remove the nuts shown in the picture
above.
4. Replace the fuse with a new one of the
same rating.
5. Reinstall in the reverse order of
removal.
Multi fuse
If the multi fuse is blown, it must be
removed as follows:
1. Turn off the engine.
2. Disconnect the negative battery cable.
3. Remove the fuse panel in the engine
compartment.
4. Remove the nuts shown in the picture
above.
5. Replace the fuse with a new one of the
same rating.
6. Reinstall in the reverse order of
removal.
✽NOTICE
If the multi fuse is blown, we recommend
that you consult an authorized HYUNDAI
dealer.
CAUTION
After checking the fuse panel in the
engine compartment, securely
install the fuse panel cover. If not,
electrical failures may occur from
water contact.
OHG070021OVG079023L
Page 439 of 473
757
Maintenance
✽NOTICE
Not all fuse panel descriptions in this
manual may be applicable to your vehi-
cle. It is accurate at the time of printing.
When you inspect the fuse panel in your
vehicle, refer to the fuse panel label.
Fuse/relay panel description
Inside the fuse/relay panel covers, you can find the fuse/relay label describing fuse/relay name and capacity.
Engine compartment fuse panel
OHG070022/OHG070023/OHG070024
Instrument panel fuse panel
Page 443 of 473
761
Maintenance
No.Fuse ratingSymbol Protected component
MULTI
FUSE
F1 60A2Smart Junction Box (Fuse - F20/F25/F28/F35, IPS 1, IPS 2, ARISU-LT 1)
F2 60A3Smart Junction Box (Fuse - F26/F29/F32/F33/F36)
F3 40AIG 1W/O Smart Key - Ignition Switch
With Smart Key - RLY. 2 (PDM 1 (ACC) Relay), RLY. 9 (PDM 2 (IG1) Relay)
F440A1ESC Control Module, ABS Control Module
F540ARLY. 1 (RR HTD Relay)
F640ARLY. 14 (Blower Relay)
F760A4Smart Junction Box (Fuse - F19/F24/F27/F30, IPS 3, IPS 4, ARISU-LT 2)
F880A1-
FUSE
F910AA/C Control Module
F1010AB/UP LAMPRear Combination Lamp (IN) LH/RH, Electro Chromic Mirror , Front Monitor, Audio,
Transaxle Range Switch, PCM
F1210AE4PCM
F1310AE5Multipurpose Check Connector
Engine compartment main fuse panel
Page 445 of 473
763
Maintenance
No.Fuse ratingSymbol Protected component
FUSE
F2820AICM Relay Box (Head Lamp Washer Relay)
F2930ADRVDriver Lumbar Support Limit Switch, Driver IMS Module,
Power Seat Relay Box LH, Driver Reclining Limit Switch
F3040A1Smart Junction Box (Fuse - F37/F34, Leak Current Autocut Device (Leak Current Autocut Relay,
Leak Current Autocut Switch, IPS 5))
No.Fuse ratingSymbol Protected component
F3120AIgnition Coil #1~#4, Condenser
F3210AS2Camshaft Position Sensor #1/#2, Oil Control Valve #1/#2,
E/R Junction Block (RLY. 3 : C/FAN 2 Relay)
F3310AE2-
F3410AEMS Box (RLY. 1 : Fuel Pump Relay), Injector #1~#4
F3515AS1Crankshaft Position Sensor, Oxygen Sensor(UP/DOWN), Purge Control Solenoid Valve,
PCM, Variable Intake Solenoid Valve
F3615AE3PCM
F3720AFUEL PUMPEMS Block (RLY. 1 : Fuel Pump Relay)
F3815AEMS Block (RLY. 2 : Horn Relay), ICM Relay Box(Burglar Horn Relay)
F3930AE1EMS Block (RLY. 3 : Engine Control Relay)
Engine compartment main fuse panel (2.4L)
Page 446 of 473
Maintenance
64 7
No.Fuse ratingSymbol Protected component
F3120AIgnition Coil #1~#6, Condenser #1/#2
F3210ACamshaft Position Sensor #1~#4, E/R Junction Block (RLY. 3 : C/FAN 2 Relay), PCM
F3310AE2-
F3410AEMS Block (RLY. 1 : Fuel Pump Relay), Injector #1 ~ #6
F3515AS1Oxygen Sensor #1 ~ #4, Purge Control Solenoid Valve, Variable Intake Solenoid Valve #1,2,
Oil Control Valve #1 ~ #4, PCM
F3615AE3PCM
F3720AFUEL PUMPEMS Block (RLY. 1 : Fuel Pump Relay)
F3815AEMS Block (RLY. 2 : Horn Relay), ICM Relay Box(Burglar Horn Relay)
F3930AE1EMS Block (RLY. 3 : Engine Control Relay)
Engine compartment main fuse panel (3.0L)
Page 449 of 473

767
Maintenance
✽NOTICE
HID lamps have superior performance
vs. halogen bulbs. HID lamps are esti-
mated by the manufacturer to last twice
as long or longer than halogen bulbs
depending on their frequency of use.
They will probably require replacement
at some point in the life of the vehicle.
Cycling the headlamps on and off more
than typical use will shorten HID lamps
life. HID lamps do not fail in the same
manner as halogen incandescent lamps.
If a headlamp goes out after a period of
operation but will immediately relight
when the headlamp switch is cycled it is
likely the HID lamp needs to be
replaced. HID lighting components are
more complex than conventional halo-
gen bulbs thus have higher replacement
cost.
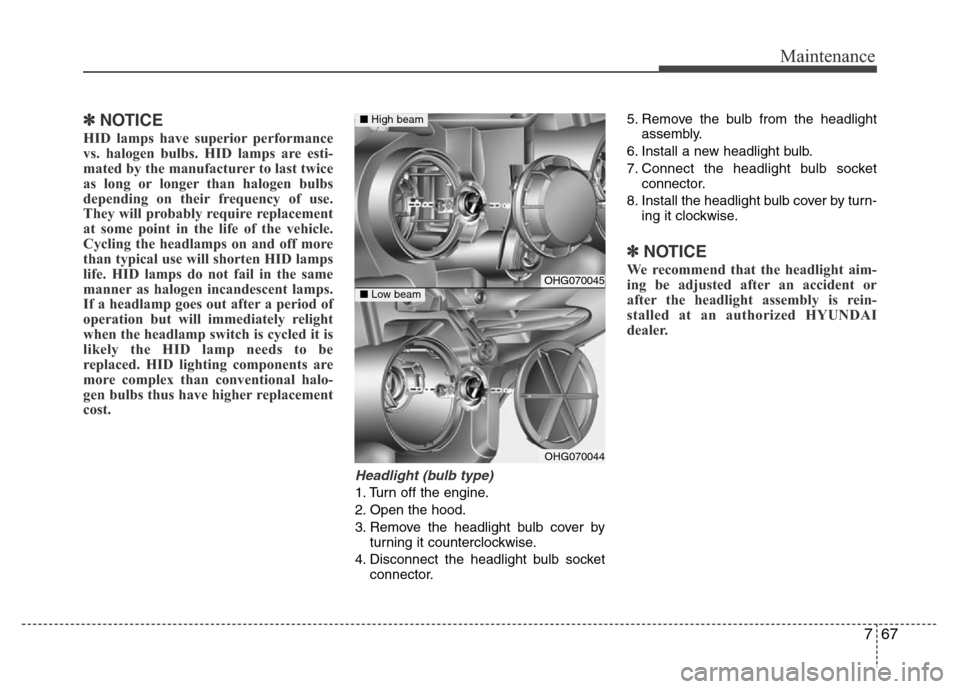
Headlight (bulb type)
1. Turn off the engine.
2. Open the hood.
3. Remove the headlight bulb cover by
turning it counterclockwise.
4. Disconnect the headlight bulb socket
connector.5. Remove the bulb from the headlight
assembly.
6. Install a new headlight bulb.
7. Connect the headlight bulb socket
connector.
8. Install the headlight bulb cover by turn-
ing it clockwise.
✽NOTICE
We recommend that the headlight aim-
ing be adjusted after an accident or
after the headlight assembly is rein-
stalled at an authorized HYUNDAI
dealer.OHG070045
OHG070044
■High beam
■Low beam