2015 Hyundai Accent ignition
[x] Cancel search: ignitionPage 327 of 425
617
What to do in an emergency
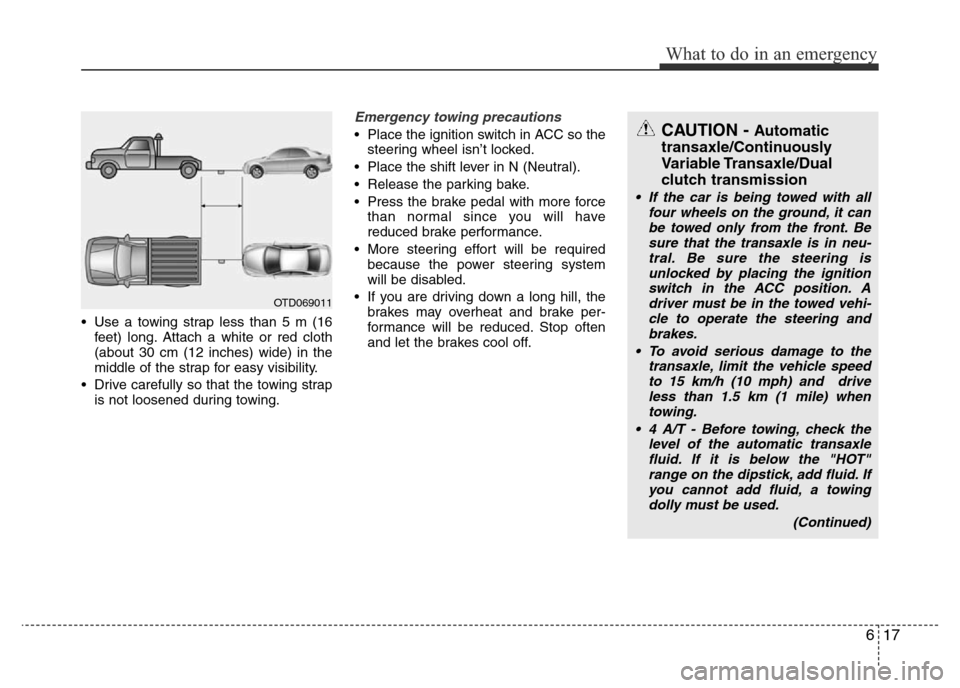
• Use a towing strap less than 5 m (16
feet) long. Attach a white or red cloth
(about 30 cm (12 inches) wide) in the
middle of the strap for easy visibility.
• Drive carefully so that the towing strap
is not loosened during towing.
Emergency towing precautions
• Place the ignition switch in ACC so the
steering wheel isn’t locked.
• Place the shift lever in N (Neutral).
• Release the parking bake.
• Press the brake pedal with more force
than normal since you will have
reduced brake performance.
• More steering effort will be required
because the power steering system
will be disabled.
• If you are driving down a long hill, the
brakes may overheat and brake per-
formance will be reduced. Stop often
and let the brakes cool off.CAUTION - Automatic
transaxle/Continuously
Variable Transaxle/Dual
clutch transmission
• If the car is being towed with all
four wheels on the ground, it can
be towed only from the front. Be
sure that the transaxle is in neu-
tral. Be sure the steering is
unlocked by placing the ignition
switch in the ACC position. A
driver must be in the towed vehi-
cle to operate the steering and
brakes.
• To avoid serious damage to the
transaxle, limit the vehicle speed
to 15 km/h (10 mph) and drive
less than 1.5 km (1 mile) when
towing.
• 4 A/T - Before towing, check the
level of the automatic transaxle
fluid. If it is below the "HOT"
range on the dipstick, add fluid. If
you cannot add fluid, a towing
dolly must be used.
(Continued)
OTD069011
Page 346 of 425

Maintenance
18 7
EXPLANATION OF SCHEDULED MAINTENANCE ITEMS
Engine oil and filter
The engine oil and filter should be
changed at the intervals specified in the
maintenance schedule. If the car is being
driven in severe conditions, more fre-
quent oil and filter changes are required.
Drive belts
Inspect all drive belts for evidence of
cuts, cracks, excessive wear or oil satu-
ration and replace if necessary. Drive
belts should be checked periodically for
proper tension and adjusted as neces-
sary.
Fuel filter
A clogged filter can limit the speed at
which the vehicle may be driven, damage
the emission system and cause multiple
issues such as hard starting. If an exces-
sive amount of foreign matter accumu-
lates in the fuel tank, the filter may
require replacement more frequently.
After installing a new filter, run the engine
for several minutes, and check for leaks
at the connections. Fuel filters should be
installed by an authorised HYUNDAI
dealer.
Fuel lines, fuel hoses and con-
nections
Check the fuel lines, fuel hoses and con-
nections for leakage and damage. Have
an authorised HYUNDAI dealer replace
any damaged or leaking parts immedi-
ately.
WARNING - Diesel only
Never work on injection system
with engine running or within 30
seconds after shutting off engine.
High pressure pump, rail, injectors
and high pressure pipes are sub-
ject to high pressure even after the
engine stopped. The fuel jet pro-
duced by fuel leaks may cause seri-
ous injury, if it touch the body.
People using pacemakers should
not move within 30 cm of the ECU
or wiring harness within the engine
room whilst engine is running, high
currents used in the Common Rail
system produce considerable mag-
netic fields.
CAUTION
When you are inspecting the belt,
place the ignition switch in the
LOCK/OFF or ACC position.
Page 359 of 425
731
Maintenance
FUEL FILTER (FOR DIESEL)
Draining water from the fuel filter
The fuel filter for diesel engine plays an
important role of separating water from
fuel and accumulating the water in its
bottom.
If water accumulates in the fuel filter, the
warning light comes on when the ignition
switch is in the ON position.
If this warning light illuminates,
take your car to an authorised
HYUNDAI dealer and have
drain the water and checked
the system.
Extracting air from the fuel filter
If you drive until you have no fuel left or if
you replace the fuel filter, be sure to
extract air from the fuel system as it
makes it difficult to start the engine.
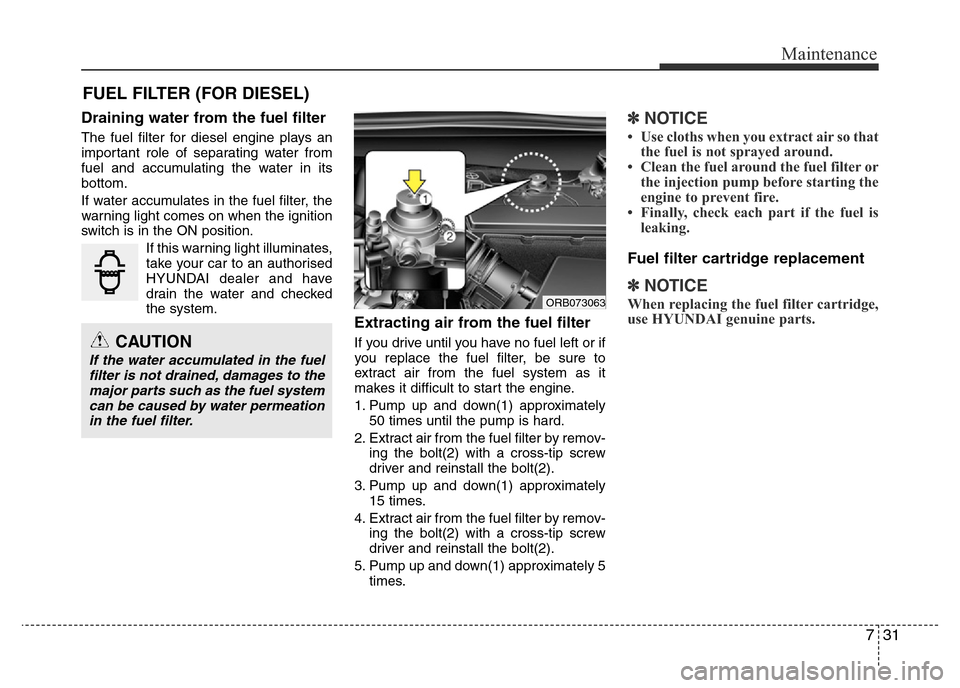
1. Pump up and down(1) approximately
50 times until the pump is hard.
2. Extract air from the fuel filter by remov-
ing the bolt(2) with a cross-tip screw
driver and reinstall the bolt(2).
3. Pump up and down(1) approximately
15 times.
4. Extract air from the fuel filter by remov-
ing the bolt(2) with a cross-tip screw
driver and reinstall the bolt(2).
5. Pump up and down(1) approximately 5
times.
✽NOTICE
• Use cloths when you extract air so that
the fuel is not sprayed around.
• Clean the fuel around the fuel filter or
the injection pump before starting the
engine to prevent fire.
• Finally, check each part if the fuel is
leaking.
Fuel filter cartridge replacement
✽NOTICE
When replacing the fuel filter cartridge,
use HYUNDAI genuine parts.
CAUTION
If the water accumulated in the fuel
filter is not drained, damages to the
major parts such as the fuel system
can be caused by water permeation
in the fuel filter.
ORB073063
Page 369 of 425
741
Maintenance
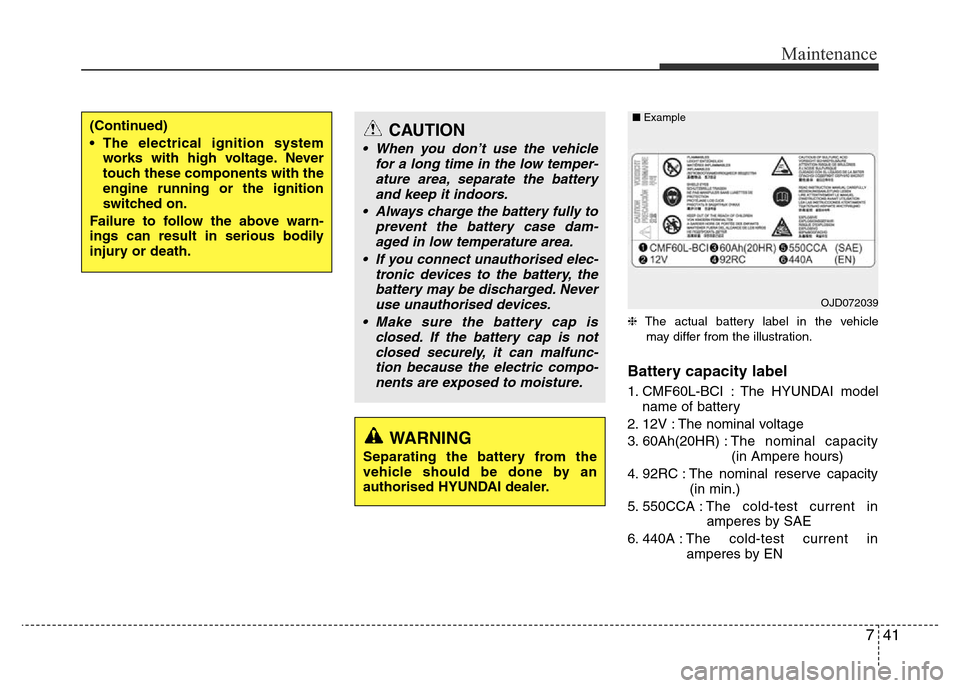
❈The actual battery label in the vehicle
may differ from the illustration.
Battery capacity label
1. CMF60L-BCI : The HYUNDAI model
name of battery
2. 12V : The nominal voltage
3. 60Ah(20HR) :The nominal capacity
(in Ampere hours)
4. 92RC : The nominal reserve capacity
(in min.)
5. 550CCA :The cold-test current in
amperes by SAE
6. 440A :The cold-test current in
amperes by EN
(Continued)
• The electrical ignition system
works with high voltage. Never
touch these components with the
engine running or the ignition
switched on.
Failure to follow the above warn-
ings can result in serious bodily
injury or death.CAUTION
• When you don’t use the vehicle
for a long time in the low temper-
ature area, separate the battery
and keep it indoors.
• Always charge the battery fully to
prevent the battery case dam-
aged in low temperature area.
• If you connect unauthorised elec-
tronic devices to the battery, the
battery may be discharged. Never
use unauthorised devices.
• Make sure the battery cap is
closed. If the battery cap is not
closed securely, it can malfunc-
tion because the electric compo-
nents are exposed to moisture.
WARNING
Separating the battery from the
vehicle should be done by an
authorised HYUNDAI dealer.
OJD072039 ■Example
Page 383 of 425
755
Maintenance
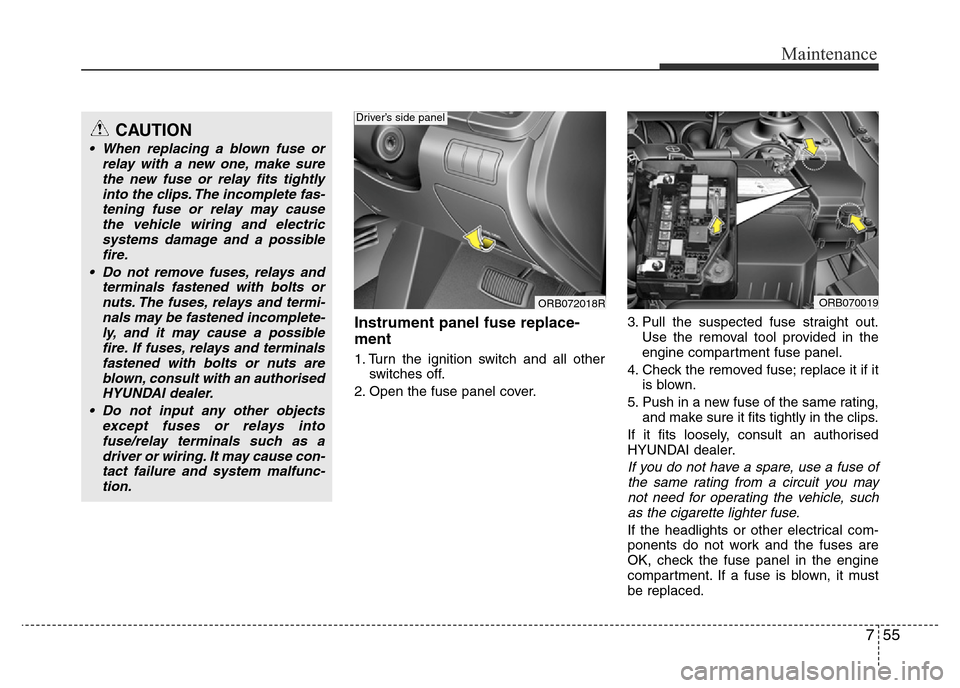
Instrument panel fuse replace-
ment
1. Turn the ignition switch and all other
switches off.
2. Open the fuse panel cover.3. Pull the suspected fuse straight out.
Use the removal tool provided in the
engine compartment fuse panel.
4. Check the removed fuse; replace it if it
is blown.
5. Push in a new fuse of the same rating,
and make sure it fits tightly in the clips.
If it fits loosely, consult an authorised
HYUNDAI dealer.
If you do not have a spare, use a fuse of
the same rating from a circuit you may
not need for operating the vehicle, such
as the cigarette lighter fuse.
If the headlights or other electrical com-
ponents do not work and the fuses are
OK, check the fuse panel in the engine
compartment. If a fuse is blown, it must
be replaced.
ORB072018R
Driver’s side panel
ORB070019
CAUTION
• When replacing a blown fuse or
relay with a new one, make sure
the new fuse or relay fits tightly
into the clips. The incomplete fas-
tening fuse or relay may cause
the vehicle wiring and electric
systems damage and a possible
fire.
• Do not remove fuses, relays and
terminals fastened with bolts or
nuts. The fuses, relays and termi-
nals may be fastened incomplete-
ly, and it may cause a possible
fire. If fuses, relays and terminals
fastened with bolts or nuts are
blown, consult with an authorised
HYUNDAI dealer.
• Do not input any other objects
except fuses or relays into
fuse/relay terminals such as a
driver or wiring. It may cause con-
tact failure and system malfunc-
tion.
Page 384 of 425
Maintenance
56 7
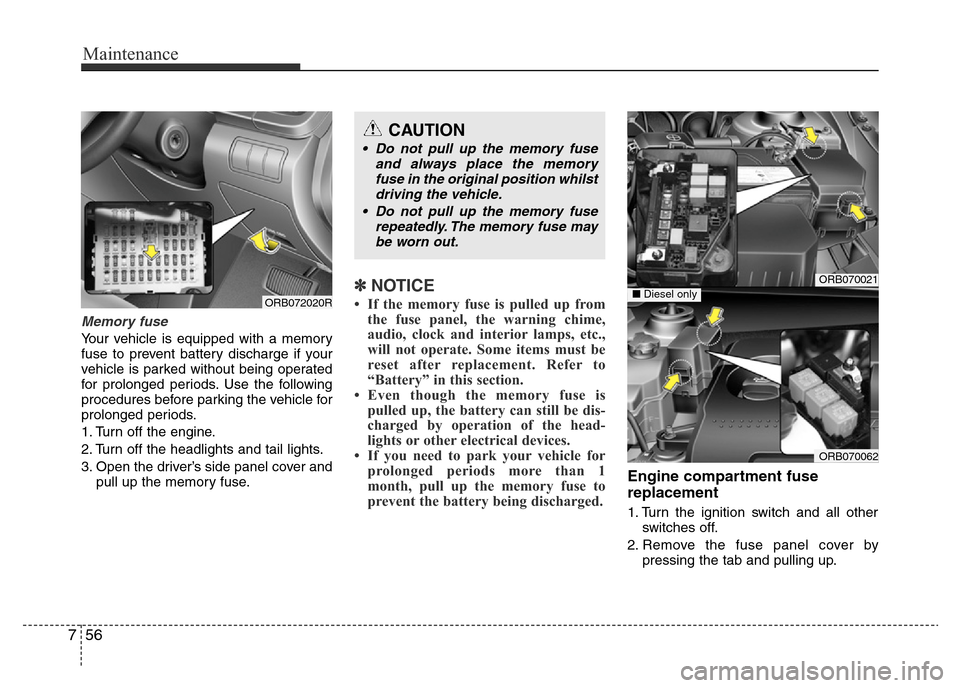
Memory fuse
Your vehicle is equipped with a memory
fuse to prevent battery discharge if your
vehicle is parked without being operated
for prolonged periods. Use the following
procedures before parking the vehicle for
prolonged periods.
1. Turn off the engine.
2. Turn off the headlights and tail lights.
3. Open the driver’s side panel cover and
pull up the memory fuse.
✽NOTICE
• If the memory fuse is pulled up from
the fuse panel, the warning chime,
audio, clock and interior lamps, etc.,
will not operate. Some items must be
reset after replacement. Refer to
“Battery” in this section.
• Even though the memory fuse is
pulled up, the battery can still be dis-
charged by operation of the head-
lights or other electrical devices.
• If you need to park your vehicle for
prolonged periods more than 1
month, pull up the memory fuse to
prevent the battery being discharged.
Engine compartment fuse
replacement
1. Turn the ignition switch and all other
switches off.
2. Remove the fuse panel cover by
pressing the tab and pulling up.
ORB072020R
ORB070021
ORB070062
■Diesel only
CAUTION
• Do not pull up the memory fuse
and always place the memory
fuse in the original position whilst
driving the vehicle.
• Do not pull up the memory fuse
repeatedly. The memory fuse may
be worn out.
Page 385 of 425
757
Maintenance
3. Check the removed fuse; replace it if it
is blown. To remove or insert the fuse,
use the fuse puller in the engine com-
partment fuse panel.
4. Push in a new fuse of the same rating,
and make sure it fits tightly in the clips.
If it fits loosely, consult an authorised
HYUNDAI dealer.
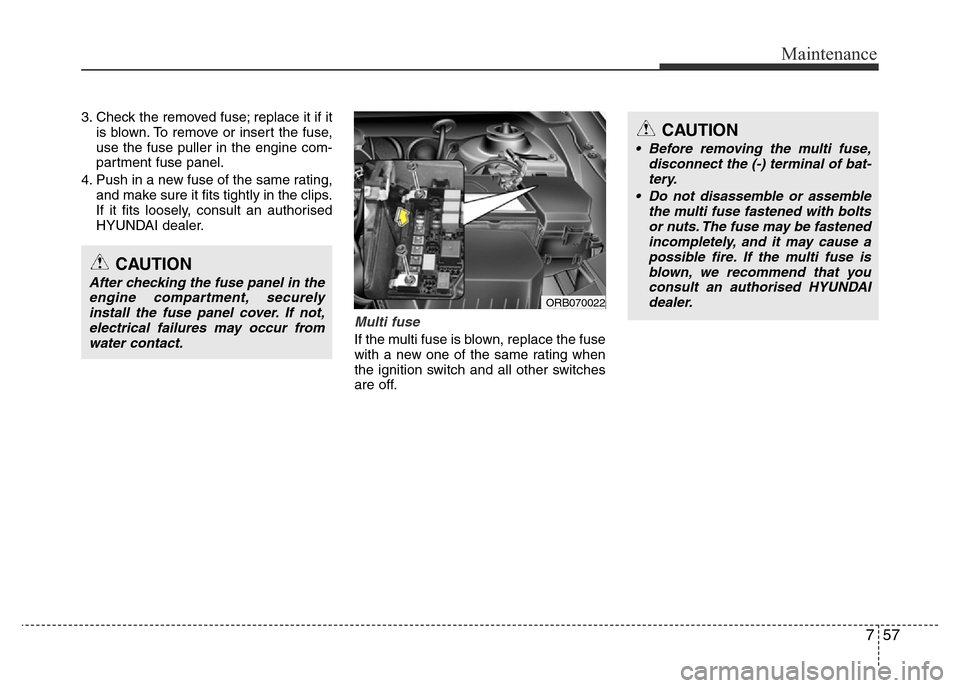
Multi fuse
If the multi fuse is blown, replace the fuse
with a new one of the same rating when
the ignition switch and all other switches
are off.
CAUTION
After checking the fuse panel in the
engine compartment, securely
install the fuse panel cover. If not,
electrical failures may occur from
water contact.
ORB070022
CAUTION
• Before removing the multi fuse,
disconnect the (-) terminal of bat-
tery.
• Do not disassemble or assemble
the multi fuse fastened with bolts
or nuts. The fuse may be fastened
incompletely, and it may cause a
possible fire. If the multi fuse is
blown, we recommend that you
consult an authorised HYUNDAI
dealer.
Page 391 of 425

763
Maintenance
DescriptionSymbolFuse ratingProtected component
SAFETY POWER
WINDOW25ADriver Safety Power Window Module
2SPARE2SPARE15A-1SPARE1SPARE10A-
ROOM LAMP10AInstrument Cluster, Tyre Pressure Monitoring Module, BCM, A/C Control Module, Luggage
Lamp, Front Room Lamp
AUDIO20AAudio
TAIL LAMP LH10ARear Combination Lamp LH, Head Lamp LH, License Lamp LH/RH (4DOOR), License
Lamp (5DOOR)
TAIL LAMP RH10A
Head Lamp RH, Rear Combination Lamp RH, Rheostat, Head Lamp Levelling Device
Switch, Hazard Switch, Audio, AUX & USB Jack, ESC Off Switch, Instrument Cluster,
Multifunction Switch (Remote Control), A/C Switch, Rear Defogger Switch, A/C Control
Module, Front Wiper Deicer Switch, ATM Shift Lever Switch ILL.
START10AE/R Fuse & Relay Box (RLY. 7), ECM, Ignition Lock Switch, Transaxle Range Switch
H/LAMP10AInstrument Cluster, Engine Compartment Fuse & Relay Box (Head Lamp Relay)
P/WDW LH25APower Window Main Switch, Rear Power Window Switch LH
P/WDW RH25APower Window Main Switch, Rear Power Window Switch RH, Passenger Power Window
Switch
HTD MIRR10AECM (Petrol), Rear Defogger Switch, Driver/ Passenger Power Outside Mirror
A/CON10AA/C Control Module (Auto)
BLOWER10AECM, Blower Switch, Blower Resistor