Page 48 of 453

47
uuAirbags uFront Airbags (SRS)
Safe DrivingYour front airbags have advanced features to help reduce the likelihood of airbag
related injuries to smaller occupants.
The driver’s advanced front airbag system
includes a seat position sensor.
If the seat is too far forward, the airbag
inflates with less force, regardless of the
severity of the impact.
The passenger’s advanced front airbag system
has weight sensors.
Although we recommend against carrying an
infant or small child in front, if the sensors
detect the weight of a child (up to about 65
lbs or 29 kg), the system will automatically
turn off the passenger’s front airbag.
■Advanced Airbags1 Advanced Airbags
If there is a problem with the driver’s seat position
sensor, the SRS indicator wi ll come on and the airbag
will inflate with full (normal) force, regardless of the
driver’s seating position.
For both advanced front airbags to work properly:
•Do not spill any liquid on or under the seats.•Do not put any object under the passenger’s seat.
•Make sure any objects are positioned properly on
the floor. Improperly pos itioned objects can
interfere with the advanced airbag sensors.
•All occupants should sit upri ght and wear their seat
belts properly.
•Do not place any cover over the passenger side
dashboard.
Driver’s
Seat
Position
Sensor
Passenger’s
Seat
Weight
Sensors
15 US FIT-31T5A6000.book 47 ページ 2014年3月6日 木曜日 午後7時5分
Page 135 of 453

uuAdjusting the Seats uAdjusting the Seat Positions
134
Controls
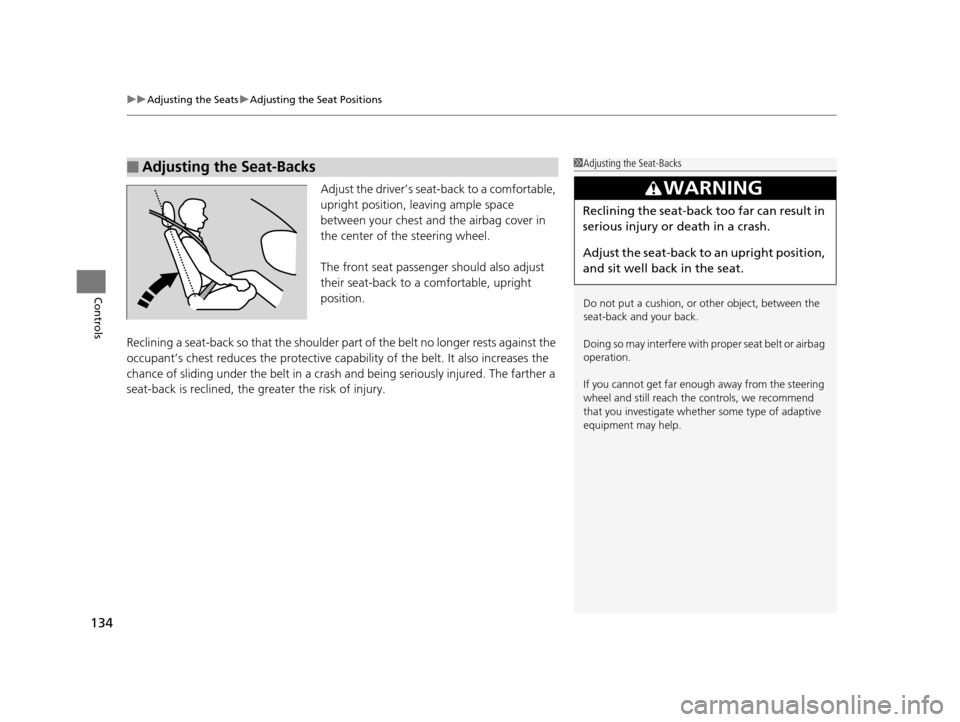
Adjust the driver’s sea t-back to a comfortable,
upright position, leaving ample space
between your chest and the airbag cover in
the center of the steering wheel.
The front seat passenger should also adjust
their seat-back to a comfortable, upright
position.
Reclining a seat-back so that the shoulder pa rt of the belt no longer rests against the
occupant’s chest reduces the protective capa bility of the belt. It also increases the
chance of sliding under the belt in a crash and being seriously injured. The farther a
seat-back is reclined, the greater the risk of injury.
■Adjusting the Seat-Backs1 Adjusting the Seat-Backs
Do not put a cushion, or other object, between the
seat-back and your back.
Doing so may interfere with proper seat belt or airbag
operation.
If you cannot get far e nough away from the steering
wheel and still reach th e controls, we recommend
that you investigate whether some type of adaptive
equipment may help.
3WARNING
Reclining the seat-back too far can result in
serious injury or death in a crash.
Adjust the seat-back to an upright position,
and sit well back in the seat.
15 US FIT-31T5A6000.book 134 ページ 2014年3月6日 木曜日 午後7時5分
Page 367 of 453

366
uuMaintenance Under the Hood uChanging the Engine Oil and Oil Filter
Maintenance
Changing the Engine Oil and Oil Filter
You must change the engine oil and oil filter regularly in order to maintain the
engine’s lubrication. The engine may be damaged if they are not changed regularly.
Change the oil and filter in accordance with the Maintenance Minder message on
the information display. 1.Run the engine until it reaches normal
operating temperature, and then turn the
engine off.
2. Open the hood and remove the engine oil
fill cap.
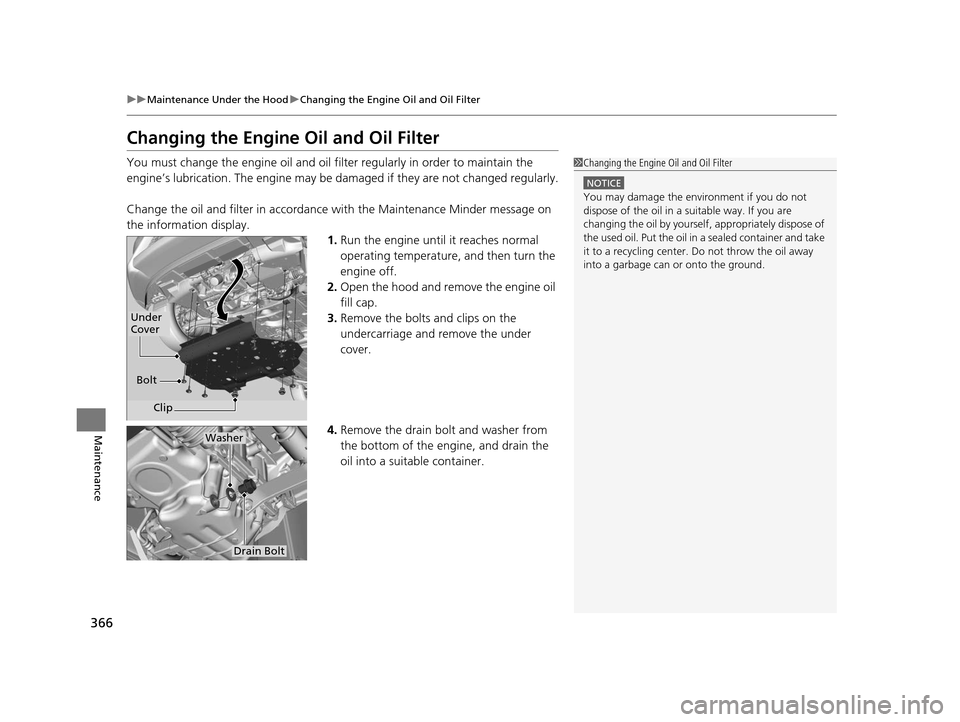
3. Remove the bolts and clips on the
undercarriage and remove the under
cover.
4. Remove the drain bolt and washer from
the bottom of the engine, and drain the
oil into a suitable container.1Changing the Engine Oil and Oil Filter
NOTICE
You may damage the environment if you do not
dispose of the oil in a suitable way. If you are
changing the oil by yourself , appropriately dispose of
the used oil. Put the oil in a sealed container and take
it to a recycling center. Do not throw the oil away
into a garbage can or onto the ground.
Under
Cover
Bolt Clip
Washer
Drain Bolt
15 US FIT-31T5A6000.book 366 ページ 2014年3月6日 木曜日 午後7時5分
Page 371 of 453

370
uuMaintenance Under the Hood uTransmission Fluid
Maintenance
Transmission Fluid
Have a dealer check the fluid level and replace if necessary.
Have a dealer check the fluid level and replace if necessary.
■Continuously Variable Transmission (CVT) Fluid
Specified fluid: Honda HCF-2 Transmission Fluid
■Manual Transmission Fluid
Specified fluid: Honda Manual Transmission Fluid (MTF)
Automatic transmission (CVT) models
1Continuously Variable Transmission (CVT) Fluid
NOTICE
Do not mix HCF-2 with other transmission fluids
Using a transmission fluid other than HCF-2 may
adversely affect the operati on and durability of your
vehicle's transmission, and damage the transmission.
Any damage caused by usi ng a transmission fluid that
is not equivalent to HCF-2 is not covered by Honda's
new vehicl e warranty.
Manual transmission models
1Manual Transmission Fluid
If Honda MTF is not availa ble, you may use the API
certificated SAE 0 W-20 or 5 W-20 viscosity motor oil
as a temporary measure.
Replace with MTF as soon as possible. Motor oil does
not contain the proper addi tives for the transmission
and continued use can cause decreased shifting
performance and lead to transmission damage.
15 US FIT-31T5A6000.book 370 ページ 2014年3月6日 木曜日 午後7時5分
Page 376 of 453
375
uuReplacing Light Bulbs uSide Marker Light Bulbs
Continued
Maintenance
Side Marker Light Bulbs
When replacing, use the following bulbs.
1.Turn the socket to the left and remove it.
2. Remove the old bulb and insert a new bulb.
Fog Light Bulbs*
When replacing, use the following bulbs.
1.Loosen the screw using a Phillips-head
screwdriver.
2. Remove the screw, th en push up the under
cover.
Side Marker Light: 3CP
Bulb
Socket
Fog Light: 35W (H8 LL for halogen bulb type)
1 Fog Light Bulbs*
NOTICE
Halogen bulbs get very hot wh en lit. Oil, perspiration,
or a scratch on the glass can cause the bulb to
overheat and shatter.
When replacing a halogen bulb, handle it by its
plastic case, and protect th e glass from contact with
your skin or hard objects. If you touch the glass, clean
it with denatured alc ohol and a clean cloth.
CoverScrew
* Not available on all models
15 US FIT-31T5A6000.book 375 ページ 2014年3月6日 木曜日 午後7時5分
Page 408 of 453
407
uuIf a Tire Goes Flat uChanging a Flat Tire
Continued
Handling the Unexpected
5. Place the compact spare tire (wheel side up)
under the vehicle body, near the tire that
needs to be replaced.
6. Put the flat tip of the jack handle bar into
the edge of the wheel cover. Carefully pry
the edge and remove the cover.
u Wrap a cloth around the flat tip of the
jack handle bar to prevent scratches on
the cover.
7. Loosen each wheel nut about one turn
using the wheel nut wrench.
Jack Handle Bar
Wheel Nut Wheel
CoverModels with wheel cover
All models
15 US FIT-31T5A6000.book 407 ページ 2014年3月6日 木曜日 午後7時5分
Page 411 of 453

uuIf a Tire Goes Flat uChanging a Flat Tire
410
Handling the Unexpected
1. Remove the center cap.
2. Place the flat tire face down in the spare tire
well.
3. Remove the spacer cone from the wing
bolt, flip it over, and insert it back on the
bolt. Secure the flat tire with the wing bolt.
4. Securely store the wheel nut wrench, jack
handle bar and jack back in the tool case.
Store the case in the cargo area under the
cargo floor lid.
If you replace a flat tire with the spare tire, the low tire pressure/TPMS indicator
comes on while you are driving. After driving for a few miles (kilometers), the
indicator will start blinking for a short time and then stay on, but this is normal.
Calibrate the TPMS when you replace the tire with a specified regular tire.
2TPMS Calibration P. 336
■Storing the Flat Tire1Storing the Flat Tire
Make sure the wire support ring is on the outer side
of the tire valve as shown.
3WARNING
Loose items can fly around the interior in a
crash and can seriously injure the
occupants.
Store the wheel, jack, and tools securely
before driving.
Models with wheel cover
Wire Support Ring
Tire Valve
For full-size
tire
For compact
spare tire
Wing BoltSpacer
Cone
Models with aluminum wheels
All models
■TPMS and the Spare Tire
U.S. models
15 US FIT-31T5A6000.book 410 ページ 2014年3月6日 木曜日 午後7時5分
Page 415 of 453

414
Handling the Unexpected
Jump Starting
Turn off the power to electric devices, such as audio and lights. Turn off the engine,
then open the hood. 1.Connect the first jump er cable to your
vehicle’s battery + terminal.
u Remove the cover from the under-hood
fuse box.
2 Engine Compartment Fuse Box P. 423
2.Connect the other end of the first jumper
cable to the booster battery + terminal.
u Use a 12-volt booster battery only.
u Connect when using the automotive
battery charger to boost your 12-volt
battery, select a lo wer charging voltage
than 15-volt. Check the charger manual
for the proper setting.
3. Connect the second jumper cable to the
booster battery - terminal.
4. Connect the other end of the second
jumper cable to the stud bolt as shown. Do
not connect this jumper cable to any other
part.
5. If your vehicle is connected to another
vehicle, start the assi sting vehicle’s engine
and increase its rpm slightly.
6. Attempt to start your vehicle’s engine. If it
turns over slowly, check that the jumper
cables have good metal-to-metal contact.
■Jump Starting Procedure1Jump Starting
Securely attach the jumper cables clips so that they
do not come off when the e ngine vibrates. Also be
careful not to tangle the ju mper cables or allow the
cable ends to touch each other while attaching or
detaching the jumper cables.
Battery performance degrades in cold conditions and
may prevent the engi ne from starting.
3WARNING
A battery can explode if you do not follow
the correct procedure, seriously injuring
anyone nearby.
Keep all sparks, open flames, and smoking
materials away from the battery.
Booster
Battery
15 US FIT-31T5A6000.book 414 ページ 2014年3月6日 木曜日 午後7時5分