2015 HONDA FIT tire size
[x] Cancel search: tire sizePage 333 of 453

332
uuWhen Driving uVehicle Stability Assist (VSA® ), aka Electronic Stability Control (ESC), System
Driving
Vehicle Stability Assist (VSA®), aka Electronic
Stability Control (ESC), System
VSA ® helps to stabilize the vehicle during cornering if the vehicle turns more or less
than what was intended. It also assists in maintaining traction on slippery surfaces.
It does so by regulating engine output and selectively applying the brakes.
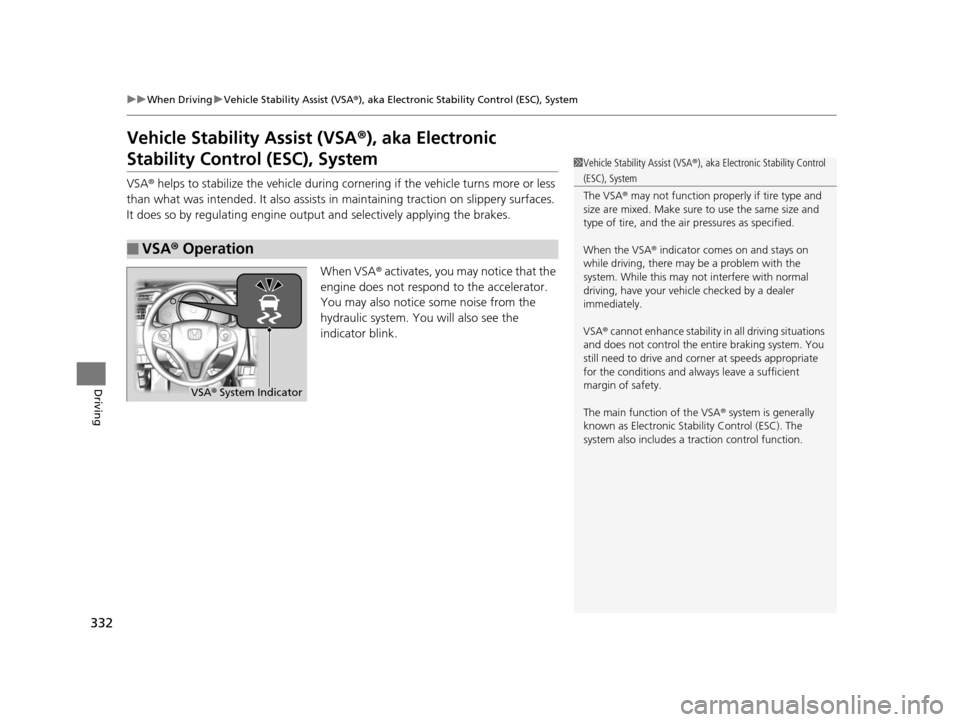
When VSA® activates, you may notice that the
engine does not respond to the accelerator.
You may also notice some noise from the
hydraulic system. You will also see the
indicator blink.
■VSA ® Operation
1 Vehicle Stability Assist (VSA ®), aka Electronic Stability Control
(ESC), System
The VSA ® may not function properl y if tire type and
size are mixed. Make sure to use the same size and
type of tire, and the air pressures as specified.
When the VSA ® indicator comes on and stays on
while driving, there may be a problem with the
system. While this may not interfere with normal
driving, have your vehi cle checked by a dealer
immediately.
VSA ® cannot enhance stability in all driving situations
and does not control the entire braking system. You
still need to drive and corner at speeds appropriate
for the conditions and always leave a sufficient
margin of safety.
The main function of the VSA ® system is generally
known as Electronic Stab ility Control (ESC). The
system also includes a traction control function.
VSA® System Indicator
15 US FIT-31T5A6000.book 332 ページ 2014年3月6日 木曜日 午後7時5分
Page 335 of 453

334
uuWhen Driving uLaneWatchTM*
Driving
LaneWatchTM*
Is an assistance system that allows y ou to check the passenger side rear areas
displayed on the audio/information screen when the turn signal is activated to the
passenger’s side. A camera in the passenger side door mirror monitors these areas
and allows you to check for vehicles, in addition to your visual check and use of the
passenger door mirror. You can also keep th e system on for your convenience while
driving.1 LaneWatchTM*
Important Safety Reminder
Like all assistance systems, LaneWatch has
limitations. Over reliance on LaneWatch may result in
a collision.
The LaneWatch func tion can be affected by weather,
lighting (including headli ghts and low sun angle),
ambient darkness, camera condition, and loading.
The LaneWatch may not prov ide the intended display
of traffic to the side and rear under the following
conditions:
•Your vehicle’s suspension has been altered,
changing the height of the vehicle.
•Your tires are over or under inflated.
•Your tires or wheels are of varied size or
construction.
3WARNING
Failure to visually confirm that it is safe to
change lanes before do ing so may result in
a crash and serious injury or death.
Do not rely only on LaneWatch while
driving.
Always look in your mirrors, to either side
of your vehicle, and behind you for other
vehicles before changing lanes.
The system activates when you: The passenger side view
display appears on the
audio/information
screen.
Move the turn
signal lever to the
passenger side. Press the
LaneWatch
button.
The system deactivates when you:
Pull the turn signal
lever back. Press the LaneWatch
button again.
CameraAudio/Information Screen
* Not available on all models
15 US FIT-31T5A6000.book 334 ページ 2014年3月6日 木曜日 午後7時5分
Page 337 of 453

336
uuWhen Driving uTire Pressure Monitoring System (TPMS)
Driving
Tire Pressure Monitoring System (TPMS)
Instead of directly measuring the pressu re in each tire, the TPMS on this vehicle
monitors and compares the rolling radius and rotational characteristics of each
wheel and tire while you are driving to determine if one or more tires are
significantly under-inflated. This will caus e the low tire pressure/TPMS indicator to
come on.
You must start TPMS calibration every time you:
• Adjust the pressure in one or more tires.
• Rotate the tires.
• Replace one or more tires.
Before calibrating the TPMS:
• Set the cold tire pressu re in all four tires.
2Checking Tires P. 384
Make sure:
• The vehicle is at a complete stop.
• The shift lever is in
(N.
• The shift lever is in
(P.
• The ignition switch is in ON
(w*1.
*1 : Models with the smart entry system have an ENGINE START/STOP button instead of an ignition switch.
■TPMS Calibration
U.S. models only
1Tire Pressure Monitoring System (TPMS)
The system does not monitor the tires when driving
at low speed.
Conditions such as low ambient temperature and
altitude change directly a ffect tire pressure and can
trigger the low tire pressure/TPMS indicator to come on.
Tire pressure checked and inflated in:
•Warm weather can beco me under-inflated in
colder weather.
•Cold weather can become over-inflated in warmer
weather.
The low tire pressure/TPMS indicator will not come
on as a result of over inflation.
The TPMS may not function pr operly if tire type and
size are mixed. Make sure to use the same size and
type of tire. 2 Checking and Maintaining Tires P. 384
The low tire pressure/TPMS indicator may come on
with a delay or may not come on at all when:
•You rapidly accelerate, decelerate, or turn the
steering wheel.
•You drive on snowy or slippery roads.
•Snow chains are used.
The low tire pressure/TPMS indicator may come on
under the following conditions:
•A compact spare tire is used.•There is a heavier and uneve n load on the tires than
the condition at calibration.
•Snow chains are used.
Manual transmission models
Automatic transmission (CVT) models
All models
15 US FIT-31T5A6000.book 336 ページ 2014年3月6日 木曜日 午後7時5分
Page 338 of 453

337
uuWhen Driving uTire Pressure Monitoring System (TPMS)
Driving
Press and hold the TPM S button until the low
tire pressure/TPMS indicator blinks twice,
indicating the calibration process has begun.
• If the low tire pressure/TPMS indicator does
not blink, confirm the above conditions
then press and hold the TPMS button again.
• The calibration process finishes
automatically.
*1 : Models with the smart entry system have an ENGINE START/STOP button instead of an ignition switch.
1TPMS Calibration
•TPMS cannot be calibrated if a compact spare tire is
installed.
•The calibration process requires approximately 30
minutes of cumulative dr iving at speeds between
30-60 mph (48-97 km/h).
•During this period, if the ignition is turned on*1 and
the vehicle is not move d within 45 seconds, you
may notice the low tire pressure/TPMS indicator
comes on briefly. This is normal and indicates that
the calibration process is not yet complete.
If the snow chains are installed, remove them before
calibrating the TPMS.
If the low tire pressure/TPMS indicator comes on even
when the properly inflated specified regular tires are
installed, have your vehicle checked by a dealer.
We recommend that the tires be replaced with the
same brand, model, and size as the originals. Ask a
dealer for details.
TPMS Button
Low Tire Pressure/TPMS Indicator
15 US FIT-31T5A6000.book 337 ページ 2014年3月6日 木曜日 午後7時5分
Page 339 of 453

338
uuWhen Driving uTire Pressure Monitoring System (TPMS) - Required Federal Explanation
Driving
Tire Pressure Monitoring System (TPMS) - Required
Federal Explanation
Each tire, including the spare (i f provided), should be checked
monthly when cold and inflated to the inflation pressure
recommended by the vehicle manufacturer on the vehicle placard
or tire inflation pressure label.
(If your vehicle has tires of a different size than the size indicated
on the vehicle placard or tire infl ation pressure label, you should
determine the proper tire inflat ion pressure for those tires.)
As an added safety feature, your vehicle has been equipped with
a tire pressure monitoring system (TPMS) that illuminates a low
tire pressure telltale
when one or more of your tire s is significantly under-inflated.
Accordingly, when the low tire pr essure telltale illuminates, you
should stop and check your tires as soon as possible, and inflate
them to the proper pressure.
Driving on a significantly under-in flated tire causes the tire to
overheat and can lead to tire fail ure. Under-inflation also reduces
fuel efficiency and tire tread li fe, and may affect the vehicle’s
handling and stopping ability.
U.S. models
15 US FIT-31T5A6000.book 338 ページ 2014年3月6日 木曜日 午後7時5分
Page 343 of 453

342
uuBraking uAnti-lock Brake System (ABS)
Driving
Anti-lock Brake System (ABS)
Helps prevent the wheels from locking up, an d helps you retain steering control by
pumping the brakes rapidly, much faster than you.
The electronic brake distribution (EBD) system, which is part of the ABS, also
balances the front-to-rear braking distri bution according to vehicle loading.
You should never pump the brake pedal. Let the ABS work for you by always
keeping firm, steady pressure on the brake pe dal. This is sometimes referred to as
“stomp and steer.”
■ABS operation
The brake pedal may pulsate slightly when the ABS is working. Keep holding the
pedal firmly down. On dry pavement, you will need to press on the brake pedal very
hard before the ABS activates. However, you may feel the ABS activate immediately
if you are trying to stop on snow or ice.
When the vehicle speed goes unde r 6 mph (10 km/h), the ABS stops.
■ABS1Anti-lock Brake System (ABS)
NOTICE
The ABS may not function correctly if you use an
incorrect tire type and size.
When the ABS indicator comes on while driving,
there may be a problem with the system.
While normal braking is not affected, there is a
possibility of the ABS not operating. Have your
vehicle checked by a dealer immediately.
The ABS does not reduce the ti me or distance it takes
to stop the vehicle. It only helps with steering control
during hard braking.
In the following cases, yo ur vehicle may need more
stopping distance than a vehicle without the ABS:
•When driving on rough road surfaces, including
when driving on uneven surf aces, such as gravel or
snow.
•When tire chains are installed.
You may hear a motor sound coming from the
engine compartment while system checks are being
performed immediately after starting the engine or
while driving. This is normal.
15 US FIT-31T5A6000.book 342 ページ 2014年3月6日 木曜日 午後7時5分
Page 385 of 453

384
Maintenance
Checking and Maintaining Tires
Checking Tires
To safely operate your vehicle, your tires must be of the proper type and size, in
good condition with adequate tread, and properly inflated.
■Inflation guidelines
Properly inflated tires provide the best combination of handlin g, tread life, and comfort.
Refer to the driver’s doorjamb label or spec ification’s page for the specified pressure.
Underinflated tires wear unevenly, adversely affect handling and fuel economy, and
are more likely to fail from overheating.
Overinflated tires make your vehicle ride harshly, are more prone to road hazards,
and wear unevenly.
Every day before you drive, look at each of the tires. If one looks lower than the
others, check the pressure with a tire gauge.
At least once a month or before long trips, use a gauge to measure the pressure in
all tires, including the spare. Even tires in good condition can lose 1 to 2 psi (10 to
20 kPa, 0.1 to 0.2 kgf/cm
2) per month.
■Inspection guidelines
Every time you check inflation, also examine the tires and valve stems.
Look for:
• Bumps or bulges on the side or in the tread . Replace the tire if you find any cuts,
splits, or cracks in the si de of the tire. Replace it if you see fabric or cord.
• Remove any foreign objects and inspect for air leaks.
• Uneven tread wear. Have a deal er check the wheel alignment.
• Excessive tread wear.
2 Wear Indicators P. 389
•Cracks or other damage around valve stem.
1Checking Tires
Measure the air pressure when tires are cold. This
means the vehicle has been parked for at least three
hours, or driven less than 1 mile (1.6 km). If
necessary, add or releas e air until the specified
pressure is reached.
If checked when hot, tire pressure can be as much as
4–6 psi (30–40 kPa, 0.3–0.4 kgf/cm
2) higher than if
checked when cold.
Have a dealer check the tires if you feel a consistent
vibration while driving. Ne w tires and any that have
been removed and reinst alled should be properly
balanced.
Whenever tire pressure is adjusted, you must
calibrate the TPMS.
2 TPMS Calibration P. 336
3WARNING
Using tires that are excessively worn or
improperly inflated can cause a crash in
which you can be seriously hurt or killed.
Follow all instruction s in this owner’s
manual regarding ti re inflation and
maintenance.
U.S. models
15 US FIT-31T5A6000.book 384 ページ 2014年3月6日 木曜日 午後7時5分
Page 386 of 453

385
uuChecking and Maintaining Tires uTire and Loading Information Label
Continued
Maintenance
Tire and Loading Information Label
The label attached to the dr iver’s doorjamb provides necessary tire and loading
information.
Tire Labeling
The tires that came on your vehicle have a
number of markings. Those you should be
aware of are described below.
Whenever tires are replaced, they should be replaced with tires of the same size.
1Tire and Loading Information Label
The tire and loading informat ion label attached to the
driver’s doorjamb contains:
aThe number of people your vehicle can carry.
bThe total weight your vehicle can carry. Do not
exceed this weight.
cThe original tire sizes for front, rear, and spare.
dThe proper cold tire pre ssure for front, rear, and
spare.
Label
Example
Example Tire Size
Tire
Identification
Number (TIN)
Maximum
Tire Load
Maximum
Tire Pressure
Tire Size
■Tire Sizes
1 Tire Sizes
Following is an example of tire size with an
explanation of what each component means.
185/55R16 83H
185: Tire width in millimeters.
55: Aspect ratio (the tire’s section height as a
percentage of its width).
R: Tire construction code (R indicates radial).
16: Rim diameter in inches.
83: Load index (a numerical code associated with the
maximum load the tire can carry).
H: Speed symbol (an alphabe tical code indicating the
maximum speed rating).
15 US FIT-31T5A6000.book 385 ページ 2014年3月6日 木曜日 午後7時5分