Page 452 of 573

451
uuBraking uAnti-lock Brake System (ABS)
Driving
Anti-lock Brake System (ABS)
Helps prevent the wheels from locking up, and helps you retain steering control by
pumping the brakes rapidly, much faster than you.
The electronic brake distribu tion (EBD) system, which is part of the ABS, also
balances the front-to-rear braking distribution according to vehicle loading.
You should never pu mp the brake pedal. Let the ABS work for you by always
keeping firm, steady pressure on the brake pe dal. This is sometimes referred to as
“stomp and steer.”
■ABS operation
The brake pedal may pulsate slightly when the ABS is working. Keep holding the
pedal firmly down. On dry pavement, you w ill need to press on the brake pedal very
hard before the ABS activates. However, you may feel the ABS activate immediately
if you are trying to stop on snow or ice.
When the vehicle speed goes unde r 6 mph (10 km/h), the ABS stops.
■ABS1Anti-lock Brake System (ABS)
NOTICE
The ABS may not function correctly if you use an
incorrect tire type and size.
When the ABS indicator comes on while driving,
there may be a problem with the system.
While normal braking is not affected, there is a
possibility of the ABS not operating. Have the vehicle
checked by a dealer immediately.
The ABS does not reduce the ti me or distance it takes
to stop the vehicle. It only helps with steering control
during hard braking.
In the following cases, yo ur vehicle may need more
stopping distance than a vehicle without the ABS:
•When driving on rough road surfaces, including
when driving on uneven surf aces, such as gravel or
snow.
•When tire chains are installed.
You may hear a motor sound coming from the
engine compartment while system checks are being
performed immediately after starting the engine or
while driving. This is normal.
15 CROSSTOUR-31TP66500.book 451 ページ 2014年7月31日 木曜日 午後3時23分
Page 456 of 573

455
Driving
Multi-View Rear Camera
About Your Multi-View Rear Camera
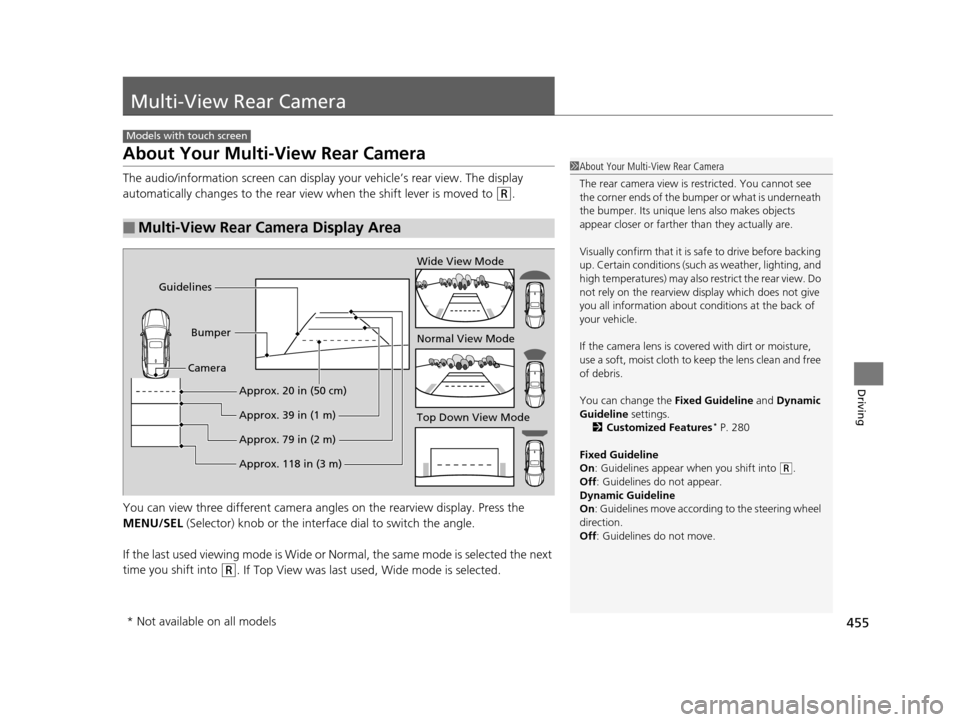
The audio/information screen can display your vehicle’s rear view. The display
automatically changes to the rear view when the shift lever is moved to
(R.
You can view three differen t camera angles on the rearview display. Press the
MENU/SEL (Selector) knob or the interfa ce dial to switch the angle.
If the last used viewing mode is Wide or Normal, the same mode is selected the next
time you shift into
(R. If Top View was last used, Wide mode is selected.
■Multi-View Rear Camera Display Area
Models with touch screen
1 About Your Multi-View Rear Camera
The rear camera view is restricted. You cannot see
the corner ends of the bum per or what is underneath
the bumper. Its unique le ns also makes objects
appear closer or farther than they actually are.
Visually confirm that it is safe to drive before backing
up. Certain conditions (such as weather, lighting, and
high temperatures) may also re strict the rear view. Do
not rely on the rearview display which does not give
you all information about conditions at the back of
your vehicle.
If the camera lens is cove red with dirt or moisture,
use a soft, moist cloth to keep the lens clean and free
of debris.
You can change the Fixed Guideline and Dynamic
Guideline settings.
2 Customized Features
* P. 280
Fixed Guideline
On : Guidelines appear when you shift into
(R.
Off : Guidelines do not appear.
Dynamic Guideline
On : Guidelines move according to the steering wheel
direction.
Off : Guidelines do not move.
Top Down View Mode Normal View Mode Wide View Mode
Guidelines
Bumper
Camera
Approx. 118 in (3 m) Approx. 79 in (2 m) Approx. 39 in (1 m) Approx. 20 in (50 cm)
* Not available on all models
15 CROSSTOUR-31TP66500.book 455 ページ 2014年7月31日 木曜日 午後3時23分
Page 462 of 573

461
Maintenance
This chapter discusses basic maintenance.
Before Performing MaintenanceInspection and Maintenance ............ 462
Safety When Performing Maintenance..... 463Parts and Fluids Used in Maintenance Service ........................................... 464
Maintenance Minder
TM..................... 465
Maintenance Under the Hood
Maintenance Items Under the Hood ..... 469Opening the Hood ........................... 471
Recommended Engine Oil ................ 472
Oil Check ......................................... 473
Adding Engine Oil ............................ 475
Changing the Engine Oil and Oil Filter ....476
Engine Coolant ................................ 478
Transmission Fluid ............................ 480
Brake Fluid ....................................... 481
Power Steering Fluid Check
*............ 482
Refilling Window Washer Fluid......... 483
Replacing Light Bulbs ....................... 484
Checking and Maintaining Wiper Blades... 493Checking and Maintaining Tires
Checking Tires ................................. 497
Tire and Loading Information Label ...... 498Tire Labeling .................................... 498DOT Tire Quality Grading (U.S. Vehicles)....... 500Wear Indicators................................ 502 Tire Service Life ................................ 502
Tire and Wheel Replacement ........... 503
Tire Rotation .................................... 504
Winter Tires ..................................... 505
Battery ............................................... 506
Remote Transmitter Care ................. 507
Replacing the Button Battery ........... 507
Heating and Cooling System
*/Climate
Control System* Maintenance ....... 509
Cleaning
Interior Care .................................... 510
Exterior Care.................................... 512
* Not available on all models
15 CROSSTOUR-31TP66500.book 461 ページ 2014年7月31日 木曜日 午後3時23分
Page 468 of 573

467
uuMaintenance MinderTMuTo Use Maintenance MinderTM
Continued
Maintenance
■Maintenance Service Items1Maintenance Service Items
•Independent of the Maintenance Minder
information, replace the brake fluid every 3 years.
•Inspect idle speed every 160,000 miles (256,000
km).
•Adjust the valves during services A, B, 1, 2, or 3 if
they are noisy.
Maintenance Minder
Message
System Message
Indicator
Sub Items
Main
Item
*1: If a message SERVICE does not appear more than 12 months after the display is reset, change the
engine oil every year.
# : See information on maintenance and emissions warranty.
CODEMaintenance Main Items
A
●Replace engine oil*1
B●Replace engine oil*1 and oil filter●Inspect front and rear brakes●Check parking brake adjustment●Inspect tie rod ends, steering gearbox, and boots●Inspect suspension components●Inspect driveshaft boots●Inspect brake hoses and li nes (Including ABS/VSA)●Inspect all fluid levels and condition of fluids●Inspect exhaust system#
●Inspect fuel lines and connections#
*2: If you drive in dusty conditions, replace the air cleaner element every 15,000 miles (24,000 km).
*3: If you drive primarily in urban areas that have high concentrations of soot in the air from industry and
from diesel-powered vehicles, replace the dust and pollen filter every 15,000 miles (24,000 km).
*4: 4WD only
*5: 6-cylinder models
*6: If you drive regularly in very high temperatures (over 110°F, 43°C), in very low temperatures (under -20°F, -29°C), or tow a trailer, replace every 60,000 miles (U.S.)/100,000 km (Canada).
CODEMaintenance Sub Items
1
●Rotate tires
2●Replace air cleaner element*2
●Replace dust and pollen filter*3
●Inspect drive belt
3
●Replace transmission and transfer*4 fluid
4●Replace spark plugs●Replace timing belt and inspect water pump*5, *6
●Inspect valve clearance
5
●Replace engine coolant
6●Replace rear differential fluid*4
15 CROSSTOUR-31TP66500.book 467 ページ 2014年7月31日 木曜日 午後3時23分
Page 470 of 573
469Continued
Maintenance
Maintenance Under the Hood
Maintenance Items Under the Hood
4-cylinder models
Brake Fluid
(Black Cap)
Engine Coolant
Reserve Tank Radiator Cap
Washer Fluid
(Blue Cap) Engine Oil Dipstick
(Orange) Engine Oil Fill Cap
Battery
Power Steering Fluid
(Red Cap)
15 CROSSTOUR-31TP66500.book 469 ページ 2014年7月31日 木曜日 午後3時23分
Page 483 of 573

482
uuMaintenance Under the Hood uPower Steering Fluid Check*
Maintenance
Power Steering Fluid Check*
We recommend that you check the power st eering fluid level every time you refuel.
Check when the engi ne is not running.
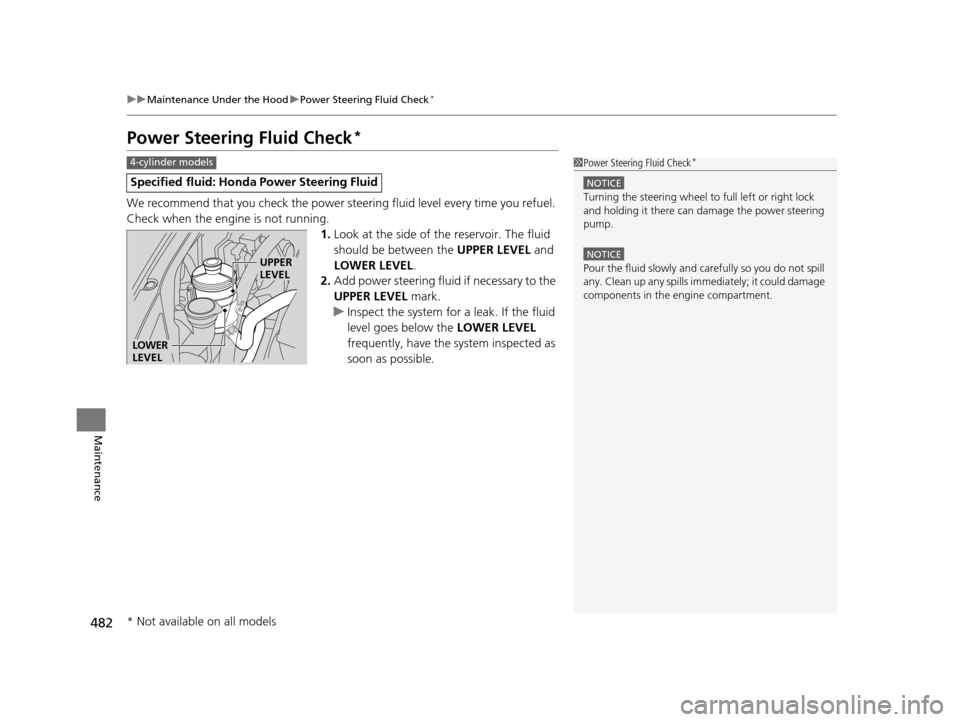
1.Look at the side of the reservoir. The fluid
should be between the UPPER LEVEL and
LOWER LEVEL .
2. Add power steering fluid if necessary to the
UPPER LEVEL mark.
u Inspect the system for a leak. If the fluid
level goes below the LOWER LEVEL
frequently, have the system inspected as
soon as possible.
Specified fluid: Honda Power Steering Fluid
1 Power Steering Fluid Check*
NOTICE
Turning the steering wheel to full left or right lock
and holding it there can da mage the power steering
pump.
NOTICE
Pour the fluid slowly and ca refully so you do not spill
any. Clean up any spills imme diately; it could damage
components in the e ngine compartment.
4-cylinder models
LOWER
LEVEL
UPPER
LEVEL
* Not available on all models
15 CROSSTOUR-31TP66500.book 482 ページ 2014年7月31日 木曜日 午後3時23分
Page 486 of 573
485
uuReplacing Light Bulbs uHeadlight Bulbs
Maintenance
1. Turn the steering wheel all the way to the
opposite side from the light being replaced.
Passenger side: Turn the steering wheel
to the left.
Driver side: Turn the steering wheel to the
right.
2. Remove the holding clip and screw, and
pull the inner fender back.
3. Push the tab to remove the coupler.
4. Rotate the old bulb to the left to remove.
5. Insert a new bulb into the headlight
assembly and turn it to the right.
6. Insert the coupler into the connector of the
bulb.
■Low Beam Headlights1 Headlight Bulbs
Insert a flat-tip screwdriver, lift and remove the
central pin to remove the clip.
Insert the clip with the central pin raised, and push
until it is flat.
Central pin
Push until the
pin is flat.
Holding
Clip
Screw
TabCoupler
Bulb
15 CROSSTOUR-31TP66500.book 485 ページ 2014年7月31日 木曜日 午後3時23分
Page 488 of 573
487
uuReplacing Light Bulbs uFog Light Bulbs
Maintenance
1. Turn the steering wheel all the way to the
right.
2. Remove the holding clips and screw, and
pull the inner fender back.
3. Push the tab to remove the coupler.
4. Rotate the old bulb to the left to remove.
5. Insert a new bulb into the headlight
assembly and turn it to the right.
6. Insert the coupler into the connector of the
bulb.
1 Fog Light Bulbs
Remove the clip by using a flat-tip screwdriver.
2 Low Beam Headlights P. 485Holding Clip
ScrewDriver side
Bulb
Coupler
Tab
15 CROSSTOUR-31TP66500.book 487 ページ 2014年7月31日 木曜日 午後3時23分