2015 HONDA CIVIC COUPE warning
[x] Cancel search: warningPage 20 of 79
32 || 33
VEHICLE CONTROLS
VEHICLE CONTROLS
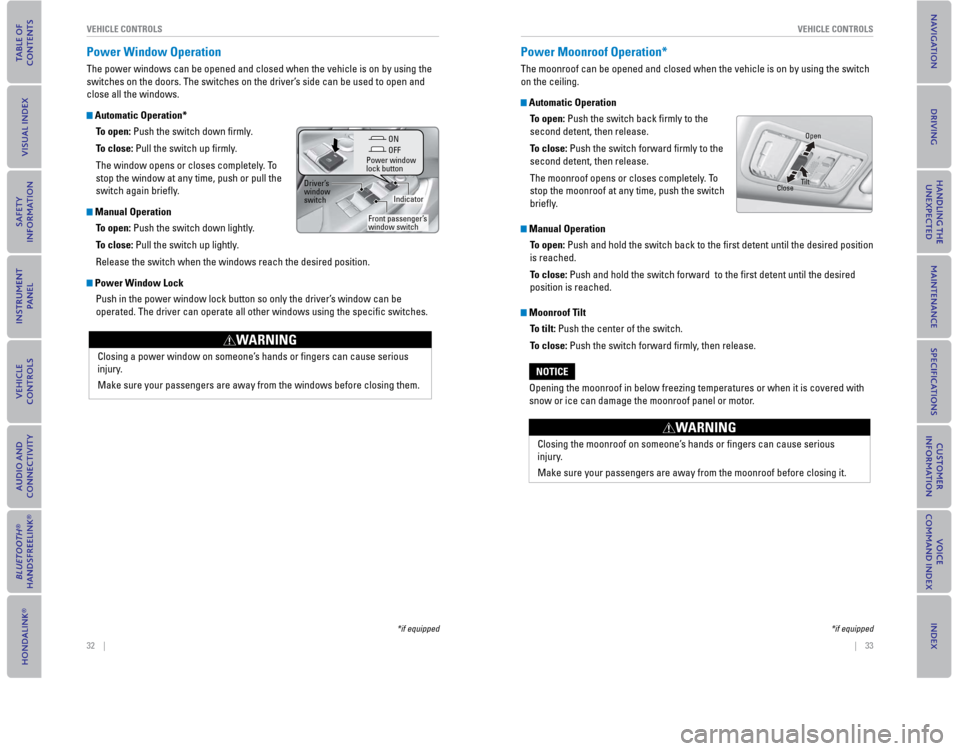
Power Window Operation
The power windows can be opened and closed when the vehicle is on by usi\
ng the
switches on the doors. The switches on the driver’s side can be used to open and
close all the windows.
Automatic Operation*
To open: Push the switch down fi rmly .
T
o close: Pull the switch up fi rmly.
The window opens or closes completely. To
stop the window at any time, push or pull the
switch again briefl y.
Manual Operation To open: Push the switch down lightly.
To close: Pull the switch up lightly
.
Release the switch when the windows reach the desired position.
Power Window Lock Push in the power window lock button so only the driver’s window can be
operated. The driver can operate all other windows using the specifi c switches.
OFF
Power window
lock button
Driver’s
window
switch
Front passenger’s
window switch ON
Indicator
Closing a power window on someone’s hands or fi ngers can cause serious
injury.
Make sure your passengers are away from the windows before closing them.\
WARNING
*if equipped
Power Moonroof Operation*
The moonroof can be opened and closed when the vehicle is on by using th\
e switch
on the ceiling.
Automatic Operation
To open: Push the switch back fi rmly to the
second detent, then release.
T o close:
Push the switch forward fi rmly to the
second detent, then release.
The moonroof opens or closes completely. To
stop the moonroof at any time, push the switch
briefl y.
Manual Operation
To open: Push and hold the switch back to the fi rst detent until the desired position
is reached.
T o close:
Push and hold the switch forward to the fi rst detent until the desired
position is reached.
Moonroof Tilt
To tilt: Push the center of the switch.
To close: Push the switch forward fi
rmly, then release.
CloseOpen
Tilt
Opening the moonroof in below freezing temperatures or when it is covere\
d with
snow or ice can damage the moonroof panel or motor.
NOTICE
Closing the moonroof on someone’s hands or fi ngers can cause serious
injury.
Make sure your passengers are away from the moonroof before closing it.
WARNING
*if equipped
Page 22 of 79
36 || 37
VEHICLE CONTROLS
VEHICLE CONTROLS
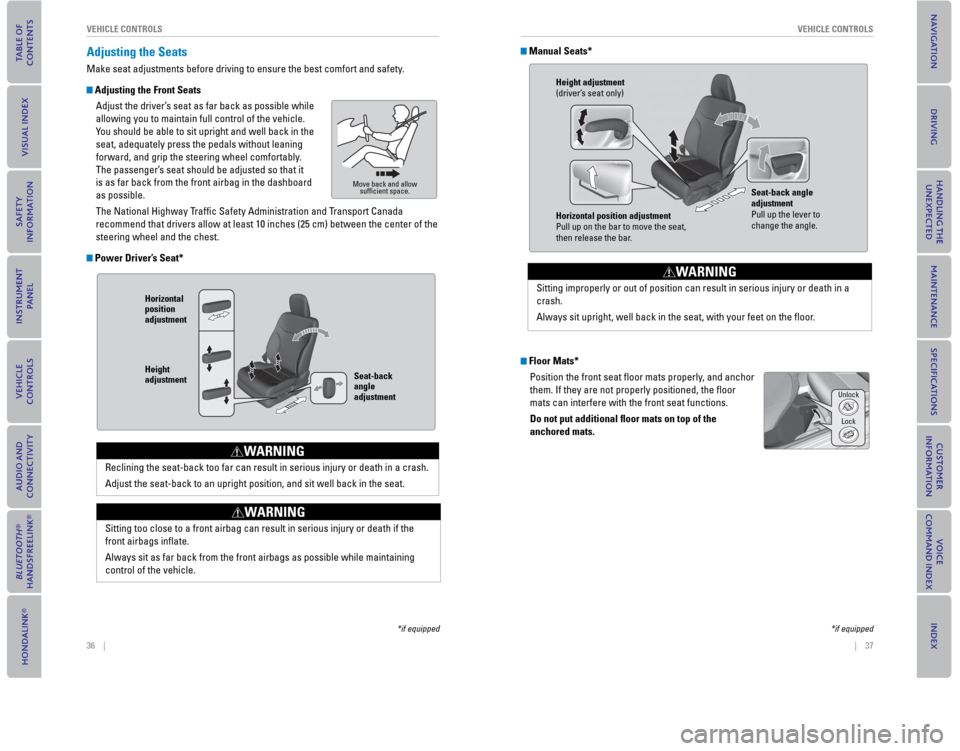
Adjusting the Seats
Make seat adjustments before driving to ensure the best comfort and safe\
ty.
Adjusting the Front Seats
Adjust the driver’s seat as far back as possible while
allowing you to maintain full control of the vehicle.
You should be able to sit upright and well back in the
seat, adequately press the pedals without leaning
forward, and grip the steering wheel comfortably.
The passenger’ s seat should be adjusted so that it
is as far back from the front airbag in the dashboard
as possible.
The National Highway T
raffi c Safety Administration and Transport Canada
recommend that drivers allow at least 10 inches (25 cm) between the ce\
nter of the
steering wheel and the chest.
Power Driver’s Seat*
Move back and allow suffi cient space.
Horizontal
position
adjustment
Height
adjustment Seat-back
angle
adjustment
Reclining the seat-back too far can result in serious injury or death in\
a crash.
Adjust the seat-back to an upright position, and sit well back in the se\
at.
WARNING
Sitting too close to a front airbag can result in serious injury or deat\
h if the
front airbags infl ate.
Always sit as far back from the front airbags as possible while maintain\
ing
control of the vehicle.
WARNING
*if equipped
Manual Seats*
Floor Mats*
Position the front seat fl oor mats properly, and anchor
them. If they are not properly positioned, the fl oor
mats can interfere with the front seat functions.
Do not put additional �
oor mats on top of the
anchored mats.
Height adjustment
(driver’s seat only)
Horizontal position adjustment
Pull up on the bar to move the seat,
then release the bar. Seat-back angle
adjustment
Pull up the lever to
change the angle.
Sitting improperly or out of position can result in serious injury or de\
ath in a
crash.
Always sit upright, well back in the seat, with your feet on the fl oor.
WARNING
Unlock
Lock
*if equipped
Page 23 of 79
38 || 39
VEHICLE CONTROLSVEHICLE CONTROLS
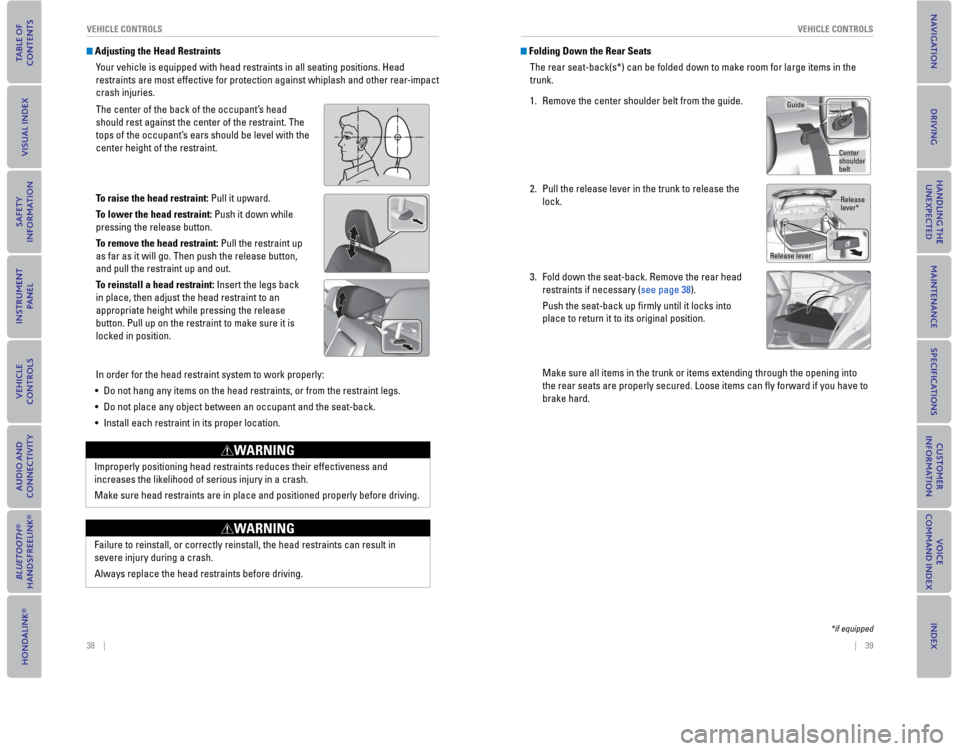
Adjusting the Head Restraints
Your vehicle is equipped with head restraints in all seating positions. Head
restraints are most effective for protection against whiplash and other rear-impact
crash injuries.
The center of the back of the occupant’s head
should rest against the center of the restraint. The
tops of the occupant’s ears should be level with the
center height of the restraint.
To raise the head restraint: Pull it upward.
To lower the head restraint: Push it down while
pressing the release button.
To remove the head restraint: Pull the restraint up
as far as it will go. Then push the release button,
and pull the restraint up and out.
To reinstall a head restraint: Insert the legs back
in place, then adjust the head restraint to an
appropriate height while pressing the release
button. Pull up on the restraint to make sure it is
locked in position.
In order for the head restraint system to work properly:
• Do not hang any items on the head restraints, or from the restraint legs.
• Do not place any object between an occupant and the seat-back.
• Install each restraint in its proper location.
Improperly positioning head restraints reduces their effectiveness and
increases the likelihood of serious injury in a crash.
Make sure head restraints are in place and positioned properly before driving.
WARNING
Failure to reinstall, or correctly reinstall, the head restraints can result in
severe injury during a crash.
Always replace the head restraints before driving.
WARNING
Folding Down the Rear Seats
The rear seat-back(s*) can be folded down to make room for large items in the
trunk.
1. Remove the center shoulder belt from the guide.
2. Pull the release lever in the trunk to release the
lock.
3. Fold down the seat-back. Remove the rear head
restraints if necessary (see page 38).
Push the seat-back up fi rmly until it locks into
place to return it to its original position.
Make sure all items in the trunk or items extending through the opening into
the rear seats are properly secured. Loose items can fl y forward if you have to
brake hard.
Guide
Center shoulder belt
Release lever*
Release lever
*if equipped
Page 24 of 79
40 || 41
VEHICLE CONTROLS
VEHICLE CONTROLS
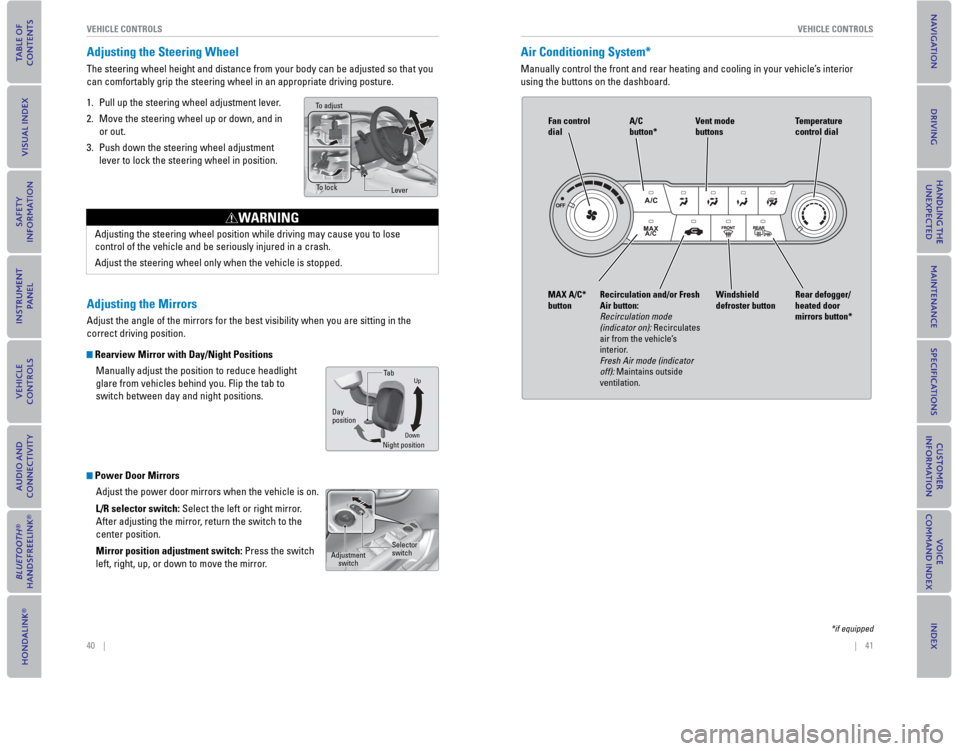
Adjusting the Steering Wheel
The steering wheel height and distance from your body can be adjusted so\
that you
can comfortably grip the steering wheel in an appropriate driving postur\
e.
1. Pull up the steering wheel adjustment lever.
2. Move the steering wheel up or down, and in
or out.
3. Push down the steering wheel adjustment lever to lock the steering wheel in position.
Adjusting the Mirrors
Adjust the angle of the mirrors for the best visibility when you are sit\
ting in the
correct driving position.
Rearview Mirror with Day/Night Positions
Manually adjust the position to reduce headlight
glare from vehicles behind you. Flip the tab to
switch between day and night positions.
Power Door MirrorsAdjust the power door mirrors when the vehicle is on.
L/R selector switch: Select the left or right mirror.
After adjusting the mirror, return the switch to the
center position.
Mirror position adjustment switch: Press the switch
left, right, up, or down to move the mirror
.
To adjust
To lockLever
Adjusting the steering wheel position while driving may cause you to los\
e
control of the vehicle and be seriously injured in a crash.
Adjust the steering wheel only when the vehicle is stopped.
WARNING
DownNight positionTa b
Day
position
Up
Adjustment switchSelector
switch
Air Conditioning System*
Manually control the front and rear heating and cooling in your vehicle’\
s interior
using the buttons on the dashboard.
Fan control
dial A/C
button*
MAX A/C*
button Windshield
defroster buttonTemperature
control dial
Recirculation and/or Fresh
Air button:
Recirculation mode
(indicator on): Recirculates
air from the vehicle’s
interior.
Fresh Air mode (indicator
off): Maintains outside
ventilation. Rear defogger/
heated door
mirrors button*Vent mode
buttons
*if equipped
Page 25 of 79

42 || 43
VEHICLE CONTROLS
VEHICLE CONTROLS
Climate Control System*
The automatic climate control system can maintain your preferred interio\
r
temperature by selecting the proper mix of heated or cooled air and fan \
speed. Use
the buttons on the dashboard to control the system.
Seat Heaters*
Quickly warm the front seats when the vehicle is on.
Press the seat heater switch in the front console to
the LO or HI position. An indicator appears for the
selected setting. Return the switch to the middle
position to turn off.
AUTO button: Press, then
use the temperature
control dial to set your
preferred temperature.
Temperature
control dial
A/C
buttonFan control
dial
Recirculation button:
Recirculation mode
(indicator on):
Recirculates air from the
vehicle’s interior.
Fresh Air mode (indicator
off): Maintains outside
ventilation. Rear defogger/
heated door
mirrors button*
Windshield
defroster
button ON/OFF
button
Mode button:
Change airfl ow
location.
Heat-induced burns are possible when using seat heaters.
Persons with a diminished ability to sense temperature (e.g., persons w\
ith
diabetes, lower-limb nerve damage, or paralysis) or with sensitive skin should
not use the seat heaters.
WARNING
*if equipped
Customized Features*
Use the Vehicle Menu in the i-MID to customize certain features, such as the
display, the trip computer, and door locking/unlocking. Use the steering wheel
controls to make and enter selections when the vehicle is stopped.
Changing Settings Using the Touchscreen*
Select items on the touchscreen to make and enter selections.
1. Select SETTINGS.
2. Select an option (Clock/Info, Audio, Bluetooth, Phone, Camera, System, \
or
Navi*).
3.
Select a setting option, and make your preferred changes.
4. Press BACK to exit the menus.
MENU
SOURCE Button
Press to go to the next
display.
SOURCE Button
Press to set your selection.
MENU Button
Press to go to Vehicle Menu. + Button
Press to scroll upwards.
Button
Press to go back to the
previous display.
- Button
Press to scroll downwards.
*if equipped
Page 43 of 79
78 || 79
NAVIGATION
NAVIGATION
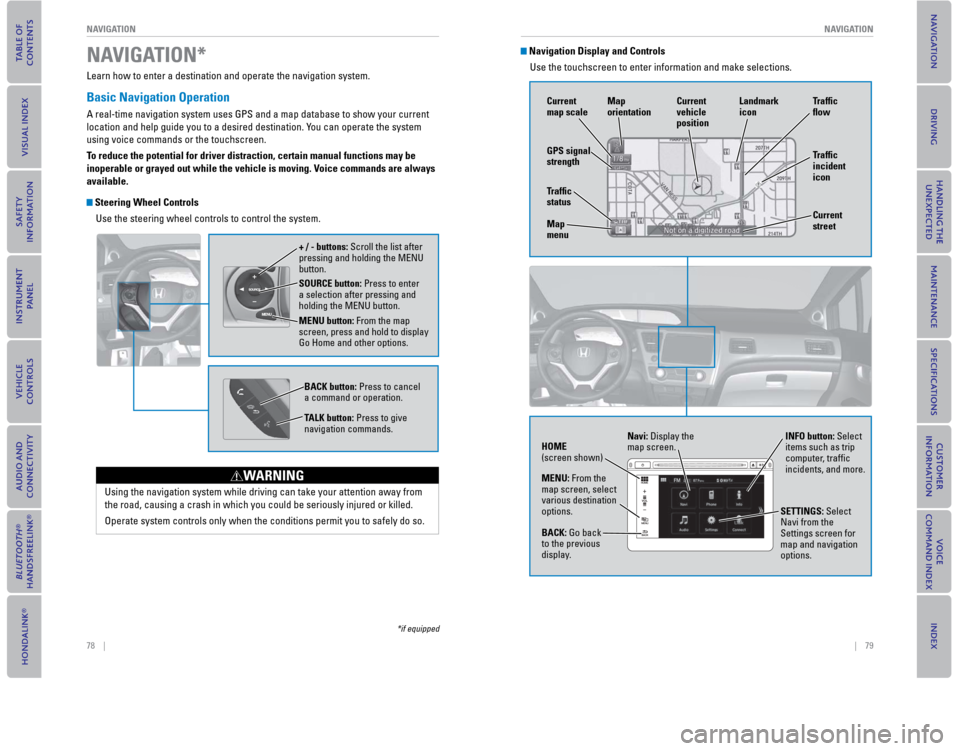
Learn how to enter a destination and operate the navigation system.
Basic Navigation Operation
A real-time navigation system uses GPS and a map database to show your c\
urrent
location and help guide you to a desired destination. You can operate the system
using voice commands or the touchscreen.
To reduce the potential for driver distraction, certain manual functions \
may be
inoperable or grayed out while the vehicle is moving. Voice commands are always
available.
Steering Wheel Controls
Use the steering wheel controls to control the system.
SOURCE button: Press to enter
a selection after pressing and
holding the MENU button.
MENU button: From the map
screen, press and hold to display
Go Home and other options. + / - buttons: Scroll the list after
pressing and holding the MENU
button.
BACK button: Press to cancel
a command or operation.
TALK button: Press to give
navigation commands.
Using the navigation system while driving can take your attention away f\
rom
the road, causing a crash in which you could be seriously injured or kil\
led.
Operate system controls only when the conditions permit you to safely do\
so.
WARNING
NAVIGATION*
*if equipped
Navigation Display and ControlsUse the touchscreen to enter information and make selections.
GPS signal
strength Traf� c
incident
icon Traf� c
� o w
Current
map scale Current
vehicle
position
Map
orientation
Current
street
Traf� c
status
Map
menu Landmark
icon
Navi: Display the
map screen.
HOME
(screen shown) INFO button: Select
items such as trip
computer, traffi c
incidents, and more.
BACK: Go back
to the previous
display. SETTINGS: Select
Navi from the
Settings screen for
map and navigation
options.
MENU: From the
map screen, select
various destination
options.
Page 47 of 79

86 || 87
DRIVING
DRIVING
In addition:
• During the fi rst 600 miles (1,000 km) of operation, avoid sudden acceleration or full throttle operation so as not to damage the engine or powertrain.
• Avoid hard braking for the fi rst 200 miles (300 km). You should also follow this when the brake pads are replaced.
Natural Gas (CNG) models
Do not put large, heavy, or pointed objects in the trunk. When storing items, properly
secure them so that they do not move around while driving. The fuel tank\
is located
in the trunk, and although a partition separates the tank from the cargo\
space, large
items or loose items can damage the fuel tank and fuel system components\
.
Improper accessories or modifi cations can affect your vehicle’s handling, and
stability, and performance, and cause a crash in which you can be seriously hurt \
or killed.
Follow all instructions in the vehicle owner’s manual regarding accessories and
modifi cations.
WARNING
Maximum Load Limit
Carrying too much cargo or improperly storing it can affect your vehicle\
’s handling,
stability, stopping distance, and tires, and make it unsafe.
The maximum load for your vehicle is 850 lbs (385 kg). See the Tire and Loading
Information label on the driver’s doorjamb.
This fi gure includes the total weight of all occupants, cargo, and
accessories, and the tongue load if you are towing a trailer. Below are the
steps for determining the correct load limit:
1. Locate the statement “The combined weight of occupants and cargo should never exceed XXX kg or XXX lbs.” on your vehicle’s placard.
2. Determine the combined weight of the driver and passengers that will be riding in your vehicle.
3. Subtract the combined weight of the driver and passengers from XXX kg or XXX lbs.
4. The resulting fi gure equals the available amount of cargo and luggage load capacity. For example, if the “XXX” amount equals 1,400 lbs. and
there will be fi ve 150 lb. passengers in your vehicle, the amount of
available cargo and luggage load capacity is 650 lbs. (1,400 - 750 (5 \
x 150)
= 650 lbs.)
5. Determine the combined weight of luggage and cargo being loaded on the vehicle. That weight may not safely exceed the available cargo and
luggage load capacity calculated in step 4.
6. If your vehicle will be towing a trailer, load from your trailer will be transferred to your vehicle. Consult the Owner’s Manual on the Owner
Information CD or at owners.honda.com (U.S.) or myhonda.ca (Canada)
to determine how this reduces the available cargo and luggage load
capacity of your vehicle.
In addition, the total weight of the vehicle, all occupants, accessories\
,
cargo, and trailer tongue load must not exceed the Gross Vehicle Weight
Rating (GVWR) or the Gross Axle Weight Rating (GAWR). Both are on a label
on the driver’s doorjamb.
Label example
Page 48 of 79

88 || 89
DRIVINGDRIVING
Towing a Trailer
Your vehicle can tow a trailer if you carefully observe the load limits, use the proper
equipment, and follow the towing guidelines. Check the load limits before driving
(see page 87).
Civic HF, Coupe, and Natural Gas (CNG) models are not designed to tow a trailer.
Attempting to do so can void your warranties.
Total Trailer Weight
Maximum allowable weight of the trailer, cargo, and
everything in or on it must not exceed 1,000 lbs (450
kg). Towing loads in excess of this can seriously
affect vehicle handling and performance and can
damage the engine and drivetrain.
Tongue Load
The weight of the tongue with a fully loaded trailer
on the hitch should be approximately 10% of the
total trailer weight.
• Excessive tongue load reduces front tire traction
and steering control. Too little tongue load can
make the trailer unstable and cause it to sway.
• To achieve a proper tongue load, start by loading
60% of the load toward the front of the trailer and
40% toward the rear. Readjust the load as needed.
Pre-tow Checklist
When preparing to tow, and before driving away, ensure the following:
• The vehicle has been properly serviced, and the suspension and the cooling
system are in good operating condition.
• Avoid towing a trailer during your vehicle’s fi rst 600 miles (1,000 km).
• The trailer has been properly serviced and is in good condition.
• All weights and loads are within limits. Never exceed the gross weight ratings.
• Check if all loads are within limits at a public scale. If a public scale is not
available, add the estimated weight of your cargo load to the weight of your
trailer (as quoted by the manufacturer) and the tongue load.
• The hitch, safety chains, and any other attachments are secure.
• All items in or on the trailer are properly secured and cannot shift while you drive.
Tongue Load
Total load
Tongue load
Exceeding any load limit or improperly loading your vehicle and trailer can
cause a crash in which you can be seriously hurt or killed.
Check the loading of your vehicle and trailer carefully before starting to drive.
WARNING
The headlight aim on your vehicle was set by the factory, and does not need to be
adjusted. However, if you regularly carry heavy items in the cargo area or pull a
trailer, have the aiming readjusted at your dealer or by a qualifi ed technician.
Load limits example
Example 1
Max load 850 lbs (385 kg)
Passenger weight 150 lbs x 2 = 300 lbs (68 kg x 2 = 136 kg)
Cargo weight 550 lbs (249 kg)
Example 2
Max load 850 lbs (385 kg)
Passenger weight 150 lbs x 5 = 750 lbs (68 kg x 5 = 340 kg)
Cargo weight 100 lbs (45 kg)
Overloading or improper loading can affect handling and stability and cause a
crash in which you can be hurt or killed.
Follow all load limits and other loading guidelines in this guide.
WARNING