2015 HONDA CIVIC COUPE display
[x] Cancel search: displayPage 286 of 441

Continued
285
uuBluetooth ® HandsFreeLink ®u HFL Menus
Features
■Displaying text messages
1. Go to the Phone menu screen.2Phone menu screen P. 268
2.Select Text/Email .
u Select account if necessary.
3. Select a message.
u The text message is displayed. The
system automatically starts reading the
message aloud.
■
Displaying Messages
1Displaying Messages
The icon appears next to an unread message.
If you delete a message on the phone, the message is
also deleted in the system. If you send a message
from the system, the message goes to your phone’s
outbox.
To see the previous or next message, select Previous
or Next on the message screen.
Message List
Text Message
Page 287 of 441

286
uuBluetooth ® HandsFreeLink ®u HFL Menus
Features
■Displaying e-mails
1. Go to the Phone menu screen.2Phone menu screen P. 268
2.Select Text/Email .
u Select account if necessary.
3. Select a folder.
4. Select a message.
u The e-mail is displayed. The system
automatically starts reading the message
aloud.
Folder List
Message List
E-mail
Page 288 of 441

Continued
287
uuBluetooth ® HandsFreeLink ®u HFL Menus
Features
■Read or stop reading a message
1. Go to the text/e-mail message screen.
u The system automatically starts reading
the message aloud.
2 Displaying Messages P. 285
2.Select Stop to stop reading.
Select Read to start reading the message
from the beginning.■Reply to a message
1. Go to the text/e-mail message screen.
u The system automatically starts reading
the message aloud.
2 Displaying Messages P. 285
2.Select Reply.
3. Select the reply message.
u The pop-up menu appears on the screen.
4. Select Send to send the message.
u Complete appears on the screen when
the reply message was successfully sent.
1 Reply to a message
The available fixed reply messages are as follows:•Talk to you later, I’m driving.•I’m on my way.•I’m running late.•OK•Yes•No
You cannot add, edit, or delete reply messages.
Page 310 of 441

Continued
309
uuWhen Driving uShifting
Driving
Use the paddle shifters to change between 1st and 7th speeds without removing
your hands from the steering wheel. The transmission switches to the 7-speed
manual shift mode when you pull a paddle shifter while driving. This mode is useful
when engine braking is needed.■When the shift lever is in
(D
:
The shift mode goes into the 7-speed manual shift mode temporarily, and the
number is displayed in the shift indicator.
The 7-speed manual shift mode is canceled automatically if you drive at constant
speed or accelerate, and the number in the shift indicator goes off.
You can cancel this mode by pulling the
(+
paddle shifter for a few seconds.
The 7-speed manual shift mode is especially useful when reducing the vehicle speed
temporarily before making a turn.
■When the shift lever is in
(S
:
The shift mode goes into the 7-speed manual shift mode. The M indicator and the
speed number are displayed in the shift indicator. As the vehicle speed slows down,
the transmission automatically shifts down accordingly. When the vehicle comes to
a stop, it automatically shifts down into 1st.
If the vehicle speed increases and the engine speed reaches near the tachometer’s
red zone, the transmission automatically shifts up.
You can only pull away in 1st speed.
When canceling the 7-speed manual shift mode, move the shift lever from
(S
to
(D
. When the 7-speed manual shift mode is canceled, the M indicator and shift
indicator go off.
■
7-Speed Manual Shift Mode
1 7-Speed Manual Shift Mode
In the 7-speed manual shift mode, the transmission
shifts up or down by operating either paddle shifter
under the following conditions:
Shift Up: The engine speed reaches the lowest
threshold of the higher speed position.
Shift Down: The engine speed reaches the highest
threshold of the lower speed position.
When the engine speed reaches near the
tachometer’s red zone, the transmission shifts up
automatically.
When the engine speed reaches the lowest threshold
of the selected speed position, the transmission shifts
down automatically.
Operating the paddle shifters on slippery surfaces
may cause the tires to lock up. In this case, the 7-
speed manual shift mode is canceled and goes back
to the normal D driving mode.
Page 321 of 441

320
uuWhen Driving uLaneWatch
TM*
Driving
LaneWatch
TM
*
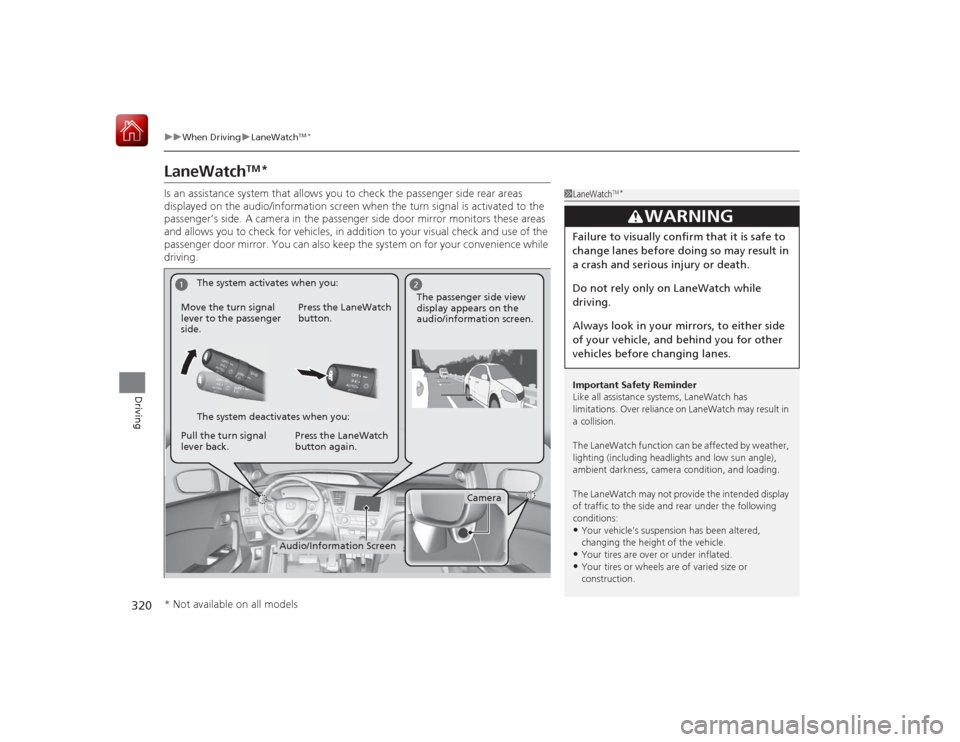
Is an assistance system that allows you to check the passenger side rear areas
displayed on the audio/information screen when the turn signal is activated to the
passenger’s side. A camera in the passenger side door mirror monitors these areas
and allows you to check for vehicles, in addition to your visual check and use of the
passenger door mirror. You can also keep the system on for your convenience while
driving.
1LaneWatch
TM*
Important Safety Reminder
Like all assistance systems, LaneWatch has
limitations. Over reliance on LaneWatch may result in
a collision.
The LaneWatch function can be affected by weather, lighting (including headlights and low sun angle),
ambient darkness, camera condition, and loading.
The LaneWatch may not provide the intended display
of traffic to the side and rear under the following
conditions:•Your vehicle’s suspension has been altered,
changing the height of the vehicle.•Your tires are over or under inflated.•Your tires or wheels ar e of varied size or
construction.
3
WARNING
Failure to visually confirm that it is safe to
change lanes before doing so may result in
a crash and serious in jury or death.
Do not rely only on LaneWatch while
driving.
Always look in your mirrors, to either side
of your vehicle, and behind you for other
vehicles before changing lanes.
1
2
Camera
Audio/Information Screen
Move the turn signal
lever to the passenger
side.
Press the LaneWatch
button.
Pull the turn signal
lever back. Press the LaneWatch
button again. The passenger side view
display appears on the
audio/information screen.
The system activates when you:
The system deactivates when you:
* Not available on all models
Page 322 of 441

321
uuWhen Driving uLaneWatch
TM*
Driving
■Customizing the LaneWatch settings
You can customize the following items using the audio/information screen.
• Show with Turn Signal : Selects whether LaneWatch monitor comes on when
you operate the turn signal light lever.
• Display Time after Turn Signal Off : Changes the length of time the LaneWatch
display stays on after you pull the turn signal lever back.
• Reference Lines : Selects whether the reference lines appear on the LaneWatch
monitor.
• Next Maneuver Pop up
*: Selects whether a turn direction screen of the
navigation system interrupts the LaneWatch display.
• Display : Allows for display adjustments of items, such as brightness, and tint.
This setting is part of the Audio setup group.
2Customized Features
* P. 220
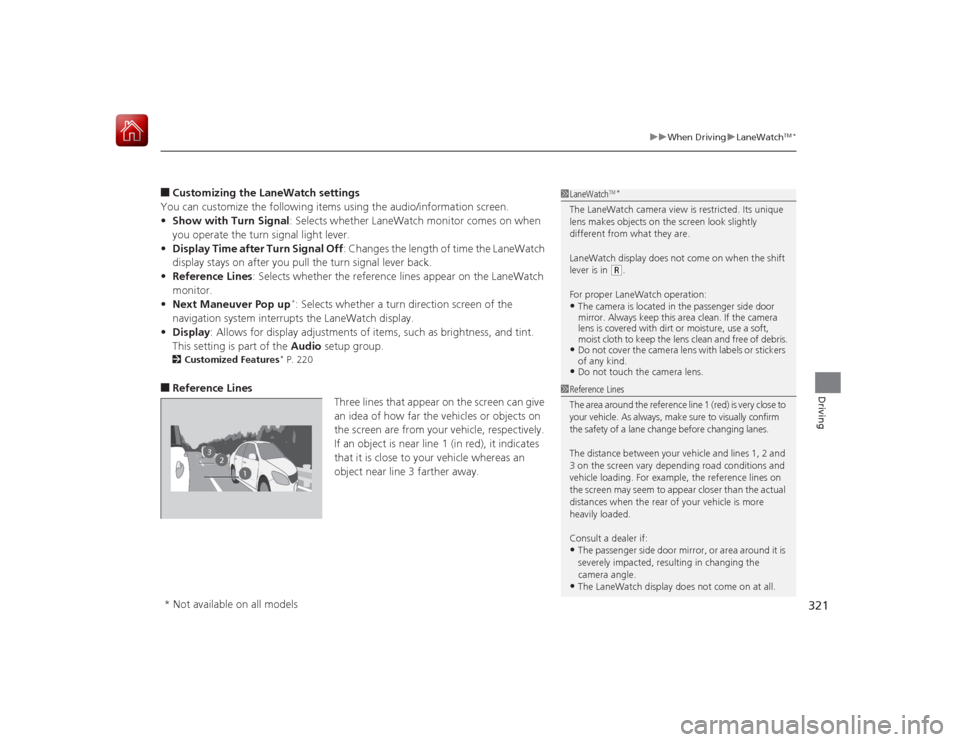
■Reference Lines
Three lines that appear on the screen can give
an idea of how far the vehicles or objects on
the screen are from your vehicle, respectively.
If an object is near line 1 (in red), it indicates
that it is close to your vehicle whereas an
object near line 3 farther away.
1 LaneWatch
TM*
The LaneWatch camera view is restricted. Its unique
lens makes objects on the screen look slightly
different from what they are.
LaneWatch display does not come on when the shift
lever is in
(R.
For proper LaneWatch operation:
•The camera is located in the passenger side door
mirror. Always keep this area clean. If the camera
lens is covered with dirt or moisture, use a soft,
moist cloth to keep the lens clean and free of debris.•Do not cover the camera lens with labels or stickers
of any kind.•Do not touch the camera lens.
2
3
1
1 Reference Lines
The area around the reference line 1 (red) is very close to
your vehicle. As always, make sure to visually confirm
the safety of a lane change before changing lanes.
The distance between your vehicle and lines 1, 2 and
3 on the screen vary depending road conditions and
vehicle loading. For example, the reference lines on
the screen may seem to appear closer than the actual
distances when the rear of your vehicle is more
heavily loaded.
Consult a dealer if:•The passenger side door mirror, or area around it is
severely impacted, resulting in changing the
camera angle.•The LaneWatch display does not come on at all.
* Not available on all models
Page 324 of 441

323
uuWhen Driving uTire Pressure Monitoring System (TPMS)
Driving
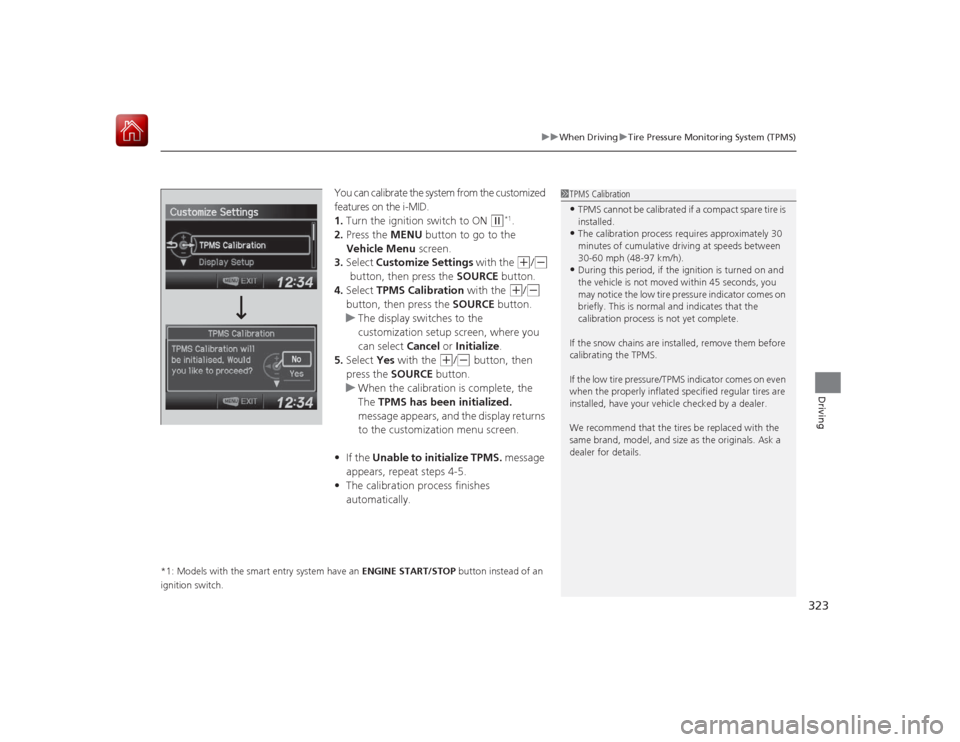
You can calibrate the system from the customized
features on the i-MID.
1. Turn the ignition switch to ON
(w
*1.
2. Press the MENU button to go to the
Vehicle Menu screen.
3. Select Customize Settings with the (+
/(-
button, then press the SOURCE button.
4. Select TPMS Calibration with the
(+
/(-
button, then press the SOURCE button.
u The display switches to the
customization setup screen, where you
can select Cancel or Initialize .
5. Select Yes with the
(+
/(-
button, then
press the SOURCE button.
u When the calibration is complete, the
The TPMS has been initialized.
message appears, and the display returns
to the customization menu screen.
• If the Unable to initialize TPMS. message
appears, repeat steps 4-5.
• The calibration process finishes
automatically.
*1: Models with the smart entry system have an ENGINE START/STOP button instead of an
ignition switch.
1 TPMS Calibration•TPMS cannot be calibrated if a compact spare tire is
installed.•The calibration process requires approximately 30
minutes of cumulative driving at speeds between
30-60 mph (48-97 km/h).•During this period, if the ignition is turned on and
the vehicle is not moved within 45 seconds, you
may notice the low tire pressure indicator comes on
briefly. This is normal and indicates that the
calibration process is not yet complete.
If the snow chains are installed, remove them before
calibrating the TPMS.
If the low tire pressure/TPMS indicator comes on even
when the properly inflated specified regular tires are
installed, have your vehicle checked by a dealer.
We recommend that the tires be replaced with the
same brand, model, and size as the originals. Ask a
dealer for details.
Page 332 of 441

331Driving
Rearview Camera
*
About Your Rearview CameraFor models with the navigation system, see the Navigation System Manual for the
rearview camera.
The i-MID can display your vehicle’s rear view.
The display automatically changes to a rear view when the shift lever is moved to (R
.
The audio/information screen can display your vehicle’s rear view. The display
automatically changes to the rear view when the shift lever is moved to
(R
.
The rearview camera has a unique lens that makes objects appear closer or further
than they actually are.
■
Rearview Camera Display Area
1 About Your Rearview Camera
The rear camera view is restricted. You cannot see
the corner ends of the bumper or what is underneath
the bumper. Its unique lens also makes objects
appear closer or farther than they actually are.
Visually confirm that it is safe to drive before backing
up. Certain conditions, such as weather, lighting, and
high temperatures, may also restrict the rear view. Do
not rely on the rearview display which does not give
you all information about conditions at the back of
your vehicle.
If the camera lens is covered with dirt or moisture,
use a soft, moist cloth to keep the lens clean and free
of debris.
You can change the Fixed Guideline and Dynamic
Guideline settings.
2 Customized Features
* P. 220
Fixed Guideline
On : Guidelines appear when you shift into
(R.
Off : Guidelines do not appear when the dynamic
guideline is off.
Dynamic Guideline
On : Guidelines move according to the steering wheel
direction.
Off : Guidelines do not move.
Models with display audio system
Models with navigation systemModels without navigation systemModels with one displayModels without navigation systemModels with display audio system
Bumper
Guidelines
Approx. 118 in (3 m)
Approx. 79 in (2 m) Approx. 39 in (1 m)
Approx. 20 in (0.5 m)
Approx. 118 in (3 m) Approx. 79 in (2 m) Approx. 39 in (1 m) Camera
* Not available on all models