2015 HONDA ACCORD display
[x] Cancel search: displayPage 495 of 593

uuMaintenance Minder
TMuTo Use Maintenance Minder
TM
494Maintenance
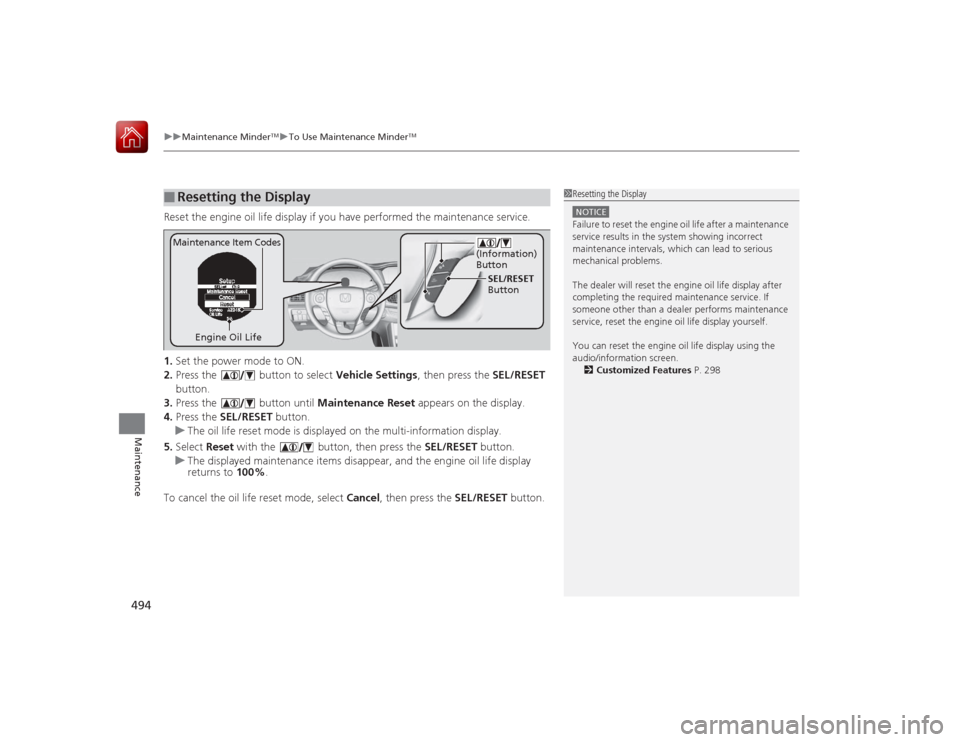
Reset the engine oil life display if you have performed the maintenance service.
1. Set the power mode to ON.
2. Press the button to select Vehicle Settings, then press the SEL/RESET
button.
3. Press the button until Maintenance Reset appears on the display.
4. Press the SEL/RESET button.
u The oil life reset mode is displayed on the multi-information display.
5. Select Reset with the button, then press the SEL/RESET button.
u The displayed maintenance items disappear, and the engine oil life display
returns to 100%.
To cancel the oil life reset mode, select Cancel, then press the SEL/RESET button.■
Resetting the Display
1Resetting the DisplayNOTICEFailure to reset the engine oil life after a maintenance
service results in the system showing incorrect
maintenance intervals, which can lead to serious
mechanical problems.
The dealer will reset th e engine oil life display after
completing the requi red maintenance service. If
someone other than a dealer performs maintenance
service, reset the engine oil life display yourself.
You can reset the engine oil life display using the
audio/information screen.
2 Customized Features P. 298
Engine Oil Life SEL/RESET
Button
Maintenance Item Codes
(Information)
Button
Page 504 of 593

503
uuMaintenance Under the Hood uChanging the Engine Oil and Oil Filter
Continued
Maintenance
Changing the Engine Oil and Oil FilterYou must change the engine oil and oil filter regularly in order to maintain the
engine's lubrication. The engine may be damaged if they are not changed regularly.
Change the oil and filter in accordance with the maintenance message on the
information display
*/multi-information display
*.
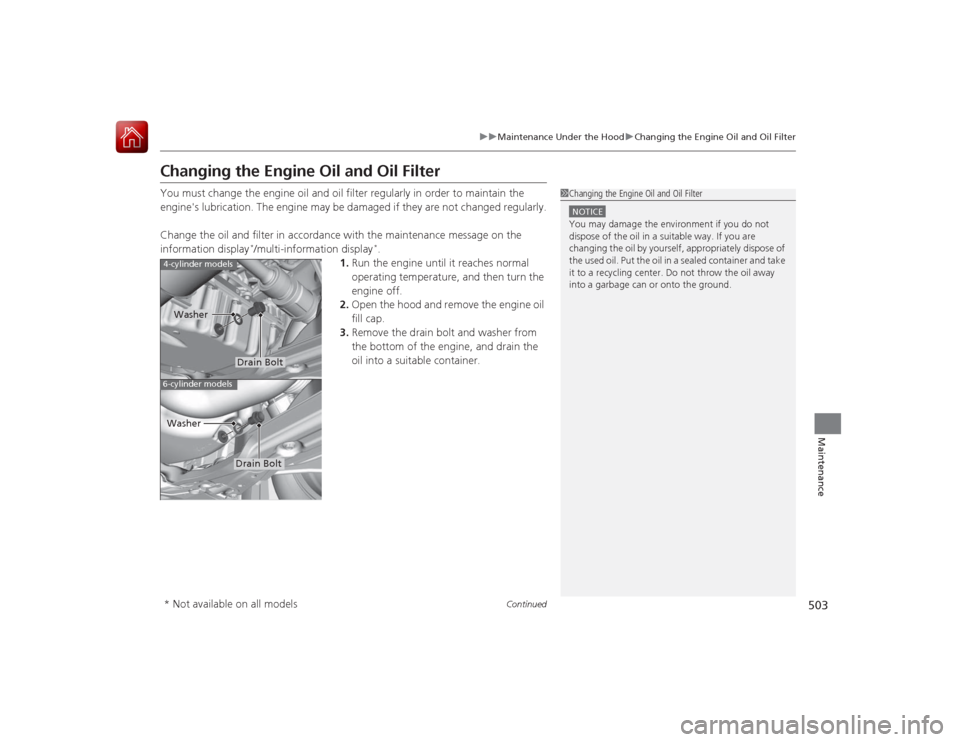
1. Run the engine until it reaches normal
operating temperature, and then turn the
engine off.
2. Open the hood and remove the engine oil
fill cap.
3. Remove the drain bolt and washer from
the bottom of the en gine, and drain the
oil into a suitable container.
1 Changing the Engine Oil and Oil FilterNOTICEYou may damage the environment if you do not
dispose of the oil in a suitable way. If you are
changing the oil by yourself, appropriately dispose of
the used oil. Put the oil in a sealed container and take
it to a recycling center. Do not throw the oil away
into a garbage can or onto the ground.
4-cylinder models6-cylinder models
Drain Bolt
Washer
Drain Bolt
Washer
* Not available on all models
Page 531 of 593

530
uuChecking and Maintaining Tires uTire Rotation
Maintenance
Tire RotationRotating tires according to the maintenance messages on the information display
*/
multi-information display
* helps to distribute wear more evenly and increase tire life.
■Tires without rotation marks Rotate the tires as shown here.■Tires with rotation marksRotate the tires as shown here.
1Tire Rotation
Tires with directional tread patterns should only be
rotated front to back (not from one side to the other).
Directional tires should be mounted with the rotation
indication mark facing forward, as shown below.
Whenever tires are rotate d, you must calibrate the
TPMS. 2 TPMS Calibration P. 468
FRONT
Direction Mark
FrontFront
* Not available on all models
Page 533 of 593

532Maintenance
BatteryChecking the Battery
Check the battery terminals for corrosion
monthly.
The battery condition is being monitored by
the sensor on the negative terminal. If there is
a problem with the sensor, the warning
message on the information display
*/multi-
information display
* will let you know. Have
your vehicle checked by a dealer.
If your vehicle's battery is disconnected or goes dead:
• The audio system is disabled.
2 Reactivating the audio system P. 177
•The clock resets.
2 Clock P. 106
•The navigation system
* is disabled.
2 Refer to the Navigation System Manual
Charging the BatteryDisconnect both battery cables to prevent damaging your vehicle's electrical system.
Always disconnect the negative (–) cable first, and reconnect it last.
1BatteryWARNING: Battery post, terminals,
and related accessori es contain lead
and lead compounds.
Wash your hands after handling.When you find corrosion, clean the battery terminals
by applying a baking powder and water solution.
Clean the terminals with a damp towel. Cloth/towel
dry the battery. Coat the terminals with grease to
help prevent future corrosion.
When replacing the battery, the replacement must be
of the same specifications.
Please consult a dealer for more information.
3
WARNING
The battery gives off explosive hydrogen
gas during normal operation.
A spark or flame can cause the battery to
explode with enough force to kill or
seriously hurt you.
When conducting any battery
maintenance, wear protective clothing and
a face shield, or have a skilled technician do
it.
* Not available on all models
Page 549 of 593

uuIf a Tire Goes Flat uChanging a Flat Tire
548Handling the Unexpected
1. Remove the center cap.
2. Place the flat tire face down in the spare tire
well.
3. Remove the spacer cone from the wing
bolt, flip it over, and insert it back on the
bolt. Secure the flat tire with the wing bolt.
4. Securely put the jack and wheel nut wrench
back in the tool case. Store the case in the
trunk.
If you replace a flat tire with the spare tire, the low tire pressure/TPMS indicator
comes on while you are driving. After driving for a few miles (kilometers), the
indicator will start blinking for a short time and then stay on. Tire Pressures Low
appears on the multi-information display
*, but this is normal.
Calibrate the TPMS when you replace the tire with a specified regular tire.
2 TPMS Calibration P. 468■
Storing the Flat Tire
1Storing the Flat Tire
3
WARNING
Loose items can fly around the interior in a
crash and can seriously injure the
occupants.
Store the wheel, jack, and tools securely
before driving.
Spacer
Cone
Wing
Bolt
For
compact
spare tire For
full-size
tire
■
TPMS and the Spare Tire
* Not available on all models
Page 550 of 593

549Handling the Unexpected
Engine Does Not StartChecking the EngineIf the engine does not start, check the starter.
Starter condition
Checklist
Starter doesn’t turn or turns
over slowly.
The battery may be dead. Check
each of the items on the right and
respond accordingly.
Check for a message on the multi-information display.●If the To Start, Hold Remote Near Start Button message appears
2 If the Smart Entry Remote Battery is Weak P. 550
uMake sure the smart entry remote is in its operating range.
2 ENGINE START/STOP Button Operating Range P. 132
Check brightness of the interior lights.
Turn on the interior lights and check the brightness.●If the interior lights are dim or do not come on at all
2Battery P. 532
●If the interior lights come on normally
2 Fuses P. 562
The starter turns over normally
but the engine doesn’t start.
There may be a problem with the
fuse. Check each of the items on
the right and respond accordingly. Review the engine start procedure.
Follow its instructions, and try to start the engine again.
2
Starting the Engine P. 425, 427
Check the immobilizer system indicator.
When the immobilizer system indicator is blinking, the engine cannot be started.
2Immobilizer System P. 124
Check the fuel level.
There should be enough fuel in the tank.
2 Fuel Gauge P. 89
Check the fuse.
Check all fuses, or have the vehicle checked by a dealer.
2Inspecting and Changing Fuses P. 564
If the problem continues:
2Emergency Towing P. 565
1Checking the Engine
If you must start the vehicle immediately, use an
assisting vehicle to jump start it.
2 Jump Starting P. 552
Models with multi-information display
Page 551 of 593

550
uuEngine Does Not Start uIf the Smart Entry Remote Battery is Weak
Handling the Unexpected
If the Smart Entry Remote Battery is WeakIf the beeper sounds, the indicator on the ENGINE START/STOP button flashes,
and the engine won’t start.
The To Start, Hold Remote Near Start Button message appears on the multi-
information display.
Start the engine as follows. 1.Touch the center of the ENGINE START/
STOP button with the H logo on the smart
entry remote while the indicator on the
ENGINE START/STOP button is flashing.
The buttons on the smart entry remote
should be facing you.
u The indicator flashes for about 30
seconds.
2. Depress the brake pedal (automatic
transmission) or clutch pedal (manual
transmission) and press the ENGINE
START/STOP button within 10 seconds
after the beeper sounds and the indicator
stays on.
u If you don’t depress the pedal, the mode
will change to ACCESSORY.Models with smart entry systemModels with multi-information displayAll models
Page 582 of 593

581
uuCustomer Service Information u
Continued
Information
Music recognition technology and related
data are provided by Gracenote®.
Gracenote is the industry standard in music
recognition technology and related content
delivery.
For more information, visit
www.gracenote.com.
When music is recorded to the HDD from a
CD, information such as the recording artist
and track name are retrieved from the
Gracenote Database and displayed (when
available).
Gracenote may not contain information for
all albums.
Gracenote is an internet-based music
recognition service that allows artist, album,
and track information from CDs to display
on the HDD.
Gracenote users are allowed 4 free updates
a year. More information about Gracenote,
its features, and downloads are available at ■
Gracenote Music Recognition
Service (CDDB)
www.honda.com (in U.S.) or
www.honda.ca (in Canada).
CD and music-related data from Gracenote,
Inc., copyright © 2000 to present
Gracenote. Gracenote Software, copyright
© 2000 to present Gracenote.
One or more patents owned by Gracenote
apply to this product and service. See the
Gracenote website for a non-exhaustive list
of applicable Gracenote patents.
Gracenote, CDDB, MusicID, MediaVOCS,
the Gracenote logo and logotype, and the
“Powered by Gracenote” logo are either
registered trademarks or trademarks of
Gracenote in the United States and/or other
countries.
This application or device contains software
from Gracenote, Inc. of Emeryville,
California (“Gracenote”). The software
from Gracenote (the “Gracenote
Software”) enables this application to
perform disc and/or file identification and
obtain music- related information, including
name, artist, track, and title information
(“Gracenote Data”) from online servers or ■
Gracenote ® END USER LICENSE
AGREEMENT
embedded databases (collectively,
“Gracenote Servers”) and to perform other
functions. You may use Gracenote Data
only by means of the intended End-User
functions or this application or device.
You agree that you will use Gracenote Data,
the Gracenote Software, and Gracenote
Servers for your own personal non-
commercial use only.
You agree not to assign, copy, transfer, or
transmit the Gracenote Software or any
Gracenote Data to any third party.
YOU AGREE NOT TO USE OR EXPLOIT
GRACENOTE DATA, THE GRACENOTE
SOFTWARE, OR GRACENOTE SERVERS,
EXCEPT AS EXPRESSLY PERMITTED HEREIN.
You agree that your non-exclusive license to
use the Gracenote Data, the Gracenote
Software, and Gracenote Servers will
terminate if you violate these restrictions. If
your license terminates, you agree to cease
any and all use of the Gracenote Data, the
Gracenote Software, and Gracenote
Servers.