Page 410 of 557

409
uuWhen Driving uShifting
Continued
Driving
ShiftingChange the shift position in acco rdance with your driving needs.■Shift lever positions*1: Models with the smart entry system have an ENGINE START/STOP button instead of an
ignition switch.Continuously variable transmission (CVT) models
1 Shifting
You cannot turn the ignition switch to LOCK
(0*1
and remove the key unless the shift lever is in
( P.
The vehicle may move forward very slightly even in
( N while the engine is cold.
Depress the brake pedal firmly and, when necessary,
apply the parking brake.
When shifting positions in extremely low
temperatures (-22°F/-30°C), there may be a short
delay before the shift position is displayed. Always
confirm you are in the correct shift position before
driving.
Reverse
Used when reversingDrive
Used:●For normal driving●When temporarily driving in the 7-speed
manual shift modePark
Used when parking or starting the engine
Neutral
Used when idling
Release ButtonDrive (S)
Used:●For better acceleration●To increase engine braking●When going up or down hills●When driving in the 7-speed manual
shift mode
Page 411 of 557

uuWhen Driving uShifting
410Driving
■
Shift Lever Operation
1Shift Lever OperationNOTICEWhen you change the shift lever from
(D to
(R and
vice versa, come to a complete stop and keep the
brake pedal depressed.
Operating the shift lever before the vehicle has come
to a complete standstill can damage the transmission.
Use the shift lever position indicator to check the
lever position before pulling away.
If the transmission i ndicator blinks when driving, in
any shift position, there is a problem with the
transmission.
Avoid sudden acceleration and have the transmission
checked by a dealer as soon as possible.
The fuel supply may be cut off if you drive at engine
speeds in or over the tachometer's red zone (engine
speed limit). If this happens, you may experience a
slight jolt.
It may not be possible to operate the shift lever if the
brake pedal is applied while the shift lever release
button is held down.
Depress the brake pedal first.
Shift Lever Position Indicator
Depress the brake pedal and press the
shift lever release button to shift.
Shift without pressing the shift lever
release button.
Press the shift lever release button
and shift. Tachometer’s red zoneM
(7-Speed Manu al Shift Mode)
Indicator/Shift Indicator
Page 413 of 557

uuWhen Driving uShifting
412Driving
■
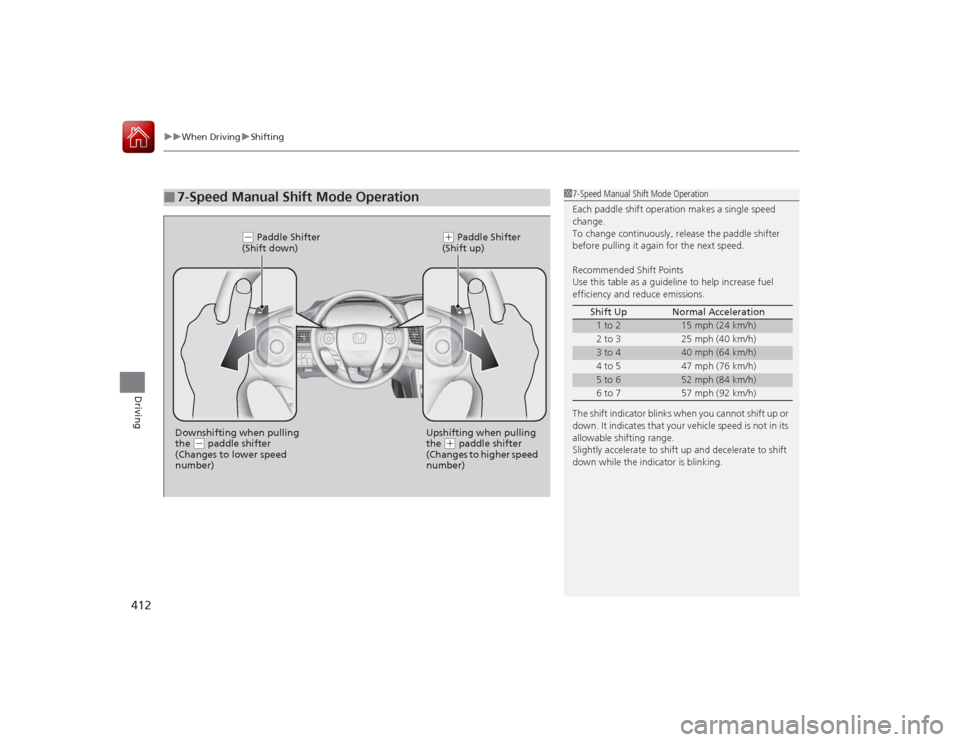
7-Speed Manual Shift Mode Operation
17-Speed Manual Shift Mode Operation
Each paddle shift operation makes a single speed
change.
To change continuously, release the paddle shifter
before pulling it again for the next speed.
Recommended Shift Points
Use this table as a guideline to help increase fuel
efficiency and re duce emissions.
The shift indicator blinks when you cannot shift up or
down. It indicates that your vehicle speed is not in its
allowable shifting range.
Slightly accelerate to shift up and decelerate to shift
down while the indicator is blinking. Shift Up Normal Acceleration
1 to 2
15 mph (24 km/h)
2 to 3 25 mph (40 km/h)
3 to 4
40 mph (64 km/h)
4 to 5 47 mph (76 km/h)
5 to 6
52 mph (84 km/h)
6 to 7 57 mph (92 km/h)
(- Paddle Shifter
(Shift down)
( + Paddle Shifter
(Shift up)
Downshifting when pulling
the
( - paddle shifter
(Changes to lower speed
number) Upshifting when pulling
the
(
+ paddle shifter
(Changes to higher speed
number)
Page 414 of 557

413
uuWhen Driving uShifting
Continued
Driving
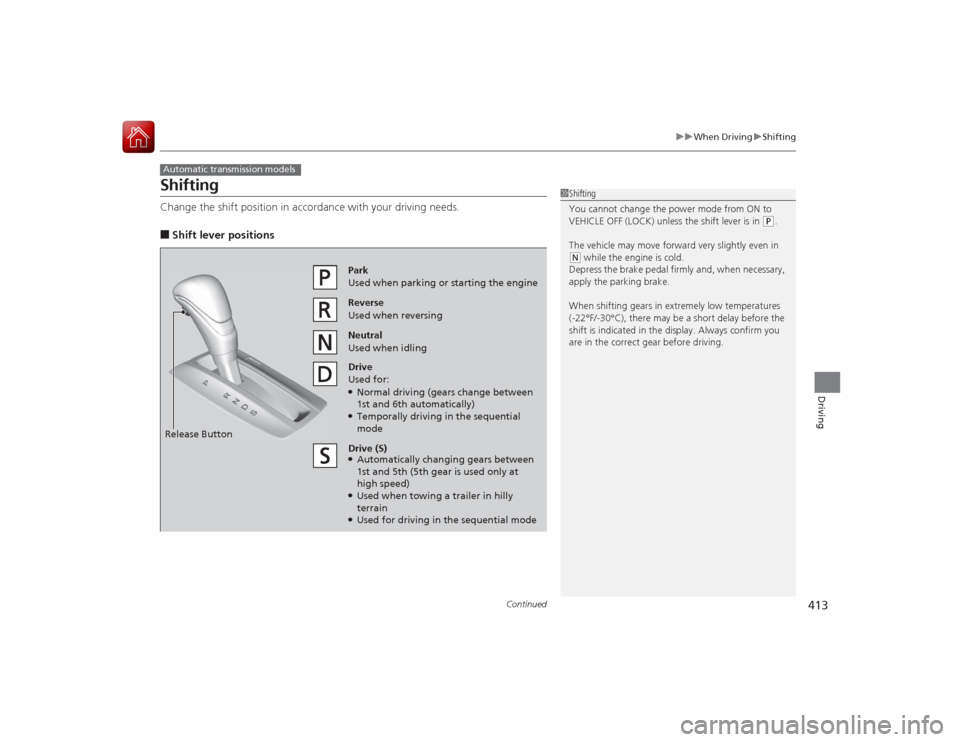
ShiftingChange the shift position in acco rdance with your driving needs.■Shift lever positionsAutomatic transmission models
1Shifting
You cannot change the power mode from ON to
VEHICLE OFF (LOCK) unless the shift lever is in
(P.
The vehicle may move forward very slightly even in
( N while the engine is cold.
Depress the brake pedal firmly and, when necessary,
apply the parking brake.
When shifting gears in ext remely low temperatures
(-22°F/-30°C), there may be a short delay before the
shift is indicated in the display. Always confirm you
are in the correct gear before driving.
Reverse
Used when reversingDrive
Used for:●Normal driving (gears change between
1st and 6th automatically)●Temporally driving in the sequential
modePark
Used when parking or starting the engine
Neutral
Used when idling
Release ButtonDrive (S)●Automatically changing gears between
1st and 5th (5th g ear is used only at
high speed)●Used when towing a trailer in hilly
terrain●Used for driving in the sequential mode
Page 415 of 557

uuWhen Driving uShifting
414Driving
■
Shift Lever Operation
1Shift Lever OperationNOTICEWhen you change the shift lever from
(D to
(R and
vice versa, come to a complete stop and keep the
brake pedal depressed.
Operating the shift lever before the vehicle has come
to a complete standstill can damage the transmission.
Use the shift lever position indicator to check the
lever position before pulling away.
If the transmission i ndicator blinks when driving, in
any shift position, there is a problem with the
transmission.
Avoid sudden acceleration and have the transmission
checked by a dealer as soon as possible.
The fuel supply may be cut off if you drive at engine
speeds in or over the tachometer’s red zone (engine
speed limit). If this happens, you may experience a
slight jolt.
It may not be possible to operate the shift lever if the
brake pedal is applied while the shift lever release
button is held down.
Depress the brake pedal first.
Shift Lever Position Indicator
Depress the brake pedal and press the
shift lever release button to shift.
Shift without pressing the shift lever
release button.
Press the shift lever release button
and shift. Tachometer’s red zoneM
(Sequential Shift Mode)
Indicator/Gear Position Indicator
Page 417 of 557

uuWhen Driving uShifting
416Driving
■Second gear lock mode
If you pull the
(+
paddle shifter while stopped or driving at 6 mph (10 km/h) or less,
the gear position will be locked in 2nd gear. This makes it easier to pull away on
slippery surfaces such as snow covered roads.
To cancel the 2nd gear lock mode, pull the
(-
paddle shifter, or move the shift lever
from
(S
to
(D
.
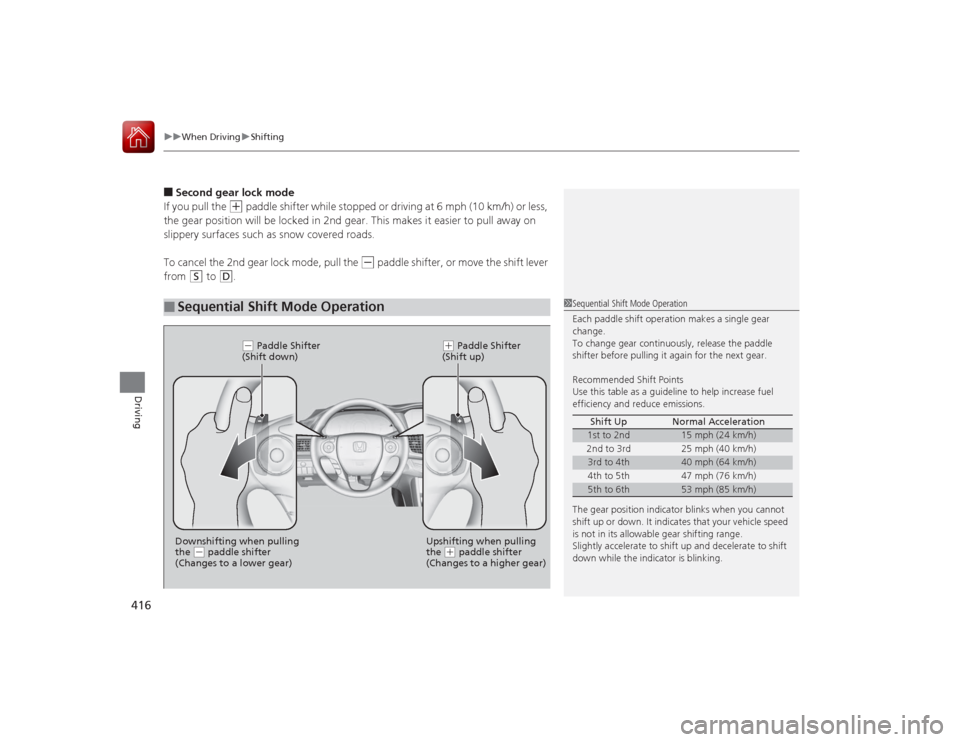
■
Sequential Shift Mode Operation
1 Sequential Shift Mode Operation
Each paddle shift operation makes a single gear
change.
To change gear continuously, release the paddle
shifter before pulling it again for the next gear.
Recommended Shift Points
Use this table as a guideline to help increase fuel
efficiency and re duce emissions.
The gear position indicator blinks when you cannot
shift up or down. It indicates that your vehicle speed
is not in its allowable gear shifting range.
Slightly accelerate to shift up and decelerate to shift
down while the indicator is blinking. Shift Up Normal Acceleration
1st to 2nd
15 mph (24 km/h)
2nd to 3rd 25 mph (40 km/h)
3rd to 4th
40 mph (64 km/h)
4th to 5th 47 mph (76 km/h)
5th to 6th
53 mph (85 km/h)
( - Paddle Shifter
(Shift down)
( + Paddle Shifter
(Shift up)
Downshifting when pulling
the
( - paddle shifter
(Changes to a lower gear) Upshifting when pulling
the
(
+ paddle shifter
(Changes to a higher gear)
Page 419 of 557
uuWhen Driving uShifting
418Driving
When you are not shifting , do not rest your
foot on the clutch pedal. This can cause your
clutch to wear out faster.
1 Shifting
Recommended Shift Points
Driving in the highest gear that allows the engine to
run and accelerate smoothly helps to optimize fuel
economy and effective emissions control. The
following shift points are recommended:
If you exceed the maximum speed for the gear you
are in, the engine speed will enter into the
tachometer's red zone. When this happens, you may
experience a slight jolt. Shift Up Normal Acceleration
1st to 2nd
17 mph (27 km/h)
2nd to 3rd 29 mph (46 km/h)
3rd to 4th
37 mph (60 km/h)
4th to 5th 43 mph (69 km/h)
5th to 6th
49 mph (79 km/h)
Shift Up Normal Acceleration
1st to 2nd
17 mph (28 km/h)
2nd to 3rd 27 mph (44 km/h)
3rd to 4th
36 mph (58 km/h)
4th to 5th 41 mph (66 km/h)
5th to 6th
44 mph (71 km/h)
4-cylinder models6-cylinder models
Page 426 of 557

Continued
425
uuWhen Driving uForward Collision Warning (FCW)
*
Driving
1Forward Collision Warning (FCW)
*
Never apply a film or attach any objects to the
windshield that could obstruct the FCW camera's
field of vision.
Scratches, nicks, and other damage to the windshield
within the FCW camera's field of vision can cause the
system to operate abnormally. If this occurs, we
recommend that you replace the windshield with a
genuine Honda replacement windshield. Making
even minor repairs within the camera's field of vision
or installing an aftermarket replacement windshield
may also cause the system to operate abnormally.
After replacing the windshield, have a dealer
recalibrate the camera. Proper calibration of the FCW
camera is necessary for the system to operate
properly.
Beep
Camera-based system
The camera is located
behind the rearview mirror.
The beeper sounds and
the FCW indicator blinks
until a possible collision
is avoided.
Head-up Warning LightsFlash twice.
1 How the system works
The head-up warning uses a lens located at the front
end of the dashboard.
Do not cover the lens or spill any liquid on it.
Lens
* Not available on all models