Page 458 of 557

457
uuMaintenance Minder
TMuTo Use Maintenance Minder
TM
Continued
Maintenance
■
Maintenance Service Items
1Maintenance Service Items•Independent of the Maintenance Minder
information, replace the brake fluid every 3 years.•Inspect idle speed every 160,000 miles (256,000
km).•Adjust the valves during services A, B, 1, 2, or 3 if
they are noisy.
Maintenance Minder
Message
Maintenance
Minder Indicator
Sub Items
Main Item
*1: If a message SERVICE does not appear more than 12 months after the display is reset, change the
engine oil every year.
# : See information on maintenance and emissions warranty.CODE
Maintenance Main Items
A
●Replace engine oil
*1
B
●Replace engine oil
*1 and oil filter
●Inspect front and rear brakes/service as necessary●Check parking brake adjustment●Inspect tie rod ends, steering gearbox, and boots●Inspect suspension components●Inspect driveshaft boots●Inspect brake hoses and lines (Including ABS/VSA)●Inspect all fluid levels and condition of fluids●Inspect exhaust system
#
●Inspect fuel lines and connections
#
*2: If you drive in dusty conditions, replace the air cleaner element every 15,000 miles (24,000 km).
*3: If you drive primarily in urban areas that have high concentrations of soot in the air from industry and from diesel-powered vehicles, replace the dust and pollen filter every 15,000 miles (24,000 km).
*4: Continuously variable transmission (CVT) models
*5: Driving in mountainous areas at very low vehicle speeds or trailer towing results in higher transmission temperatures. This requires transmission fluid changes more frequently than recommended by the
Maintenance Minder. If you regularly drive your vehicle under these conditions, have the transmission
fluid changed every 25,000 miles (40,000 km).
*6: 6-cylinder models
*7: If you drive regularly in very high temperatures (over 110 °F, 43 °C), in very low temperatures (under -20 °F, -29 °C), or tow a trailer, replace every 60,000 miles/100,000 km.CODE
Maintenance Sub Items
1
●Rotate tires
2
●Replace air cleaner element
*2
●Replace dust and pollen filter
*3
●Inspect drive belt
3●Replace transmission fluid
*4,*5
4
●Replace spark plugs●Replace timing belt and inspect water pump
*6,*7
●Inspect valve clearance
5●Replace engine coolant
Page 460 of 557
459
Continued
Maintenance
Maintenance Under the HoodMaintenance Items Under the Hood4-cylinder models
Brake Fluid
(Black Cap)
Engine Coolant
Reserve Tank Radiator Cap
Washer Fluid
(Blue Cap) Engine Oil Dipstick
(Orange Handle)
Clutch Fluid
(Light Gray Cap)
Engine Oil Fill Cap
BatteryManual transmission
models
Page 461 of 557
460
uuMaintenance Under the Hood uMaintenance Items Under the Hood
Maintenance
6-cylinder models
Engine Oil Dipstick
(Orange Handle)
Washer Fluid
(Blue Cap)
Engine Coolant
Reserve Tank
Radiator Cap Brake Fluid
(Black Cap)
Engine Oil Fill Cap
Battery
Clutch Fluid
(Light Gray Cap)Manual transmission
models
Page 462 of 557
461
uuMaintenance Under the Hood uOpening the Hood
Continued
Maintenance
Opening the Hood
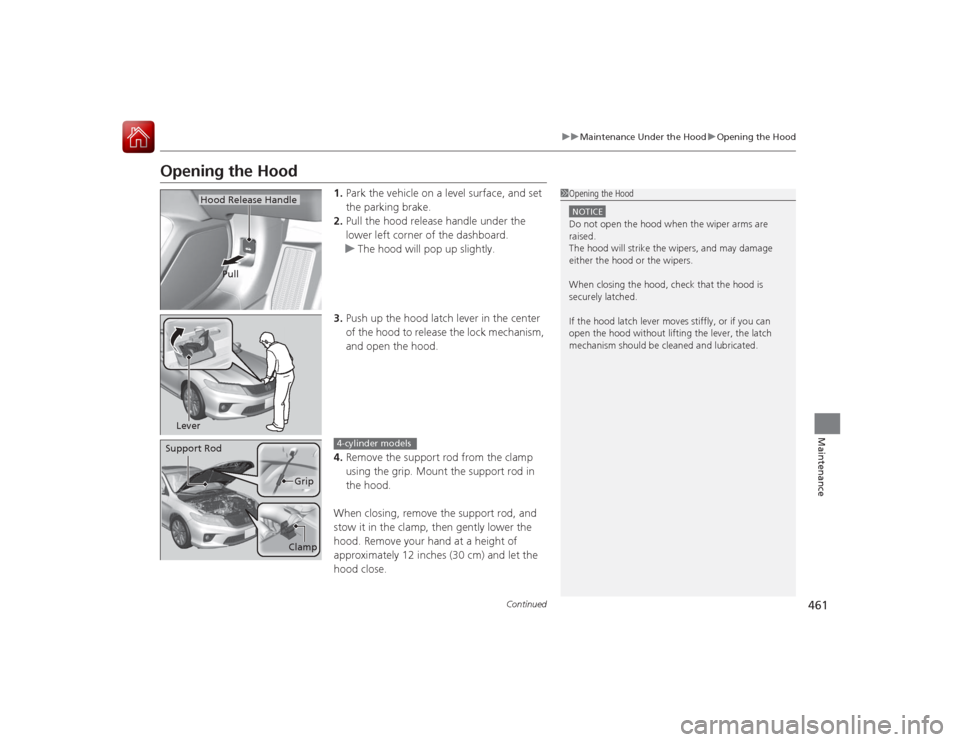
1. Park the vehicle on a level surface, and set
the parking brake.
2. Pull the hood release handle under the
lower left corner of the dashboard.
u The hood will pop up slightly.
3. Push up the hood latch lever in the center
of the hood to release the lock mechanism,
and open the hood.
4. Remove the support rod from the clamp
using the grip. Mount the support rod in
the hood.
When closing, remove the support rod, and
stow it in the clamp, then gently lower the
hood. Remove your hand at a height of
approximately 12 inches (30 cm) and let the
hood close.
1 Opening the HoodNOTICEDo not open the hood when the wiper arms are
raised.
The hood will strike the wipers, and may damage
either the hood or the wipers.
When closing the hood, check that the hood is
securely latched.
If the hood latch lever moves stiffly, or if you can
open the hood without lifting the lever, the latch
mechanism should be cleaned and lubricated.
Hood Release Handle
Pull
LeverSupport Rod
Grip
Clamp
4-cylinder models
Page 474 of 557
473
uuMaintenance Under the Hood uBrake/Clutch Fluid
Maintenance
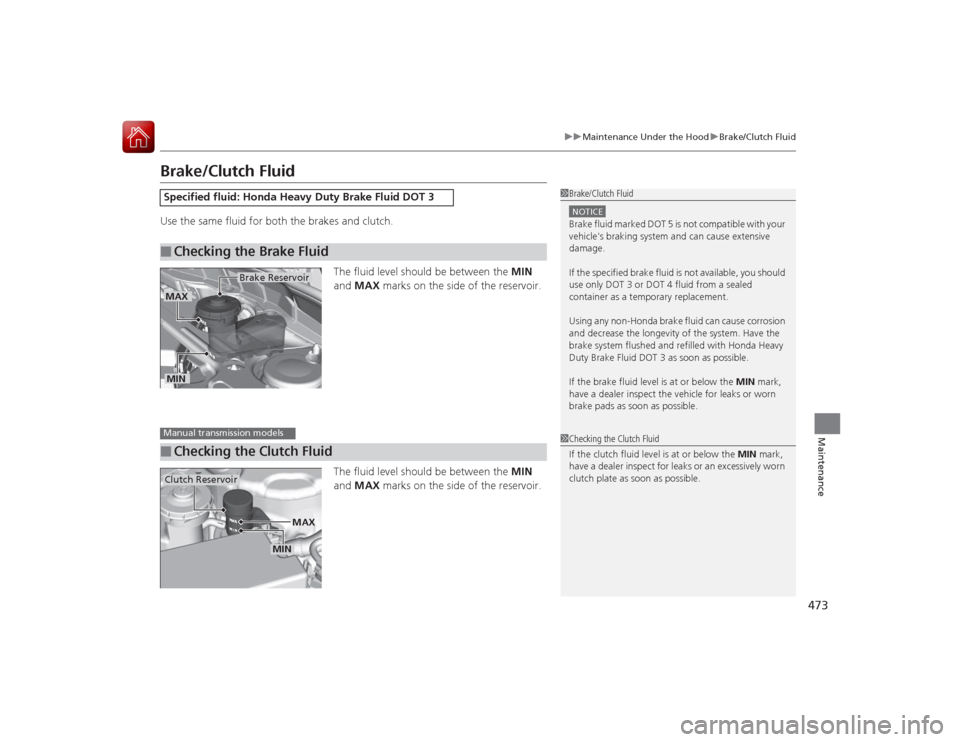
Brake/Clutch FluidUse the same fluid for both the brakes and clutch.
The fluid level should be between the MIN
and MAX marks on the side of the reservoir.
The fluid level should be between the MIN
and MAX marks on the side of the reservoir.Specified fluid: Honda Heavy Duty Brake Fluid DOT 3■
Checking the Brake Fluid
1Brake/Clutch FluidNOTICEBrake fluid marked DOT 5 is not compatible with your
vehicle's braking system and can cause extensive
damage.
If the specified brake fluid is not available, you should
use only DOT 3 or DOT 4 fluid from a sealed
container as a temporary replacement.
Using any non-Honda brake fluid can cause corrosion
and decrease the longevity of the system. Have the
brake system flushed and refilled with Honda Heavy
Duty Brake Fluid DOT 3 as soon as possible.
If the brake fluid level is at or below the MIN mark,
have a dealer inspect the vehicle for leaks or worn
brake pads as soon as possible.
Brake Reservoir
MINMAX■
Checking the Clutch FluidManual transmission models
1 Checking the Clutch Fluid
If the clutch fluid level is at or below the MIN mark,
have a dealer inspect for leaks or an excessively worn
clutch plate as soon as possible.
Clutch Reservoir
MIN MAX
Page 482 of 557
481
uuReplacing Light Bulbs uBrake/Taillight, Back-Up Light, Rear Turn Signal Light and Rear Side Marker Light Bulbs
Maintenance
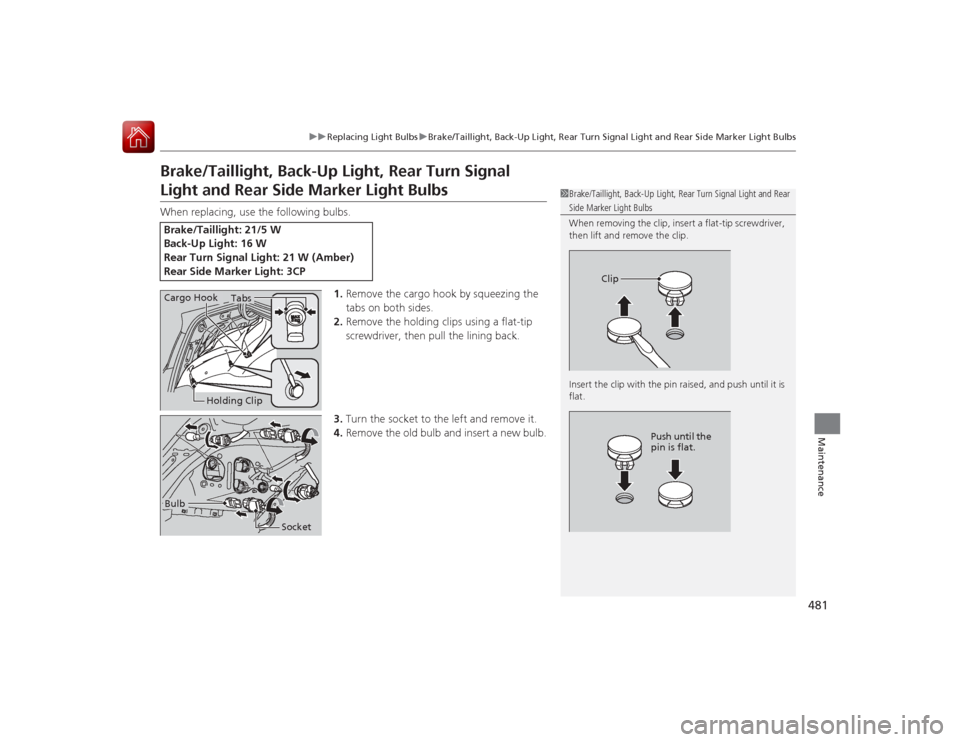
Brake/Taillight, Back-Up Light, Rear Turn Signal Light and Rear Side Marker Light BulbsWhen replacing, use the following bulbs.
1.Remove the cargo hook by squeezing the
tabs on both sides.
2. Remove the holding clips using a flat-tip
screwdriver, then pull the lining back.
3. Turn the socket to the left and remove it.
4. Remove the old bulb and insert a new bulb.Brake/Taillight: 21/5 W
Back-Up Light: 16 W
Rear Turn Signal Light: 21 W (Amber)
Rear Side Marker Light: 3CP
1Brake/Taillight, Back-Up Light, Rear Turn Signal Light and Rear Side Marker Light Bulbs
When removing the clip, inser t a flat-tip screwdriver,
then lift and remove the clip.
Insert the clip with the pin raised, and push until it is
flat.
Clip
Push until the
pin is flat.
Holding Clip
Tabs
Cargo HookBulb
Socket
Page 483 of 557
482
uuReplacing Light Bulbs uRear License Plate Light Bulbs
Maintenance
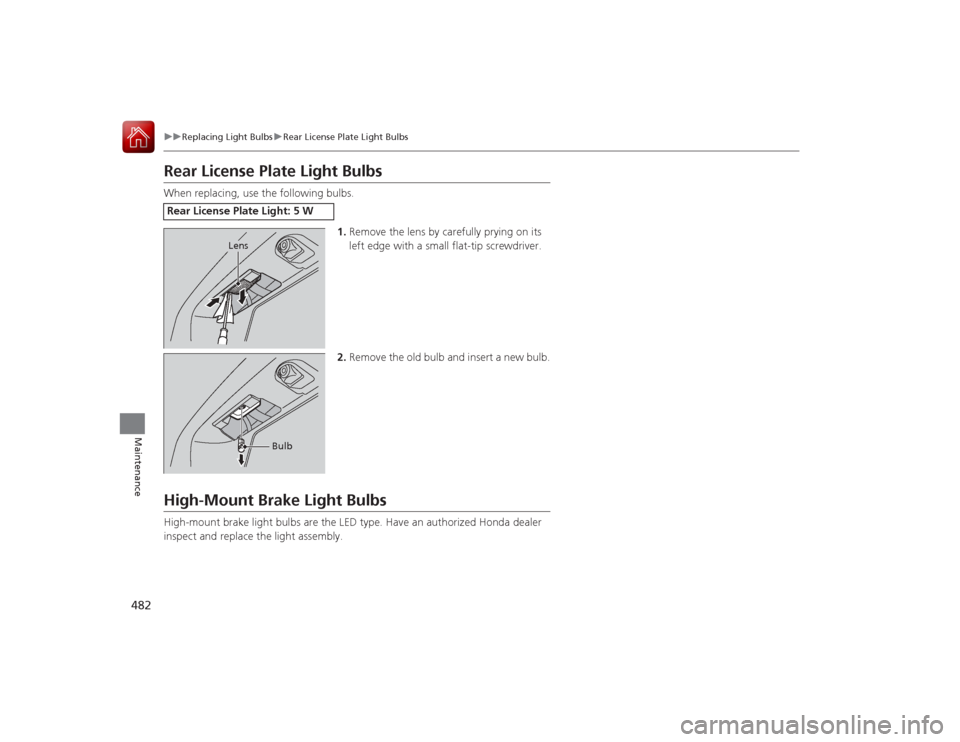
Rear License Plate Light BulbsWhen replacing, use the following bulbs.
1.Remove the lens by carefully prying on its
left edge with a small flat-tip screwdriver.
2. Remove the old bulb and insert a new bulb.High-Mount Brake Light BulbsHigh-mount brake light bulbs are the LED type. Have an authorized Honda dealer
inspect and replace the light assembly.Rear License Plate Light: 5 W
Lens
Bulb
Page 494 of 557

493
uuChecking and Maintaining Tires uWinter Tires
Maintenance
Winter TiresIf driving on snowy or frozen roads, mount all season marked M+S tires, snow tires, or tire
chains; reduce speed; and maintain sufficient distance between vehicles when driving.
Be particularly careful when operating the steering wheel or brakes to prevent
skidding.
Use tire chains, snow tires, or all season tires when necessary or according to the law.
When mounting, refer to the following points.
For winter tires:
• Select the size and load ranges that are the same as the original tires.
• Mount the tires to all four wheels.
For tire chains:
• Install them on the front tires only.
• Because your vehicle has limited tire clearance, we strongly recommend using the
chains listed below:
• Follow the chain manufacturer's instruction when installing. Mount them as
tightly as you can.
• Check that the chains do not touch the brake lines or suspension.
• Drive slowly.Cable-type: SCC Radial Chain SC1036Cable-type: SCC Radial Chain SC1040
1Winter TiresNOTICETraction devices that are the wrong size or improperly
installed can damage your vehicle's brake lines,
suspension, body, and wheels. Stop driving if they are
hitting any part of the vehicle.
When tire chains are mounted, follow the chain
manufacturer's instructions regarding vehicle
operational limits.
If your vehicle is equipped with summer tires, be
aware that these tires are not designed for winter
driving conditions. For more information, contact a
dealer.
3
WARNING
Using the wrong chains, or not properly
installing chains, can damage the brake
lines and cause a crash in which you can be
seriously injured or killed.
Follow all instruc tions in this owner's
manual regarding the selection and use of
tire chains.
Models with 215/55R17 tiresModels with 235/45R18 tires