Page 123 of 557
122
uuOperating the Switches Around the Steering Wheel uDriving Position Memory System
*
Controls
Driving Position Memory System
*
You can store two driver’s seat positions with the driving position memory system.
When you unlock and open the driver’s door with a remote, the seat adjusts
automatically to one of the two preset positions.
• DRIVER 1 transmitter is linked to memory button 1.
• DRIVER 2 transmitter is linked to memory button 2.
1Driving Position Memory System
*
Using the audio/information screen, you can disable
the automatic seat adjustment function.
2 Customized Features P. 274
DRIVER 1
DRIVER 2
* Not available on all models
Page 124 of 557
123
uuOperating the Switches Around the Steering Wheel uDriving Position Memory System
*
Controls
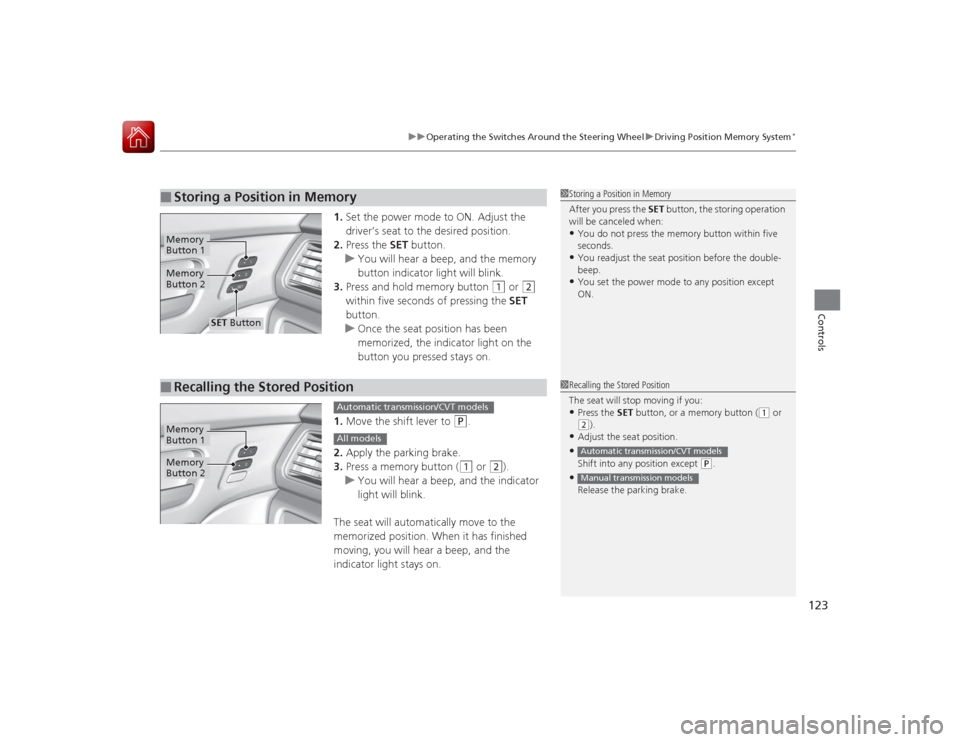
1. Set the power mode to ON. Adjust the
driver’s seat to the desired position.
2. Press the SET button.
u You will hear a beep, and the memory
button indicator light will blink.
3. Press and hold memory button
(1
or
(2
within five seconds of pressing the SET
button.
u Once the seat position has been
memorized, the indicator light on the
button you pressed stays on.
1. Move the shift lever to
(P
.
2. Apply the parking brake.
3. Press a memory button ((1
or
(2
).
u You will hear a beep, and the indicator
light will blink.
The seat will automatically move to the
memorized position. When it has finished
moving, you will hear a beep, and the
indicator light stays on.
■
Storing a Position in Memory
1 Storing a Position in Memory
After you press the SET button, the storing operation
will be canceled when:•You do not press the memory button within five
seconds.•You readjust the seat position before the double-
beep.•You set the power mode to any position except
ON.
Memory
Button 1Memory
Button 2
SET Button
■
Recalling the Stored Position
1 Recalling the Stored Position
The seat will stop moving if you: •Press the SET button, or a memory button (
(1 or
(2).
•Adjust the seat position.•Shift into any position except
(P.
•Release the parking brake.Automatic transmission/CVT modelsManual transmission models
Memory
Button 1Memory
Button 2
Automatic transmission/CVT modelsAll models
Page 125 of 557

124
uuOperating the Switches Around the Steering Wheel uAdjusting the Steering Wheel
Controls
Adjusting the Steering WheelThe steering wheel height and distance from your body can be adjusted so that you
can comfortably grip the steering wheel in an appropriate driving posture.
1. Pull the steering wheel adjustment lever up.
u The steering wheel adjustment lever is
under the steering column.
2. Move the steering wheel up or down, and
in or out.
u Make sure you can see the instrument
panel gauges and indicators.
3. Push the steering wheel adjustment lever
down to lock the steering wheel in position.
u After adjusting the position, make sure
you have securely locked the steering
wheel in place by trying to move it up,
down, in, and out.
1Adjusting the Steering Wheel
Make any steering wheel adjustments before you
start driving.
3
WARNING
Adjusting the steering wheel po sition while
driving may cause you to lose control of the
vehicle and be seriously injured in a crash.
Adjust the steering wheel only when the
vehicle is stopped.
To adjustTo lock
Lever
Page 128 of 557
127
Continued
Controls
Adjusting the SeatsAdjusting the Seat Positions
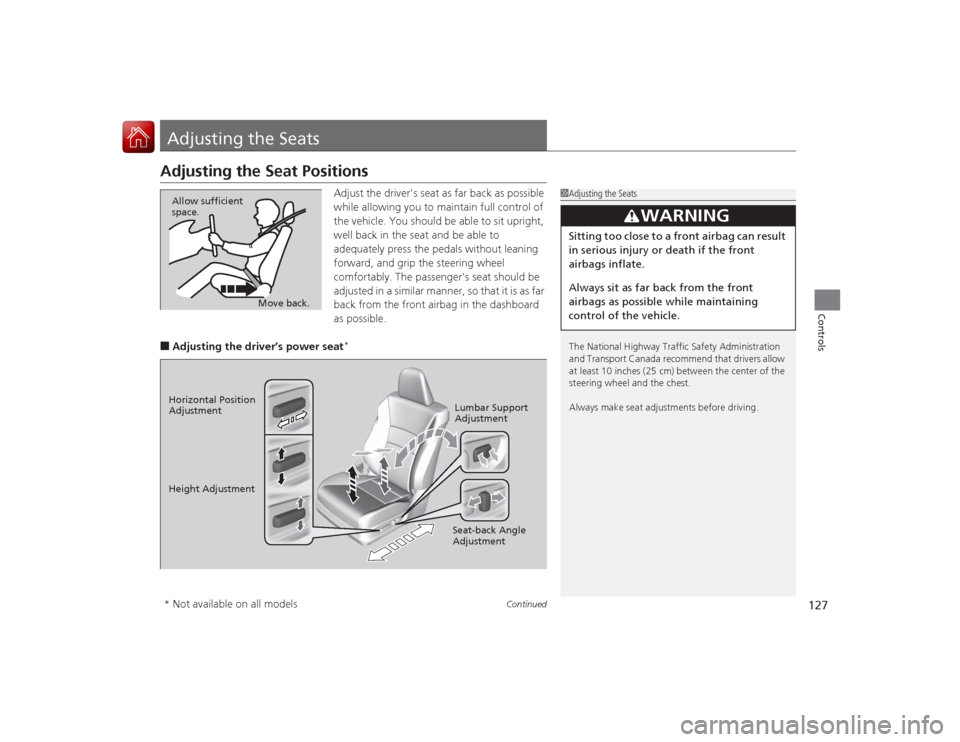
Adjust the driver's seat as far back as possible
while allowing you to maintain full control of
the vehicle. You should be able to sit upright,
well back in the seat and be able to
adequately press the pedals without leaning
forward, and grip the steering wheel
comfortably. The passenger's seat should be
adjusted in a similar manner, so that it is as far
back from the front airbag in the dashboard
as possible.
■Adjusting the driver’s power seat
*
1Adjusting the Seats
The National Highway Traffic Safety Administration
and Transport Canada recommend that drivers allow
at least 10 inches (25 cm) between the center of the
steering wheel and the chest.
Always make seat adjustments before driving.
3
WARNING
Sitting too close to a front airbag can result
in serious injury or death if the front
airbags inflate.
Always sit as far back from the front
airbags as possible while maintaining
control of the vehicle.
Move back.
Allow sufficient
space.
Horizontal Position
Adjustment
Height Adjustment
Seat-back Angle
AdjustmentLumbar Support
Adjustment* Not available on all models
Page 130 of 557
Continued
129
uuAdjusting the Seats uAdjusting the Seat Positions
Controls
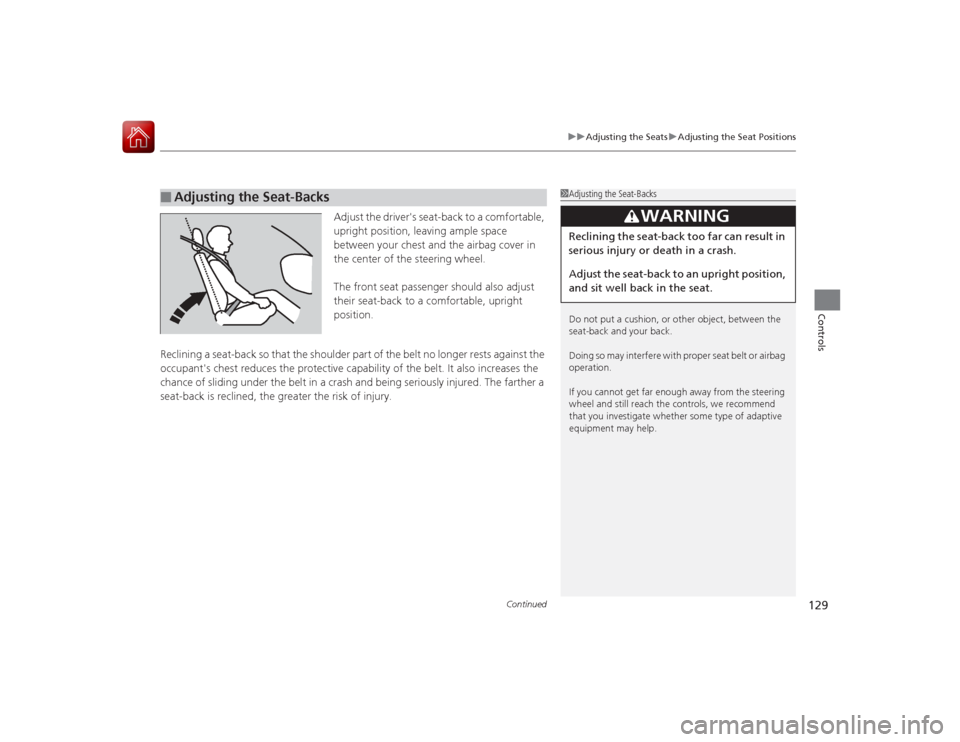
Adjust the driver's seat-back to a comfortable,
upright position, leaving ample space
between your chest and the airbag cover in
the center of the steering wheel.
The front seat passenger should also adjust
their seat-back to a comfortable, upright
position.
Reclining a seat-back so that the shoulder part of the belt no longer rests against the
occupant's chest reduces the protective capability of the belt. It also increases the
chance of sliding under the belt in a crash and being seriously injured. The farther a
seat-back is reclined, the greater the risk of injury.
■
Adjusting the Seat-Backs
1 Adjusting the Seat-Backs
Do not put a cushion, or other object, between the
seat-back and your back.
Doing so may interfe re with proper seat belt or airbag
operation.
If you cannot get far enough away from the steering
wheel and still reach the controls, we recommend
that you investigate whether some type of adaptive
equipment may help.
3
WARNING
Reclining the seat-back too far can result in
serious injury or death in a crash.
Adjust the seat-back to an upright po sition,
and sit well back in the seat.
Page 165 of 557
uuAudio System Basic Operation uPlaying AM/FM Radio
164Features
Provides text data information related to your selected RDS-capable FM station.■To find an RDS stat ion from Station List
1. Press while listening to an FM station.
2. Rotate to select the station, then press .■Manual update
Updates your available station list at any time.
1. Press while listening to an FM station.
2. Rotate to select Refresh, then press .■Radio text
Displays the radio text information of the selected RDS station.
1. Press the MENU button.
2. Rotate to select Radio Text, then press .■Scan
Samples each of the strongest stations on the selected band for 10 seconds.
1. Press the MENU button.
2. Rotate to select Scan, then press .
To turn off scan, press to select Stop, or press the BACK button.■
Radio Data System (RDS)
1Playing AM/FM Radio
The ST indicator appears on the display indicating
stereo FM broadcasts.
Stereo reproduction in AM is not available.
Switching the Audio Mode
Press the SOURCE button on the steering wheel.
2 Audio Remote Controls P. 155
You can also switch the mode by pressing the MENU
button and selecting Change Source on the MENU
screen.
You can store 6 AM stations and 12 FM stations into
the preset memory.1 Radio Data System (RDS)
When you select an RDS-capable FM station, the RDS
automatically turns on, and the frequency display
changes to the station name. However, when the
signals of that station become weak, the display
changes from the station name to the frequency.
Page 191 of 557
uuAudio System Basic Operation uPlaying AM/FM Radio
190Features
To store a station:
1. Tune to the selected station.
2. Press to switch to the Audio menu screen.
3. Rotate to select Save Preset, then press .
4. Rotate to select the preset number you want to store that station, then press \
.
2. Select More.
3. Select Save Preset .
4. Select the preset number you want to store that station.
You can also store the station by pressing and holding a preset number.■
Preset Memory
1 Playing AM/FM Radio
The ST indicator appears on the display indicating
stereo FM broadcasts.
Stereo reproduction in AM is not available.
Switching the Audio Mode
Press the SOURCE button on the steering wheel.
2 Audio Remote Controls P. 155
You can also switch the mode by pressing and
selecting Change Source on the Audio menu
screen.
You can store 6 AM stations and 12 FM stations into
the preset memory.
Selector KnobAudio with Touch Screen
Page 221 of 557
220
uuAudio System Basic Operation uVoice Control Operation
Features
Voice Control OperationYour vehicle has a voice control system that allows hands-free operation of most of
the navigation system functions.
The voice control system uses the (Talk) and (hang-up/back) buttons on the
steering wheel and a microphone near the map lights on the ceiling.
To achieve optimum voice recognition when using the navigation voice control
system:
• Make sure the correct screen is displayed for the voice command that you are
using.
• Close the windows and moonroof.
• Adjust the dashboard and side vents so air does not blow onto the microphone
on the ceiling.
• Speak clearly in a clear, natural speaking voice without pausing between words.
• Reduce any background noise if poss ible. The system may misinterpret your
command if more than one person is speaking at the same time.
• Refer to the Voice Help feature.
2 Refer to the Navigation System Manual
■
Voice Recognition
1Voice Control Operation
When you press the button, a helpful prompt asks
what you would like to do. Press and release the
button again to bypass this prompt and give a
command.1Voice Recognition
The voice control system can only be used from the
driver’s seat because the microphone unit removes
noises from the front passenger’s side.