2015 GMC SIERRA 1500 glove box
[x] Cancel search: glove boxPage 29 of 539
Black plate (22,1)GMC Sierra Owner Manual (GMNA Localizing-U.S/Canada/Mexico-
7299746) - 2015 - crc - 11/11/13
1-22 In Brief
{:Press to go to the Home Page.
MENU: Press to select a menu.
g:Press to seek the previous
station or track.
l: Press to seek the next station
or track.
See Overview on page 7-2 about
these and other radio features.
Storing Radio Station Presets
Up to 25 preset stations from all
bands can be stored in the favorite
lists in any order. Up to five stations
can be stored in each favorite page
and the number of favorite pages
can be set.
To store the station to a position in
the list, while on the active source
main page, such as AM, FM,
or SiriusXM (if equipped), press and
hold a favorites/soft key button on
the faceplate.
See “Storing Radio Station Presets”
under AM-FM Radio on page 7-8.
Setting the Clock
SeeClock on page 5-5.
Satellite Radio
Vehicles with a SiriusXM®satellite
radio tuner and a valid SiriusXM
satellite radio subscription can
receive SiriusXM programming.
SiriusXM Satellite Radio
Service
SiriusXM is a satellite radio service
based in the 48 contiguous United
States and 10 Canadian provinces.
SiriusXM satellite radio has a wide
variety of programming and
commercial-free music, coast to
coast, and in digital-quality sound.
A fee is required to receive the
SiriusXM service.
For more information refer to:
.www.siriusxm.com or call
1-866-635-2349 (U.S.).
.www.xmradio.ca or call
1-877-209-0079 (Canada). See
Satellite Radio on page 7-10.
Portable Audio Devices
This vehicle may have a 3.5 mm
(1/8 in) auxiliary input jack, SD card
reader, and USB ports in the center
console or armrest. There may be a
USB port in the upper glove box.
External devices such as iPods
®,
laptop computers, MP3 players, CD
changers, and USB storage devices
may be connected, depending on
the audio system.
See USB Port on page 7-18, SD
Card Reader on page 7-20, and
Auxiliary Jack on page 7-21.
Page 77 of 539
Black plate (18,1)GMC Sierra Owner Manual (GMNA Localizing-U.S/Canada/Mexico-
7299746) - 2015 - crc - 11/11/13
3-18 Seats and Restraints
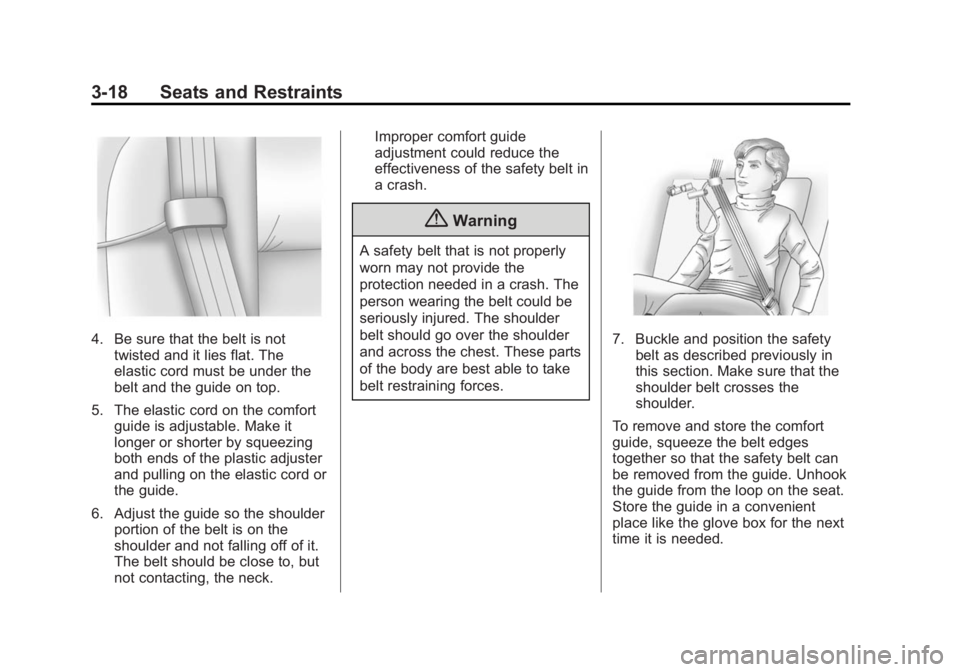
4. Be sure that the belt is nottwisted and it lies flat. The
elastic cord must be under the
belt and the guide on top.
5. The elastic cord on the comfort guide is adjustable. Make it
longer or shorter by squeezing
both ends of the plastic adjuster
and pulling on the elastic cord or
the guide.
6. Adjust the guide so the shoulder portion of the belt is on the
shoulder and not falling off of it.
The belt should be close to, but
not contacting, the neck. Improper comfort guide
adjustment could reduce the
effectiveness of the safety belt in
a crash.
{Warning
A safety belt that is not properly
worn may not provide the
protection needed in a crash. The
person wearing the belt could be
seriously injured. The shoulder
belt should go over the shoulder
and across the chest. These parts
of the body are best able to take
belt restraining forces.
7. Buckle and position the safety
belt as described previously in
this section. Make sure that the
shoulder belt crosses the
shoulder.
To remove and store the comfort
guide, squeeze the belt edges
together so that the safety belt can
be removed from the guide. Unhook
the guide from the loop on the seat.
Store the guide in a convenient
place like the glove box for the next
time it is needed.
Page 132 of 539
Black plate (1,1)GMC Sierra Owner Manual (GMNA Localizing-U.S/Canada/Mexico-
7299746) - 2015 - crc - 11/11/13
Storage 4-1
Storage
Storage Compartments
Storage Compartments . . . . . . . 4-1
Instrument Panel Storage . . . . . 4-1
Glove Box . . . . . . . . . . . . . . . . . . . . 4-2
Cupholders . . . . . . . . . . . . . . . . . . . 4-2
Sunglasses Storage . . . . . . . . . . 4-3
Center Console Storage . . . . . . 4-3
Floor Console Storage . . . . . . . . 4-4
Additional Storage Features
Cargo Tie-Downs . . . . . . . . . . . . . 4-4
Storage
Compartments
{Warning
Do not store heavy or sharp
objects in storage compartments.
In a crash, these objects may
cause the cover to open and
could result in injury.
Instrument Panel Storage
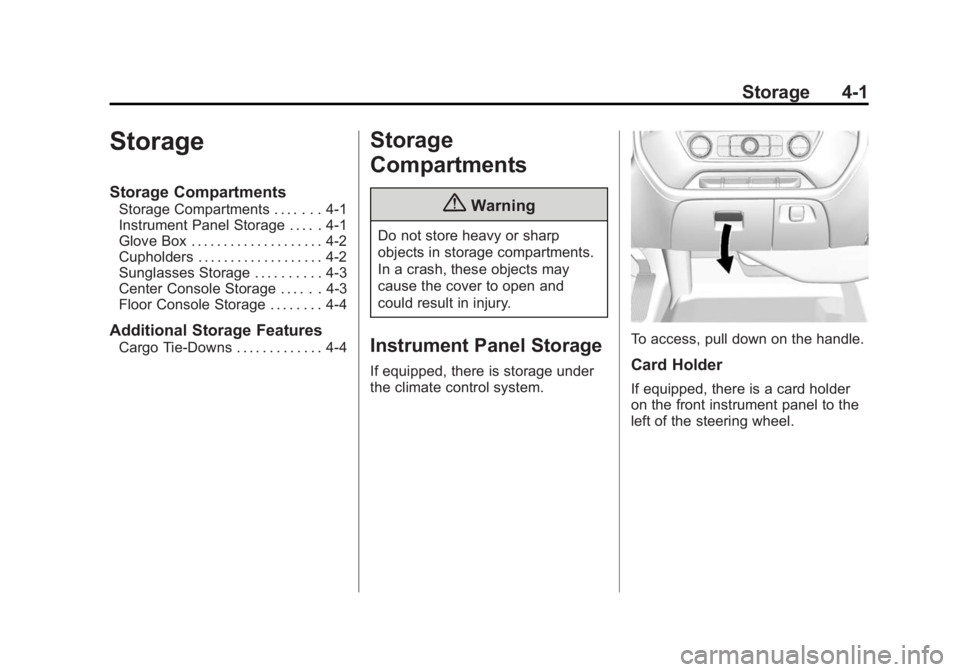
If equipped, there is storage under
the climate control system.
To access, pull down on the handle.
Card Holder
If equipped, there is a card holder
on the front instrument panel to the
left of the steering wheel.
Page 133 of 539
Black plate (2,1)GMC Sierra Owner Manual (GMNA Localizing-U.S/Canada/Mexico-
7299746) - 2015 - crc - 11/11/13
4-2 Storage
Glove Box
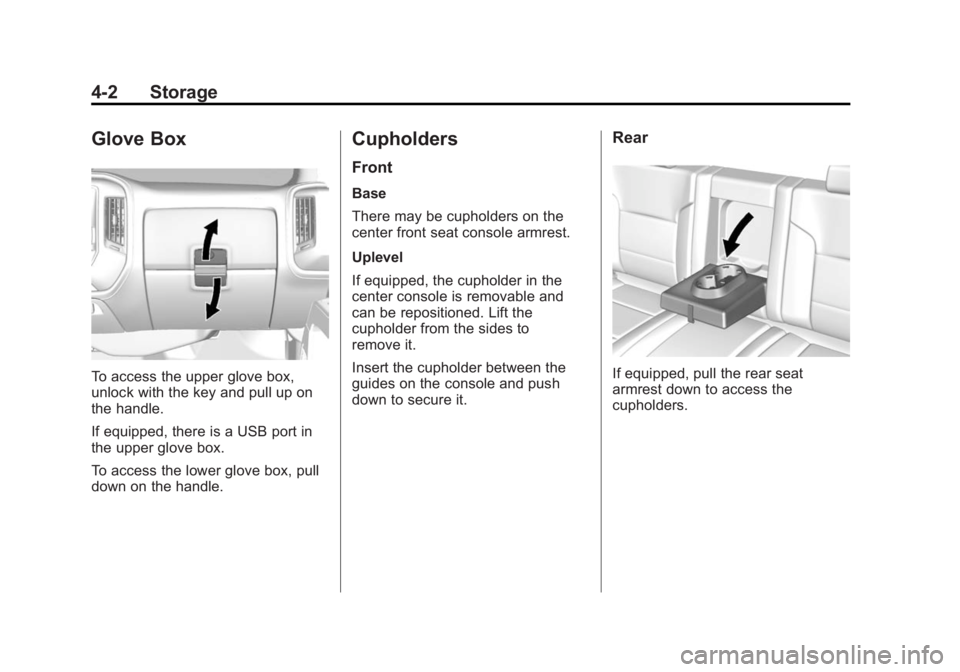
To access the upper glove box,
unlock with the key and pull up on
the handle.
If equipped, there is a USB port in
the upper glove box.
To access the lower glove box, pull
down on the handle.
Cupholders
Front
Base
There may be cupholders on the
center front seat console armrest.
Uplevel
If equipped, the cupholder in the
center console is removable and
can be repositioned. Lift the
cupholder from the sides to
remove it.
Insert the cupholder between the
guides on the console and push
down to secure it.
Rear
If equipped, pull the rear seat
armrest down to access the
cupholders.
Page 221 of 539
Black plate (18,1)GMC Sierra Owner Manual (GMNA Localizing-U.S/Canada/Mexico-
7299746) - 2015 - crc - 11/11/13
7-18 Infotainment System
USB Port
Playing from a USB
A USB mass storage device or
Media Transfer Protocol (MTP)
device can be connected to the
USB port.
The vehicle may have USB ports
are in the center console, armrest,
or one in the upper glove box. See
Center Console Storage on
page 4-3andGlove Box on
page 4-2.
USB MP3 Player and USB Drives
.The USB MP3 players and USB
drives connected must comply
with the USB Mass Storage
Class specification (USB MSC).
.Hard disk drives are not
supported.
To play a USB device:
.Connect the USB.
.Press the MEDIA button on the
faceplate until the connected
device is shown. While the USB source is active,
press the corresponding faceplate
button for the icons on the screen to
operate USB function:
.t(Seek Previous/Fast
Reverse)
.u(Seek Next/Fast Forward)
.j/r(Play/Pause)
.Z(Shuffle)
For information on how to use the
screen icons, see “Playing an
Audio CD.”
USB Menu
Press the MENU knob to display the
USB menu and the following may
display:
Browse : Select to display the files
and folders on the USB device.
Tone Settings : Select to adjust
Bass, Midrange, Treble, Balance,
Fade, and EQ (Equalizer). See “Tone Settings”
under“Playing an
Audio CD” inCD Player on
page 7-15.
Auto Volume : If equipped, see
“Playing an Audio CD” inCD Player
on page 7-15.
EQ (Equalizer): If equipped, this
feature adjusts the equalizer
settings. See “EQ (Equalizer)
Settings” inAM-FM Radio on
page 7-8.
Playing from an iPod®/iPad®/
iPhone®
This feature supports the following
devices:
.iPod nano®(1st, 2nd, 3rd, and
4th generation)
.iPod with video (5.0 and 5.5
generation)
.iPod classic®(6th generation)
.iPod touch®(1st and 2nd
generation)
.iPad
Page 264 of 539
Black plate (9,1)GMC Sierra Owner Manual (GMNA Localizing-U.S/Canada/Mexico-
7299746) - 2015 - crc - 11/11/13
Climate Controls 8-9
Operation Tips
.Clear away any ice, snow,
or leaves from air inlets at the
base of the windshield that could
block the flow of air into the
vehicle.
.Keep the path under the front
seats clear of objects to help
circulate the air inside of the
vehicle more effectively.
.Use of non-GM approved hood
deflectors can adversely affect
the performance of the system.
Check with your dealer before
adding equipment to the outside
of the vehicle.
Maintenance
Passenger Compartment
Air Filter
The filter removes dust, pollen, and
other airborne irritants from outside
air that is pulled into the vehicle.
The filter should be replaced as part
of routine scheduled maintenance.
SeeMaintenance Schedule on
page 11-3. To find out what type of
filter to use, see Maintenance
Replacement Parts on page 11-14.
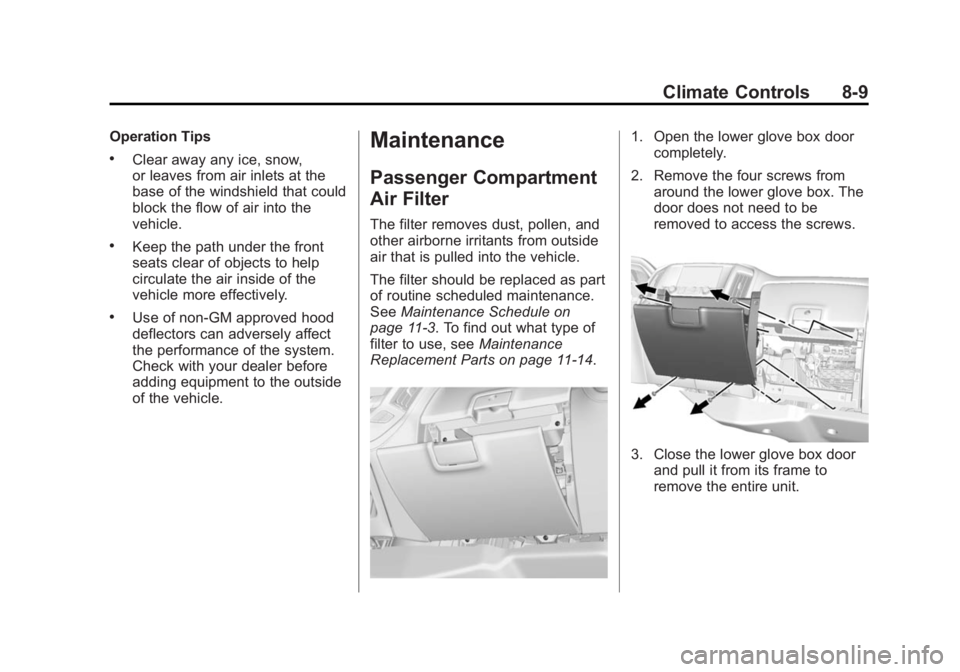
1. Open the lower glove box door completely.
2. Remove the four screws from around the lower glove box. The
door does not need to be
removed to access the screws.
3. Close the lower glove box doorand pull it from its frame to
remove the entire unit.
Page 265 of 539
Black plate (10,1)GMC Sierra Owner Manual (GMNA Localizing-U.S/Canada/Mexico-
7299746) - 2015 - crc - 11/11/13
8-10 Climate Controls
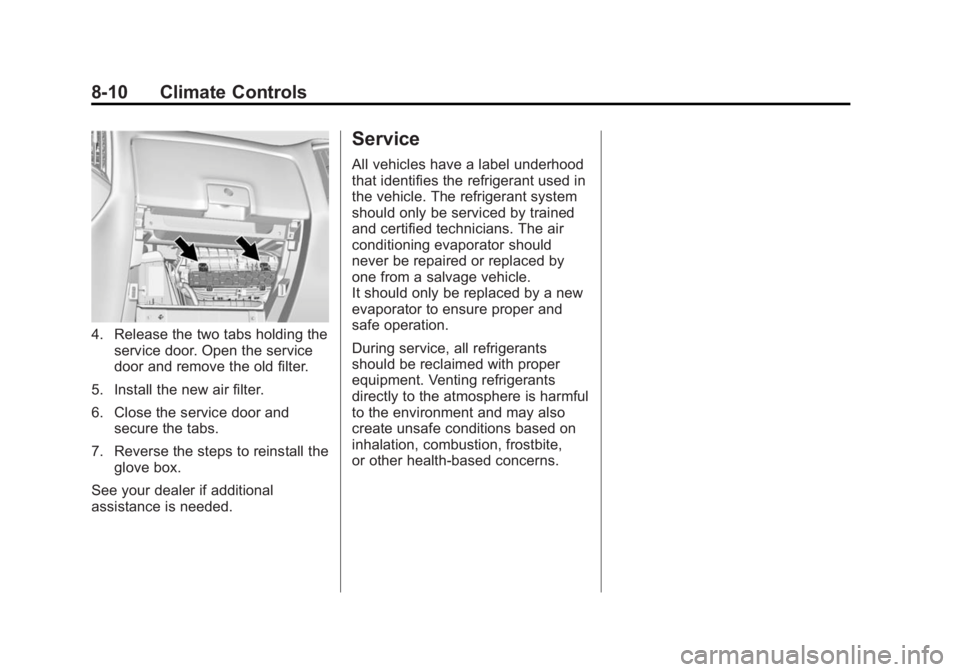
4. Release the two tabs holding theservice door. Open the service
door and remove the old filter.
5. Install the new air filter.
6. Close the service door and secure the tabs.
7. Reverse the steps to reinstall the glove box.
See your dealer if additional
assistance is needed.
Service
All vehicles have a label underhood
that identifies the refrigerant used in
the vehicle. The refrigerant system
should only be serviced by trained
and certified technicians. The air
conditioning evaporator should
never be repaired or replaced by
one from a salvage vehicle.
It should only be replaced by a new
evaporator to ensure proper and
safe operation.
During service, all refrigerants
should be reclaimed with proper
equipment. Venting refrigerants
directly to the atmosphere is harmful
to the environment and may also
create unsafe conditions based on
inhalation, combustion, frostbite,
or other health-based concerns.
Page 286 of 539
Black plate (21,1)GMC Sierra Owner Manual (GMNA Localizing-U.S/Canada/Mexico-
7299746) - 2015 - crc - 11/11/13
Driving and Operating 9-21
* EquipmentMaximum
Weight
Side Boxes
and Cargo 113 kg per
side (250 lb
per side)
* The combined weight for all
rail-mounted equipment should
not exceed 454 kg (1,000 lb).
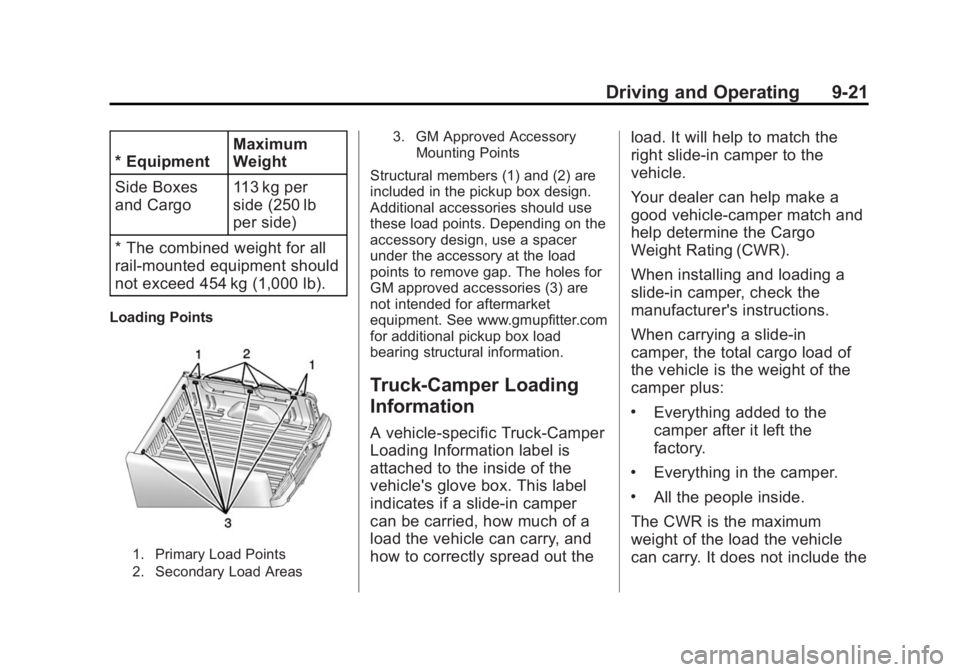
Loading Points
1. Primary Load Points
2. Secondary Load Areas 3. GM Approved Accessory
Mounting Points
Structural members (1) and (2) are
included in the pickup box design.
Additional accessories should use
these load points. Depending on the
accessory design, use a spacer
under the accessory at the load
points to remove gap. The holes for
GM approved accessories (3) are
not intended for aftermarket
equipment. See www.gmupfitter.com
for additional pickup box load
bearing structural information.
Truck-Camper Loading
Information
A vehicle-specific Truck-Camper
Loading Information label is
attached to the inside of the
vehicle's glove box. This label
indicates if a slide-in camper
can be carried, how much of a
load the vehicle can carry, and
how to correctly spread out the load. It will help to match the
right slide-in camper to the
vehicle.
Your dealer can help make a
good vehicle-camper match and
help determine the Cargo
Weight Rating (CWR).
When installing and loading a
slide-in camper, check the
manufacturer's instructions.
When carrying a slide-in
camper, the total cargo load of
the vehicle is the weight of the
camper plus:
.Everything added to the
camper after it left the
factory.
.Everything in the camper.
.All the people inside.
The CWR is the maximum
weight of the load the vehicle
can carry. It does not include the