2015 GMC SIERRA 1500 remove seats
[x] Cancel search: remove seatsPage 127 of 539
Black plate (68,1)GMC Sierra Owner Manual (GMNA Localizing-U.S/Canada/Mexico-
7299746) - 2015 - crc - 11/11/13
3-68 Seats and Restraints
In Canada, the law requires that
forward-facing child restraints have
a top tether, and that the tether be
attached.
If the child restraint does not have
the LATCH system, you will be
using the safety belt to secure the
child restraint in this position. Be
sure to follow the instructions that
came with the child restraint. Secure
the child in the child restraint when
and as the instructions say.
If more than one child restraint
needs to be installed in the rear
seat, be sure to readWhere to Put
the Restraint on page 3-43.
Double Cab
1. Remove the headrest prior to installing a forward-facing child
restraint in an outboard rear
seating position. See “Headrest
Removal and Reinstallation”
under Lower Anchors and
Tethers for Children (LATCH
System) on page 3-45. 2. Put the child restraint on
the seat.
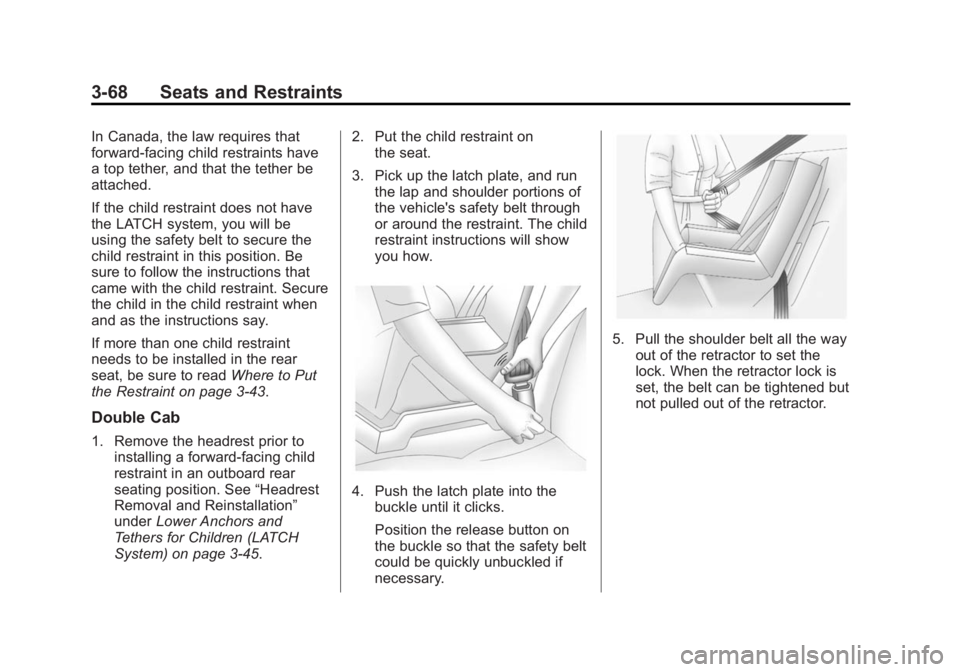
3. Pick up the latch plate, and run the lap and shoulder portions of
the vehicle's safety belt through
or around the restraint. The child
restraint instructions will show
you how.
4. Push the latch plate into thebuckle until it clicks.
Position the release button on
the buckle so that the safety belt
could be quickly unbuckled if
necessary.
5. Pull the shoulder belt all the wayout of the retractor to set the
lock. When the retractor lock is
set, the belt can be tightened but
not pulled out of the retractor.
Page 128 of 539
Black plate (69,1)GMC Sierra Owner Manual (GMNA Localizing-U.S/Canada/Mexico-
7299746) - 2015 - crc - 11/11/13
Seats and Restraints 3-69
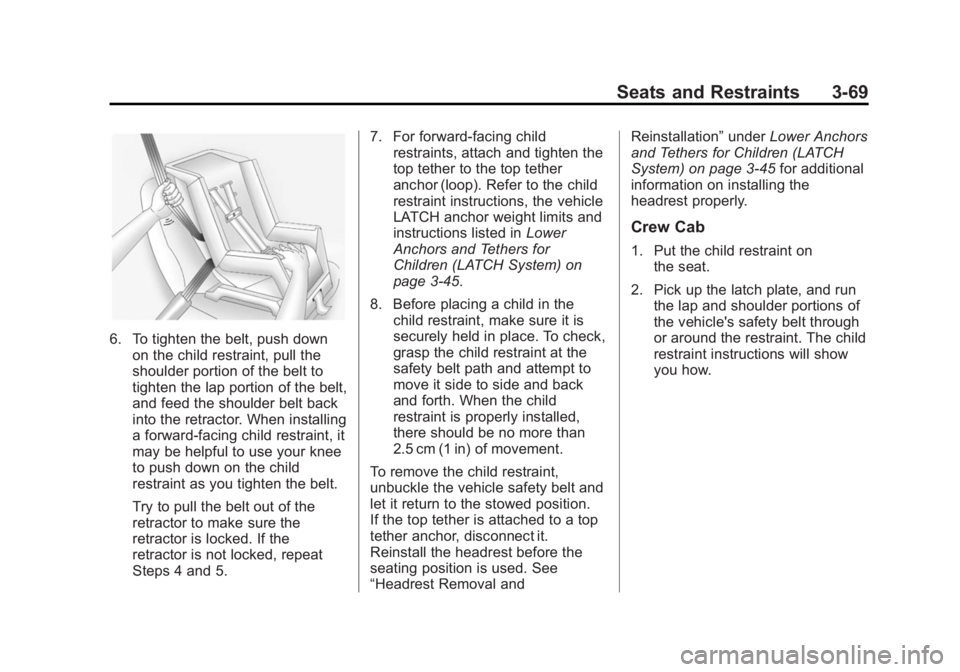
6. To tighten the belt, push downon the child restraint, pull the
shoulder portion of the belt to
tighten the lap portion of the belt,
and feed the shoulder belt back
into the retractor. When installing
a forward-facing child restraint, it
may be helpful to use your knee
to push down on the child
restraint as you tighten the belt.
Try to pull the belt out of the
retractor to make sure the
retractor is locked. If the
retractor is not locked, repeat
Steps 4 and 5. 7. For forward-facing child
restraints, attach and tighten the
top tether to the top tether
anchor (loop). Refer to the child
restraint instructions, the vehicle
LATCH anchor weight limits and
instructions listed in Lower
Anchors and Tethers for
Children (LATCH System) on
page 3-45.
8. Before placing a child in the child restraint, make sure it is
securely held in place. To check,
grasp the child restraint at the
safety belt path and attempt to
move it side to side and back
and forth. When the child
restraint is properly installed,
there should be no more than
2.5 cm (1 in) of movement.
To remove the child restraint,
unbuckle the vehicle safety belt and
let it return to the stowed position.
If the top tether is attached to a top
tether anchor, disconnect it.
Reinstall the headrest before the
seating position is used. See
“Headrest Removal and Reinstallation”
underLower Anchors
and Tethers for Children (LATCH
System) on page 3-45 for additional
information on installing the
headrest properly.
Crew Cab
1. Put the child restraint on the seat.
2. Pick up the latch plate, and run the lap and shoulder portions of
the vehicle's safety belt through
or around the restraint. The child
restraint instructions will show
you how.
Page 130 of 539
Black plate (71,1)GMC Sierra Owner Manual (GMNA Localizing-U.S/Canada/Mexico-
7299746) - 2015 - crc - 11/11/13
Seats and Restraints 3-71
6. If the child restraint has a toptether, follow the child restraint
manufacturer's instructions
regarding the use of the top
tether. See Lower Anchors and
Tethers for Children (LATCH
System) on page 3-45 for more
information on using the top
tether anchors.
7. Before placing a child in the child restraint, make sure it is
securely held in place. To check,
grasp the child restraint at the
safety belt path and attempt to
move it side to side and back
and forth. When the child
restraint is properly installed,
there should be no more than
2.5 cm (1 in) of movement.
To remove the child restraint,
unbuckle the vehicle safety belt and
let it return to the stowed position.
If the top tether is attached to a top
tether anchor, disconnect it.
For outboard rear seating positions,
if the child restraint cannot be
installed properly with the headrest in place, the headrest may be
removed. See your dealer for
assistance with removal, and store
the removed headrest in a secure
place. When the child restraint is
removed, reinstall the headrest
before the seating position is used.
For reinstallation instructions, see
“Headrest Removal and
Reinstallation”
underLower Anchors
and Tethers for Children (LATCH
System) on page 3-45.
Page 201 of 539
Black plate (8,1)GMC Sierra Owner Manual (GMNA Localizing-U.S/Canada/Mexico-
7299746) - 2015 - crc - 11/11/13
6-8 Lighting
Lighting Features
Entry Lighting
The vehicle has an illuminated entry
feature.
When a door is opened, the dome
lamps and puddle lamps come on if
the dome lamp control is in the
DOOR position. If the dome lamp
control is in the OFF position, the
lamps do not come on.
The headlamps, parking lamps,
taillamps, and back-up lamps turn
on briefly at night, or in areas with
limited lighting, when
Kis pressed
on the Remote Keyless Entry (RKE)
transmitter. After about 30 seconds
the exterior lamps turn off. Entry
lighting can be disabled manually by
changing the ignition out of the OFF
position, or by pressing the RKE
transmitter
Qbutton.
This feature can be changed. See
“Vehicle Locator Lights” under
Vehicle Personalization on
page 5-45.
Exit Lighting
The interior lamps, headlamps,
parking lamps, back-up lamps, and
license plate lamps come on when
the key is removed from the ignition.
The interior lamps turn off
automatically in 20 seconds. The
interior lamps do not come on if the
dome lamp control is in the OFF
position.
The exterior lamps turn off
immediately by turning the exterior
lamps control off.
This feature can be changed. See
Vehicle Personalization on
page 5-45.
Battery Load
Management
The vehicle has Electric Power
Management (EPM), which
estimates the battery's temperature
and state of charge. It then adjusts
the voltage for best performance
and extended life of the battery. When the battery's state of charge
is low, the voltage is raised slightly
to quickly bring the charge back up.
When the state of charge is high,
the voltage is lowered slightly to
prevent overcharging. The voltmeter
gauge or the voltage display on the
Driver Information Center (DIC),
if equipped, may show the voltage
moving up or down. This is normal.
If there is a problem, an alert will be
displayed.
The battery can be discharged at
idle if the electrical loads are very
high. This is true for all vehicles.
This is because the generator
(alternator) may not be spinning fast
enough at idle to produce all the
power that is needed for very high
electrical loads.
A high electrical load occurs when
several of the following are on, such
as: headlamps, high beams, fog
lamps, rear window defogger,
climate control fan at high speed,
heated seats, engine cooling fans,
trailer loads, and loads plugged into
accessory power outlets.
Page 264 of 539
Black plate (9,1)GMC Sierra Owner Manual (GMNA Localizing-U.S/Canada/Mexico-
7299746) - 2015 - crc - 11/11/13
Climate Controls 8-9
Operation Tips
.Clear away any ice, snow,
or leaves from air inlets at the
base of the windshield that could
block the flow of air into the
vehicle.
.Keep the path under the front
seats clear of objects to help
circulate the air inside of the
vehicle more effectively.
.Use of non-GM approved hood
deflectors can adversely affect
the performance of the system.
Check with your dealer before
adding equipment to the outside
of the vehicle.
Maintenance
Passenger Compartment
Air Filter
The filter removes dust, pollen, and
other airborne irritants from outside
air that is pulled into the vehicle.
The filter should be replaced as part
of routine scheduled maintenance.
SeeMaintenance Schedule on
page 11-3. To find out what type of
filter to use, see Maintenance
Replacement Parts on page 11-14.
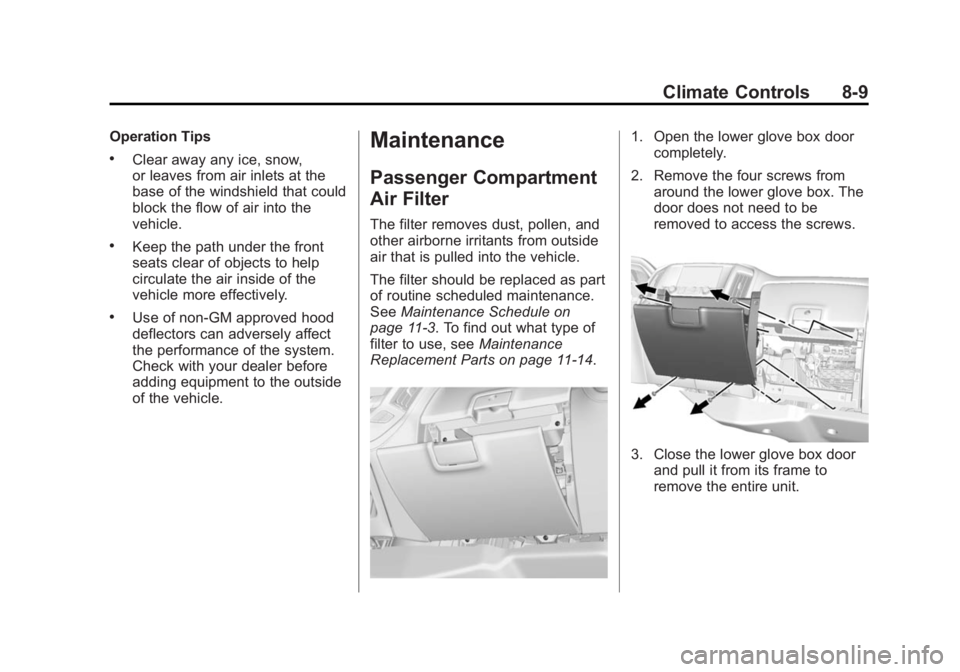
1. Open the lower glove box door completely.
2. Remove the four screws from around the lower glove box. The
door does not need to be
removed to access the screws.
3. Close the lower glove box doorand pull it from its frame to
remove the entire unit.
Page 452 of 539
Black plate (85,1)GMC Sierra Owner Manual (GMNA Localizing-U.S/Canada/Mexico-
7299746) - 2015 - crc - 11/11/13
Vehicle Care 10-85
Caution (Continued)
sequence and to the proper
torque specification. See
Capacities and Specifications for
the wheel nut torque specification.
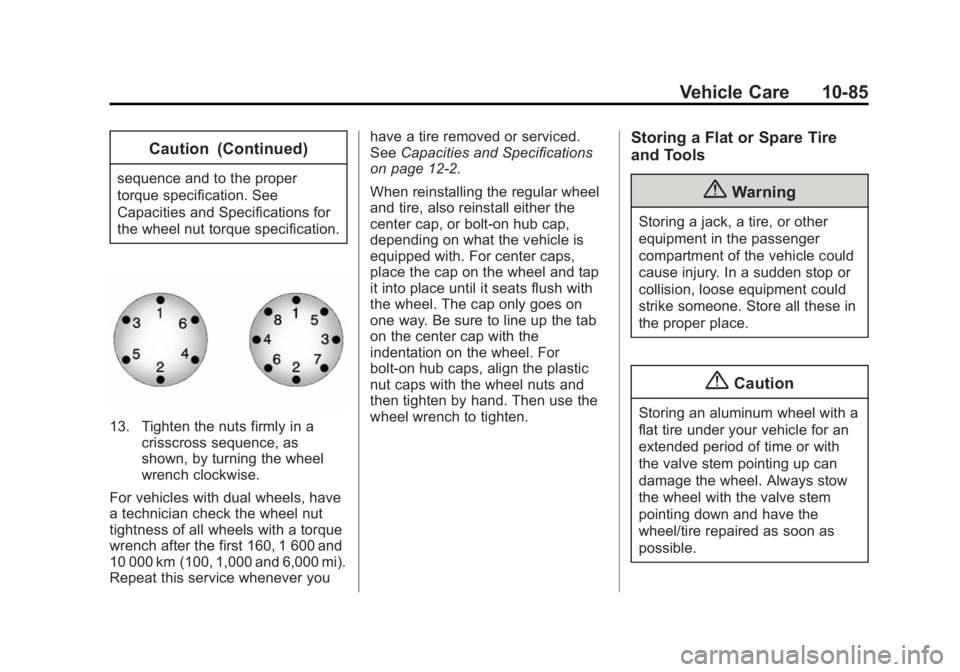
13. Tighten the nuts firmly in acrisscross sequence, as
shown, by turning the wheel
wrench clockwise.
For vehicles with dual wheels, have
a technician check the wheel nut
tightness of all wheels with a torque
wrench after the first 160, 1 600 and
10 000 km (100, 1,000 and 6,000 mi).
Repeat this service whenever you have a tire removed or serviced.
See
Capacities and Specifications
on page 12-2.
When reinstalling the regular wheel
and tire, also reinstall either the
center cap, or bolt-on hub cap,
depending on what the vehicle is
equipped with. For center caps,
place the cap on the wheel and tap
it into place until it seats flush with
the wheel. The cap only goes on
one way. Be sure to line up the tab
on the center cap with the
indentation on the wheel. For
bolt-on hub caps, align the plastic
nut caps with the wheel nuts and
then tighten by hand. Then use the
wheel wrench to tighten.
Storing a Flat or Spare Tire
and Tools
{Warning
Storing a jack, a tire, or other
equipment in the passenger
compartment of the vehicle could
cause injury. In a sudden stop or
collision, loose equipment could
strike someone. Store all these in
the proper place.
{Caution
Storing an aluminum wheel with a
flat tire under your vehicle for an
extended period of time or with
the valve stem pointing up can
damage the wheel. Always stow
the wheel with the valve stem
pointing down and have the
wheel/tire repaired as soon as
possible.