2015 GMC CANYON change wheel
[x] Cancel search: change wheelPage 10 of 433

Black plate (3,1)GMC Canyon Owner Manual (GMNA-Localizing-U.S./Canada-7587000) -
2015 - CRC - 3/17/15
In Brief 1-3
1.Air Vents on page 8-6.
2. Turn Signal Lever. See Turn and
Lane-Change Signals on
page 6-4.
Driver Information Center (DIC)
(Base Level) Controls (If
Equipped). See Driver
Information Center (DIC) (Base
Level) on page 5-27 orDriver
Information Center (DIC)
(Uplevel) on page 5-29.
3. Instrument Cluster (Base Level)
on page 5-8 orInstrument
Cluster (Uplevel) on page 5-10.
4. Windshield Wiper/Washer on
page 5-3.
5. Light Sensor. See Automatic
Headlamp System on page 6-3.
Vehicle Alarm System Indicator
(If Equipped). See Vehicle Alarm
System on page 2-12.
6. Infotainment on page 7-1.
7. Instrument Panel Illumination
Control on page 6-6. 8.
Exterior Lamp Controls on
page 6-1.
Fog Lamps on page 6-5 (If
Equipped).
9. Data Link Connector (DLC) (Out of View). See Malfunction
Indicator Lamp on page 5-18.
10. Parking Brake on page 9-41.
11. Hood Release. See Hood on
page 10-5.
12. Transfer Case Knob (If Equipped). See Four-Wheel
Drive on page 9-36.
13. Cruise Control on page 9-46.
Forward Collision Alert (FCA)
System on page 9-48 (If
Equipped).
14. Steering Wheel Adjustment on
page 5-2 (Out of View).
15. Horn on page 5-3. 16.
Steering Wheel Controls on
page 5-3 (If Equipped).
Driver Information Center (DIC)
(Uplevel) Controls (If
Equipped). See Driver
Information Center (DIC) (Base
Level) on page 5-27 orDriver
Information Center (DIC)
(Uplevel) on page 5-29.
17. Hazard Warning Flashers on
page 6-4.
Traction Control/Electronic
Stability Control on page 9-43.
Cargo Lamp on page 6-6.
Lane Departure Warning
(LDW) on page 9-52 (If
Equipped).
Hill Descent Control (If
Equipped). See Hill Descent
Control (HDC) on page 9-45.
Tow/Haul Selector Button (If
Equipped). See Tow/Haul
Mode on page 9-34.
Page 31 of 433

Black plate (2,1)GMC Canyon Owner Manual (GMNA-Localizing-U.S./Canada-7587000) -
2015 - CRC - 3/17/15
2-2 Keys, Doors, and Windows
{Warning
If the key is unintentionally
rotated while the vehicle is
running, the ignition could be
moved out of the RUN position.
This could be caused by heavy
items hanging from the key ring,
or by large or long items attached
to the key ring that could be
contacted by the driver or
steering wheel. If the ignition
moves out of the RUN position,(Continued)
Warning (Continued)
the engine will shut off, braking
and steering power assist may be
impacted, and airbags may not
deploy. To reduce the risk of
unintentional rotation of the
ignition key, do not change the
way the ignition key and Remote
Keyless Entry (RKE) transmitter,
if equipped, are connected to the
provided key rings.
The ignition key and key rings, and
RKE transmitter, if equipped, are
designed to work together as a
system to reduce the risk of
unintentionally moving the key out
of the RUN position. The ignition
key has a small hole to allow
attachment of the provided key ring.
It is important that any replacement
ignition keys have a small hole. See
your dealer if a replacement key is
required. The combination and size of the
rings that came with your keys were
specifically selected for your
vehicle. The rings are connected to
the key like two links of a chain to
reduce the risk of unintentionally
moving the key out of the RUN
position. Do not add any additional
items to the ring attached to the
ignition key. Attach additional items
only to the second ring, and limit
added items to a few essential keys
or small, light items no larger than
an RKE transmitter.
Page 77 of 433

Black plate (28,1)GMC Canyon Owner Manual (GMNA-Localizing-U.S./Canada-7587000) -
2015 - CRC - 3/17/15
3-28 Seats and Restraints
Adding Equipment to the
Airbag-Equipped Vehicle
{Warning
If a snow plow or similar
equipment is installed on the
vehicle, the airbag system may
not function properly. An airbag
could inflate when it is not
supposed to inflate. People riding
in the vehicle could be injured,
and the vehicle and/or snow plow
could be damaged. Do not install
a snow plow or similar equipment
on the vehicle.
Adding accessories that change the
vehicle's frame, bumper system,
height, front end, or side sheet
metal may keep the airbag system
from working properly. The
operation of the airbag system can
also be affected by changing any
parts of the front seats, safety belts,
the airbag sensing and diagnostic
module, steering wheel, instrument panel, any of the airbag modules,
ceiling or pillar garnish trim,
overhead console, front sensors,
side impact sensors, or airbag
wiring.
Your dealer and the service manual
have information about the location
of the airbag sensors, sensing and
diagnostic module, and airbag
wiring.
In addition, the vehicle has a
passenger sensing system for the
front outboard passenger position,
which includes sensors that are part
of the passenger seat. The
passenger sensing system may not
operate properly if the original seat
trim is replaced with non-GM
covers, upholstery, or trim; or with
GM covers, upholstery, or trim
designed for a different vehicle. Any
object, such as an aftermarket seat
heater or a comfort-enhancing pad
or device, installed under or on top
of the seat fabric, could also
interfere with the operation of the
passenger sensing system. This
could either prevent properdeployment of the passenger
airbag(s) or prevent the passenger
sensing system from properly
turning off the passenger airbag(s).
See
Passenger Sensing System on
page 3-23.
If the vehicle has rollover roof-rail
airbags, see Different Size Tires
and Wheels on page 10-59 for
additional important information.
If you have to modify your vehicle
because you have a disability and
you have questions about whether
the modifications will affect the
vehicle's airbag system, or if you
have questions about whether the
airbag system will be affected if the
vehicle is modified for any other
reason, call Customer Assistance.
See Customer Assistance Offices
(U.S. and Canada) on page 13-3.
Page 125 of 433

Black plate (12,1)GMC Canyon Owner Manual (GMNA-Localizing-U.S./Canada-7587000) -
2015 - CRC - 3/17/15
5-12 Instruments and Controls
Cluster Menu
There is an interactive display area
in the center of the instrument
cluster.
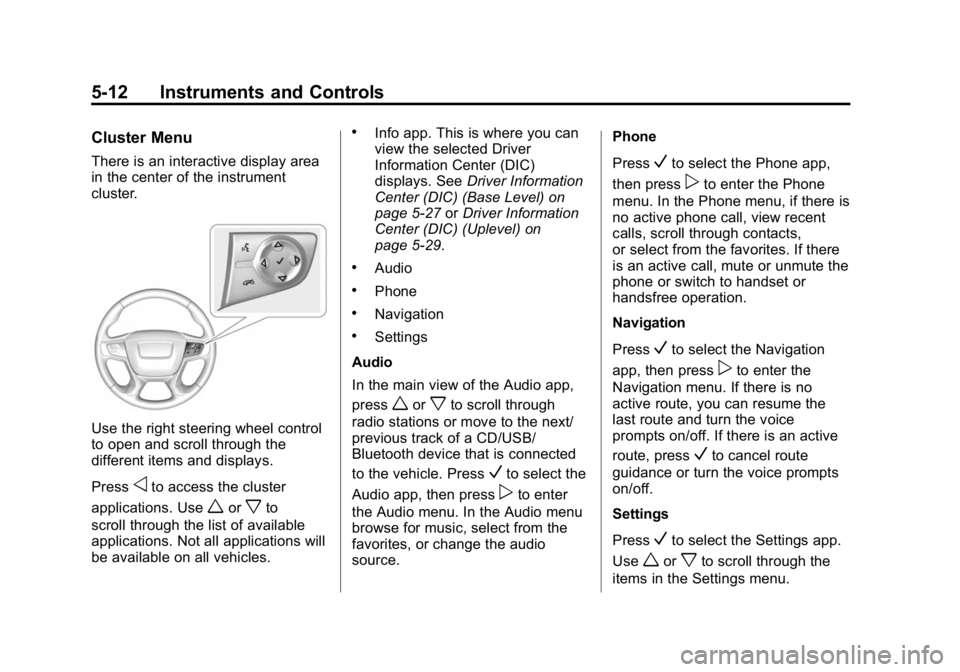
Use the right steering wheel control
to open and scroll through the
different items and displays.
Press
oto access the cluster
applications. Use
worxto
scroll through the list of available
applications. Not all applications will
be available on all vehicles.
.Info app. This is where you can
view the selected Driver
Information Center (DIC)
displays. See Driver Information
Center (DIC) (Base Level) on
page 5-27 orDriver Information
Center (DIC) (Uplevel) on
page 5-29.
.Audio
.Phone
.Navigation
.Settings
Audio
In the main view of the Audio app,
press
worxto scroll through
radio stations or move to the next/
previous track of a CD/USB/
Bluetooth device that is connected
to the vehicle. Press
Vto select the
Audio app, then press
pto enter
the Audio menu. In the Audio menu
browse for music, select from the
favorites, or change the audio
source. Phone
Press
Vto select the Phone app,
then press
pto enter the Phone
menu. In the Phone menu, if there is
no active phone call, view recent
calls, scroll through contacts,
or select from the favorites. If there
is an active call, mute or unmute the
phone or switch to handset or
handsfree operation.
Navigation
Press
Vto select the Navigation
app, then press
pto enter the
Navigation menu. If there is no
active route, you can resume the
last route and turn the voice
prompts on/off. If there is an active
route, press
Vto cancel route
guidance or turn the voice prompts
on/off.
Settings
Press
Vto select the Settings app.
Use
worxto scroll through the
items in the Settings menu.
Page 142 of 433

Black plate (29,1)GMC Canyon Owner Manual (GMNA-Localizing-U.S./Canada-7587000) -
2015 - CRC - 3/17/15
Instruments and Controls 5-29
Battery Voltage:Displays the
current battery voltage, if equipped.
Battery voltage changes are normal
while driving. See Charging System
Light on page 5-17. If there is a
problem with the battery charging
system, the DIC will display a
message. See Battery Voltage and
Charging Messages on page 5-33.
Engine Hours: Shows the total
number of hours the engine has run.
Transmission Fluid
Temperature: Shows the
temperature of the automatic
transmission fluid in either degrees
Celsius (°C) or degrees
Fahrenheit (°F).
Units: Move
w xto change
between Metric or US when the Unit
display is active. Press SET/CLR to
confirm the setting. This will change
the displays on the DIC to the type
of measurements you select.
ECO Drive Assist Menu (ECO)
Items
This menu is only available on some
vehicles. Press MENU on the turn
signal lever until the ECO menu is
displayed. Use
w xto scroll
through the menu items. Not all
items are available on every vehicle.
The following is a list of all possible
menu items:
Best Average Fuel Economy: The
bottom displays the best average
fuel economy (AFE) that is achieved
for a selected distance. The top
displays a running average of fuel
economy for the most recently
traveled selected distance. The
center bar graph displays the
instantaneous fuel economy.
Quickly press the SET/CLR button
to change the settings for the
distance options.
When viewing best AFE, a several
second press and hold of SET/CLR
will reset the best value. The best value will show
“- - -“until
the selected distance has been
traveled.
The display provides feedback on
how current driving behavior in the
bar graph affects the running
average in the top display and how
well recent driving compares to the
best that has been achieved.
Driver Information Center
(DIC) (Uplevel)
The DIC displays are shown in the
center of the instrument cluster in
the Info app. See Instrument Cluster
(Base Level) on page 5-8 or
Instrument Cluster (Uplevel) on
page 5-10. The displays show the
status of many vehicle systems. The
controls for the DIC are on the right
steering wheel control.
Page 160 of 433

Black plate (1,1)GMC Canyon Owner Manual (GMNA-Localizing-U.S./Canada-7587000) -
2015 - CRC - 3/17/15
Lighting 6-1
Lighting
Exterior Lighting
Exterior Lamp Controls . . . . . . . . 6-1
Exterior Lamps OffReminder . . . . . . . . . . . . . . . . . . . . 6-2
Headlamp High/Low-Beam Changer . . . . . . . . . . . . . . . . . . . . . 6-2
Flash-to-Pass . . . . . . . . . . . . . . . . . 6-3
Daytime Running Lamps (DRL) . . . . . . . . . . . . . . . . 6-3
Automatic Headlamp System . . . . . . . . . . . . . . . . . . . . . . 6-3
Hazard Warning Flashers . . . . . 6-4
Turn and Lane-Change Signals . . . . . . . . . . . . . . . . . . . . . . 6-4
Fog Lamps . . . . . . . . . . . . . . . . . . . . 6-5
Interior Lighting
Instrument Panel Illumination Control . . . . . . . . . . . . . . . . . . . . . . 6-6
Cargo Lamp . . . . . . . . . . . . . . . . . . 6-6
Dome Lamps . . . . . . . . . . . . . . . . . 6-6
Reading Lamps . . . . . . . . . . . . . . . 6-7
Lighting Features
Entry Lighting . . . . . . . . . . . . . . . . . 6-7
Exit Lighting . . . . . . . . . . . . . . . . . . . 6-7
Battery Load Management . . . . 6-8
Battery Power Protection . . . . . . 6-8
Exterior Lighting
Exterior Lamp Controls
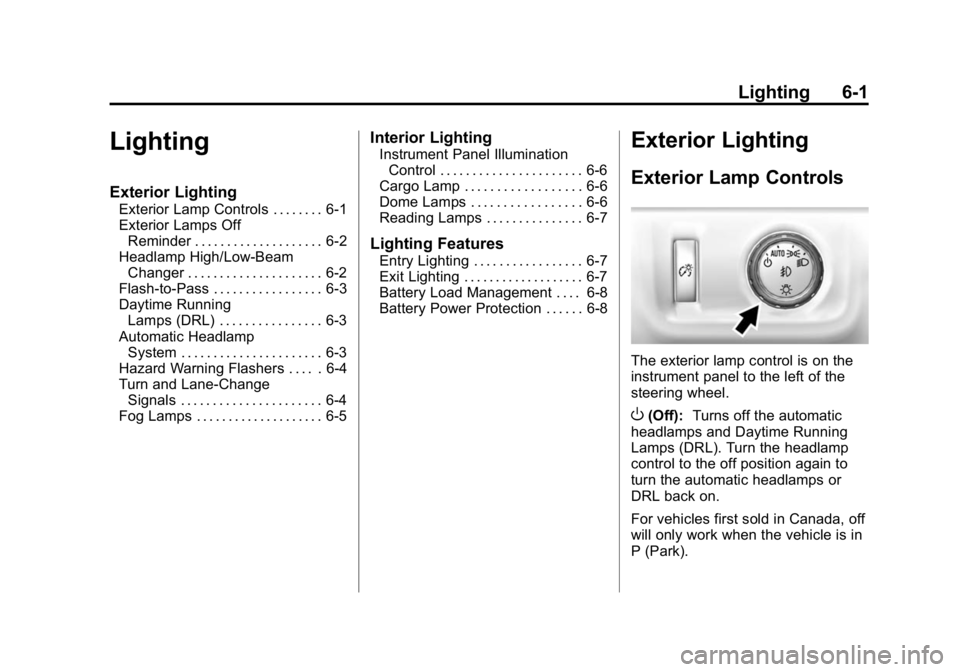
The exterior lamp control is on the
instrument panel to the left of the
steering wheel.
O(Off): Turns off the automatic
headlamps and Daytime Running
Lamps (DRL). Turn the headlamp
control to the off position again to
turn the automatic headlamps or
DRL back on.
For vehicles first sold in Canada, off
will only work when the vehicle is in
P (Park).
Page 220 of 433

Black plate (5,1)GMC Canyon Owner Manual (GMNA-Localizing-U.S./Canada-7587000) -
2015 - CRC - 3/17/15
Driving and Operating 9-5
The vehicle's right wheels can drop
off the edge of a road onto the
shoulder while driving. Follow
these tips:
1. Ease off the accelerator andthen, if there is nothing in the
way, steer the vehicle so that it
straddles the edge of the
pavement.
2. Turn the steering wheel about one-eighth of a turn, until the
right front tire contacts the
pavement edge.
3. Turn the steering wheel to go straight down the roadway.
Loss of Control
Skidding
There are three types of skids that
correspond to the vehicle's three
control systems:
.Braking Skid —wheels are
not rolling.
.Steering or Cornering Skid —
too much speed or steering in a
curve causes tires to slip and
lose cornering force.
.Acceleration Skid —too much
throttle causes the driving
wheels to spin.
Defensive drivers avoid most skids
by taking reasonable care suited to
existing conditions, and by not
overdriving those conditions.
But skids are always possible.
If the vehicle starts to slide, follow
these suggestions:
.Ease your foot off the
accelerator pedal and steer the
way you want the vehicle to go.
The vehicle may straighten out.
Be ready for a second skid if it
occurs.
.Slow down and adjust your
driving according to weather
conditions. Stopping distance
can be longer and vehicle
control can be affected when
traction is reduced by water,
snow, ice, gravel, or other material on the road. Learn to
recognize warning clues
—such
as enough water, ice, or packed
snow on the road to make a
mirrored surface —and slow
down when you have any doubt.
.Try to avoid sudden steering,
acceleration, or braking,
including reducing vehicle speed
by shifting to a lower gear. Any
sudden changes could cause
the tires to slide.
Remember: Antilock brakes help
avoid only the braking skid.
Off-Road Driving
Four-wheel-drive vehicles can be
used for off-road driving. Vehicles
without four-wheel drive and
vehicles not equipped with All
Terrain (AT) or On-Off Road (OOR)
tires must not be driven off-road
except on a level, solid surface.
For contact information about the
original equipment tires, see the
warranty manual.
Page 221 of 433

Black plate (6,1)GMC Canyon Owner Manual (GMNA-Localizing-U.S./Canada-7587000) -
2015 - CRC - 3/17/15
9-6 Driving and Operating
One of the best ways for successful
off-road driving is to control the
speed.
{Warning
When driving off-road, bouncing
and quick changes in direction
can easily throw you out of
position. This could cause you to
lose control and crash. You and
your passengers should always
wear safety belts.
Before Driving Off-Road
.Have all necessary maintenance
and service work completed.
.Fuel the vehicle, fill fluid levels,
and check inflation pressure in
all tires, including the spare,
if equipped.
.Read all the information about
four-wheel-drive vehicles in this
manual.
.Remove any underbody air
deflector, if equipped. Re-attach
the air deflector after off-road
driving.
.SeeHill Descent Control (HDC)
on page 9-45
.Know the local laws that apply to
off-road driving.
To gain more ground clearance if
needed, it may be necessary to
remove the front fascia lower air
dam. However, driving without the
air dam reduces fuel economy.
{Caution
Operating the vehicle for
extended periods without the front
fascia lower air dam installed can
cause improper air flow to the
engine. Re-attach the front fascia
air dam after off-road driving.
Loading the Vehicle for
Off-Road Driving
{Warning
.Unsecured cargo on the load
floor can be tossed about
when driving over rough
terrain. You or your
passengers can be struck by
flying objects. Secure the
cargo properly.
.Keep cargo in the cargo area
as far forward and as low as
possible. The heaviest things
should be on the floor,
forward of the rear axle.
.Heavy loads on the roof raise
the vehicle's center of gravity,
making it more likely to roll
over. You can be seriously or
fatally injured if the vehicle
rolls over. Put heavy loads
inside the cargo area, not on
the roof.