2015 FORD SUPER DUTY park assist
[x] Cancel search: park assistPage 6 of 470
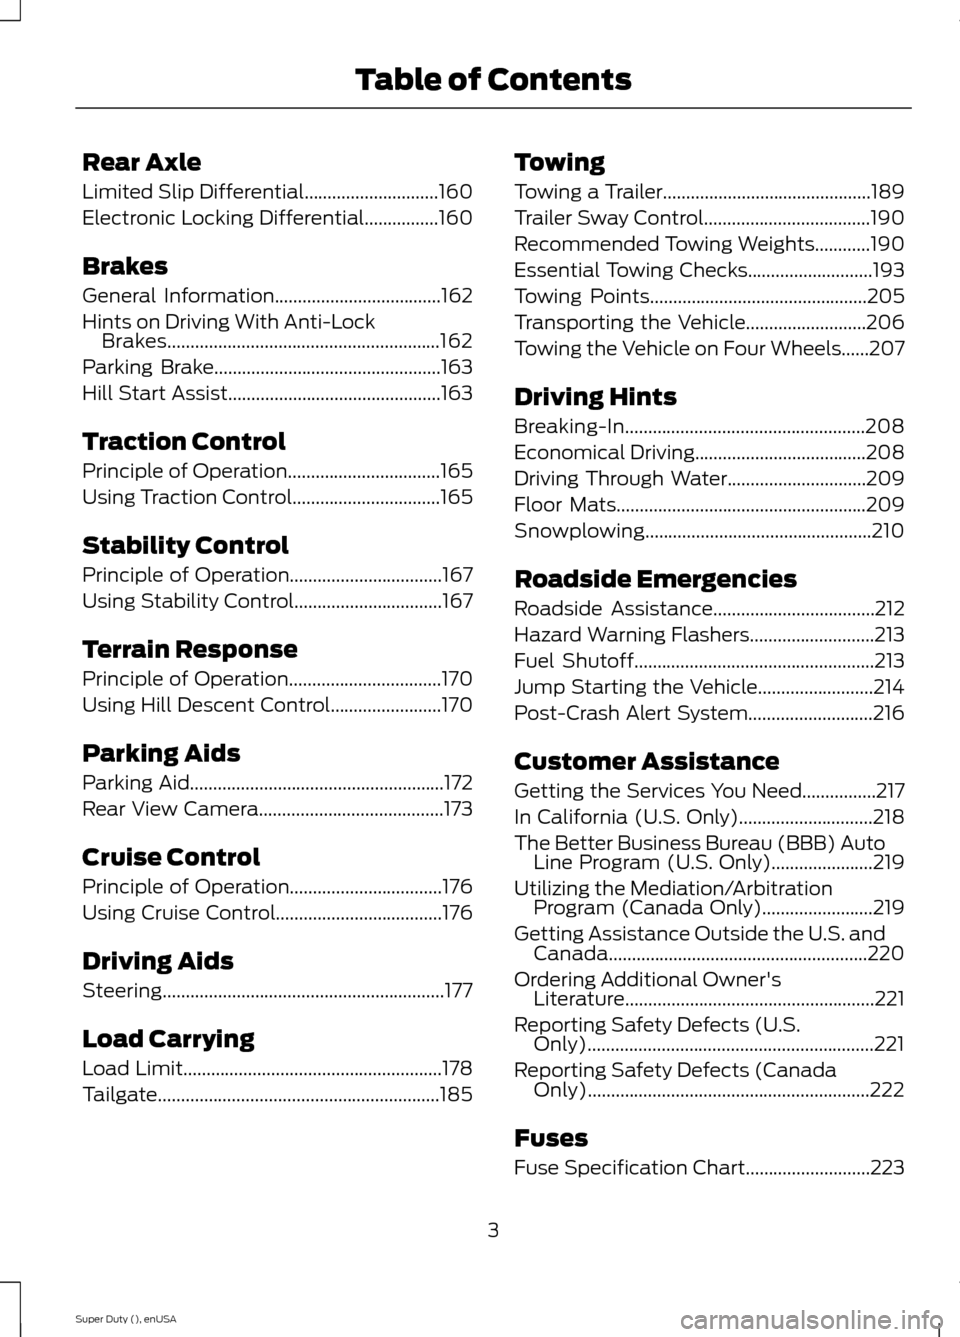
Rear Axle
Limited Slip Differential.............................160
Electronic Locking Differential................160
Brakes
General Information....................................162
Hints on Driving With Anti-LockBrakes...........................................................162
Parking Brake.................................................163
Hill Start Assist..............................................163
Traction Control
Principle of Operation.................................165
Using Traction Control................................165
Stability Control
Principle of Operation.................................167
Using Stability Control................................167
Terrain Response
Principle of Operation.................................170
Using Hill Descent Control........................170
Parking Aids
Parking Aid.......................................................172
Rear View Camera........................................173
Cruise Control
Principle of Operation.................................176
Using Cruise Control....................................176
Driving Aids
Steering.............................................................177
Load Carrying
Load Limit........................................................178
Tailgate.............................................................185
Towing
Towing a Trailer.............................................189
Trailer Sway Control....................................190
Recommended Towing Weights............190
Essential Towing Checks...........................193
Towing Points...............................................205
Transporting the Vehicle..........................206
Towing the Vehicle on Four Wheels......207
Driving Hints
Breaking-In....................................................208
Economical Driving.....................................208
Driving Through Water..............................209
Floor Mats......................................................209
Snowplowing.................................................210
Roadside Emergencies
Roadside Assistance...................................212
Hazard Warning Flashers...........................213
Fuel Shutoff....................................................213
Jump Starting the Vehicle.........................214
Post-Crash Alert System...........................216
Customer Assistance
Getting the Services You Need................217
In California (U.S. Only).............................218
The Better Business Bureau (BBB) AutoLine Program (U.S. Only)......................219
Utilizing the Mediation/ArbitrationProgram (Canada Only)........................219
Getting Assistance Outside the U.S. andCanada........................................................220
Ordering Additional Owner'sLiterature......................................................221
Reporting Safety Defects (U.S.Only)..............................................................221
Reporting Safety Defects (CanadaOnly).............................................................222
Fuses
Fuse Specification Chart...........................223
3Super Duty (), enUSATable of Contents
Page 53 of 470
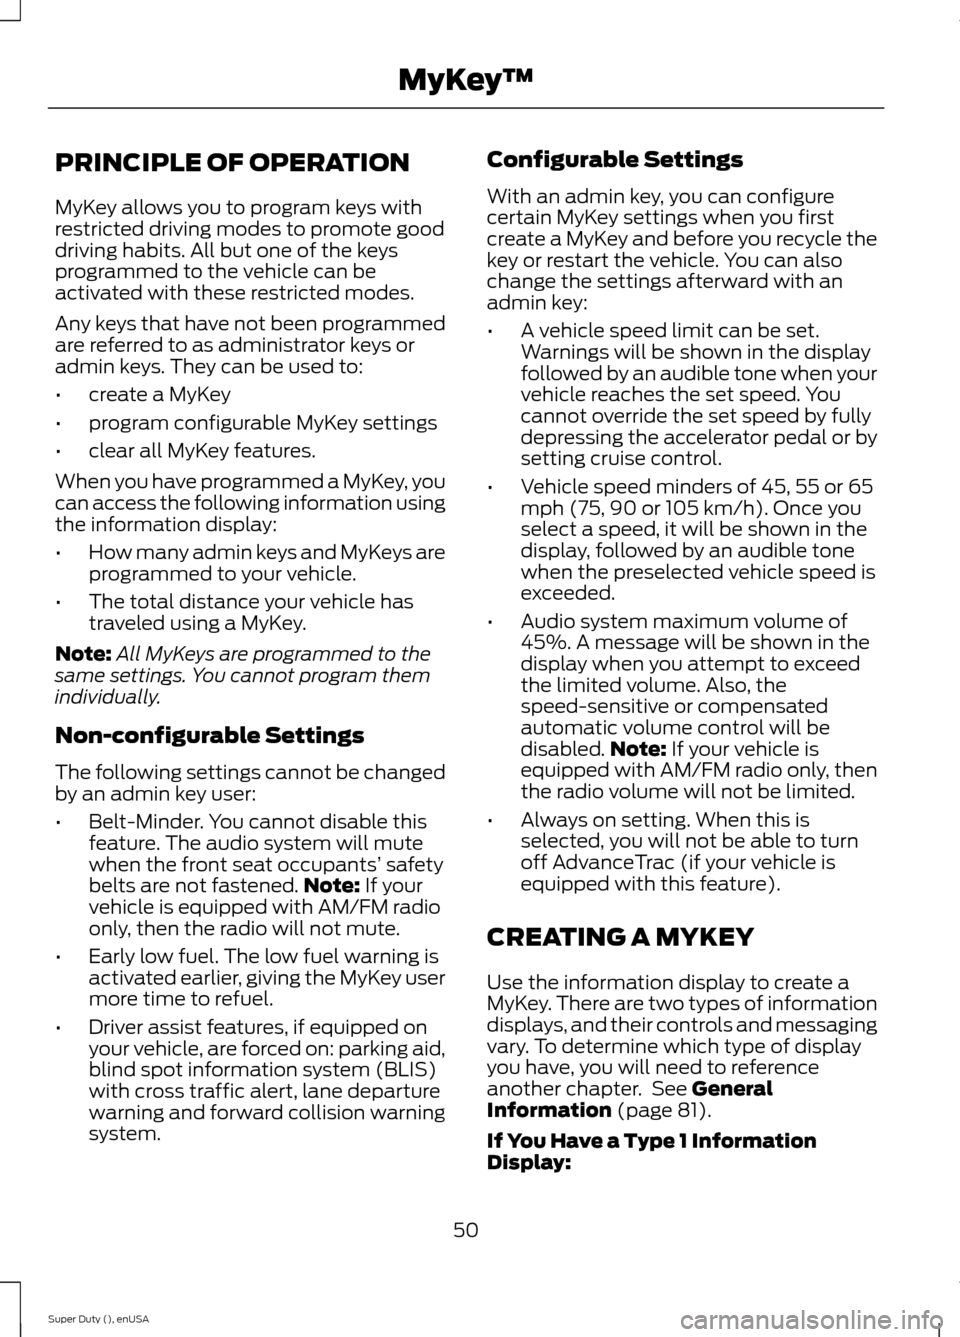
PRINCIPLE OF OPERATION
MyKey allows you to program keys withrestricted driving modes to promote gooddriving habits. All but one of the keysprogrammed to the vehicle can beactivated with these restricted modes.
Any keys that have not been programmedare referred to as administrator keys oradmin keys. They can be used to:
•create a MyKey
•program configurable MyKey settings
•clear all MyKey features.
When you have programmed a MyKey, youcan access the following information usingthe information display:
•How many admin keys and MyKeys areprogrammed to your vehicle.
•The total distance your vehicle hastraveled using a MyKey.
Note:All MyKeys are programmed to thesame settings. You cannot program themindividually.
Non-configurable Settings
The following settings cannot be changedby an admin key user:
•Belt-Minder. You cannot disable thisfeature. The audio system will mutewhen the front seat occupants’ safetybelts are not fastened.Note: If yourvehicle is equipped with AM/FM radioonly, then the radio will not mute.
•Early low fuel. The low fuel warning isactivated earlier, giving the MyKey usermore time to refuel.
•Driver assist features, if equipped onyour vehicle, are forced on: parking aid,blind spot information system (BLIS)with cross traffic alert, lane departurewarning and forward collision warningsystem.
Configurable Settings
With an admin key, you can configurecertain MyKey settings when you firstcreate a MyKey and before you recycle thekey or restart the vehicle. You can alsochange the settings afterward with anadmin key:
•A vehicle speed limit can be set.Warnings will be shown in the displayfollowed by an audible tone when yourvehicle reaches the set speed. Youcannot override the set speed by fullydepressing the accelerator pedal or bysetting cruise control.
•Vehicle speed minders of 45, 55 or 65mph (75, 90 or 105 km/h). Once youselect a speed, it will be shown in thedisplay, followed by an audible tonewhen the preselected vehicle speed isexceeded.
•Audio system maximum volume of45%. A message will be shown in thedisplay when you attempt to exceedthe limited volume. Also, thespeed-sensitive or compensatedautomatic volume control will bedisabled.Note: If your vehicle isequipped with AM/FM radio only, thenthe radio volume will not be limited.
•Always on setting. When this isselected, you will not be able to turnoff AdvanceTrac (if your vehicle isequipped with this feature).
CREATING A MYKEY
Use the information display to create aMyKey. There are two types of informationdisplays, and their controls and messagingvary. To determine which type of displayyou have, you will need to referenceanother chapter. See GeneralInformation (page 81).
If You Have a Type 1 InformationDisplay:
50Super Duty (), enUSAMyKey™
Page 93 of 470
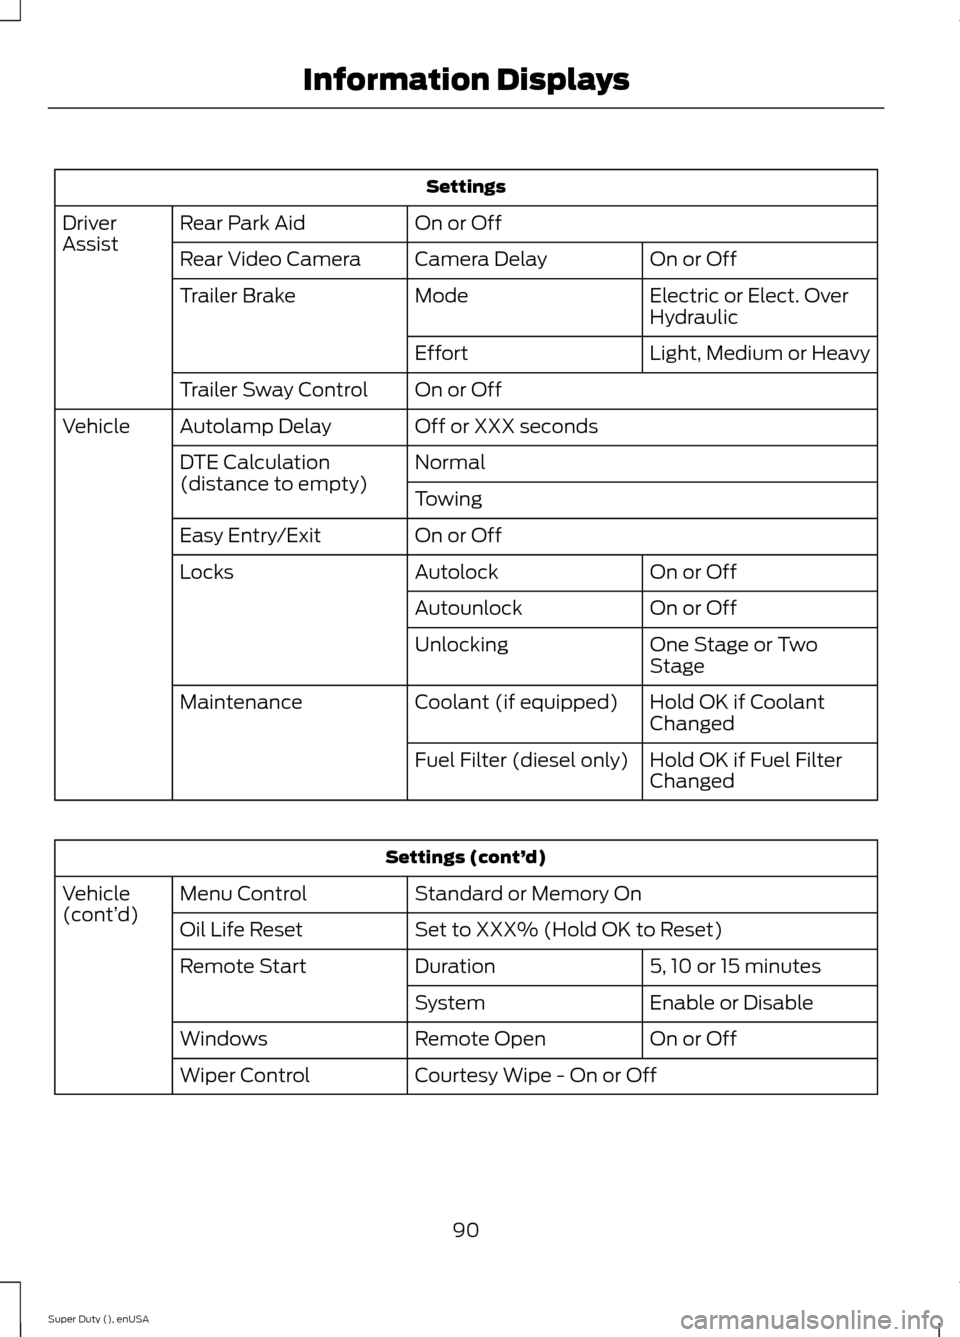
Settings
On or OffRear Park AidDriverAssistOn or OffCamera DelayRear Video Camera
Electric or Elect. OverHydraulicModeTrailer Brake
Light, Medium or HeavyEffort
On or OffTrailer Sway Control
Off or XXX secondsAutolamp DelayVehicle
NormalDTE Calculation(distance to empty)Towing
On or OffEasy Entry/Exit
On or OffAutolockLocks
On or OffAutounlock
One Stage or TwoStageUnlocking
Hold OK if CoolantChangedCoolant (if equipped)Maintenance
Hold OK if Fuel FilterChangedFuel Filter (diesel only)
Settings (cont’d)
Standard or Memory OnMenu ControlVehicle(cont’d)Set to XXX% (Hold OK to Reset)Oil Life Reset
5, 10 or 15 minutesDurationRemote Start
Enable or DisableSystem
On or OffRemote OpenWindows
Courtesy Wipe - On or OffWiper Control
90Super Duty (), enUSAInformation Displays
Page 102 of 470
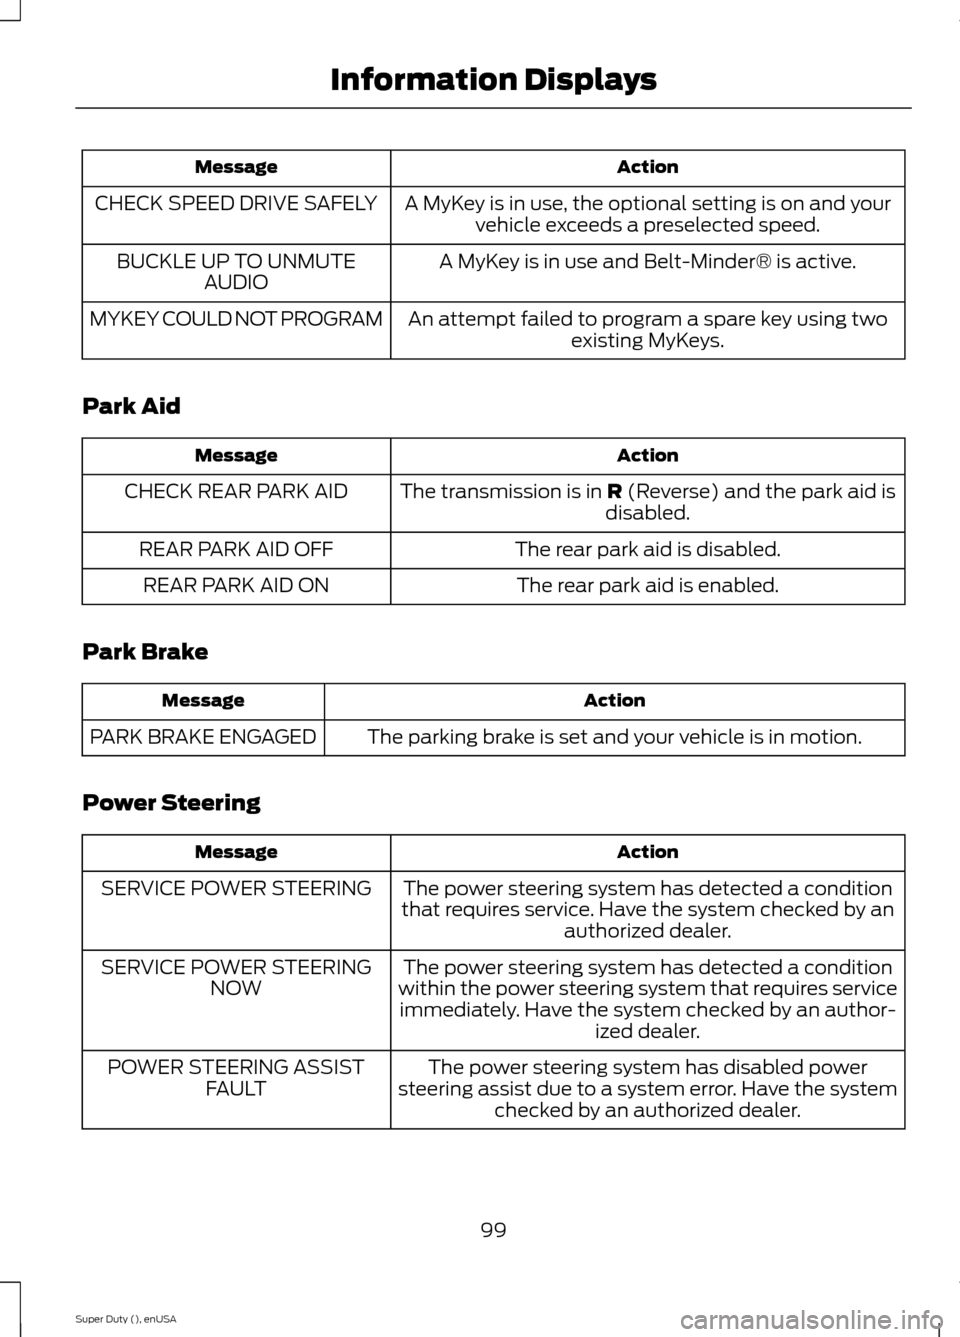
ActionMessage
A MyKey is in use, the optional setting is on and yourvehicle exceeds a preselected speed.CHECK SPEED DRIVE SAFELY
A MyKey is in use and Belt-Minder® is active.BUCKLE UP TO UNMUTEAUDIO
An attempt failed to program a spare key using twoexisting MyKeys.MYKEY COULD NOT PROGRAM
Park Aid
ActionMessage
The transmission is in R (Reverse) and the park aid isdisabled.CHECK REAR PARK AID
The rear park aid is disabled.REAR PARK AID OFF
The rear park aid is enabled.REAR PARK AID ON
Park Brake
ActionMessage
The parking brake is set and your vehicle is in motion.PARK BRAKE ENGAGED
Power Steering
ActionMessage
The power steering system has detected a conditionthat requires service. Have the system checked by anauthorized dealer.
SERVICE POWER STEERING
The power steering system has detected a conditionwithin the power steering system that requires serviceimmediately. Have the system checked by an author-ized dealer.
SERVICE POWER STEERINGNOW
The power steering system has disabled powersteering assist due to a system error. Have the systemchecked by an authorized dealer.
POWER STEERING ASSISTFAULT
99Super Duty (), enUSAInformation Displays
Page 136 of 470
STARTING A GASOLINE
ENGINE
When you start the engine, the idle speedincreases, this helps to warm up theengine. If the engine idle speed does notslow down automatically, have yourvehicle checked by an authorized dealer.
Before starting the engine check thefollowing:
•Make sure all occupants have fastenedtheir safety belts.
•Make sure the headlamps andelectrical accessories are off.
•Make sure the parking brake is on.
•Move the transmission selector leverto position P.
•Turn the ignition key to the on position.
Note:Do not touch the accelerator pedal.
1.Fully press the brake pedal.
2.Turn the key to the start position tostart the engine. Release the key whenthe engine starts.
Note:The engine may continue crankingfor up to 15 seconds or until it starts.
Note:If you cannot start the engine on thefirst try, wait for a short period and try again.
Failure to Start
If you cannot start the engine after threeattempts, wait 10 seconds and follow thisprocedure:
1.Fully press the brake pedal.
2.Fully press the accelerator pedal andhold it there.
3.Start the engine.
Stopping the Engine When YourVehicle is Stationary
1.Move the transmission selector leverto position P.
2.Turn the key to the off position.
3.Apply the parking brake.
Stopping the Engine When YourVehicle is Moving
WARNING
Switching off the engine when thevehicle is still moving will result in aloss of brake and steering assistance.The steering will not lock, but higher effortwill be required. When the ignition isswitched off, some electrical circuits,warning lamps and indicators may also beoff.
1.Move the transmission selector leverto position N and use the brakes tobring your vehicle to a safe stop.
2.When your vehicle has stopped, movethe transmission selector lever toposition P and turn the key to the offposition.
3.Apply the parking brake.
Cold Weather Starting (FlexibleFuel Vehicles Only)
The starting characteristics of all gradesof E85 ethanol make it unsuitable for usewhen ambient temperatures fall below0°F (-18°C). Consult your fuel distributorfor the availability of winter grade ethanol.As the outside temperature approachesfreezing, ethanol fuel distributors shouldsupply winter grade ethanol (same as withunleaded gasoline). If summer gradeethanol is used in cold weather conditions,0°F to 32°F (-18°C to 0°C), you mayexperience increased cranking times, roughidle or hesitation until the engine haswarmed up.
You may experience a decrease in peakperformance when the engine is cold whenoperating on E85 ethanol.
133Super Duty (), enUSAStarting and Stopping the Engine
Page 147 of 470
AUTOMATIC TRANSMISSION
WARNING
Always set the parking brake fullyand make sure the gearshift islatched in P (Park). Turn the ignitionto the off position and remove the keywhenever you leave your vehicle.
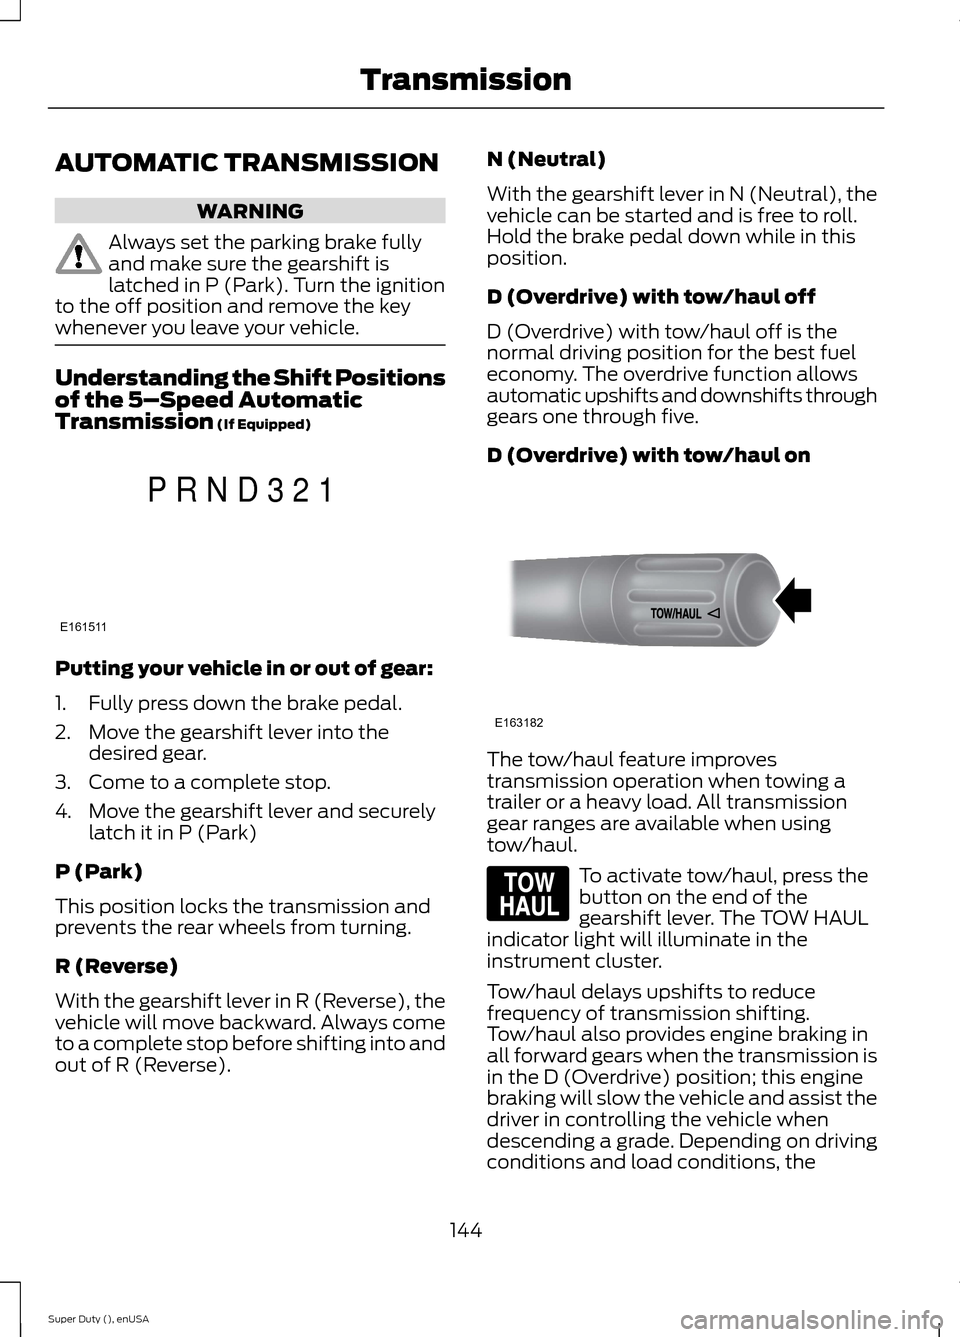
Understanding the Shift Positionsof the 5–Speed AutomaticTransmission (If Equipped)
Putting your vehicle in or out of gear:
1.Fully press down the brake pedal.
2.Move the gearshift lever into thedesired gear.
3.Come to a complete stop.
4.Move the gearshift lever and securelylatch it in P (Park)
P (Park)
This position locks the transmission andprevents the rear wheels from turning.
R (Reverse)
With the gearshift lever in R (Reverse), thevehicle will move backward. Always cometo a complete stop before shifting into andout of R (Reverse).
N (Neutral)
With the gearshift lever in N (Neutral), thevehicle can be started and is free to roll.Hold the brake pedal down while in thisposition.
D (Overdrive) with tow/haul off
D (Overdrive) with tow/haul off is thenormal driving position for the best fueleconomy. The overdrive function allowsautomatic upshifts and downshifts throughgears one through five.
D (Overdrive) with tow/haul on
The tow/haul feature improvestransmission operation when towing atrailer or a heavy load. All transmissiongear ranges are available when usingtow/haul.
To activate tow/haul, press thebutton on the end of thegearshift lever. The TOW HAULindicator light will illuminate in theinstrument cluster.
Tow/haul delays upshifts to reducefrequency of transmission shifting.Tow/haul also provides engine braking inall forward gears when the transmission isin the D (Overdrive) position; this enginebraking will slow the vehicle and assist thedriver in controlling the vehicle whendescending a grade. Depending on drivingconditions and load conditions, the
144Super Duty (), enUSATransmissionE161511PRND321 E163182 E161509
Page 165 of 470
GENERAL INFORMATION
Note:Occasional brake noise is normal. Ifa metal-to-metal, continuous grinding orcontinuous squeal sound is present, thebrake linings may be worn-out. Have thesystem checked by an authorized dealer. Ifyour vehicle has continuous vibration orshudder in the steering wheel while braking,have it checked by an authorized dealer.
Note:Brake dust may accumulate on thewheels, even under normal drivingconditions. Some dust is inevitable as thebrakes wear and does not contribute tobrake noise. See Cleaning the AlloyWheels (page 261).
See Warning Lamps andIndicators (page 77).
Wet brakes result in reduced brakingefficiency. Gently press the brake pedal afew times when driving from a car wash orstanding water to dry the brakes.
Brake Over Accelerator
In the event the accelerator pedalbecomes stuck or entrapped, apply steadyand firm pressure to the brake pedal toslow the vehicle and reduce engine power.If you experience this condition, apply thebrakes and bring your vehicle to a safestop. Move the transmission selector leverto position P, switch the engine off andapply the parking brake. Inspect theaccelerator pedal for any interference. Ifnone are found and the condition persists,have your vehicle towed to the nearestauthorized dealer.
Brake Assist
Brake assist detects when you brakerapidly by measuring the rate at which youpress the brake pedal. It providesmaximum braking efficiency as long as youpress the pedal, and can reduce stoppingdistances in critical situations.
Anti-lock Brake System
This system helps you maintain steeringcontrol during emergency stops by keepingthe brakes from locking.
This lamp momentarilyilluminates when you turn theignition on. If the light does notilluminate during start up, remains on orflashes, the system may be disabled. Havethe system checked by an authorizeddealer.
If the system is disabled, normalbraking is still effective. If thebrake warning lamp illuminateswhen you release the parking brake, havethe system checked by an authorizeddealer.
HINTS ON DRIVING WITH
ANTI-LOCK BRAKES
Note:When the system is operating, thebrake pedal will pulse and may travelfurther. Maintain pressure on the brakepedal. You may also hear a noise from thesystem. This is normal.
The anti-lock braking system will noteliminate the risks when:
•you drive too closely to the vehicle infront of you
•your vehicle is hydroplaning
•you take corners too fast
•the road surface is poor.
162Super Duty (), enUSABrakesE144522 E144522
Page 166 of 470
PARKING BRAKE
WARNING
Always set the parking brake fullyand make sure the transmissionselector lever is placed in position P.Failure to set the parking brake and engagepark could result in vehicle roll-away,property damage or bodily injury. Turn theignition to the lock position and removethe key whenever you leave your vehicle.
Apply the parking brake whenever yourvehicle is parked. Press the pedaldownward to set the parking brake. Thebrake warning lamp in the instrumentcluster will illuminate and remainsilluminated until the parking brake isreleased.
To release, pull the brake release leverlocated at the lower left side of theinstrument panel.
If you are parking your vehicle on a gradeor with a trailer, press and hold the brakepedal down, then set the parking brake.There may be a little vehicle movement asthe parking brake sets to hold the vehicle'sweight. This is normal and should be noreason for concern. If needed, press andhold the service brake pedal down, thentry reapplying the parking brake. Chock thewheels if required. If the parking brakecannot hold the weight of the vehicle, theparking brake may need to be serviced orthe vehicle may be overloaded.
HILL START ASSIST
WARNINGS
The system does not replace theparking brake. When you leave yourvehicle, always apply the parkingbrake and put the transmission in park (P).
WARNINGS
You must remain in your vehicle onceyou have activated the system.
During all times, you are responsiblefor controlling your vehicle,supervising the system andintervening, if required.
If the engine is revved excessively, orif a malfunction is detected, thesystem will be deactivated.
The system makes it easier to pull awaywhen your vehicle is on a slope without theneed to use the parking brake.
When the system is active, your vehicle willremain stationary on the slope for two tothree seconds after you release the brakepedal. This allows you time to move yourfoot from the brake to the acceleratorpedal. The brakes are releasedautomatically once the engine hasdeveloped sufficient drive to prevent yourvehicle from rolling down the slope. Thisis an advantage when pulling away on aslope, (for example from a car park ramp,traffic lights or when reversing uphill intoa parking space).
The system will activate automatically onany slope that will cause significant vehiclerollback.
Using Hill Start Assist
1.Press the brake pedal to bring yourvehicle to a complete standstill. Keepthe brake pedal pressed.
2.If the sensors detect that your vehicleis on a slope, the system will activateautomatically.
3.When you remove your foot from thebrake pedal, your vehicle will remainon the slope without rolling away forabout two or three seconds. This holdtime will automatically be extended ifyou are in the process of driving off.
163Super Duty (), enUSABrakes