2015 FORD POLICE INTERCEPTOR UTILITY Vent
[x] Cancel search: VentPage 229 of 398

WASHER FLUID CHECK
WARNING:If you operate your vehicle in temperatures below
40°F (5°C), use washer fluid with antifreeze protection. Failure
to use washer fluid with antifreeze protection in cold weather could
result in impaired windshield vision and increase the risk of injury or
accident.
Add fluid to fill the reservoir if the level is low. Only use a washer fluid
that meets Ford specifications. See the technical specifications chart in
theCapacities and Specificationschapter.
Note:The front and rear washer systems are supplied from the same
reservoir.
State or local regulations on volatile organic compounds may restrict the
use of methanol, a common windshield washer antifreeze additive.
Washer fluids containing non-methanol antifreeze agents should be used
only if they provide cold weather protection without damaging the
vehicle’s paint finish, wiper blades or washer system.
CHANGING THE VEHICLE BATTERY
WARNING:Batteries normally produce explosive gases which
can cause personal injury. Therefore, do not allow flames, sparks
or lighted substances to come near the battery. When working near the
battery, always shield your face and protect your eyes. Always provide
proper ventilation.
WARNING:When lifting a plastic-cased battery, excessive
pressure on the end walls could cause acid to flow through the
vent caps, resulting in personal injury and/or damage to the vehicle or
battery. Lift the battery with a battery carrier or with your hands on
opposite corners.
228Maintenance
2015 Police(pol)
Owners Guide gf, 1st Printing, April 2014
USA(fus)
Page 231 of 398

4. Allow the engine to idle for at least one minute.
5. Turn the A/C on and allow the engine to idle for at least one minute.
6. Drive the vehicle to complete the relearning process.
•The vehicle may need to be driven 10 miles (16 km) or more to
relearn the idle and fuel trim strategy.
•Note:If you do not allow the engine to relearn its idle trim, the idle
quality of your vehicle may be adversely affected until the idle trim is
eventually relearned.
If the battery has been disconnected or a new battery has been installed,
the clock and radio settings must be reset once the battery is
reconnected.
CHECKING THE WIPER BLADES
Run the tip of your fingers over the edge of the blade
to check for roughness.
Clean the wiper blades with washer fluid or water
applied with a soft sponge or cloth.
CHANGING THE WIPER BLADES
1. Pull the wiper blade and arm away from the glass.
230Maintenance
2015 Police(pol)
Owners Guide gf, 1st Printing, April 2014
USA(fus)
Page 237 of 398

CHANGING A BULB
Lamp Assembly Condensation
Exterior lamps are vented to accommodate normal changes in pressure.
Condensation can be a natural by-product of this design. When moist air
enters the lamp assembly through the vents, there is a possibility that
condensation can occur when the temperature is cold. When normal
condensation occurs, a thin film of mist can form on the interior of the
lens. The thin mist eventually clears and exits through the vents during
normal operation. Clearing time may take as long as 48 hours under dry
weather conditions.
These are examples of acceptable condensation:
•Presence of thin mist (no streaks, drip marks or droplets).
•Fine mist covers less than 50% of the lens.
These are examples of unacceptable moisture (usually caused by a lamp
water leak):
•Water puddle inside the lamp.
•Large water droplets, drip marks or streaks present on the interior of
the lens.
Take your vehicle to a dealer for service if any of the above conditions of
unacceptable moisture are present.
Replacing headlamp bulbs
WARNING:Handle a halogen headlamp bulb carefully and keep
out of children’s reach. Grasp the bulb only by its plastic base
and do not touch the glass. The oil from your hand could cause the
bulb to break the next time the headlamps are operated.
Note:If the bulb is accidentally touched, it should be cleaned with
rubbing alcohol before being used.
236Maintenance
2015 Police(pol)
Owners Guide gf, 1st Printing, April 2014
USA(fus)
Page 245 of 398

Replacing license plate lamp bulb (Utility)
1. Carefully release the spring clip
(1).
2. Remove the lamp (2).
3. Remove the bulb (3).
Reverse steps to reinstall bulb.
Replacing rear quarter glass LED lamp (Utility) (if equipped)
Your vehicle is equipped with an LED rear quarter glass lamp. It is
designed to last the life of the vehicle. If replacement is required, see
your authorized dealer.
Replacing exterior mirror LED lamp (Utility) (if equipped)
Your vehicle is equipped with an LED strobe located in the mirror cap. It
is designed to last the life of the vehicle. If replacement is required, see
your authorized dealer.
Replacing fender vent LED lamp (Sedan) (if equipped)
Your vehicle is equipped with an LED strobe located in the fender vent.
It is designed to last the life of the vehicle. If replacement is required,
see your authorized dealer.
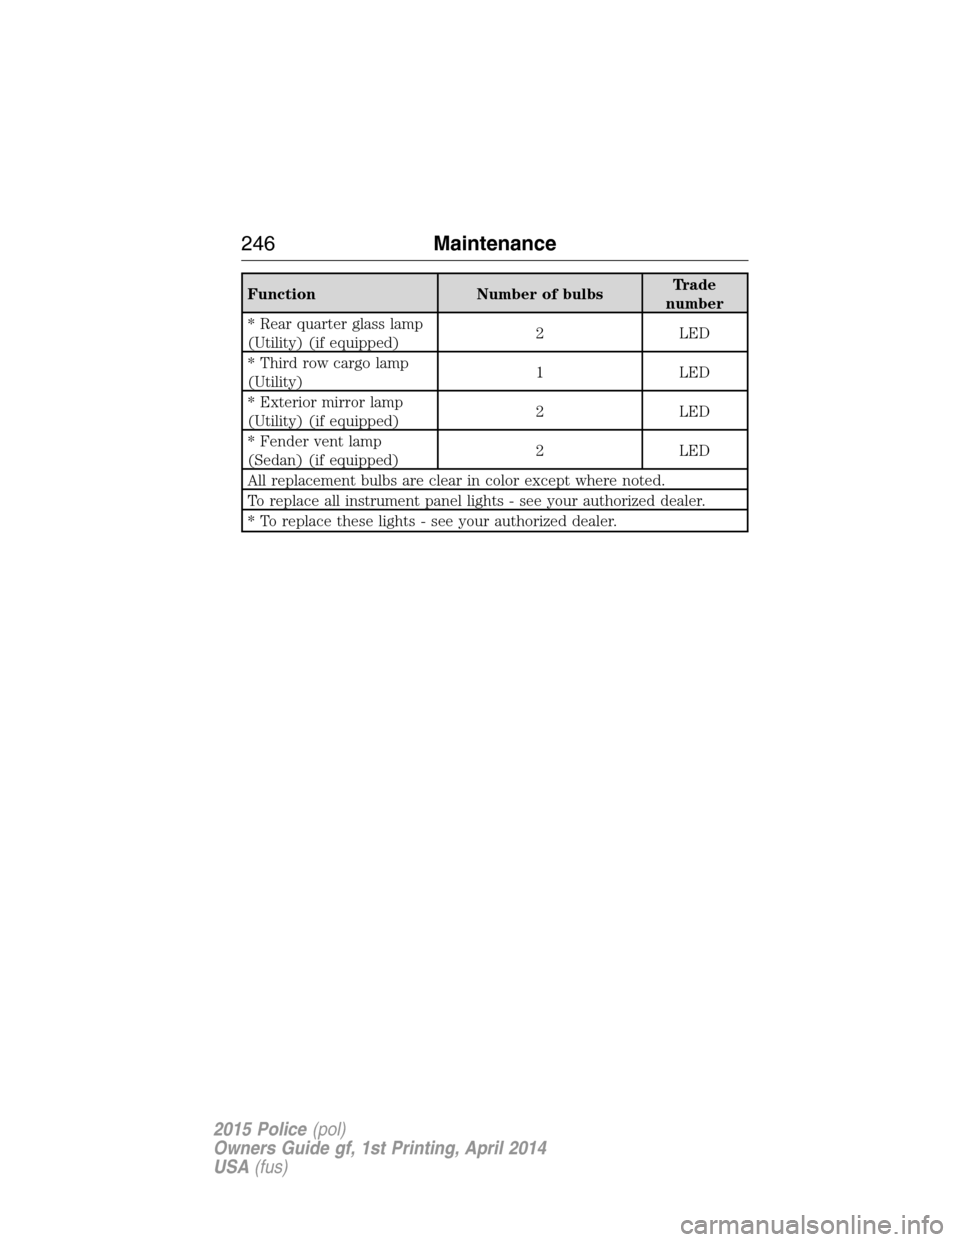
BULB SPECIFICATION CHART
Replacement bulbs are specified in the chart below. Headlamp bulbs
must be marked with an authorized “D.O.T.” for North America and an
“E” for Europe to ensure lamp performance, light brightness and pattern
and safe visibility. The correct bulbs will not damage the lamp assembly
or void the lamp assembly warranty and will provide quality bulb burn
time.
3
2
1
244Maintenance
2015 Police(pol)
Owners Guide gf, 1st Printing, April 2014
USA(fus)
Page 247 of 398

Function Number of bulbsTrade
number
* Rear quarter glass lamp
(Utility) (if equipped)2 LED
* Third row cargo lamp
(Utility)1 LED
* Exterior mirror lamp
(Utility) (if equipped)2 LED
* Fender vent lamp
(Sedan) (if equipped)2 LED
All replacement bulbs are clear in color except where noted.
To replace all instrument panel lights - see your authorized dealer.
* To replace these lights - see your authorized dealer.
246Maintenance
2015 Police(pol)
Owners Guide gf, 1st Printing, April 2014
USA(fus)
Page 251 of 398

When washing:
•Take care when using a power washer to clean the engine. The
high-pressure fluid could penetrate the sealed parts and cause
damage.
•Do not spray a hot engine with cold water to avoid cracking the
engine block or other engine components.
•Spray Motorcraft Engine Shampoo and Degreaser on all parts that
require cleaning and pressure rinse clean. In Canada, use Motorcraft
Engine Shampoo.
•Never wash or rinse the engine while it is hot or running; water in the
running engine may cause internal damage.
•Never wash or rinse any ignition coil, spark plug wire or spark plug
well, or the area in and around these locations.
•Cover the battery, power distribution box, and air filter assembly to
prevent water damage when cleaning the engine.
CLEANING THE WINDOWS AND WIPER BLADES
The windows and wiper blades should be cleaned regularly. If the wipers
do not wipe properly, substances on the vehicle’s glass or the wiper
blades may cause squeaking or chatter noise from the blades, and
streaking and smearing of the windshield. To clean these items, follow
these tips:
•The windows may be cleaned with a non-abrasive cleaner such as
Motorcraft® Ultra-Clear Spray Glass Cleaner (U.S.) or Motorcraft
Premium Glass Cleaner (Canada).
•The wiper blades can be cleaned with isopropyl (rubbing) alcohol or
Motorcraft Premium Windshield Washer Concentrates in the U.S., or
Motorcraft Premium Quality Windshield Washer Fluid in Canada.
Replace your wiper blades when they appear worn or do not function
properly.
•Do not use abrasive materials, as they may cause scratches.
•Do not use fuel, kerosene, or paint thinner to clean any parts.
If you cannot remove those streaks after cleaning with the glass cleaner
or if the wipers chatter and move in a jerky motion, clean the outer
surface of the windshield and the wiper blades using a sponge or soft
cloth with a neutral detergent or mild-abrasive cleaning solution. After
cleaning, rinse the windshield and wiper blades with clean water. The
windshield is clean if beads do not form when you rinse the windshield
with water.
250Vehicle Care
2015 Police(pol)
Owners Guide gf, 1st Printing, April 2014
USA(fus)
Page 252 of 398

Note:Do not use sharp objects, such as a razor blade, to clean the
inside of the rear window or to remove decals, as it may cause damage
to the rear window defroster’s heated grid lines.
CLEANING THE INTERIOR
WARNING:Do not use cleaning solvents, bleach or dye on the
vehicle’s safety belts, as these actions may weaken the belt
webbing.
WARNING:On vehicles equipped with seat-mounted airbags, do
not use chemical solvents or strong detergents. Such products
could contaminate the side airbag system and affect performance of the
side airbag in a collision.
For fabric, carpets, cloth seats, safety belts and seats equipped with side
airbags:
•Remove dust and loose dirt with a vacuum cleaner.
•Apply a layer of high quality foam cleaner designed for automotive
interiors, such as Motorcraft Carpet and Upholstery Cleaner, to the
dry stained area(s) of the item you are cleaning and let it soak in for
one minute.
•If grease or tar is present on the material, spot-clean the area first
with Motorcraft Spot and Stain Remover. In Canada, use Motorcraft
Multi-Purpose Cleaner.
•If a ring forms on the fabric after spot cleaning, clean the entire area
immediately (but do not oversaturate) or the ring can set.
•Do not use household cleaning products or glass cleaners, which can
stain and discolor the fabric and affect the flame retardant abilities of
the seat materials.
CLEANING THE INSTRUMENT PANEL AND INSTRUMENT
CLUSTER LENS
WARNING:Do not use chemical solvents or strong detergents
when cleaning the steering wheel or instrument panel to avoid
contamination of the airbag system.
Note:Follow the same procedure as cleaning leather seats for cleaning
leather instrument panels and leather interior trim surfaces. See
Cleaning Leather Seatsin this chapter.
Vehicle Care251
2015 Police(pol)
Owners Guide gf, 1st Printing, April 2014
USA(fus)
Page 254 of 398

Note:Test any cleaner or stain remover on an inconspicuous area.
You should:
•Remove dust and loose dirt with a vacuum cleaner.
•Clean and treat spills and stains as soon as possible.
Do not use the following products as these may damage the leather:
•Oil and petroleum or silicone-based leather conditioners.
•Household cleaners.
•Alcohol solutions.
•Solvents or cleaners intended specifically for rubber, vinyl and plastics.
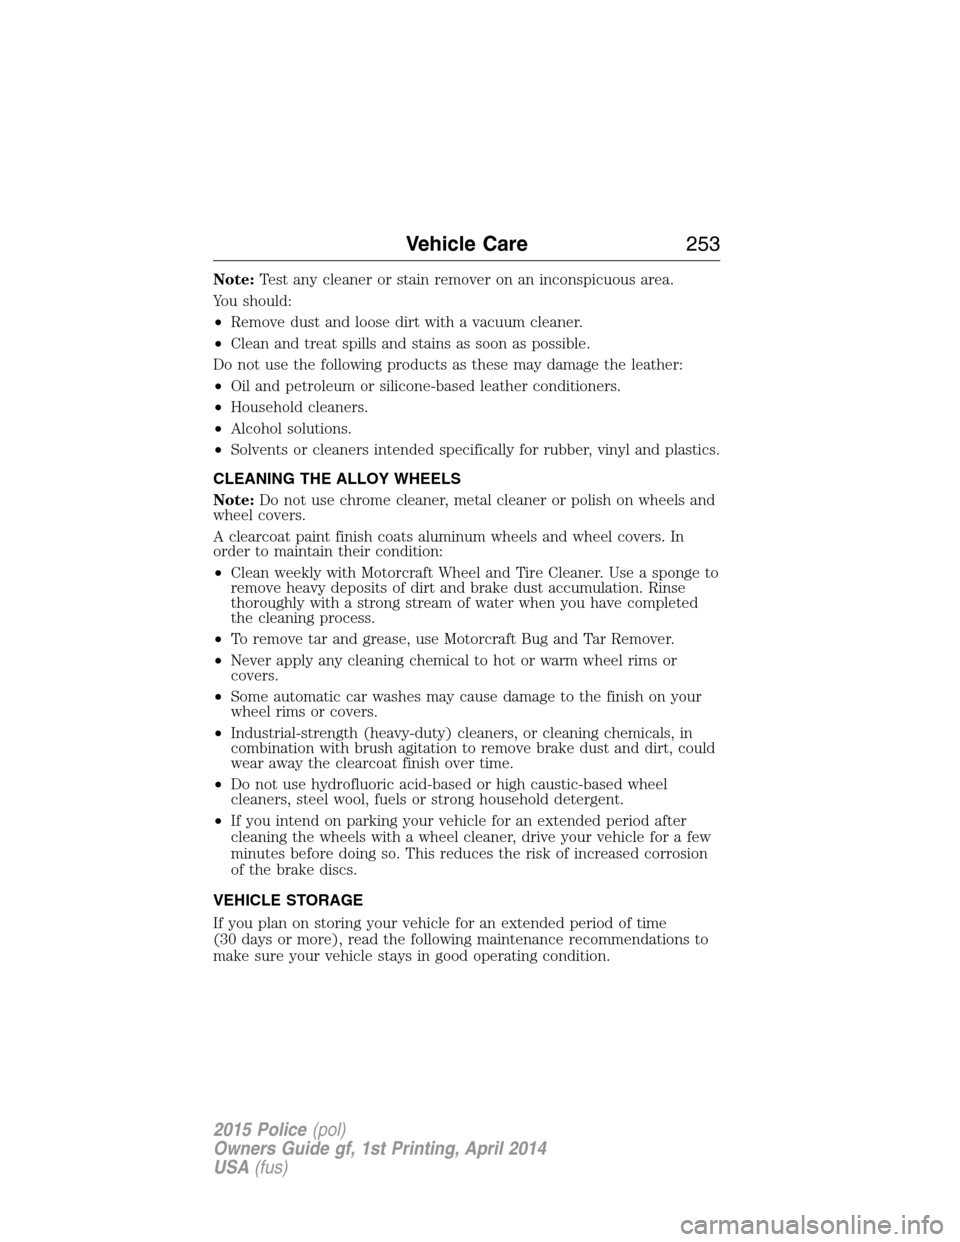
CLEANING THE ALLOY WHEELS
Note:Do not use chrome cleaner, metal cleaner or polish on wheels and
wheel covers.
A clearcoat paint finish coats aluminum wheels and wheel covers. In
order to maintain their condition:
•Clean weekly with Motorcraft Wheel and Tire Cleaner. Use a sponge to
remove heavy deposits of dirt and brake dust accumulation. Rinse
thoroughly with a strong stream of water when you have completed
the cleaning process.
•To remove tar and grease, use Motorcraft Bug and Tar Remover.
•Never apply any cleaning chemical to hot or warm wheel rims or
covers.
•Some automatic car washes may cause damage to the finish on your
wheel rims or covers.
•Industrial-strength (heavy-duty) cleaners, or cleaning chemicals, in
combination with brush agitation to remove brake dust and dirt, could
wear away the clearcoat finish over time.
•Do not use hydrofluoric acid-based or high caustic-based wheel
cleaners, steel wool, fuels or strong household detergent.
•If you intend on parking your vehicle for an extended period after
cleaning the wheels with a wheel cleaner, drive your vehicle for a few
minutes before doing so. This reduces the risk of increased corrosion
of the brake discs.
VEHICLE STORAGE
If you plan on storing your vehicle for an extended period of time
(30 days or more), read the following maintenance recommendations to
make sure your vehicle stays in good operating condition.
Vehicle Care253
2015 Police(pol)
Owners Guide gf, 1st Printing, April 2014
USA(fus)