Page 62 of 401
4.Utility:Area in front of electronic finish panel from the bottom to the
top of the instrument panel
Figure 7
1. Area on top of instrument panel
2. Area in front of center console from tunnel up to instrument panel
3. Prisoner screen (reference only)
4. 10 inches (254 millimeters)
5. Area on tunnel between seats
6. Height: 8.5 inches (216 millimeters)
7. 12 inches (305 millimeters)
8. Area on tunnel beneath center console
9. Tunnel
10. Depth: 1.5 inches (38 millimeters)
A5A
4 A6
A3
A
7
A8 A
9A
10A
1
A2
Supplementary Restraints System61
2015 Police(pol)
Owners Guide gf, 2nd Printing, April 2015
USA(fus)
Page 236 of 401

ADJUSTING THE HEADLAMPS
The headlamps on your vehicle are properly aimed at the assembly plant.
If your vehicle has been in an accident, an authorized dealer should
check the alignment of your headlamps.
Vertical Aim Adjustment
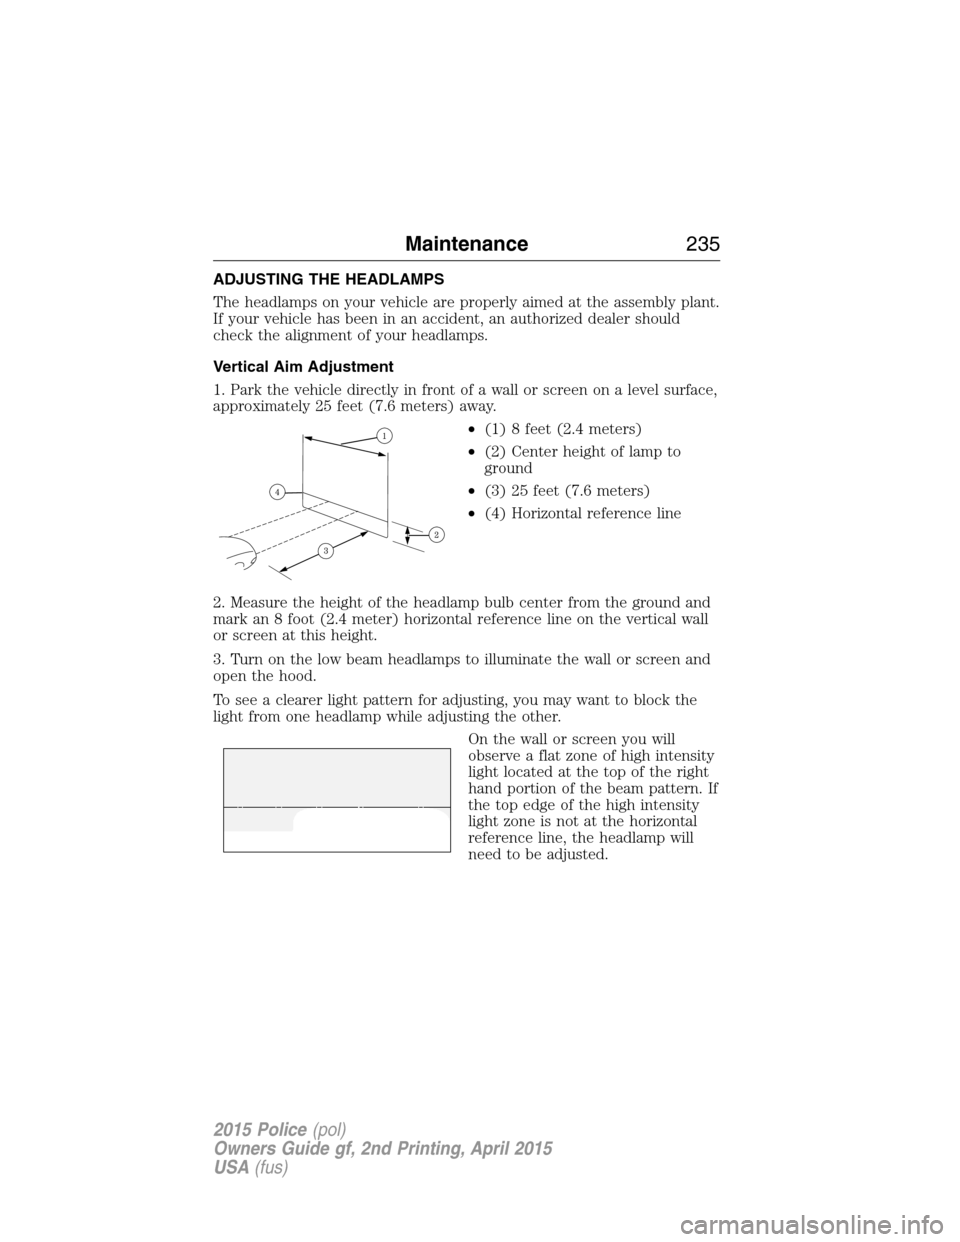
1. Park the vehicle directly in front of a wall or screen on a level surface,
approximately 25 feet (7.6 meters) away.
•(1) 8 feet (2.4 meters)
•(2) Center height of lamp to
ground
•(3) 25 feet (7.6 meters)
•(4) Horizontal reference line
2. Measure the height of the headlamp bulb center from the ground and
mark an 8 foot (2.4 meter) horizontal reference line on the vertical wall
or screen at this height.
3. Turn on the low beam headlamps to illuminate the wall or screen and
open the hood.
To see a clearer light pattern for adjusting, you may want to block the
light from one headlamp while adjusting the other.
On the wall or screen you will
observe a flat zone of high intensity
light located at the top of the right
hand portion of the beam pattern. If
the top edge of the high intensity
light zone is not at the horizontal
reference line, the headlamp will
need to be adjusted.
Maintenance235
2015 Police(pol)
Owners Guide gf, 2nd Printing, April 2015
USA(fus)
Page 264 of 401

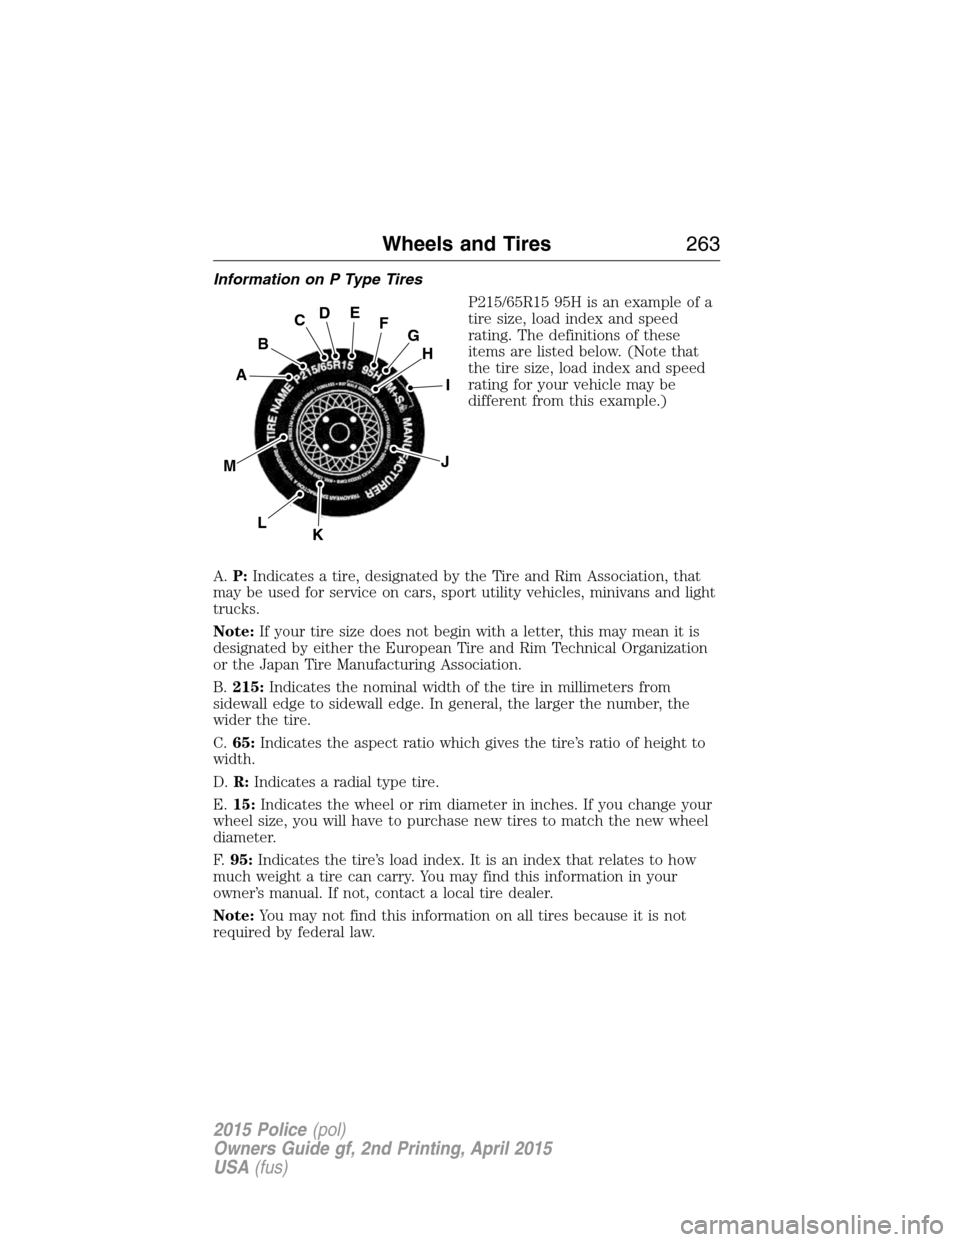
Information on P Type Tires
P215/65R15 95H is an example of a
tire size, load index and speed
rating. The definitions of these
items are listed below. (Note that
the tire size, load index and speed
rating for your vehicle may be
different from this example.)
A.P:Indicates a tire, designated by the Tire and Rim Association, that
may be used for service on cars, sport utility vehicles, minivans and light
trucks.
Note:If your tire size does not begin with a letter, this may mean it is
designated by either the European Tire and Rim Technical Organization
or the Japan Tire Manufacturing Association.
B.215:Indicates the nominal width of the tire in millimeters from
sidewall edge to sidewall edge. In general, the larger the number, the
wider the tire.
C.65:Indicates the aspect ratio which gives the tire’s ratio of height to
width.
D.R:Indicates a radial type tire.
E.15:Indicates the wheel or rim diameter in inches. If you change your
wheel size, you will have to purchase new tires to match the new wheel
diameter.
F.95:Indicates the tire’s load index. It is an index that relates to how
much weight a tire can carry. You may find this information in your
owner’s manual. If not, contact a local tire dealer.
Note:You may not find this information on all tires because it is not
required by federal law.
H
I
J
KL
M
A
B
CDEFG
Wheels and Tires263
2015 Police(pol)
Owners Guide gf, 2nd Printing, April 2015
USA(fus)
Page 268 of 401

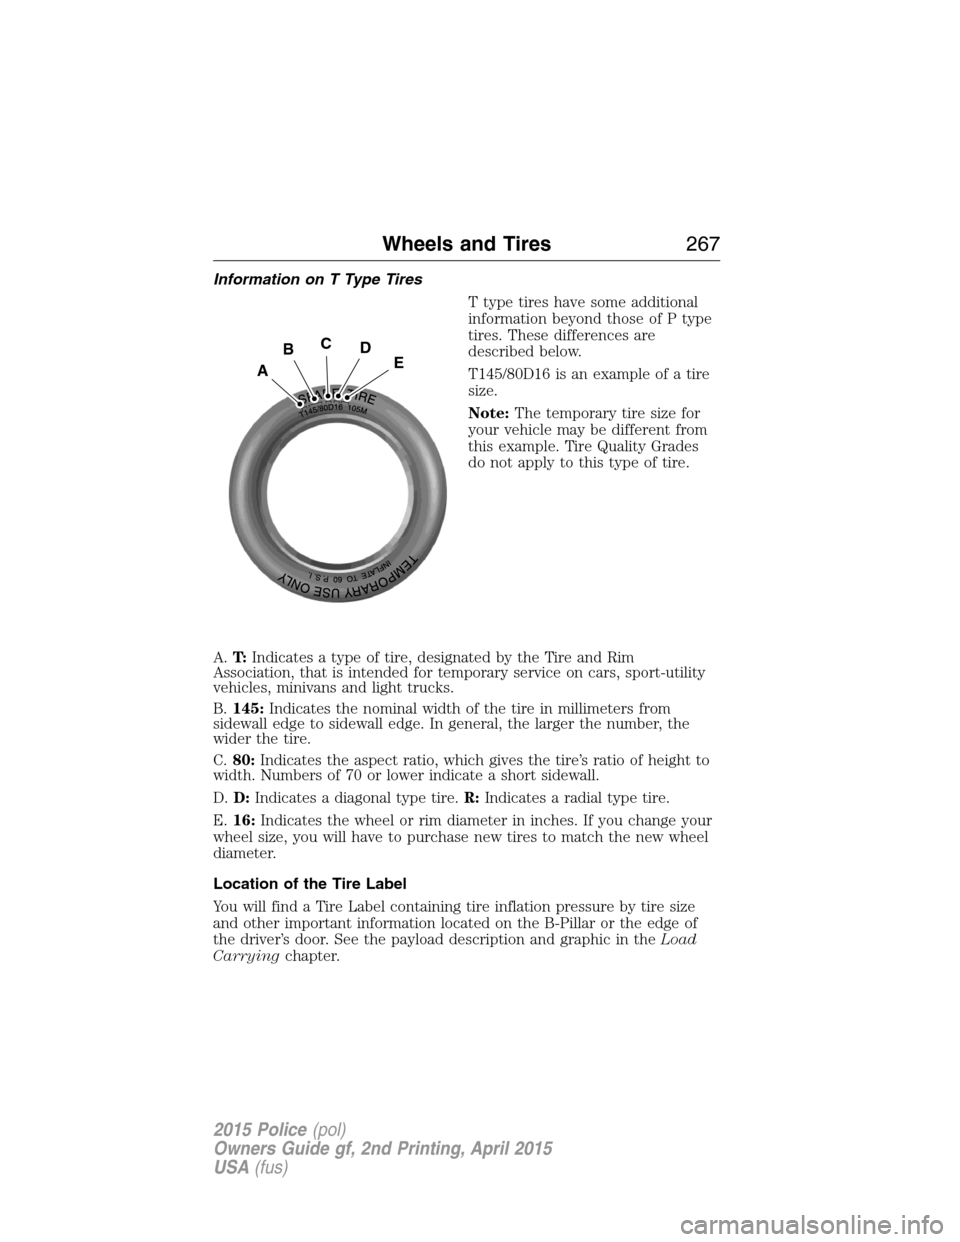
Information on T Type Tires
T type tires have some additional
information beyond those of P type
tires. These differences are
described below.
T145/80D16 is an example of a tire
size.
Note:The temporary tire size for
your vehicle may be different from
this example. Tire Quality Grades
do not apply to this type of tire.
A.T:Indicates a type of tire, designated by the Tire and Rim
Association, that is intended for temporary service on cars, sport-utility
vehicles, minivans and light trucks.
B.145:Indicates the nominal width of the tire in millimeters from
sidewall edge to sidewall edge. In general, the larger the number, the
wider the tire.
C.80:Indicates the aspect ratio, which gives the tire’s ratio of height to
width. Numbers of 70 or lower indicate a short sidewall.
D.D:Indicates a diagonal type tire.R:Indicates a radial type tire.
E.16:Indicates the wheel or rim diameter in inches. If you change your
wheel size, you will have to purchase new tires to match the new wheel
diameter.
Location of the Tire Label
You will find a Tire Label containing tire inflation pressure by tire size
and other important information located on the B-Pillar or the edge of
the driver’s door. See the payload description and graphic in theLoad
Carryingchapter.
A
BCDE
Wheels and Tires267
2015 Police(pol)
Owners Guide gf, 2nd Printing, April 2015
USA(fus)
Page 271 of 401

Note:Some spare tires operate at a higher inflation pressure than the
other tires. For T-type mini-spare tires, see theDissimilar Spare Tire
and Wheel Assembly Informationsection. Store and maintain at 60 psi
(4.15 bar). For full-size and dissimilar spare tires, seeDissimilar Spare
Tire and Wheel Assembly InformationunderChanging a Road Wheel
in this chapter. Store and maintain at the higher of the front and rear
inflation pressure as shown on the Tire Label.
6. Visually inspect the tires to make sure there are no nails or other objects
embedded that could poke a hole in the tire and cause an air leak.
7. Check the sidewalls to make sure there are no gouges, cuts or bulges.
Inspecting Your Tires and Wheel Valve Stems
Periodically inspect the tire treads for uneven or excessive wear and
remove objects such as stones, nails or glass that may be wedged in the
tread grooves. Check the tire and valve stems for holes, cracks, or cuts
that may permit air leakage and repair or replace the tire and replace
the valve stem. Inspect the tire sidewalls for cracking, cuts, bruises and
other signs of damage or excessive wear. If internal damage to the tire is
suspected, have the tire demounted and inspected in case it needs to be
repaired or replaced. For your safety, tires that are damaged or show
signs of excessive wear should not be used because they are more likely
to blow out or fail.
Improper or inadequate vehicle maintenance can cause tires to wear
abnormally. Inspect all your tires, including the spare, frequently, and
replace them if one or more of the following conditions exist:
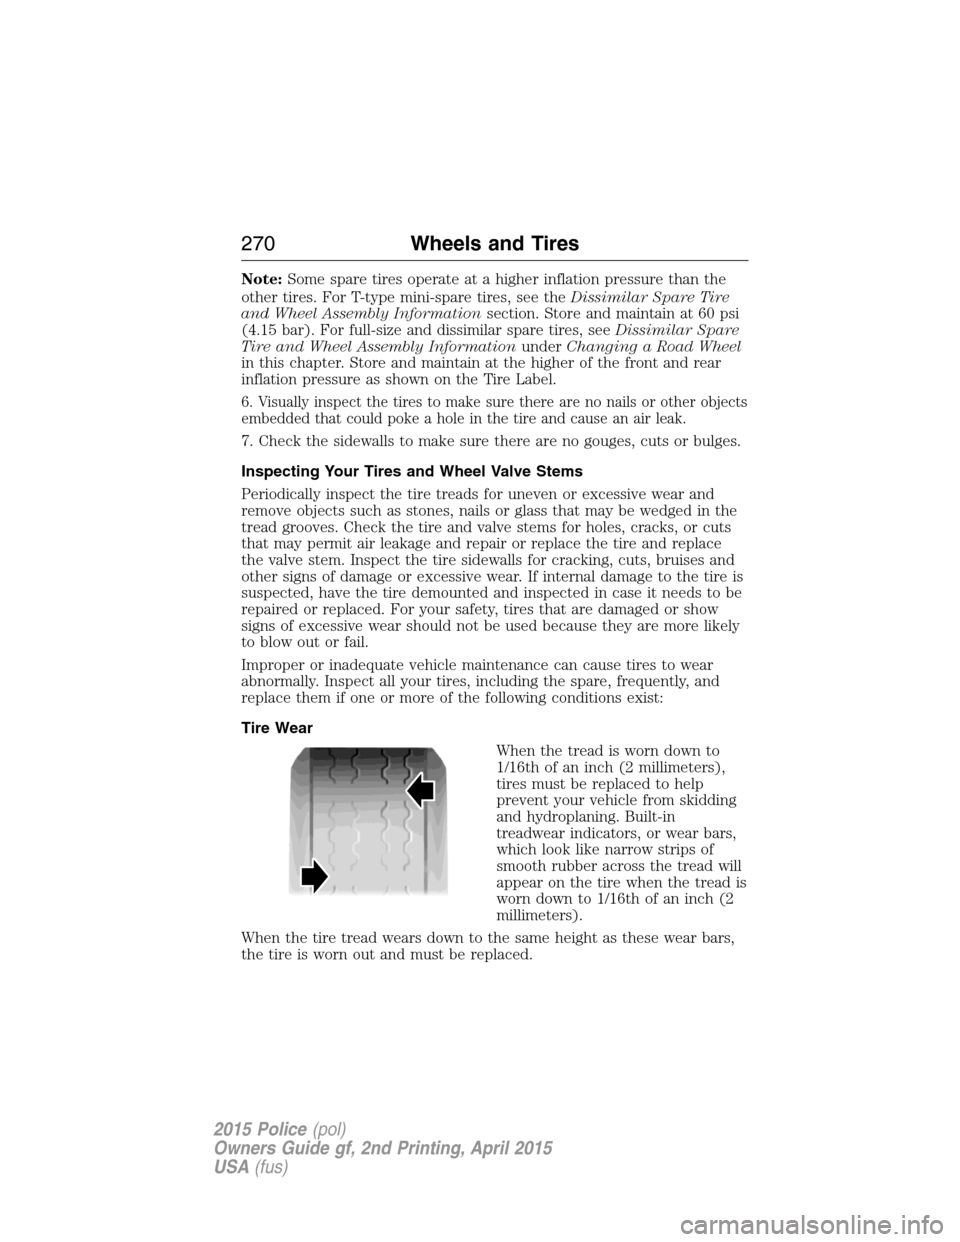
Tire Wear
When the tread is worn down to
1/16th of an inch (2 millimeters),
tires must be replaced to help
prevent your vehicle from skidding
and hydroplaning. Built-in
treadwear indicators, or wear bars,
which look like narrow strips of
smooth rubber across the tread will
appear on the tire when the tread is
worn down to 1/16th of an inch (2
millimeters).
When the tire tread wears down to the same height as these wear bars,
the tire is worn out and must be replaced.
270Wheels and Tires
2015 Police(pol)
Owners Guide gf, 2nd Printing, April 2015
USA(fus)
Page 291 of 401
Stowing the Spare and Jack (Utility)
1. Replace the wheel chock in the foam tray.
2. Adjust the jack to the proper
height to install the wrench. Turn
the jack lead screw until the arrow
on the upper link is slightly below
the circle indicator shown on the
lower link.
Push the button (A) to retract the
wrench handle and place the
wrench over the raised tab on the
lower link and drop the tang (B)
through the hole in the diagonally
opposite upper link. Turn the lead
screw of jack clockwise until the
arrow aligns with the circle
indicator to secure the wrench onto
the jack.
3. Place the jack in the foam tray and secure it with the attached strap.
4. Place the foam tray over the mounting bracket on the floor of the
spare tire well.
5. Replace the spare over the jack and secure with the wing nut.
A
B
290Wheels and Tires
2015 Police(pol)
Owners Guide gf, 2nd Printing, April 2015
USA(fus)