2015 FORD FOCUS low beam
[x] Cancel search: low beamPage 82 of 453

LIGHTING CONTROL
OffA
Parking lamps, instrument panel
lamps, license plate lamps and
tail lamps
B
Headlamps
C
High Beams Push the lever forward to switch the high
beams on.
Push the lever forward again or pull the
lever toward you to switch the high beams
off. Headlamp Flasher
Pull the lever toward you slightly and
release it to flash the headlamps.
AUTOLAMPS (If Equipped)
WARNING
The autolamps switch position may
not activate the headlamps in all low
visibility conditions, such as daytime
fog. Always ensure that your headlamps
are switched to auto or on, as appropriate,
during all low visibility conditions. Failure
to do so may result in a collision. When the lighting control is in the
autolamps position, the headlamps
automatically turn on in low light situations
or when the wipers activate.
79
Focus (CDH), enUSA, First Printing LightingE142449 E162679 E162680 E142451
Page 83 of 453

If equipped, the following also activate
when the lighting control is in the
autolamps position and you switch them
on in the information display:
•
Configurable daytime running lamps.
• Automatic high beam control.
• Adaptive headlamp control.
The headlamps remain on for a period of
time after you switch the ignition off. Use
the information display controls to adjust
the period of time that the headlamps
remain on. See Information Displays
(page 96).
Note: With the headlamps in the
autolamps position, you cannot switch the
high beam headlamps on until the
autolamps system turns the low beam
headlamps on.
Windshield Wiper Activated
Headlamps
The windshield wiper activated headlamps
turn on within 10 seconds when you switch
the windshield wipers on and the lighting
control is in the autolamps position. They
turn off approximately 60 seconds after
you switch the windshield wipers off.
The headlamps will not turn on by wiper
activation:
• During a mist wipe.
• When the wipers are on to clear washer
fluid during a wash condition.
• If the wipers are in intermittent mode.
Note: If you switch autolamps and
autowipers on, the headlamps will
automatically turn on when the windshield
wipers continuously operate. INSTRUMENT LIGHTING
DIMMER
Note:
You disable the manual dimmer
when you adjust the setting to Auto
Dimming in the information display. See
Information Displays
(page 96).
Note: If you disconnect the battery or it
becomes discharged, the illuminated
components will switch to the maximum
setting. Press repeatedly or press and hold until
you reach the desired level.
HEADLAMP EXIT DELAY
After you switch the ignition off, you can
switch the headlamps on by pulling the
direction indicator lever toward you. You
will hear a short tone. The headlamps will
switch off automatically after three
minutes with any door open or 30 seconds
after the last door has been closed. You
can cancel this feature by pulling the
direction indicator toward you again or
switching the ignition on.
80
Focus (CDH), enUSA, First Printing LightingE161902
Page 84 of 453

DAYTIME RUNNING LAMPS
WARNING
The daytime running lamps system
does not activate the rear lamps and
may not provide adequate lighting
during low visibility driving conditions. Also,
the autolamps switch position may not
activate the headlamps in all low visibility
conditions, such as daytime fog. Make sure
the headlamps are switched to auto or on,
as appropriate, during all low visibility
conditions. Failure to do so may result in a
crash. Type 1 - Conventional (Non-
Configurable)
The daytime running lamps turn on when:
1. The ignition is switched to the on
position.
2. The transmission is not in park (P) for vehicles with automatic transmissions
or the parking brake is released for
vehicles with manual transmissions.
3. The lighting control is in the off, parking
lamp or autolamps positions.
4. The headlamps are off.
Type 2 - Configurable
Switch the daytime running lamps on or
off using the information display controls.
See Information Displays (page 96).
The daytime running lamps turn on when:
1. They are switched on in the information
display. See
Information Displays
(page 96).
2. The ignition is switched to the on position.
3. The transmission is not in park (P) for vehicles with automatic transmissions
or the parking brake is released for
vehicles with manual transmissions. 4.
The lighting control is in the autolamps
position.
5. The headlamps are off.
The other lighting control switch positions
do not activate the daytime running lamps,
and you can use them to temporarily
override autolamp control.
When switched off in the information
display, the daytime running lamps are off
in all lighting control switch positions.
AUTOMATIC HIGH BEAM
CONTROL
(If Equipped)
The system automatically turns on the high
beams if it is dark enough and no other
traffic is present. When it detects the
headlights of an approaching vehicle, the
rear lamps of the preceding vehicle or
street lighting, the system turns off the high
beams before they distract other drivers.
The low beams remain on.
Note: If it appears that automatic high
beam is not functioning properly, check the
windshield in front of the camera for a
blockage. A clear view of the road is required
for proper system operation. Make sure that
authorized personnel repair any windshield
damage in the area of the camera's field of
view.
Note: If the system detects a blockage such
as bird droppings, bug splatter, snow or ice,
and you do not observe changes, the system
may go into low beam mode until you clear
the blockage. A message may also appear
in the information display noting the front
camera is blocked.
81
Focus (CDH), enUSA, First Printing Lighting
Page 85 of 453

Note:
Typical road dust, dirt and water
spots do not affect the performance of the
automatic high beam control. However, in
cold or inclement weather conditions, you
may notice a decrease in the availability of
the automatic high beam control, especially
at start up. If you want to change the beam
state independently of the system, you may
switch the high beams on or off using the
lighting control switch. Automatic high
beam control resumes when conditions are
correct.
Note: Modification of your vehicle ride
height such as using much larger tires, may
degrade feature performance.
A camera sensor, centrally mounted
behind the windshield of your vehicle,
continuously monitors conditions to decide
when to switch the high beams off and on.
Once the system is active, the high beams
switch on if:
• The ambient light level is low enough.
• There is no traffic in front of the vehicle.
• The vehicle speed is greater than
31 mph (50 km/h).
The high beams switch off if:
• The system detects the headlamps of
an approaching vehicle or the rear
lamps of a preceding vehicle.
• Vehicle speed falls below
26 mph
(42 km/h).
• The ambient light level is high enough
that high beams are not required.
• The system detects severe rain, snow
or fog.
• The camera is blocked.
Activating the System
Switch on the system in the information
display and switch the lighting control to
the autolamps position. See Information
Displays
(page 96). See Autolamps
(page 79). The indicator lamp illuminates to confirm
when the system is ready to assist.
Manually Overriding the System
When automatic high beam control has
activated the high beams, pushing or
pulling the stalk provides a temporary
override to low beam.
Use the information display menu to
permanently deactivate the system, or
switch the lighting control from autolamps
to headlamps.
82
Focus (CDH), enUSA, First Printing LightingE142451 E169254
Page 96 of 453

Direction Indicator
Lights when you switch on the
left or right direction indicator or
hazard warning flasher. If the
indicators stay on or flash faster, check for
a burned out bulb. See Changing a Bulb
(page 222).
Door Ajar Displays when the vehicle is on
and any door is not completely
closed.
Engine Oil If it illuminates with the engine
running or when you are driving,
this indicates a malfunction.
Stop your vehicle as soon as it is safe to
do so and switch the engine off. Check the
engine oil level. See
Engine Oil Check
(page 213).
Note: Do not resume your journey if it
illuminates despite the level being correct.
Have the system checked by an authorized
dealer immediately.
Fasten Safety Belt It lights and a tone sounds to
remind you to fasten your safety
belt. See
Safety Belt Minder
(page 37).
Front Airbag If it fails to light when you first
power your vehicle, continues to
flash or remains on, this
indicates a malfunction. Have the system
checked by an authorized dealer. Front Fog Lamps
(If Equipped) It lights when you switch the
front fog lamps on.
High Beam Lights when you switch the high
beam headlamps on. It flashes
when you use the headlamp
flasher.
Information
(If Equipped) Lights when a new message is
stored in the information display.
It is red or amber in color
depending on the severity of the message
and remains on until the cause of the
message has been rectified. See
Information Messages
(page 99).
Lane Keeping Aid
(If Equipped) Lights when the lane keeping
system is activated.
Liftgate Ajar Lights when the liftgate is not
completely closed.
Low Fuel Level It lights when the fuel level is low
or the fuel tank is nearly empty.
Refuel as soon as possible.
Low Tire Pressure Warning It lights when your tire pressure
is low. If the lamp remains on
with the engine running or when
driving, check your tire pressure
as soon as possible.
93
Focus (CDH), enUSA, First Printing Instrument Cluster E144813 E162453
Page 106 of 453

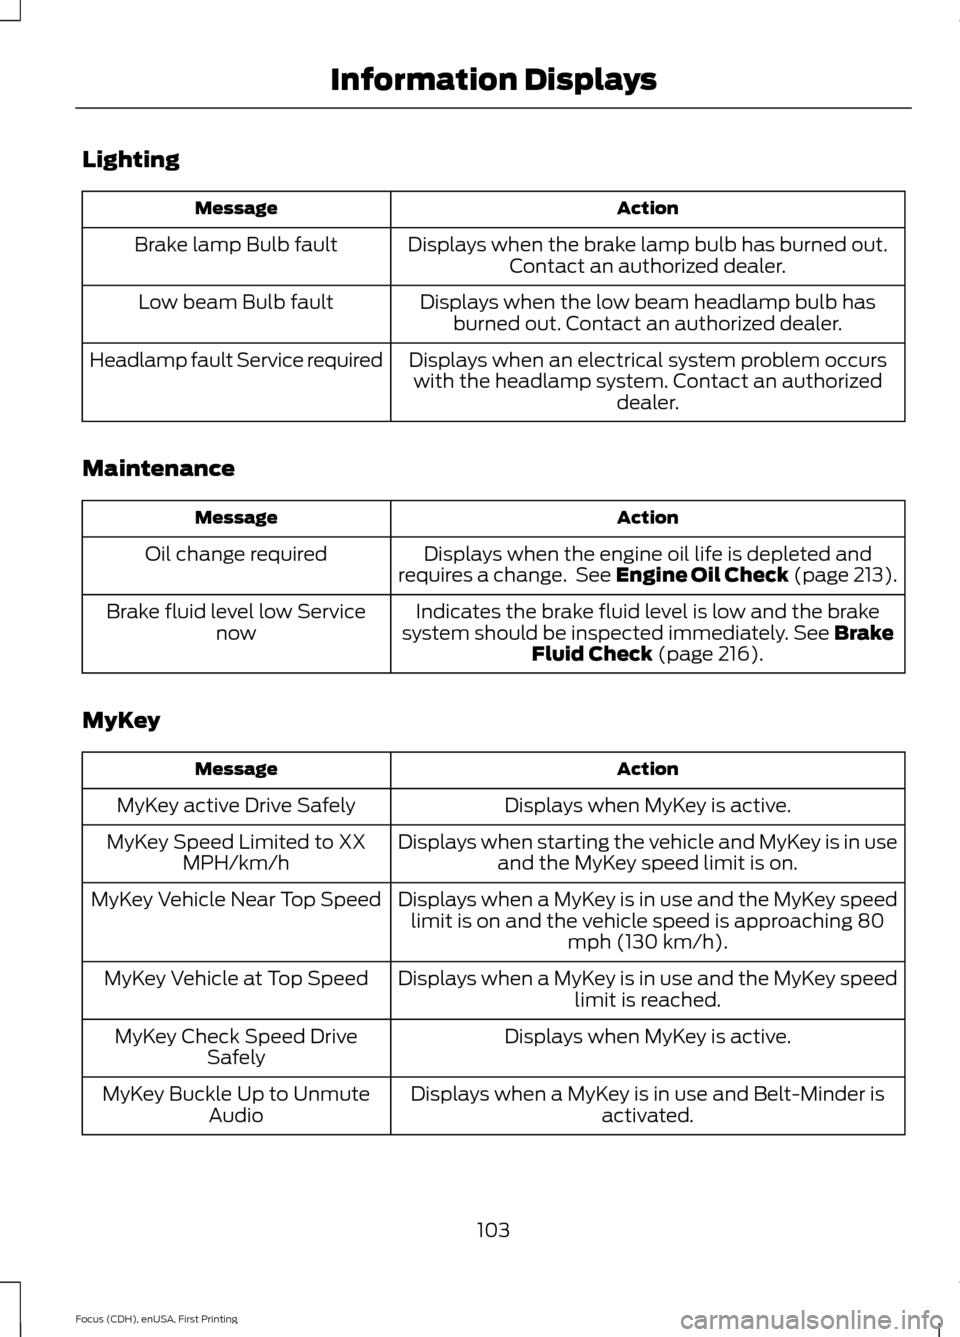
Lighting
Action
Message
Displays when the brake lamp bulb has burned out.Contact an authorized dealer.
Brake lamp Bulb fault
Displays when the low beam headlamp bulb hasburned out. Contact an authorized dealer.
Low beam Bulb fault
Displays when an electrical system problem occurswith the headlamp system. Contact an authorized dealer.
Headlamp fault Service required
Maintenance Action
Message
Displays when the engine oil life is depleted and
requires a change. See Engine Oil Check (page 213).
Oil change required
Indicates the brake fluid level is low and the brake
system should be inspected immediately. See Brake
Fluid Check (page 216).
Brake fluid level low Service
now
MyKey Action
Message
Displays when MyKey is active.
MyKey active Drive Safely
Displays when starting the vehicle and MyKey is in useand the MyKey speed limit is on.
MyKey Speed Limited to XX
MPH/km/h
Displays when a MyKey is in use and the MyKey speedlimit is on and the vehicle speed is approaching 80 mph (130 km/h).
MyKey Vehicle Near Top Speed
Displays when a MyKey is in use and the MyKey speedlimit is reached.
MyKey Vehicle at Top Speed
Displays when MyKey is active.
MyKey Check Speed Drive
Safely
Displays when a MyKey is in use and Belt-Minder isactivated.
MyKey Buckle Up to Unmute
Audio
103
Focus (CDH), enUSA, First Printing Information Displays
Page 223 of 453

3. Rotate and remove the wiper blade.
4. Install in the reverse order.
Note:
Make sure that the wiper blade locks
into place.
Changing the Rear Window Wiper
Blade
1. Lift the wiper arm. Note:
Make sure that the wiper arm does
not spring back against the glass when the
wiper blade is not attached.
2. Slightly rotate the wiper blade.
3. Disengage the wiper blade from the wiper arm.
4. Remove the wiper blade.
5. Install in the reverse order.
Note: Make sure that the wiper blade locks
into place.
ADJUSTING THE HEADLAMPS
Vertical Aim Adjustment
If your vehicle has been involved in a crash,
have the aim of the headlamp beam
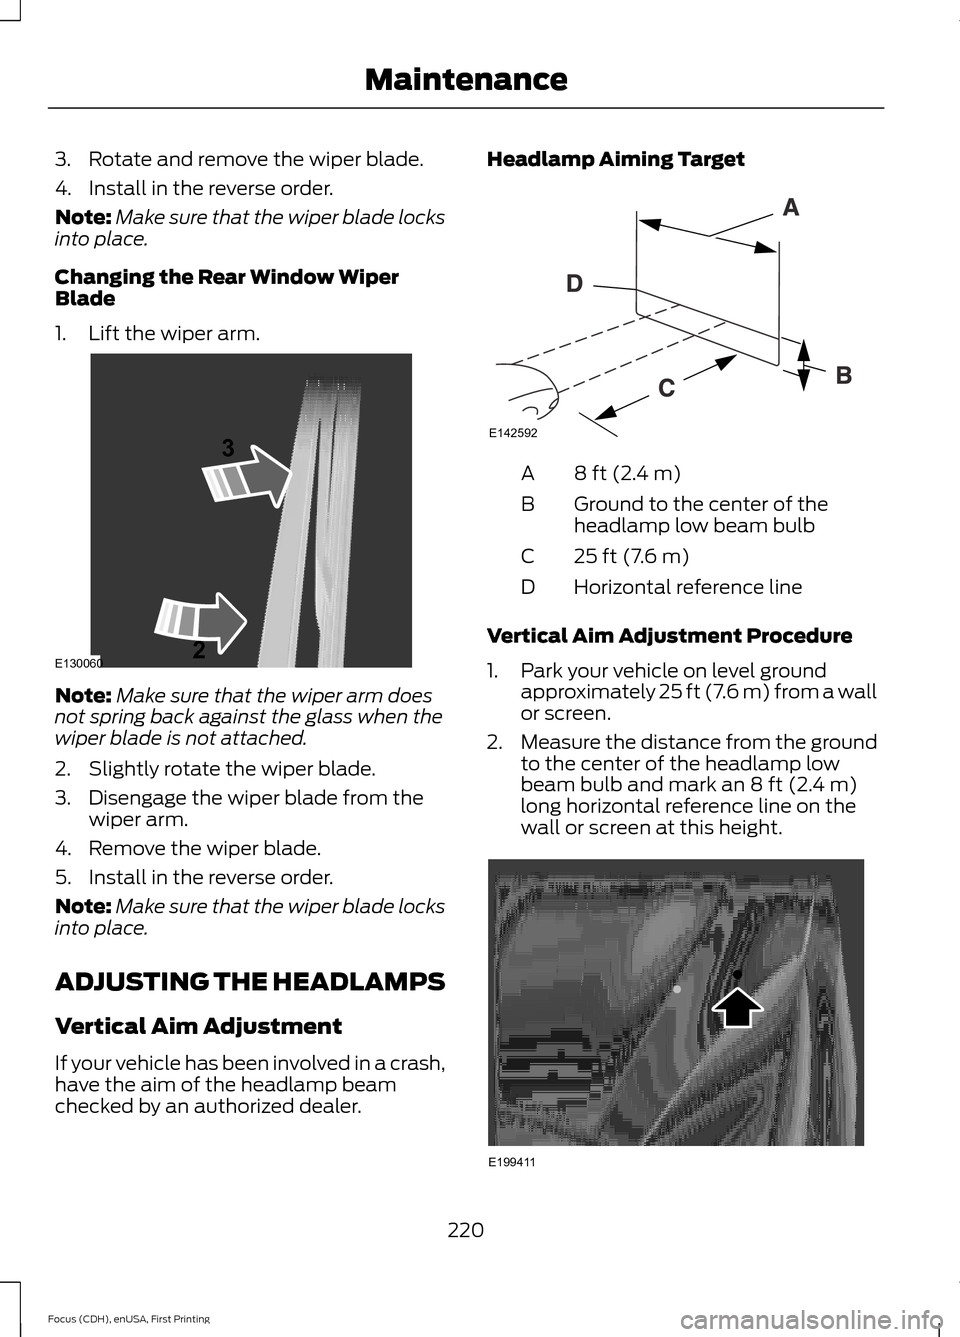
checked by an authorized dealer. Headlamp Aiming Target
8 ft (2.4 m)
A
Ground to the center of the
headlamp low beam bulb
B
25 ft (7.6 m)
C
Horizontal reference line
D
Vertical Aim Adjustment Procedure
1. Park your vehicle on level ground approximately 25 ft (7.6 m) from a wall
or screen.
2. Measure the distance from the ground
to the center of the headlamp low
beam bulb and mark an
8 ft (2.4 m)
long horizontal reference line on the
wall or screen at this height. 220
Focus (CDH), enUSA, First Printing MaintenanceE130060
3
2 E142592 E199411
Page 224 of 453

Note:
There may be an identifying mark on
the lens to help you locate the center of the
bulb.
Note: To see a clearer light pattern while
adjusting one headlamp, you may want to
block the light from the other headlamp.
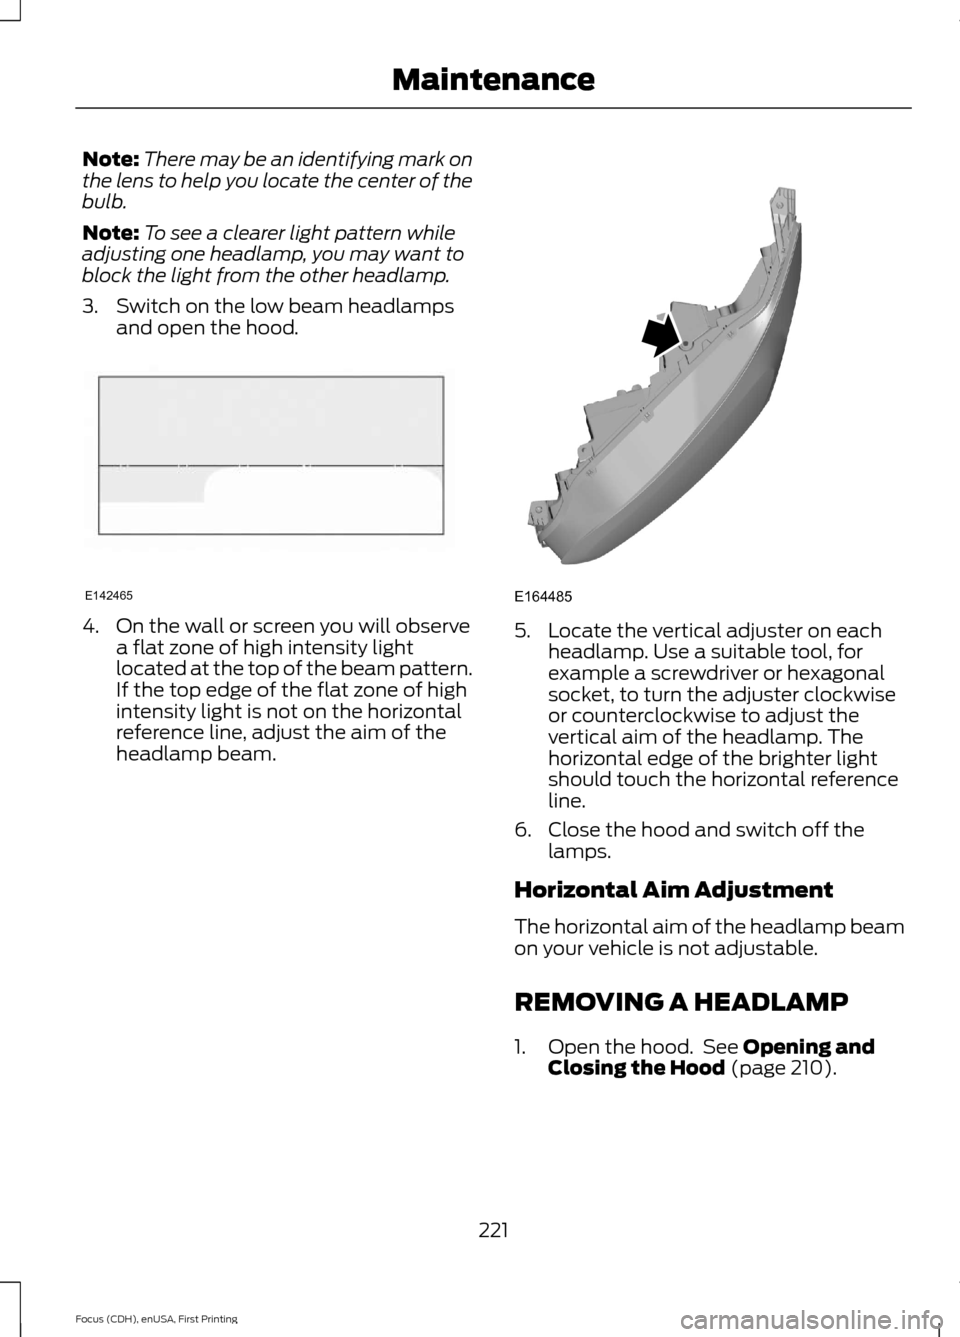
3. Switch on the low beam headlamps and open the hood. 4. On the wall or screen you will observe
a flat zone of high intensity light
located at the top of the beam pattern.
If the top edge of the flat zone of high
intensity light is not on the horizontal
reference line, adjust the aim of the
headlamp beam. 5. Locate the vertical adjuster on each
headlamp. Use a suitable tool, for
example a screwdriver or hexagonal
socket, to turn the adjuster clockwise
or counterclockwise to adjust the
vertical aim of the headlamp. The
horizontal edge of the brighter light
should touch the horizontal reference
line.
6. Close the hood and switch off the lamps.
Horizontal Aim Adjustment
The horizontal aim of the headlamp beam
on your vehicle is not adjustable.
REMOVING A HEADLAMP
1. Open the hood. See Opening and
Closing the Hood (page 210).
221
Focus (CDH), enUSA, First Printing MaintenanceE142465 E164485