2015 FORD F250 SUPER DUTY tire pressure
[x] Cancel search: tire pressurePage 286 of 470
Each tire, including the spare (ifprovided), should be checkedmonthly when cold and inflatedto the inflation pressurerecommended by the vehicle manufactureron the vehicle placard or tire inflationpressure label. (If your vehicle has tires ofa different size than the size indicated onthe vehicle placard or tire inflation pressurelabel, you should determine the proper tireinflation pressure for those tires.)
As an added safety feature, your vehiclehas been equipped with a Tire PressureMonitoring System (TPMS) thatilluminates a low tire pressure telltalewhen one or more of your tires issignificantly under-inflated. Accordingly,when the low tire pressure telltaleilluminates, you should stop and checkyour tires as soon as possible, and inflatethem to the proper pressure. Driving on asignificantly under-inflated tire causes thetire to overheat and can lead to tire failure.Under-inflation also reduces fuel efficiencyand tire tread life, and may affect thevehicle’s handling and stopping ability.
Please note that the TPMS is not asubstitute for proper tire maintenance, andit is the driver’s responsibility to maintaincorrect tire pressure, even if under-inflationhas not reached the level to triggerillumination of the TPMS low tire pressuretelltale.
Your vehicle has also been equipped witha TPMS malfunction indicator to indicatewhen the system is not operating properly.The TPMS malfunction indicator iscombined with the low tire pressuretelltale. When the system detects amalfunction, the telltale will flash forapproximately one minute and then remaincontinuously illuminated. This sequencewill continue upon subsequent vehiclestart-ups as long as the malfunction exists.
When the malfunction indicator isilluminated, the system may not be ableto detect or signal low tire pressure asintended. TPMS malfunctions may occurfor a variety of reasons, including theinstallation of replacement or alternatetires or wheels on the vehicle that preventthe TPMS from functioning properly.Always check the TPMS malfunctiontelltale after replacing one or more tires orwheels on your vehicle to ensure that thereplacement or alternate tires and wheelsallow the TPMS to continue to functionproperly.
The tire pressure monitoring systemcomplies with part 15 of the FCC rules andwith RSS-210 of Industry Canada.Operation is subject to the following twoconditions: (1) This device may not causeharmful interference, and (2) This devicemust accept any interference received,including interference that may causeundesired operation.
Changing Tires With a TirePressure Monitoring System
Note:Each road tire is equipped with a tirepressure sensor located inside the wheeland tire assembly cavity. The pressuresensor is attached to the valve stem. Thepressure sensor is covered by the tire and isnot visible unless the tire is removed. Takecare when changing the tire to avoiddamaging the sensor
283
Super Duty (), enUSA
Wheels and Tires E142549
Page 287 of 470
You should always have your tires servicedby an authorized dealer.
Check the tire pressure periodically (atleast monthly) using an accurate tiregauge. See Inflating Your Tires in thischapter.
Understanding Your Tire PressureMonitoring System
The tire pressure monitoring systemmeasures pressure in your four road tiresand sends the tire pressure readings toyour vehicle. The low tire pressure warninglight will turn on if the tire pressure issignificantly low. Once the light isilluminated, your tires are under-inflatedand need to be inflated to themanufacturer’s recommended tirepressure. Even if the light turns on and ashort time later turns off, your tire pressurestill needs to be checked.
When Your Temporary Spare Tire isInstalled
When one of your road tires needs to bereplaced with the temporary spare, thesystem will continue to identify an issue toremind you that the damaged road wheeland tire assembly needs to be repaired andput back on your vehicle.
To restore the full function of the tirepressure monitoring system, have thedamaged road wheel and tire assemblyrepaired and remounted on your vehicle.
When You Believe Your System is NotOperating Properly
The main function of the tire pressuremonitoring system is to warn you whenyour tires need air. It can also warn you inthe event the system is no longer capableof functioning as intended. See thefollowing chart for information concerningyour tire pressure monitoring system:
284
Super Duty (), enUSA
Wheels and Tires
Page 288 of 470
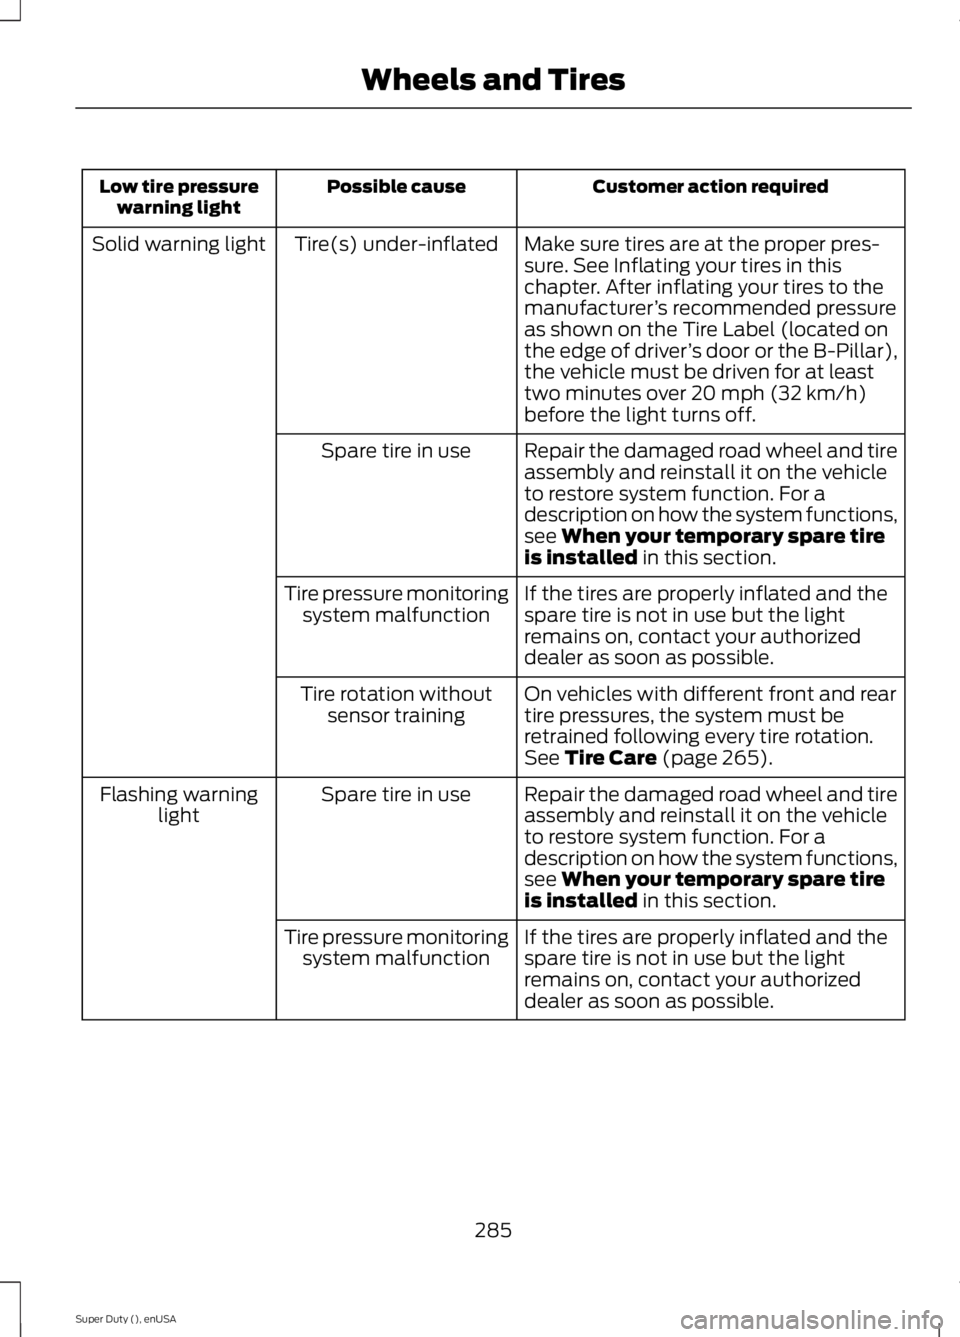
Customer action requiredPossible causeLow tire pressurewarning light
Make sure tires are at the proper pres-sure. See Inflating your tires in thischapter. After inflating your tires to themanufacturer’s recommended pressureas shown on the Tire Label (located onthe edge of driver’s door or the B-Pillar),the vehicle must be driven for at leasttwo minutes over 20 mph (32 km/h)before the light turns off.
Tire(s) under-inflatedSolid warning light
Repair the damaged road wheel and tireassembly and reinstall it on the vehicleto restore system function. For adescription on how the system functions,see When your temporary spare tireis installed in this section.
Spare tire in use
If the tires are properly inflated and thespare tire is not in use but the lightremains on, contact your authorizeddealer as soon as possible.
Tire pressure monitoringsystem malfunction
On vehicles with different front and reartire pressures, the system must beretrained following every tire rotation.See Tire Care (page 265).
Tire rotation withoutsensor training
Repair the damaged road wheel and tireassembly and reinstall it on the vehicleto restore system function. For adescription on how the system functions,see When your temporary spare tireis installed in this section.
Spare tire in useFlashing warninglight
If the tires are properly inflated and thespare tire is not in use but the lightremains on, contact your authorizeddealer as soon as possible.
Tire pressure monitoringsystem malfunction
285
Super Duty (), enUSA
Wheels and Tires
Page 289 of 470
When Inflating Your Tires
When putting air into your tires (such as ata gas station or in your garage), the tirepressure monitoring system may notrespond immediately to the air added toyour tires.
It may take up to two minutes of drivingover 20 mph (32 km/h) for the light to turnoff after you have filled your tires to therecommended inflation pressure
How Temperature Affects Your TirePressure
The tire pressure monitoring systemmonitors tire pressure in each pneumatictire. While driving in a normal manner, atypical passenger tire inflation pressuremay increase about 2 to 4 psi (14 to 28kPa) from a cold start situation. If thevehicle is stationary overnight with theoutside temperature significantly lowerthan the daytime temperature, the tirepressure may decrease about 3 psi (21kPa) for a drop of 30°F (17°C) in ambienttemperature. This lower pressure valuemay be detected by the tire pressuremonitoring system as being significantlylower than the recommended inflationpressure and activate the system warninglight for low tire pressure.
If the low tire pressure warning light is on,visually check each tire to verify that no tireis flat. If one or more tires are flat, repair asnecessary. Check the air pressure in theroad tires. If any tire is under-inflated,carefully drive the vehicle to the nearestlocation where air can be added to thetires. Inflate all the tires to therecommended inflation pressure.
Tire Pressure Monitoring System ResetProcedure
WARNING
To determine the requiredpressure(s) for your vehicle, see theSafety Compliance CertificationLabel (affixed to either the door hingepillar, door-latch post, or the door edgethat meets the door-latch post, next to thedriver's seating position), or Tire Labellocated on the B-Pillar or the edge of thedriver's door.
Note:You need to perform the tire pressuremonitoring system reset procedure aftereach tire rotation on vehicles that requiredifferent recommended tire pressures in thefront tires as compared to the rear tires.
Overview
To provide the vehicle's load carryingcapability, some vehicles require differentrecommended tire pressures in the fronttires as compared to the rear tires. The tirepressure monitoring system equipped onthese vehicles is designed to illuminate thelow tire pressure warning light at twodifferent pressures; one for the front tiresand one for the rear tires.
Since tires need to be rotated to provideconsistent performance and maximum tirelife, the tire pressure monitoring systemneeds to know when the tires are rotatedto determine which set of tires are on thefront and which are on the rear. With thisinformation, the system can detect andproperly warn of low tire pressures.
System reset tips:
286
Super Duty (), enUSA
Wheels and Tires
Page 290 of 470
•To reduce the chances of interferencefrom another vehicle, perform thesystem reset procedure at least threefeet (one meter) away from anotherFord Motor Company vehicleundergoing the system reset procedureat the same time.
•Do not wait more than two minutesbetween resetting each tire sensor orthe system will time-out and the entireprocedure will have to be repeated onall four wheels.
•A double horn will sound indicating theneed to repeat the procedure.
Performing the System Reset Procedure
Read the entire procedure beforeattempting.
1. Drive the vehicle above 20 mph (32km/h) for at least two minutes, thenpark in a safe location where you caneasily get to all four tires and haveaccess to an air pump.
2.Place the ignition in the off position andkeep the key in the ignition.
3. Cycle the ignition to the on positionwith the engine off.
4. Turn the hazard flashers on then offthree times. You must accomplish thiswithin 10 seconds. If the reset modehas been entered successfully, the hornwill sound once, the system indicatorwill flash and a message is shown inthe information display. If this does notoccur, please try again starting at Step2. If after repeated attempts to enterthe reset mode, the horn does notsound, the system indicator does notflash and no message is shown in theinformation display, seek service fromyour authorized dealer.
5. Train the tire pressure monitoringsystem sensors in the tires using thefollowing system reset sequencestarting with the left front tire in thefollowing clockwise order: Left front(driver's side front tire), Right front(passenger's side front tire), Right rear(passenger's side rear tire), Left rear(driver's side rear tire)
6. Remove the valve cap from the valvestem on the left front tire. Decrease theair pressure until the horn sounds.Note: The single horn chirp confirmsthat the sensor identification code hasbeen learned by the module for thisposition. If a double horn is heard, thereset procedure was unsuccessful, andyou must repeat it.
7. Remove the valve cap from the valvestem on the right front tire. Decreasethe air pressure until the horn sounds.
8. Remove the valve cap from the valvestem on the right rear tire. Decrease theair pressure until the horn sounds.
9. Remove the valve cap from the valvestem on the left rear tire. Decrease theair pressure until the horn sounds.Training is complete after the hornsounds for the last tire trained (driver'sside rear tire), the system indicatorstops flashing, and a message is shownin the information display.
10.Turn the ignition off. If two short hornbeeps are heard, the reset procedurewas unsuccessful and you mustrepeat it. If after repeating theprocedure and two short beeps areheard when the ignition is turned tooff, seek assistance from yourauthorized dealer.
287
Super Duty (), enUSA
Wheels and Tires
Page 291 of 470
11.Set all four tires to the recommendedair pressure as indicated on theSafety Compliance CertificationLabel (affixed to either the door hingepillar, door-latch post, or the dooredge that meets the door-latch post,next to the driver's seating position)or Tire Label located on the B-Pillaror the edge of the driver's door.
CHANGING A ROAD WHEEL
WARNINGS
The use of tire sealants may damageyour tire pressure monitoring systemand should not be used. However, ifyou must use a sealant, the tire pressuremonitoring system sensor and valve stemon the wheel must be replaced by anauthorized dealer.
If the tire pressure monitor sensorbecomes damaged, it will no longerfunction. See Tire PressureMonitoring System (page 282).
Note:If your vehicle is equipped with thetire pressure monitoring system, theindicator light will illuminate when the sparetire is in use. To restore the full function ofthe monitoring system, all road wheelsequipped with tire pressure monitoringsensors must be mounted on the vehicle.
If you get a flat tire while driving, do notapply the brake heavily. Instead, graduallydecrease your speed. Hold the steeringwheel firmly and slowly move to a safeplace on the side of the road.
If your vehicle is equipped with the tirepressure monitoring system, have a flatserviced by an authorized dealer in orderto prevent damage to the system sensors.See Tire Pressure Monitoring System(page 282). Replace the spare tire with aroad tire as soon as possible. Duringrepairing or replacing of the flat tire, havethe authorized dealer inspect the systemsensor for damage.
Dissimilar Spare Wheel and TireAssembly Information
WARNING
Failure to follow these guidelinescould result in an increased risk ofloss of vehicle control, injury or death.
If you have a dissimilar spare wheel andtire, then it is intended for temporary useonly. This means that if you need to use it,you should replace it as soon as possiblewith a road wheel and tire assembly thatis the same size and type as the road tiresand wheels that were originally providedby Ford. If the dissimilar spare tire or wheelis damaged, it should be replaced ratherthan repaired.
A dissimilar spare wheel and tire assemblyis defined as a spare wheel and tireassembly that is different in brand, size orappearance from the road tires and wheelsand can be one of three types:
1.T-type mini-spare: This spare tirebegins with the letter T for tire size andmay have Temporary Use Only molded inthe sidewall.
2.Full-size dissimilar spare with labelon wheel: This spare tire has a label onthe wheel that states: THIS WHEEL ANDTIRE ASSEMBLY FOR TEMPORARY USEONLY
When driving with one of the dissimilarspare tires listed above, do not:
288
Super Duty (), enUSA
Wheels and Tires
Page 299 of 470
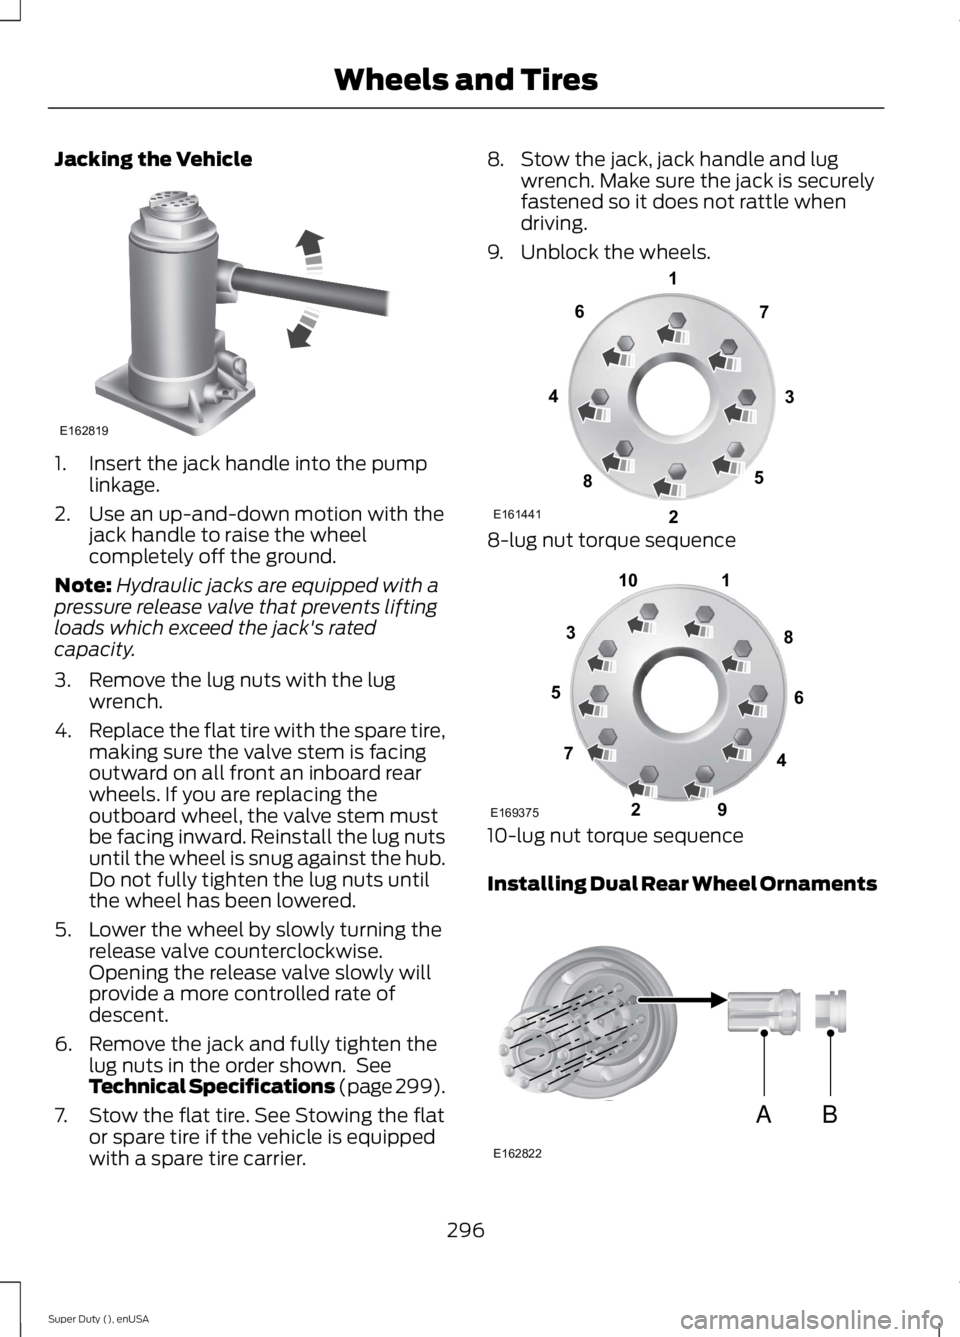
Jacking the Vehicle
1. Insert the jack handle into the pumplinkage.
2. Use an up-and-down motion with thejack handle to raise the wheelcompletely off the ground.
Note:Hydraulic jacks are equipped with apressure release valve that prevents liftingloads which exceed the jack's ratedcapacity.
3. Remove the lug nuts with the lugwrench.
4.Replace the flat tire with the spare tire,making sure the valve stem is facingoutward on all front an inboard rearwheels. If you are replacing theoutboard wheel, the valve stem mustbe facing inward. Reinstall the lug nutsuntil the wheel is snug against the hub.Do not fully tighten the lug nuts untilthe wheel has been lowered.
5. Lower the wheel by slowly turning therelease valve counterclockwise.Opening the release valve slowly willprovide a more controlled rate ofdescent.
6. Remove the jack and fully tighten thelug nuts in the order shown. SeeTechnical Specifications (page 299).
7. Stow the flat tire. See Stowing the flator spare tire if the vehicle is equippedwith a spare tire carrier.
8. Stow the jack, jack handle and lugwrench. Make sure the jack is securelyfastened so it does not rattle whendriving.
9. Unblock the wheels.
8-lug nut torque sequence
10-lug nut torque sequence
Installing Dual Rear Wheel Ornaments
296
Super Duty (), enUSA
Wheels and TiresE162819 E161441
13
4
27
6
5
8 1
2
3
4
5
6
7 8
9
10
E169375 AB
E162822
Page 301 of 470
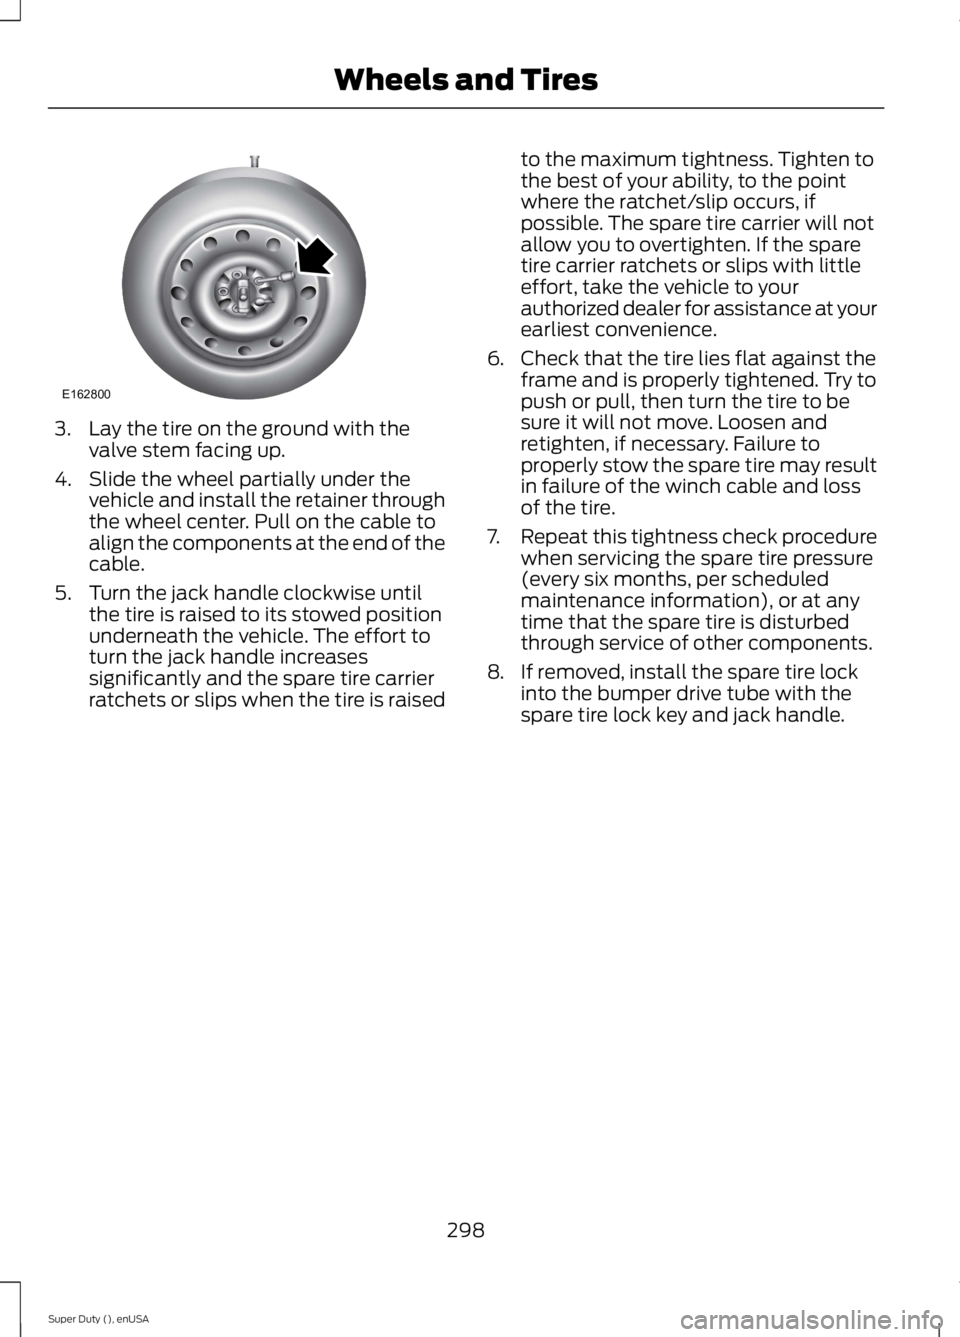
3. Lay the tire on the ground with thevalve stem facing up.
4. Slide the wheel partially under thevehicle and install the retainer throughthe wheel center. Pull on the cable toalign the components at the end of thecable.
5. Turn the jack handle clockwise untilthe tire is raised to its stowed positionunderneath the vehicle. The effort toturn the jack handle increasessignificantly and the spare tire carrierratchets or slips when the tire is raised
to the maximum tightness. Tighten tothe best of your ability, to the pointwhere the ratchet/slip occurs, ifpossible. The spare tire carrier will notallow you to overtighten. If the sparetire carrier ratchets or slips with littleeffort, take the vehicle to yourauthorized dealer for assistance at yourearliest convenience.
6. Check that the tire lies flat against theframe and is properly tightened. Try topush or pull, then turn the tire to besure it will not move. Loosen andretighten, if necessary. Failure toproperly stow the spare tire may resultin failure of the winch cable and lossof the tire.
7.Repeat this tightness check procedurewhen servicing the spare tire pressure(every six months, per scheduledmaintenance information), or at anytime that the spare tire is disturbedthrough service of other components.
8. If removed, install the spare tire lockinto the bumper drive tube with thespare tire lock key and jack handle.
298
Super Duty (), enUSA
Wheels and TiresE162800