2015 FORD F250 SUPER DUTY change wheel
[x] Cancel search: change wheelPage 294 of 470
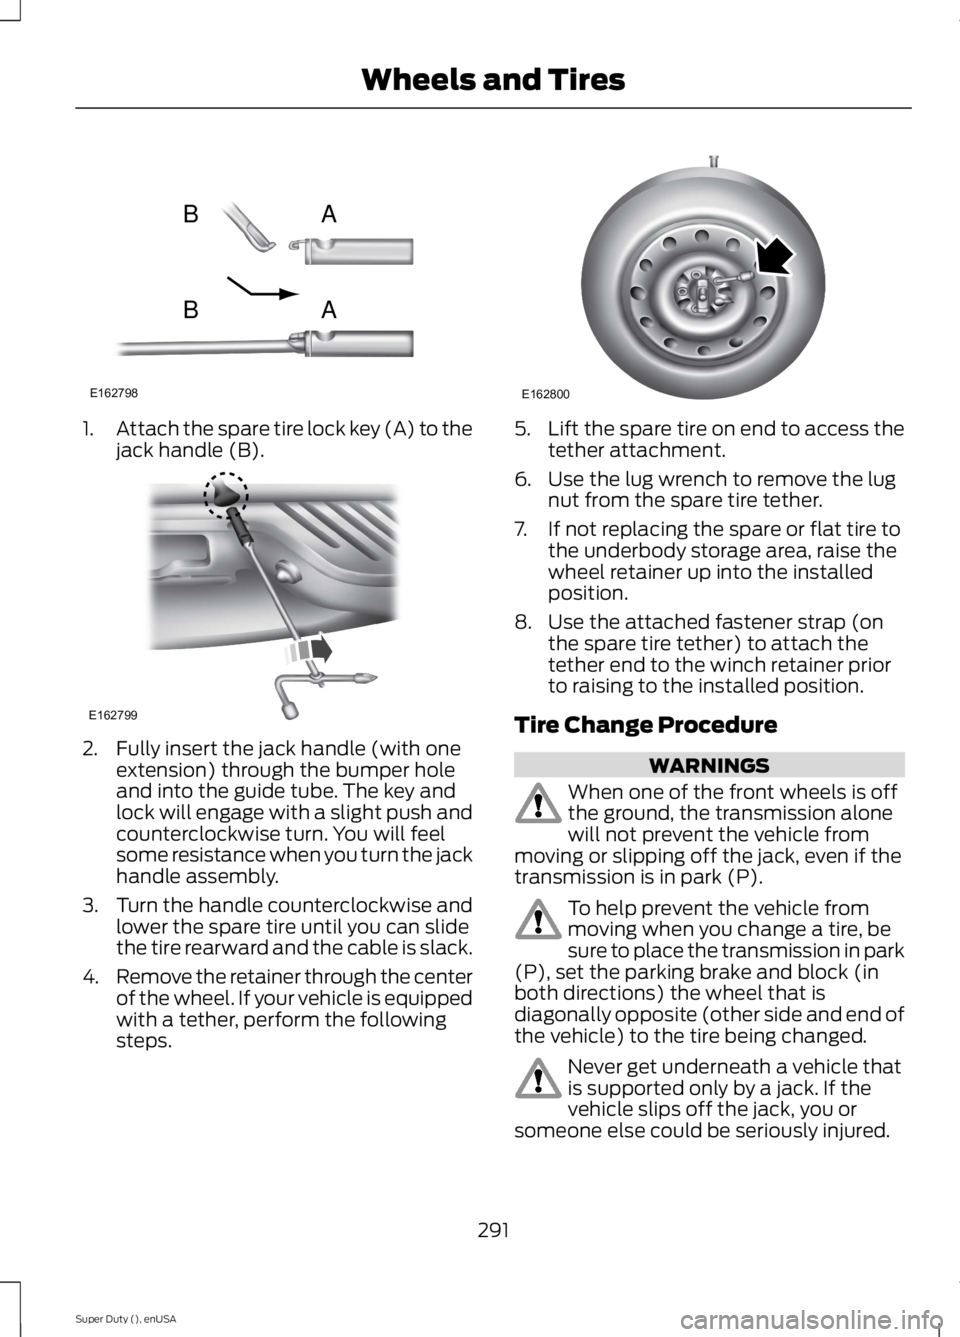
1.Attach the spare tire lock key (A) to thejack handle (B).
2. Fully insert the jack handle (with oneextension) through the bumper holeand into the guide tube. The key andlock will engage with a slight push andcounterclockwise turn. You will feelsome resistance when you turn the jackhandle assembly.
3.Turn the handle counterclockwise andlower the spare tire until you can slidethe tire rearward and the cable is slack.
4.Remove the retainer through the centerof the wheel. If your vehicle is equippedwith a tether, perform the followingsteps.
5.Lift the spare tire on end to access thetether attachment.
6. Use the lug wrench to remove the lugnut from the spare tire tether.
7. If not replacing the spare or flat tire tothe underbody storage area, raise thewheel retainer up into the installedposition.
8. Use the attached fastener strap (onthe spare tire tether) to attach thetether end to the winch retainer priorto raising to the installed position.
Tire Change Procedure
WARNINGS
When one of the front wheels is offthe ground, the transmission alonewill not prevent the vehicle frommoving or slipping off the jack, even if thetransmission is in park (P).
To help prevent the vehicle frommoving when you change a tire, besure to place the transmission in park(P), set the parking brake and block (inboth directions) the wheel that isdiagonally opposite (other side and end ofthe vehicle) to the tire being changed.
Never get underneath a vehicle thatis supported only by a jack. If thevehicle slips off the jack, you orsomeone else could be seriously injured.
291
Super Duty (), enUSA
Wheels and TiresE162798
AB
AB E162799 E162800
Page 295 of 470
WARNINGS
Do not attempt to change a tire onthe side of the vehicle close tomoving traffic. Pull far enough off theroad to avoid the danger of being hit whenoperating the jack or changing the wheel.
Always use the jack provided asoriginal equipment with your vehicle.If using a jack other than the oneprovided as original equipment with yourvehicle, make sure the jack capacity isadequate for the vehicle weight, includingany vehicle cargo or modifications.
Note:Passengers should not remain in thevehicle when the vehicle is being jacked.
Park on a level surface, set the parkingbrake and activate the hazard flashers.
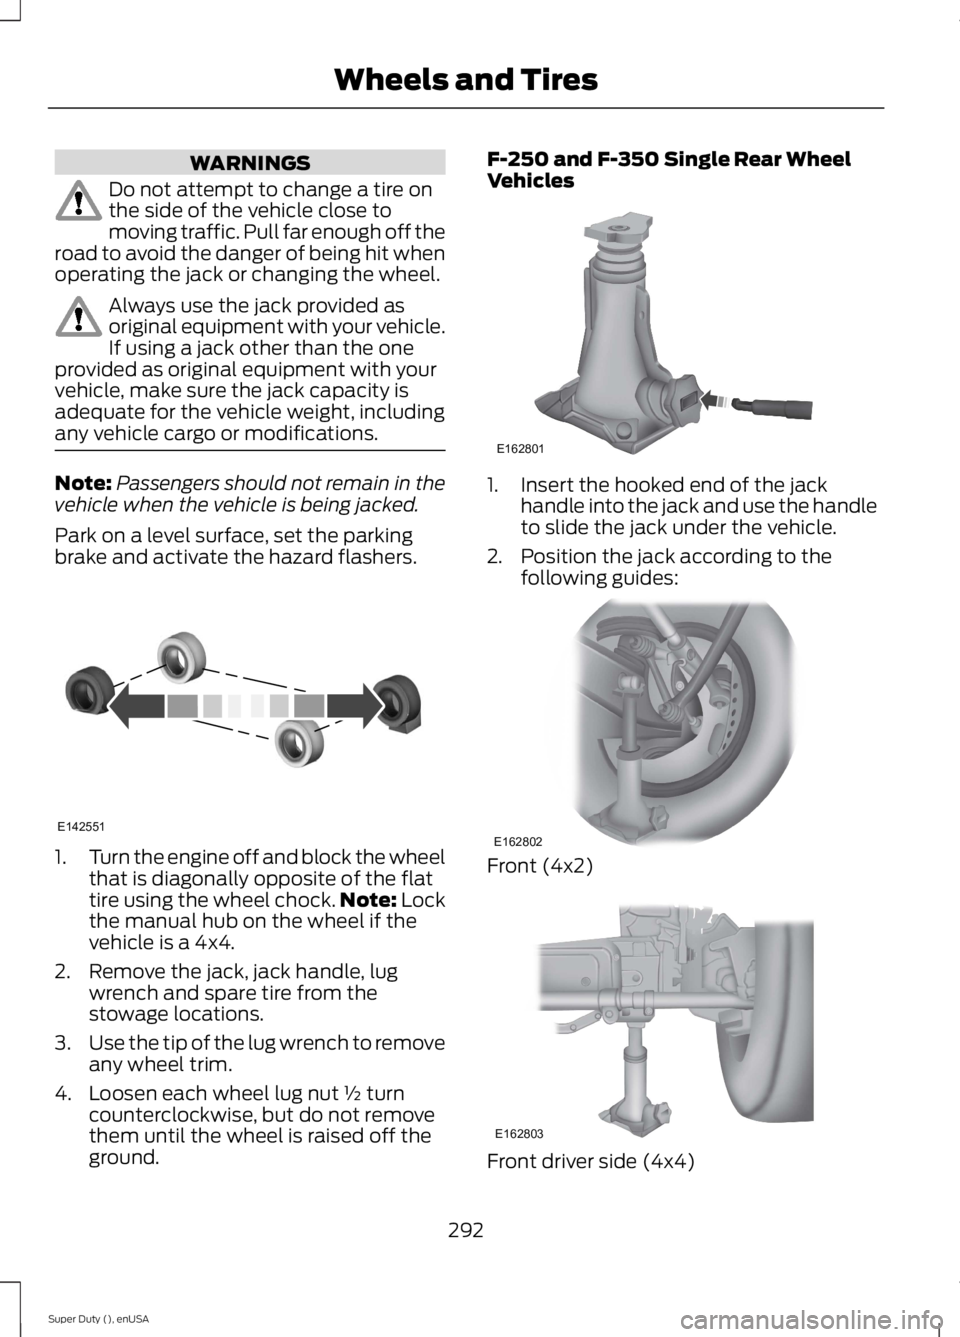
1.Turn the engine off and block the wheelthat is diagonally opposite of the flattire using the wheel chock.Note: Lockthe manual hub on the wheel if thevehicle is a 4x4.
2. Remove the jack, jack handle, lugwrench and spare tire from thestowage locations.
3.Use the tip of the lug wrench to removeany wheel trim.
4. Loosen each wheel lug nut ½ turncounterclockwise, but do not removethem until the wheel is raised off theground.
F-250 and F-350 Single Rear WheelVehicles
1. Insert the hooked end of the jackhandle into the jack and use the handleto slide the jack under the vehicle.
2. Position the jack according to thefollowing guides:
Front (4x2)
Front driver side (4x4)
292
Super Duty (), enUSA
Wheels and TiresE142551 E162801 E162802 E162803
Page 364 of 470
Press to select any of the following:
•AM
•FM
•SIRIUS
•CD
•USB
•BT Stereo
•SD Card
•A/V In
Using the Touch-SensitiveControls on Your System
To turn a feature on and off, just touch thegraphic with your finger. To get the bestperformance from the touch-sensitivecontrols:
•Do not press hard on the controls. Theyare sensitive to light touch.
•Use your bare finger to touch the centerof a touch-control graphic. Touchingoff-center of the graphic may affectoperation of a nearby control.
•Make sure your hands are clean anddry.
•Since the touchscreen operates basedon the touch of a finger, you may havetrouble using it if you are wearinggloves.
•Keep metal and other conductivematerial away from the surface of thetouchscreen as this may causeelectronic interference (for example,inadvertently turning on a feature otherthan the one you meant to turn on).
Cleaning the Touchscreen Display
Use a clean, soft cloth such as one usedfor cleaning glasses. If dirt or fingerprintsare still visible, apply a small amount ofalcohol to the cloth. Do not pour or sprayalcohol onto the display. Do not usedetergent or any type of solvent to cleanthe display.
Using Your Bezel Controls
Depending on your vehicle and optionpackage, you may also have these controlson your bezel:
•Power: Switch the media or climatefeatures off and on.
•VOL: Control the volume of playingmedia.
•Temperature, fan and climate controlbuttons: Control the temperature, fanspeed or settings of the climate controlsystem.
•Seek and Tune buttons: Use as younormally would in media modes.
•Eject: Eject a CD from theentertainment system.
•SOURCE: Touch the word repeatedlyto see all available media modes. Thescreen does not change, but you seethe media change in the lower leftstatus bar.
•MEDIA: Touch the word to access theSound menu where you can adjustsettings such as: Bass, Treble,Midrange, Balance and Fade, DSP(Digital Signal Processing), OccupancyMode and Speed CompensatedVolume. (Your vehicle may not haveall of these sound options.)
•Hazard flasher: Switch the hazardflashers off and on.
Using Your Steering WheelControls
Depending on your vehicle and optionpackage, you can use your steering wheelcontrols to interact with the touchscreensystem. See Steering Wheel (page 60).
Support
The SYNC support team is available tohelp you with any questions you are notable to answer on your own.
361
Super Duty (), enUSA
MyFord Touch™ (If Equipped)
Page 370 of 470
Under this menu, you can setyour clock, access and adjust thedisplay, sound and vehiclesettings as well as access settings forspecific modes or the help feature.
Clock
Note:You cannot manually set the date.Your vehicle’s GPS does this for you.
Note:If the battery has been disconnected,your vehicle needs to acquire a GPS signalto update the clock. Once your vehicleacquires the signal, it may take a fewminutes for the update to display the correcttime.
1. Press the Settings icon > Clock.
2. Press + and - to adjust the time.
From this screen, you can also make otheradjustments such as 12-hour or 24-hourmode, activate GPS time synchronizationand have the system automatically updatenew time zones.
You can also turn the outside airtemperature display off and on. It appearsat the top center of the touchscreen, nextto the time and date.
The system automatically saves anyupdates you make to the settings.
Display
You can adjust the touchscreen displaythrough the touchscreen or by pressing thevoice button on your steering wheelcontrols and when prompted, say, "Displaysettings".
Press the Settings icon >Display, to access and makeadjustments using thetouchscreen.
•Brightness allows you to make thescreen display brighter or dimmer.
•Auto DIM, when set to On, lets you usethe Auto Dim Manual Offset feature.When set to Off, screen brightnessdoes not change.
•Mode allows you to set the screen toa certain brightness or have the systemautomatically change based on theoutside light level, or turn the displayoff.
•If you select AUTO or NIGHT, youhave the options of turning thedisplay's Auto Dim feature on or offand changing the Auto Dim ManualOffset feature.
•Auto Dim Manual Offset allows youto adjust screen dimming as theoutside lighting conditions change fromday to night. This feature also allowsyou to adjust screen brightness usingthe instrument panel dimming control.
•Edit Wallpaper
•You can have your touchscreendisplay the default photo or uploadyour own.
Uploading Photos for Your HomeScreen Wallpaper
Note:You cannot load photos directly fromyour camera. You must access the photoseither from your USB mass storage deviceor from an SD card.
Note:Photographs with extremely largedimensions (such as 2048 x 1536) may notbe compatible and appear as a blank(black) image on the display.
Your system allows you to upload and viewup to 32 photos.
To access, press the Settingsicon > Display > EditWallpaper, and then follow thesystem prompts to upload yourphotographs.
367
Super Duty (), enUSA
MyFord Touch™ (If Equipped)E142607 E142607 E142607 E142607
Page 380 of 470
Press the voice icon on thesteering wheel. When prompted,you can say:
"BROWSE" within devices
"Browse"*
"Browse
"Browse
"Browse SD card"
"Browse Sirius channel guide"**
"Browse USB"
"Help"
* If you only say, "Browse", you can thensay any commands in the following chart.**This command is only usable if you havean active subscription to SIRIUS satelliteradio.
"BROWSE"
"
"
"SD card"**
"Sirius Channel Guide"*
"USB"**
"Help"
* This command is only usable if you havean active subscription to SIRIUS satelliteradio.** For more commands in SD card or USBmode, see the "SD Card and USB Port"section of this chapter.
Your voice system allows you to changeaudio sources with a simple voicecommand. For example, if you are listeningto music on a USB device, then want toswitch to a satellite radio channel, simplypress the voice button on the steeringwheel controls and say the name of theSIRIUS station (such as, "the Highway").The following voice commands areavailable at the top level of the voicesession no matter which current audiosource you are listening to (such as a USBdevice or SIRIUS satellite radio).
Note:This is only available when yourMyFord Touch system language is set toNorth American English.
Sample commands
"<87.9-107.9>"
"<530-1710>"
"
"AM <530-1710>"
"FM <87.9-107.9>"
"Play [album]
"Play [artist]
"Play [genre]
"Play [playlist]
"Play [song]
"Play
"Play
377
Super Duty (), enUSA
MyFord Touch™ (If Equipped)E142599
Page 384 of 470
Potential station issues
ActionCauseIssues
No action required. This is abroadcast issue.This is poor time alignmentby the radio broadcaster.Echo, stutter, skip or repeatin audio.Increase or decrease inaudio volume.
No action required. Thereception issue may clear upas you continue to drive.
The radio is shifting betweenanalog and digital audio.Sound fading or blending inand out.
No action required. This isnormal behavior. Wait untilthe audio is available.
The digital multicast is notavailable until the HD Radiobroadcast is decoded. Oncedecoded, the audio is avail-able.
There is an audio mutedelay when selecting HD2 orHD3, multicast preset orDirect Tune.
No action required. Thestation is not available inyour current location.
The previously storedmulticast preset or directtune is not available in yourcurrent reception area.
Cannot access HD2 or HD3multicast channel whenrecalling a preset or from adirect tune.
Fill out the station issueform at website listed
below.*
Data service issue by theradio broadcaster.Text information does notmatch currently playingaudio.
Fill out the station issueform at website listed
below.*
Data service issue by theradio broadcaster.There is no text informationshown for currently selectedfrequency.
No action required. This isnormal behavior.Pressing Scan disablesHD2-HD7 channel search.HD2-HD7 stations not foundwhen Scan is pressed.
* http://www.ibiquity.com/automotive/report_radio_station_experiences
HD Radio Technology manufactured underlicense from iBiquity Digital Corp. U.S. andforeign patents. HD Radio and the HD andHD Radio logos are proprietary trademarksof iBiquity Digital Corp. Ford MotorCompany and iBiquity Digital Corp. are notresponsible for the content sent using HDRadio technology. Content may bechanged, added or deleted at any time atthe station owner's discretion.
Radio Voice Commands
If you are listening to the radio,press the voice button on thesteering wheel controls. Whenprompted, say any of the followingcommands.
If you are not listening to the radio, pressthe voice button and, after the tone, say"Radio", then any of the followingcommands.
381
Super Duty (), enUSA
MyFord Touch™ (If Equipped)E142599
Page 431 of 470
WARNING
Operating certain parts of thissystem while driving can distractyour attention away from the road,and possibly cause an accident or otherserious consequences. Do not changesystem settings or enter data non-verbally(using your hands) while driving. Stop thevehicle in a safe and legal manner beforeattempting these operations. This isimportant since while setting up orchanging some functions you might berequired to distract your attention awayfrom the road and remove your hands fromthe wheel.
General Operation
Voice Command Control: Functionswithin the Windows Automotive-basedsystem may be accomplished using onlyvoice commands. Using voice commandswhile driving allows you to operate thesystem without removing your hands fromthe wheel.
Prolonged Views of Screen: Do notaccess any function requiring a prolongedview of the screen while you are driving.Pull over in a safe and legal manner beforeattempting to access a function of thesystem requiring prolonged attention. Evenoccasional short scans to the screen maybe hazardous if your attention has beendiverted away from your driving task at acritical time.
Volume Setting: Do not raise the volumeexcessively. Keep the volume at a levelwhere you can still hear outside traffic andemergency signals while driving. Drivingwhile unable to hear these sounds couldcause an accident.
Use of Speech Recognition Functions:Speech recognition software is inherentlya statistical process which is subject toerrors. It is your responsibility to monitorany speech recognition functions includedin the system and address any errors.
Navigation Features: Any navigationfeatures included in the system areintended to provide turn by turninstructions to get you to a desireddestination. Please make certain allpersons using this system carefully readand follow instructions and safetyinformation fully.
Distraction Hazard: Any navigationfeatures may require manual (non-verbal)setup. Attempting to perform such set-upor insert data while driving can seriouslydistract your attention and could cause anaccident or other serious consequences.Stop the vehicle in a safe and legal mannerbefore attempting these operations.
Let Your Judgment Prevail: Anynavigation features are provided only asan aid. Make your driving decisions basedon your observations of local conditionsand existing traffic regulations. Any suchfeature is not a substitute for your personaljudgment. Any route suggestions made bythis system should never replace any localtraffic regulations or your personaljudgment or knowledge of safe drivingpractices.
Route Safety: Do not follow the routesuggestions if doing so would result in anunsafe or illegal maneuver, if you would beplaced in an unsafe situation, or if youwould be directed into an area that youconsider unsafe. The driver is ultimatelyresponsible for the safe operation of thevehicle and therefore, must evaluatewhether it is safe to follow the suggesteddirections.
428
Super Duty (), enUSA
Appendices
Page 446 of 470
Be sure to ask your dealership serviceadvisor or technician about the multi-pointvehicle inspection. It is a comprehensiveway to perform a thorough inspection of
your vehicle. Your checklist gives youimmediate feedback on the overallcondition of your vehicle.
NORMAL SCHEDULED MAINTENANCE
6.2L and 6.8L Gasoline Engines
Every 7500 miles (12000 km) or six months (whichever comes first)
Change engine oil and filter.
Rotate tires*, inspect tire wear and measure tread depth.
Inspect wheels and related components for abnormal noise, wear, looseness or drag.
Perform multi-point inspection (recommended).
*Vehicles with dual rear wheels should rotate the front wheels when specified; rear wheelsonly if unusual wear is noted.
Every 15000 miles (24000 km) or 12 months (whichever comes first)
Inspect automatic transmission fluid level. Consult dealer for requirements.
Inspect brake pads, shoes, rotors, drums, brake linings, hoses and parking brake.
Inspect engine cooling system strength and hoses.
Inspect exhaust system and heat shields.
Inspect front axle and U-joints. Lubricate if equipped with grease fittings (Four-wheeldrive vehicles).
Inspect steering linkage, ball joints, suspension, tie-rod ends, driveshaft and U-joints.Lubricate if equipped with grease fittings.
Other maintenance items
Replace climate-controlled (heated and cooled) seat
filter.*Every 30000 miles (48000km)Replace engine air filter.
Change automatic transmission fluid and filter on 5-speedtransmission. Consult dealer for requirements.Every 60000 miles (96000km)
443
Super Duty (), enUSA
Scheduled Maintenance