2015 FORD F250 SUPER DUTY automatic transmission
[x] Cancel search: automatic transmissionPage 178 of 470
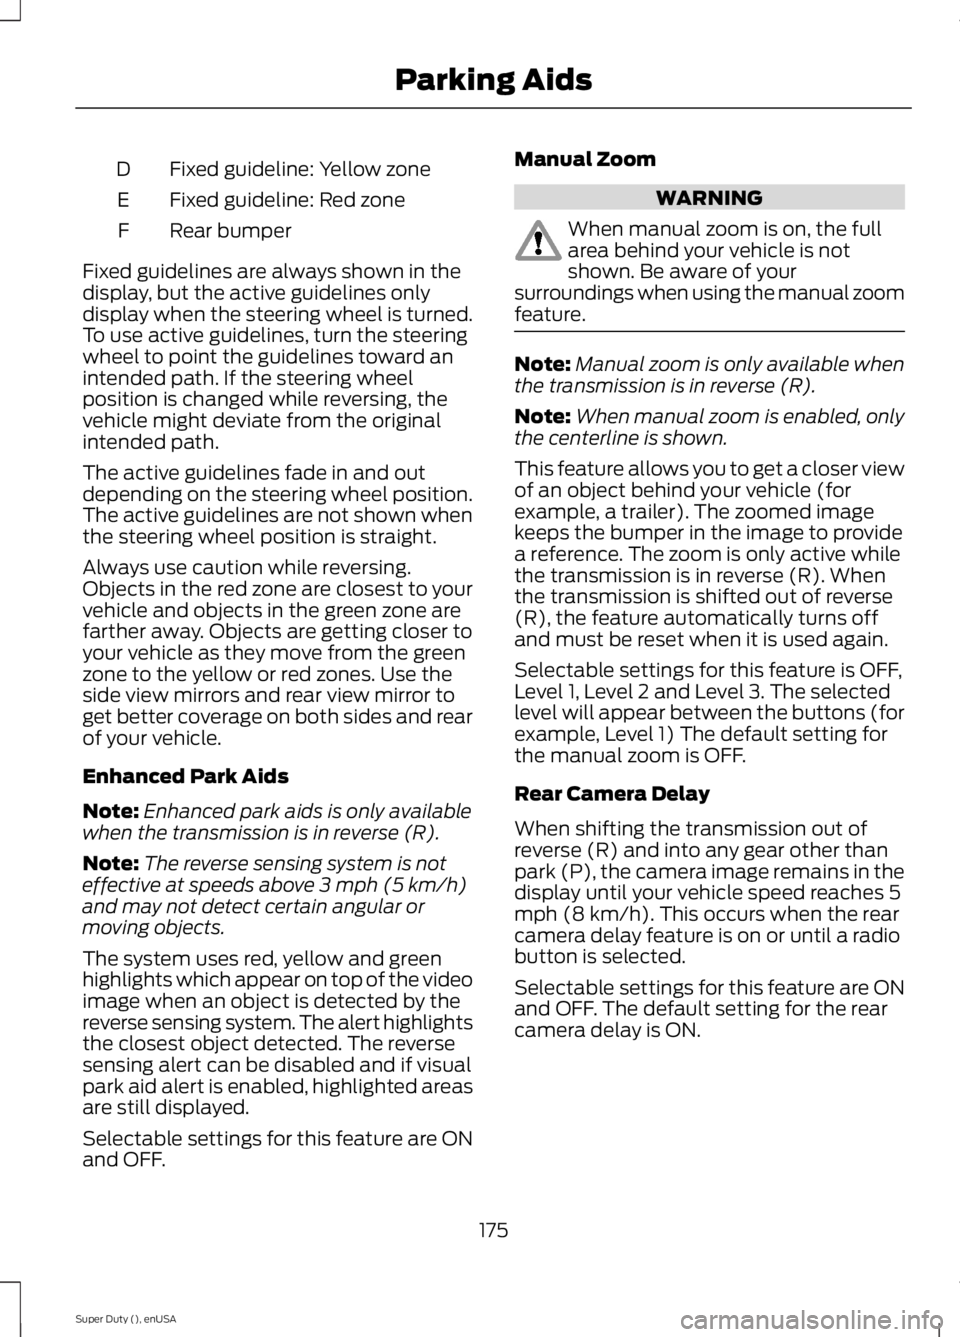
Fixed guideline: Yellow zoneD
Fixed guideline: Red zoneE
Rear bumperF
Fixed guidelines are always shown in thedisplay, but the active guidelines onlydisplay when the steering wheel is turned.To use active guidelines, turn the steeringwheel to point the guidelines toward anintended path. If the steering wheelposition is changed while reversing, thevehicle might deviate from the originalintended path.
The active guidelines fade in and outdepending on the steering wheel position.The active guidelines are not shown whenthe steering wheel position is straight.
Always use caution while reversing.Objects in the red zone are closest to yourvehicle and objects in the green zone arefarther away. Objects are getting closer toyour vehicle as they move from the greenzone to the yellow or red zones. Use theside view mirrors and rear view mirror toget better coverage on both sides and rearof your vehicle.
Enhanced Park Aids
Note:Enhanced park aids is only availablewhen the transmission is in reverse (R).
Note:The reverse sensing system is noteffective at speeds above 3 mph (5 km/h)and may not detect certain angular ormoving objects.
The system uses red, yellow and greenhighlights which appear on top of the videoimage when an object is detected by thereverse sensing system. The alert highlightsthe closest object detected. The reversesensing alert can be disabled and if visualpark aid alert is enabled, highlighted areasare still displayed.
Selectable settings for this feature are ONand OFF.
Manual Zoom
WARNING
When manual zoom is on, the fullarea behind your vehicle is notshown. Be aware of yoursurroundings when using the manual zoomfeature.
Note:Manual zoom is only available whenthe transmission is in reverse (R).
Note:When manual zoom is enabled, onlythe centerline is shown.
This feature allows you to get a closer viewof an object behind your vehicle (forexample, a trailer). The zoomed imagekeeps the bumper in the image to providea reference. The zoom is only active whilethe transmission is in reverse (R). Whenthe transmission is shifted out of reverse(R), the feature automatically turns offand must be reset when it is used again.
Selectable settings for this feature is OFF,Level 1, Level 2 and Level 3. The selectedlevel will appear between the buttons (forexample, Level 1) The default setting forthe manual zoom is OFF.
Rear Camera Delay
When shifting the transmission out ofreverse (R) and into any gear other thanpark (P), the camera image remains in thedisplay until your vehicle speed reaches 5mph (8 km/h). This occurs when the rearcamera delay feature is on or until a radiobutton is selected.
Selectable settings for this feature are ONand OFF. The default setting for the rearcamera delay is ON.
175
Super Duty (), enUSA
Parking Aids
Page 207 of 470
•When stopped in congested orheavy traffic during hotweather, place the gearshift inposition P to aid engine andtransmission cooling and tohelp A/C performance.
•Turn off the speed control withheavy loads or in hilly terrain.The speed control may turn offautomatically when you aretowing on long, steep grades.
•Shift to a lower gear whendriving down a long or steephill. Do not apply the brakescontinuously, as they mayoverheat and become lesseffective.
•If your transmission is equippedwith a Grade Assist orTow/Haul feature, use thisfeature when towing. Thisprovides engine braking andhelps eliminate excessivetransmission shifting foroptimum fuel economy andtransmission cooling.
•If your vehicle is equipped withAdvanceTrac with RSC, thissystem may turn on duringtypical cornering maneuverswith a heavily loaded trailer.This is normal. Turning thecorner at a slower speed whiletowing may reduce thistendency.
•If you are towing a trailerfrequently in hot weather, hillyconditions, at the grosscombined weight rating (or anycombination of these factors),consider refilling your rear axlewith synthetic gear lubricant (ifthe axle is not already filledwith it). See Capacities andSpecifications (page 301).
•Allow more distance forstopping with a trailerattached. Anticipate stops andbrake gradually.
•Avoid parking on a grade.However, if you must park on agrade:
1. Turn the steering wheel topoint your vehicle tires awayfrom traffic flow.
2.Set your vehicle parking brake.
3.Place the automatictransmission in position P.
4.Place wheel chocks in frontand back of the trailer wheels.(Chocks not included withvehicle.)
Your vehicle may be equippedwith a temporary or conventionalspare tire. A "temporary" spare tireis different in size (diameter orwidth), tread-type (All-Season orAll Terrain) or is from a differentmanufacturer than the road tireson your vehicle. Consultinformation on the tire label orSafety Compliance label forlimitations when using.
204
Super Duty (), enUSA
Towing
Page 209 of 470
•Use a damper device such as a tarp,heavy blanket or piece of carpetdraped over the recovery strap to helpabsorb the energy in the event thestrap breaks.
•Make sure the stuck vehicle is notloaded heavier than its gross vehicleweight rating specified on thecertification label.
•Always align the tow vehicle and stuckvehicle in a straight line (within 10degrees).
•Keep bystanders to the sides of thevehicle, at a distance of at least twicethe length of the recovery strap. Thishelps avoid injury from the hazard of arecovery hook or strap breaking, or avehicle lurching into their path.
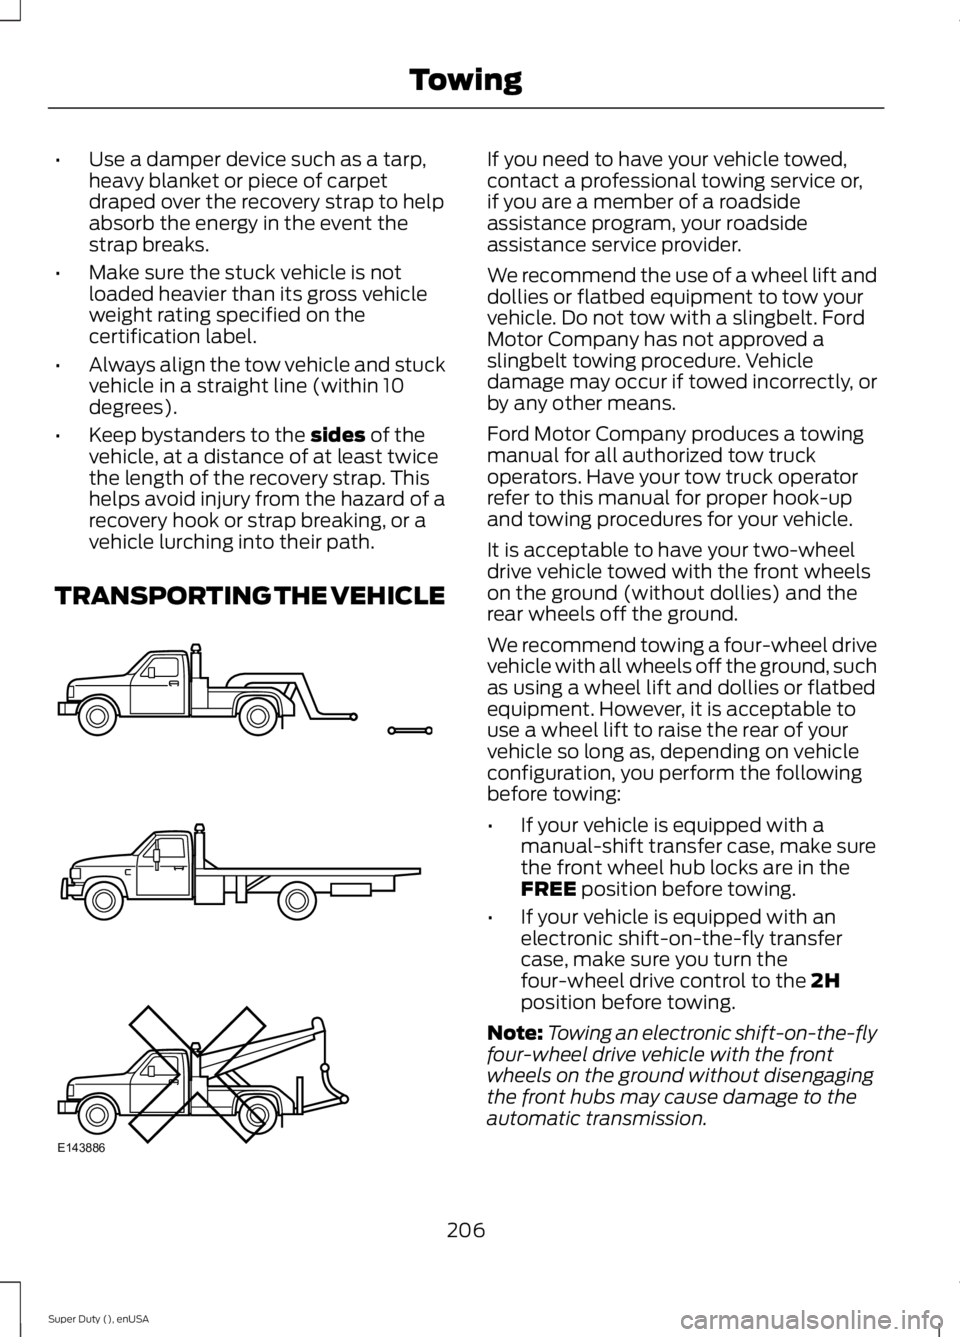
TRANSPORTING THE VEHICLE
If you need to have your vehicle towed,contact a professional towing service or,if you are a member of a roadsideassistance program, your roadsideassistance service provider.
We recommend the use of a wheel lift anddollies or flatbed equipment to tow yourvehicle. Do not tow with a slingbelt. FordMotor Company has not approved aslingbelt towing procedure. Vehicledamage may occur if towed incorrectly, orby any other means.
Ford Motor Company produces a towingmanual for all authorized tow truckoperators. Have your tow truck operatorrefer to this manual for proper hook-upand towing procedures for your vehicle.
It is acceptable to have your two-wheeldrive vehicle towed with the front wheelson the ground (without dollies) and therear wheels off the ground.
We recommend towing a four-wheel drivevehicle with all wheels off the ground, suchas using a wheel lift and dollies or flatbedequipment. However, it is acceptable touse a wheel lift to raise the rear of yourvehicle so long as, depending on vehicleconfiguration, you perform the followingbefore towing:
•If your vehicle is equipped with amanual-shift transfer case, make surethe front wheel hub locks are in theFREE position before towing.
•If your vehicle is equipped with anelectronic shift-on-the-fly transfercase, make sure you turn thefour-wheel drive control to the 2Hposition before towing.
Note:Towing an electronic shift-on-the-flyfour-wheel drive vehicle with the frontwheels on the ground without disengagingthe front hubs may cause damage to theautomatic transmission.
206
Super Duty (), enUSA
TowingE143886
Page 210 of 470
Note:Towing a two-wheel drive vehicle oran electronic shift-on-the-fly four-wheeldrive vehicle with the rear wheels on theground for more than 50 miles (80 km) orfaster than 35 mph (56 km/h) may causedamage to the automatic transmission.
Note:Using wheel lift equipment to tow adual rear wheel vehicle requires removingan outer rear wheel before towing.
TOWING THE VEHICLE ON
FOUR WHEELS
Emergency Towing
If your vehicle becomes inoperable(without access to wheel dollies,car-hauling trailer, or flatbed transportvehicle), it can be flat-towed (all wheelson the ground, regardless of the powertrainand transmission configuration) under thefollowing conditions:
•Your vehicle is facing forward fortowing in a forward direction.
•Place the transmission in position N. Ifyou cannot move the transmission intoN, you may need to override it. SeeTransmission (page 144).
•Maximum speed is 35 mph (56 km/h).
•Maximum distance is 50 miles (80kilometers).
Recreational Towing
Note:Put your climate control system inrecirculated air mode to prevent exhaustfumes from entering your vehicle. SeeClimate Control (page 103).
Follow these guidelines if you have a needfor recreational towing, such as towingyour vehicle behind a motorhome. Wedesigned these guidelines to preventdamage to your transmission.
Two-wheel Drive Vehicles andFour-wheel Drive Vehicles Equippedwith an Electronic-shift Transfer Case
Do not tow your vehicle with any wheelson the ground, as vehicle or transmissiondamage may occur. It is recommended totow your vehicle with all four (4) wheelsoff the ground, such as when using acar-hauling trailer. Otherwise, you cannottow your vehicle.
Four-wheel Drive Vehicles Equippedwith a Manual-shift Transfer Case
1. Put the transmission in position N.
2. Put the transfer case in position N.
3.Put the hub locks in the FREE position.Always make sure that both hub locksare set to the same position.
207
Super Duty (), enUSA
Towing
Page 217 of 470
JUMP STARTING THE VEHICLE
WARNINGS
The gases around the battery canexplode if exposed to flames, sparks,or lit cigarettes. An explosion couldresult in personal injury or vehicle damage.
Batteries contain sulfuric acid whichcan burn skin, eyes and clothing, ifcontacted.
Use only an adequate-sized cablewith insulated clamps.
Preparing Your Vehicle
Note:Do not attempt to push-start yourautomatic transmission vehicle. Automatictransmissions do not have push-startcapability. Attempting to push-start avehicle with an automatic transmission maycause transmission damage.
Note:Use only a 12-volt supply to start yourvehicle.
Note:Do not disconnect the battery of thedisabled vehicle as this could damage thevehicle's electrical system.
Park the booster vehicle close to the hoodof the disabled vehicle, making sure thetwo vehicles do not touch. Turn allaccessories off.
Connecting the Jumper Cables
WARNING
Do not attach the cables to fuel lines,engine rocker covers, the intakemanifold or electrical componentsas grounding points. Stay clear of movingparts. To avoid reverse polarityconnections, make sure that you correctlyidentify the positive (+) and negative (-)terminals on both the disabled and boostervehicles before connecting the cables.
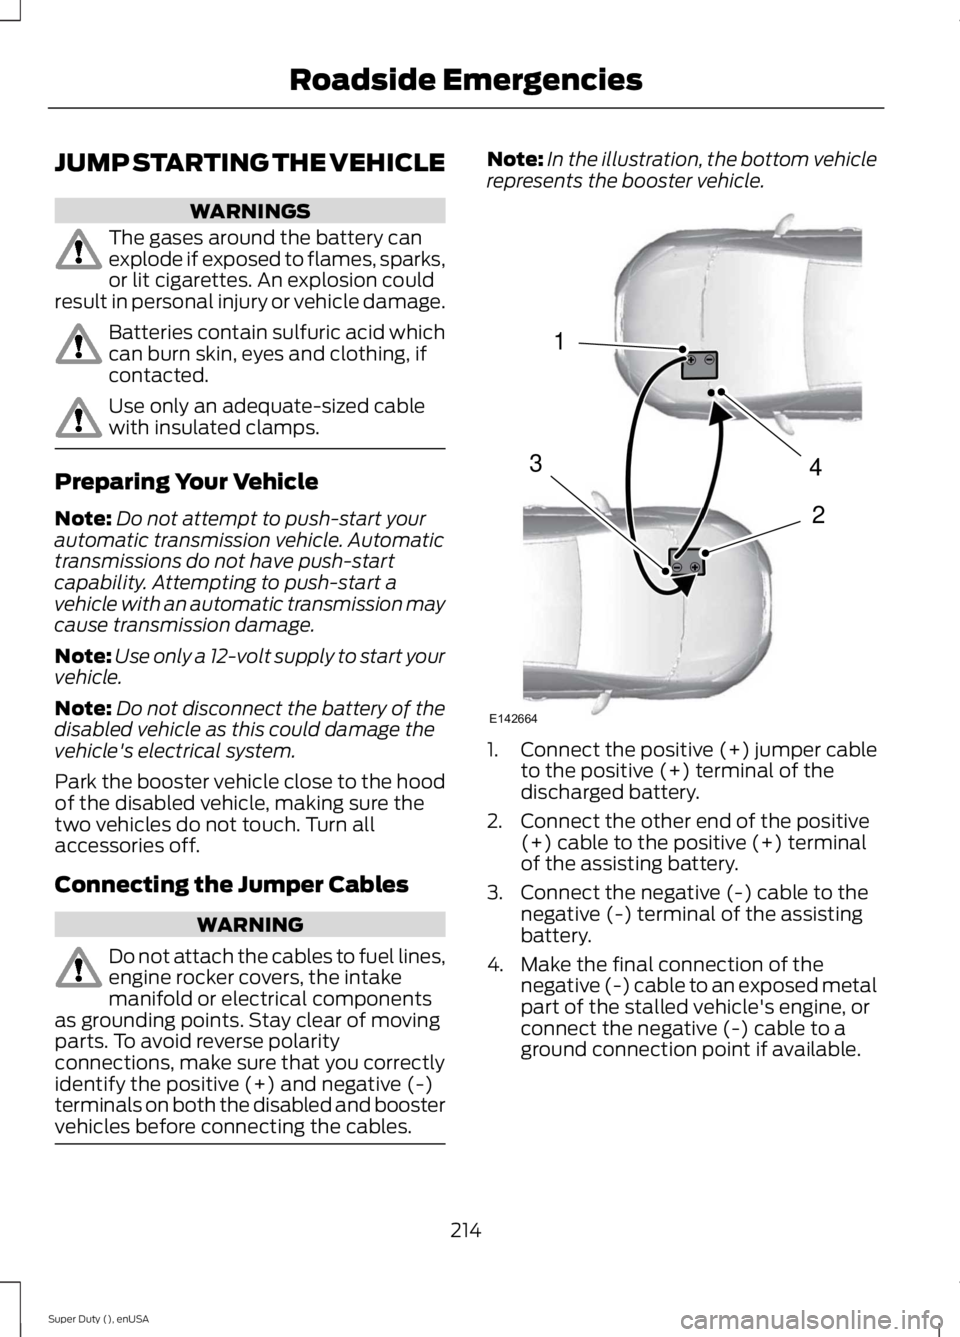
Note:In the illustration, the bottom vehiclerepresents the booster vehicle.
1.Connect the positive (+) jumper cableto the positive (+) terminal of thedischarged battery.
2. Connect the other end of the positive(+) cable to the positive (+) terminalof the assisting battery.
3. Connect the negative (-) cable to thenegative (-) terminal of the assistingbattery.
4. Make the final connection of thenegative (-) cable to an exposed metalpart of the stalled vehicle's engine, orconnect the negative (-) cable to aground connection point if available.
214
Super Duty (), enUSA
Roadside Emergencies4
2
1
3
E142664
Page 236 of 470
2. Go to the front of the vehicle andlocate the secondary release lever,which is located under the front of thehood, to your right of the center of thevehicle (driver's side), toward theheadlight.
3. Release the hood latch by pushing thesecondary release lever to your left,toward the center of the vehicle.
4. Raise the hood.
5.To close the hood, lower the hood andallow it to drop the last 8 to 11 inches(20 to 30 centimeters).
Note:Make sure that the hood is closedproperly.
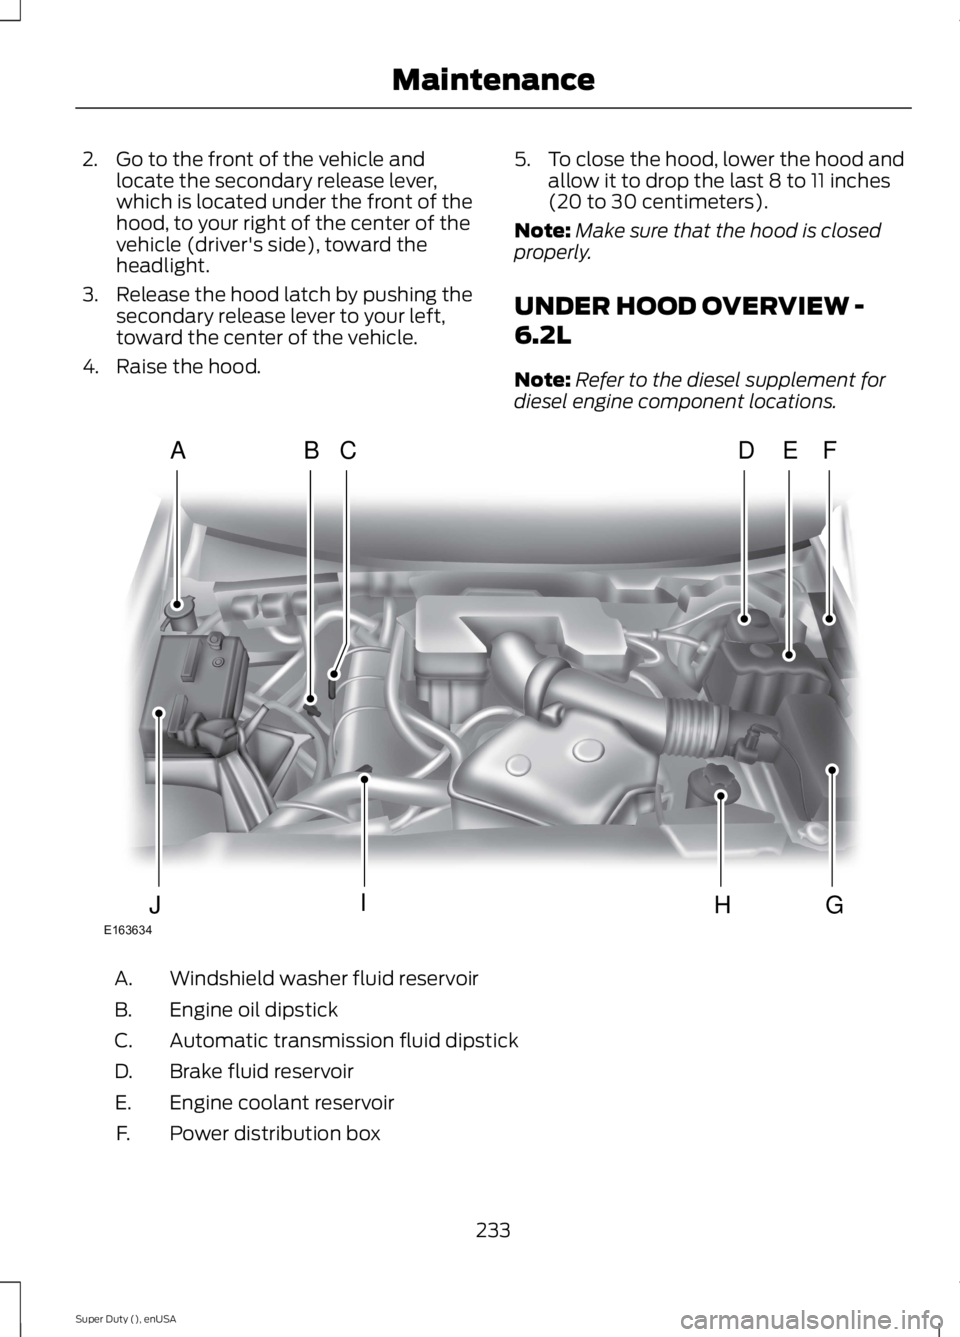
UNDER HOOD OVERVIEW -
6.2L
Note:Refer to the diesel supplement fordiesel engine component locations.
Windshield washer fluid reservoirA.
Engine oil dipstickB.
Automatic transmission fluid dipstickC.
Brake fluid reservoirD.
Engine coolant reservoirE.
Power distribution boxF.
233
Super Duty (), enUSA
MaintenanceE163634
ADFEBC
GHIJ
Page 237 of 470
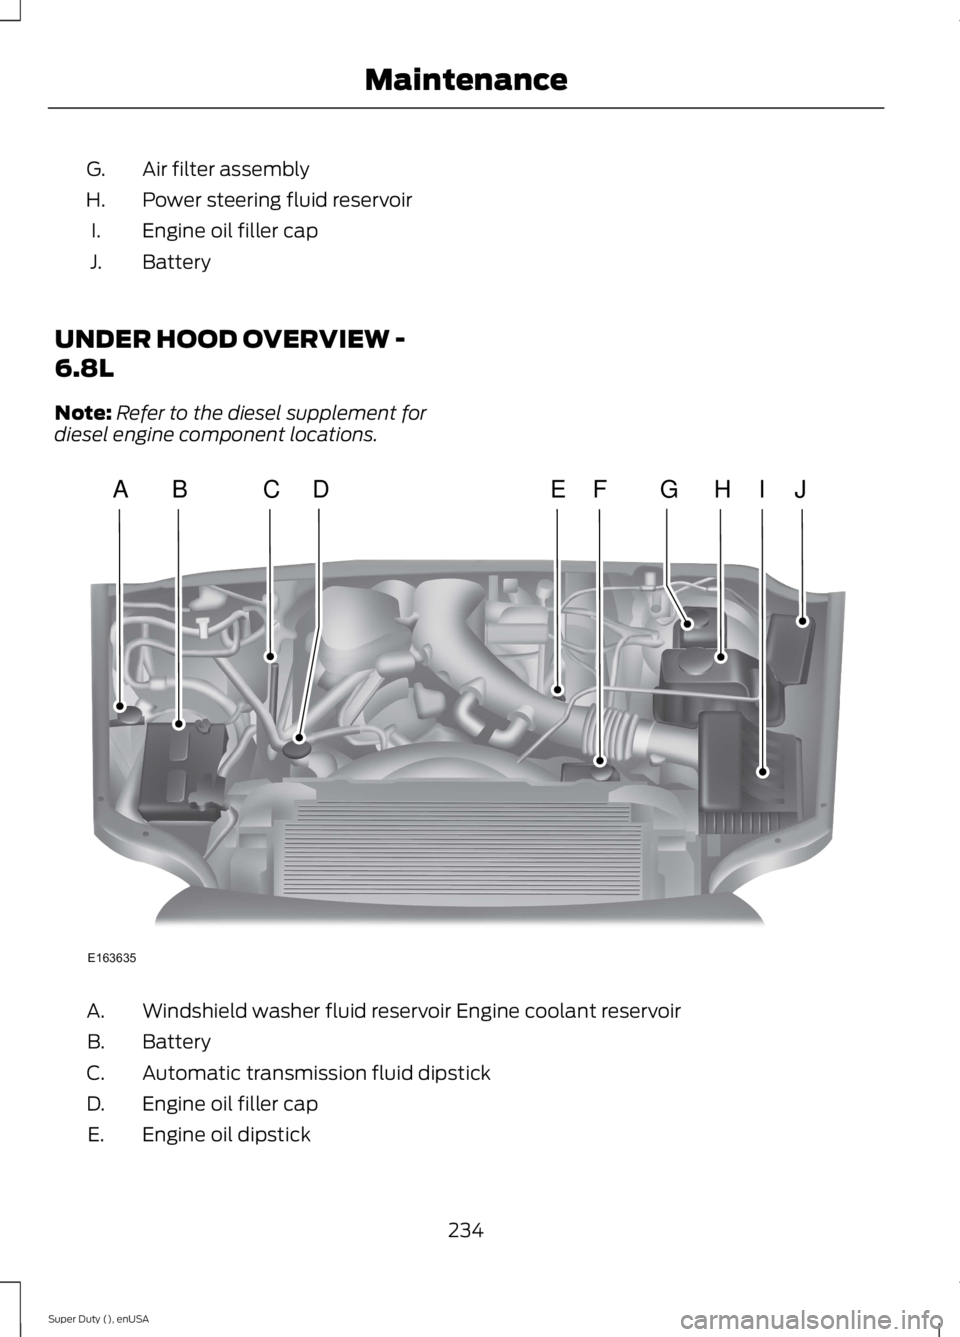
Air filter assemblyG.
Power steering fluid reservoirH.
Engine oil filler capI.
BatteryJ.
UNDER HOOD OVERVIEW -
6.8L
Note:Refer to the diesel supplement fordiesel engine component locations.
Windshield washer fluid reservoir Engine coolant reservoirA.
BatteryB.
Automatic transmission fluid dipstickC.
Engine oil filler capD.
Engine oil dipstickE.
234
Super Duty (), enUSA
MaintenanceE163635
ABCEHIJFDG
Page 243 of 470
•the engine coolant temperature gaugemoves fully into the red (hot) area
•the coolant temperature warning lightilluminates
•the service engine soon indicatorilluminates.
WARNING
Never remove the coolant reservoircap while the engine is running or hot.
1. Pull off the road as soon as safelypossible and place the vehicle in P(Park).
2. Leave the engine running until thecoolant temperature gauge needlemoves away from the H range. Afterseveral minutes, if this does nothappen, follow the remaining steps.
3. Turn the engine off and wait for it tocool before checking the coolant level.
4. If the coolant level is normal, you mayrestart your engine and continue on.
5. If the coolant is low, add coolant,restart the engine and take your vehicleto an authorized dealer. See Addingengine coolant in this chapter for moreinformation. Refer to fail-safe coolingfor additional information.
AUTOMATIC TRANSMISSION
FLUID CHECK
Have an authorized dealer check andchange the transmission fluid and filter atthe correct service interval. SeeScheduled Maintenance (page 440).
Do not use supplemental transmissionfluid additives, treatments or cleaningagents. The use of these materials mayaffect transmission operation and resultin damage to internal transmissioncomponents.
Checking Automatic TransmissionFluid (If Equipped)
For scheduled intervals of the fluid checksand changes, See ScheduledMaintenance (page 440). Yourtransmission does not consume fluid.However, the fluid level should be checkedif the transmission is not working properly,i.e., if the transmission slips or shifts slowlyor if you notice some sign of fluid leakage.
Automatic transmission fluid expandswhen warmed. To obtain an accurate fluidcheck, drive the vehicle until it is at normaloperating temperature (approximately19 mi (30 km)). Verify that thetransmission fluid temperature gauge,located on the instrument cluster, is withinnormal range.
1. Drive the vehicle 19 mi (30 km)until itreaches normal operating temperature.
2.Park the vehicle on a level surface andengage the parking brake.
3.With the engine running, parking brakeengaged and your foot on the brakepedal, move the gearshift lever throughall of the gear ranges. Allow sufficienttime for each gear to engage.
4.Latch the gearshift lever in P and leavethe engine running.
5. Remove the dipstick, wiping it cleanwith a clean, dry lint free rag. Ifnecessary, refer to the Under HoodOverview in this chapter for thelocation of the dipstick.
6.Install the dipstick making sure it is fullyseated in the filler tube.
7. Remove the dipstick and inspect thefluid level. The fluid should be in thedesignated area for normal operatingtemperature or ambient temperature.
Low Fluid Level
Type A
240
Super Duty (), enUSA
Maintenance