2015 FORD F250 SUPER DUTY ECO mode
[x] Cancel search: ECO modePage 93 of 470
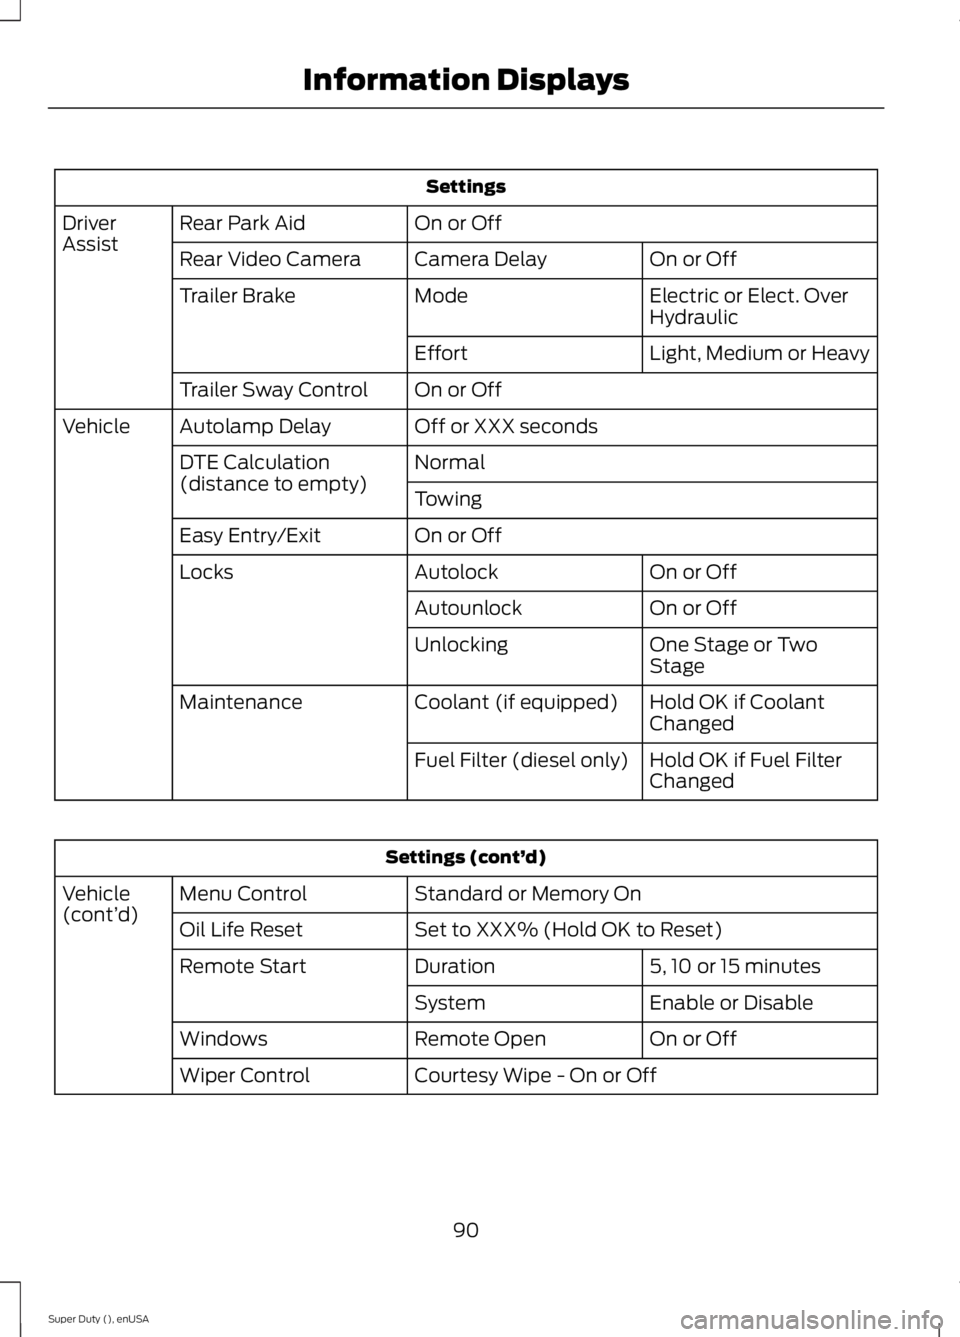
Settings
On or OffRear Park AidDriverAssistOn or OffCamera DelayRear Video Camera
Electric or Elect. OverHydraulicModeTrailer Brake
Light, Medium or HeavyEffort
On or OffTrailer Sway Control
Off or XXX secondsAutolamp DelayVehicle
NormalDTE Calculation(distance to empty)Towing
On or OffEasy Entry/Exit
On or OffAutolockLocks
On or OffAutounlock
One Stage or TwoStageUnlocking
Hold OK if CoolantChangedCoolant (if equipped)Maintenance
Hold OK if Fuel FilterChangedFuel Filter (diesel only)
Settings (cont’d)
Standard or Memory OnMenu ControlVehicle(cont’d)Set to XXX% (Hold OK to Reset)Oil Life Reset
5, 10 or 15 minutesDurationRemote Start
Enable or DisableSystem
On or OffRemote OpenWindows
Courtesy Wipe - On or OffWiper Control
90
Super Duty (), enUSA
Information Displays
Page 96 of 470
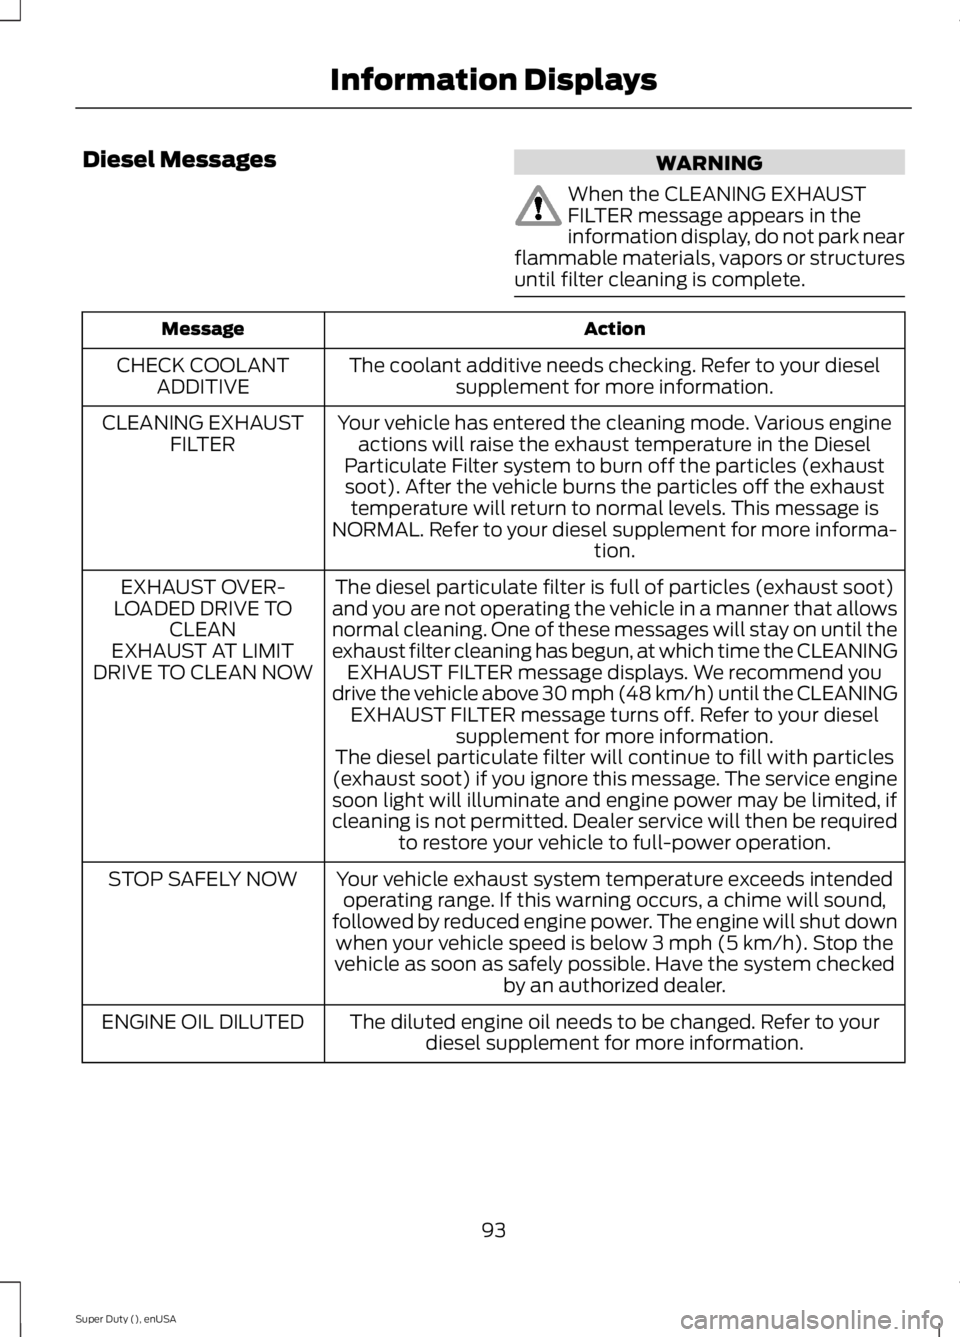
Diesel MessagesWARNING
When the CLEANING EXHAUSTFILTER message appears in theinformation display, do not park nearflammable materials, vapors or structuresuntil filter cleaning is complete.
ActionMessage
The coolant additive needs checking. Refer to your dieselsupplement for more information.CHECK COOLANTADDITIVE
Your vehicle has entered the cleaning mode. Various engineactions will raise the exhaust temperature in the DieselParticulate Filter system to burn off the particles (exhaustsoot). After the vehicle burns the particles off the exhausttemperature will return to normal levels. This message isNORMAL. Refer to your diesel supplement for more informa-tion.
CLEANING EXHAUSTFILTER
The diesel particulate filter is full of particles (exhaust soot)and you are not operating the vehicle in a manner that allowsnormal cleaning. One of these messages will stay on until theexhaust filter cleaning has begun, at which time the CLEANINGEXHAUST FILTER message displays. We recommend youdrive the vehicle above 30 mph (48 km/h) until the CLEANINGEXHAUST FILTER message turns off. Refer to your dieselsupplement for more information.
EXHAUST OVER-LOADED DRIVE TOCLEANEXHAUST AT LIMITDRIVE TO CLEAN NOW
The diesel particulate filter will continue to fill with particles(exhaust soot) if you ignore this message. The service enginesoon light will illuminate and engine power may be limited, ifcleaning is not permitted. Dealer service will then be requiredto restore your vehicle to full-power operation.
Your vehicle exhaust system temperature exceeds intendedoperating range. If this warning occurs, a chime will sound,followed by reduced engine power. The engine will shut downwhen your vehicle speed is below 3 mph (5 km/h). Stop thevehicle as soon as safely possible. Have the system checkedby an authorized dealer.
STOP SAFELY NOW
The diluted engine oil needs to be changed. Refer to yourdiesel supplement for more information.ENGINE OIL DILUTED
93
Super Duty (), enUSA
Information Displays
Page 98 of 470

ActionMessage
The diesel exhaust fluid is empty. You must replenish thediesel exhaust fluid to resume normal operation of yourvehicle. Refer to your diesel supplement for more information.
SPEED LIMITED TO XXMPH EXHAUST FLUIDEMPTY
The selective catalytic reduction system detects low exhaustfluid. The engine will eventually enter into an idle only mode.You must replenish the diesel exhaust fluid to resume normaloperation of your vehicle. Refer to your diesel supplement formore information.
ENGINE IDLED SOONEXHAUST FLUID EMPTY
A problem exists with the selective catalytic reduction system.The vehicle will enter into an idle-only mode. If the exhaustfluid is empty, you must replenish the diesel exhaust fluid toresume normal operation of your vehicle. Refer to your dieselsupplement for more information.
ENGINE IDLED - SEEOWNER’S MANUALEXHAUST FLUID EMPTY
The selective catalytic reduction system detects a fault. Thevehicle’s top speed will become limited in the displayeddistance starting at 50 miles (80 km) and count down fromthis point. Refer to your diesel supplement for more informa-tion. Have the system checked by an authorized dealer.
IN XX MILES, SPEEDLIMITED TO 50 MPHEXHAUST FLUIDSYSTEM FAULT
The selective catalytic reduction system detects a fault. Thevehicle’s top speed will become limited upon restarting. Referto your diesel supplement for more information. Have thesystem checked by an authorized dealer.
SPEED LIMITED TO 50MPH UPON RESTARTEXHAUST FLUIDSYSTEM FAULT
The selective catalytic reduction system detects a fault. Thevehicle’s top speed is limited. Refer to your diesel supplementfor more information. Have the system checked by anauthorized dealer.
SPEED LIMITED TO 50MPH EXHAUST FLUIDSYSTEM FAULT
The selective catalytic reduction system detects a fault. Theengine will enter into an idle only mode. Refer to your dieselsupplement for more information. Have the system checkedby an authorized dealer.
ENGINE IDLED SOONEXHAUST FLUIDSYSTEM FAULT SEEMANUAL
The selective catalytic reduction system detects a fault. Theengine will eventually enter into an idle-only mode. Press OKto override the idle mode. Refer to your diesel supplement formore information. Have the system checked by an authorizeddealer.
ENGINE IDLED - SEEOWNER’S MANUALEXHAUST FLUIDSYSTEM FAULT
A fuel filter change is required. See Normal ScheduledMaintenance (page 443).FUEL FILTER CHANGEREQUIRED
95
Super Duty (), enUSA
Information Displays
Page 107 of 470
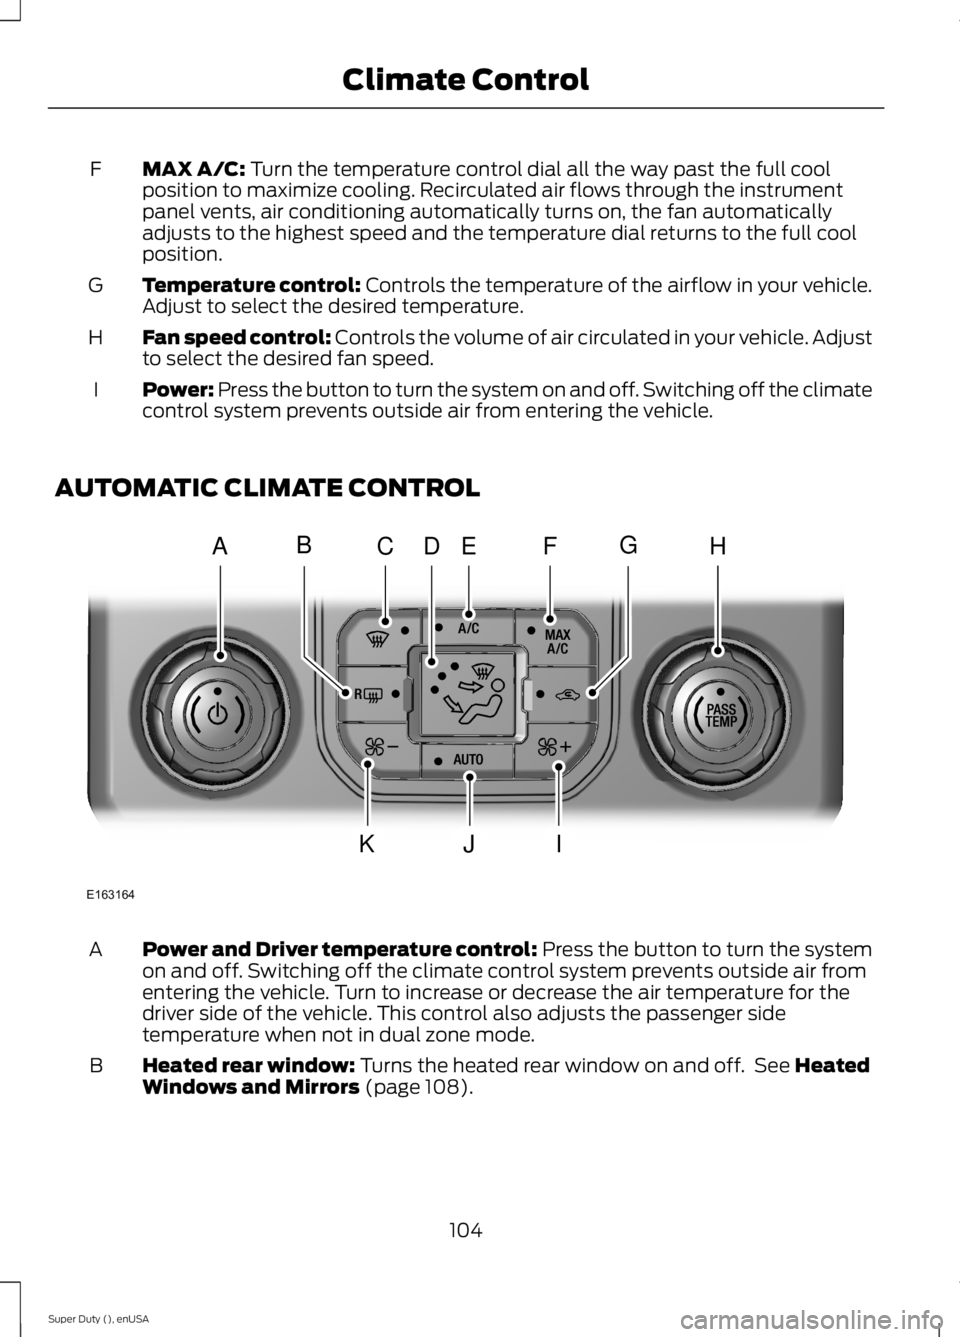
MAX A/C: Turn the temperature control dial all the way past the full coolposition to maximize cooling. Recirculated air flows through the instrumentpanel vents, air conditioning automatically turns on, the fan automaticallyadjusts to the highest speed and the temperature dial returns to the full coolposition.
F
Temperature control: Controls the temperature of the airflow in your vehicle.Adjust to select the desired temperature.G
Fan speed control: Controls the volume of air circulated in your vehicle. Adjustto select the desired fan speed.H
Power: Press the button to turn the system on and off. Switching off the climatecontrol system prevents outside air from entering the vehicle.I
AUTOMATIC CLIMATE CONTROL
Power and Driver temperature control: Press the button to turn the systemon and off. Switching off the climate control system prevents outside air fromentering the vehicle. Turn to increase or decrease the air temperature for thedriver side of the vehicle. This control also adjusts the passenger sidetemperature when not in dual zone mode.
A
Heated rear window: Turns the heated rear window on and off. See HeatedWindows and Mirrors (page 108).B
104
Super Duty (), enUSA
Climate ControlE163164
AHCEF
JIK
DBG
Page 108 of 470
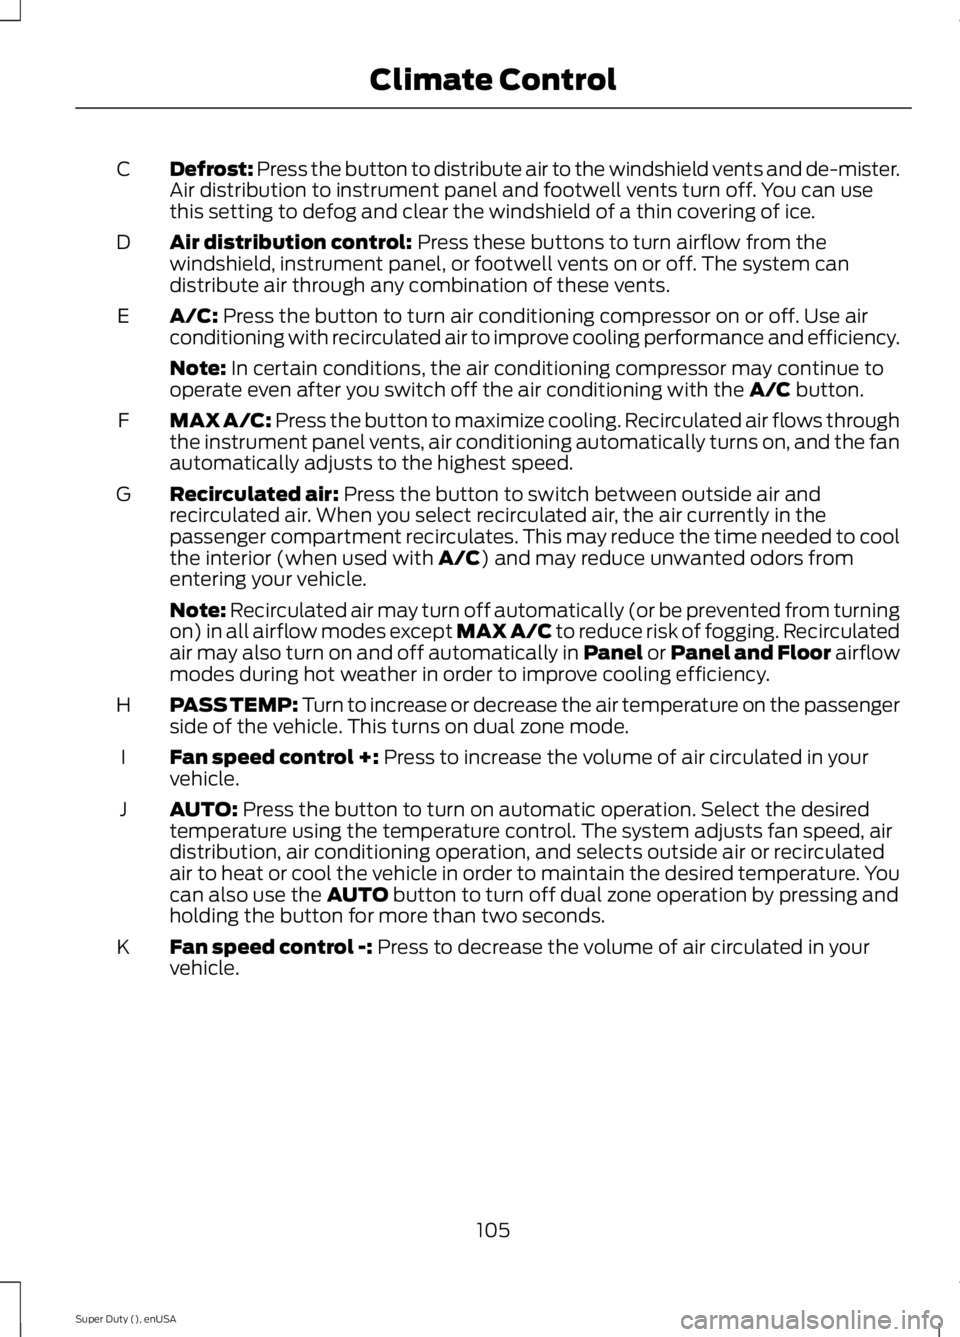
Defrost: Press the button to distribute air to the windshield vents and de-mister.Air distribution to instrument panel and footwell vents turn off. You can usethis setting to defog and clear the windshield of a thin covering of ice.
C
Air distribution control: Press these buttons to turn airflow from thewindshield, instrument panel, or footwell vents on or off. The system candistribute air through any combination of these vents.
D
A/C: Press the button to turn air conditioning compressor on or off. Use airconditioning with recirculated air to improve cooling performance and efficiency.E
Note: In certain conditions, the air conditioning compressor may continue tooperate even after you switch off the air conditioning with the A/C button.
MAX A/C: Press the button to maximize cooling. Recirculated air flows throughthe instrument panel vents, air conditioning automatically turns on, and the fanautomatically adjusts to the highest speed.
F
Recirculated air: Press the button to switch between outside air andrecirculated air. When you select recirculated air, the air currently in thepassenger compartment recirculates. This may reduce the time needed to coolthe interior (when used with A/C) and may reduce unwanted odors fromentering your vehicle.
G
Note: Recirculated air may turn off automatically (or be prevented from turningon) in all airflow modes except MAX A/C to reduce risk of fogging. Recirculatedair may also turn on and off automatically in Panel or Panel and Floor airflowmodes during hot weather in order to improve cooling efficiency.
PASS TEMP: Turn to increase or decrease the air temperature on the passengerside of the vehicle. This turns on dual zone mode.H
Fan speed control +: Press to increase the volume of air circulated in yourvehicle.I
AUTO: Press the button to turn on automatic operation. Select the desiredtemperature using the temperature control. The system adjusts fan speed, airdistribution, air conditioning operation, and selects outside air or recirculatedair to heat or cool the vehicle in order to maintain the desired temperature. Youcan also use the AUTO button to turn off dual zone operation by pressing andholding the button for more than two seconds.
J
Fan speed control -: Press to decrease the volume of air circulated in yourvehicle.K
105
Super Duty (), enUSA
Climate Control
Page 124 of 470
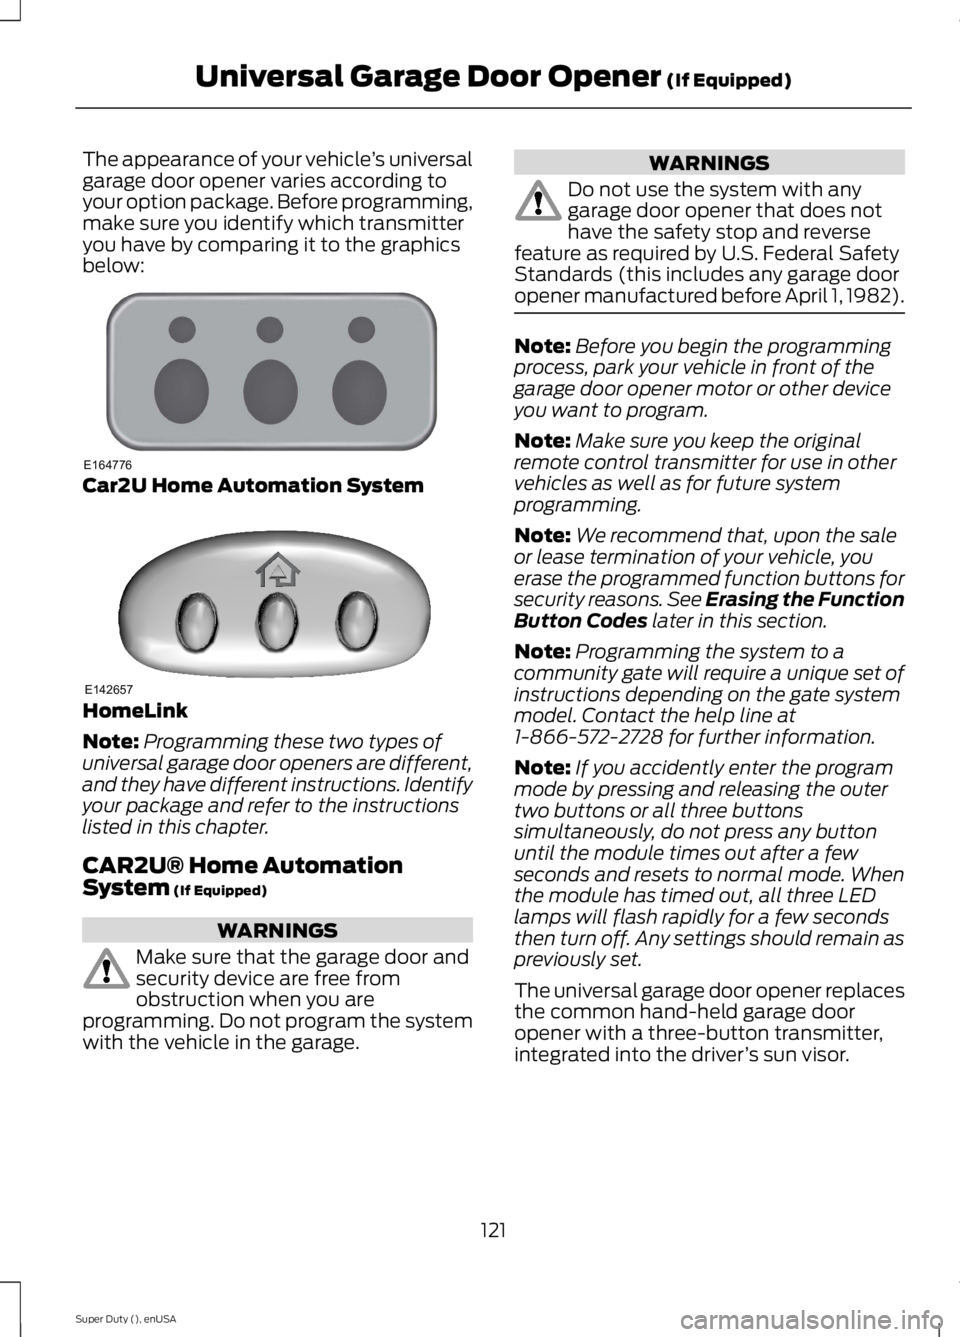
The appearance of your vehicle’s universalgarage door opener varies according toyour option package. Before programming,make sure you identify which transmitteryou have by comparing it to the graphicsbelow:
Car2U Home Automation System
HomeLink
Note:Programming these two types ofuniversal garage door openers are different,and they have different instructions. Identifyyour package and refer to the instructionslisted in this chapter.
CAR2U® Home AutomationSystem (If Equipped)
WARNINGS
Make sure that the garage door andsecurity device are free fromobstruction when you areprogramming. Do not program the systemwith the vehicle in the garage.
WARNINGS
Do not use the system with anygarage door opener that does nothave the safety stop and reversefeature as required by U.S. Federal SafetyStandards (this includes any garage dooropener manufactured before April 1, 1982).
Note:Before you begin the programmingprocess, park your vehicle in front of thegarage door opener motor or other deviceyou want to program.
Note:Make sure you keep the originalremote control transmitter for use in othervehicles as well as for future systemprogramming.
Note:We recommend that, upon the saleor lease termination of your vehicle, youerase the programmed function buttons forsecurity reasons. See Erasing the FunctionButton Codes later in this section.
Note:Programming the system to acommunity gate will require a unique set ofinstructions depending on the gate systemmodel. Contact the help line at1-866-572-2728 for further information.
Note:If you accidently enter the programmode by pressing and releasing the outertwo buttons or all three buttonssimultaneously, do not press any buttonuntil the module times out after a fewseconds and resets to normal mode. Whenthe module has timed out, all three LEDlamps will flash rapidly for a few secondsthen turn off. Any settings should remain aspreviously set.
The universal garage door opener replacesthe common hand-held garage dooropener with a three-button transmitter,integrated into the driver’s sun visor.
121
Super Duty (), enUSA
Universal Garage Door Opener (If Equipped)E164776 E142657
Page 129 of 470
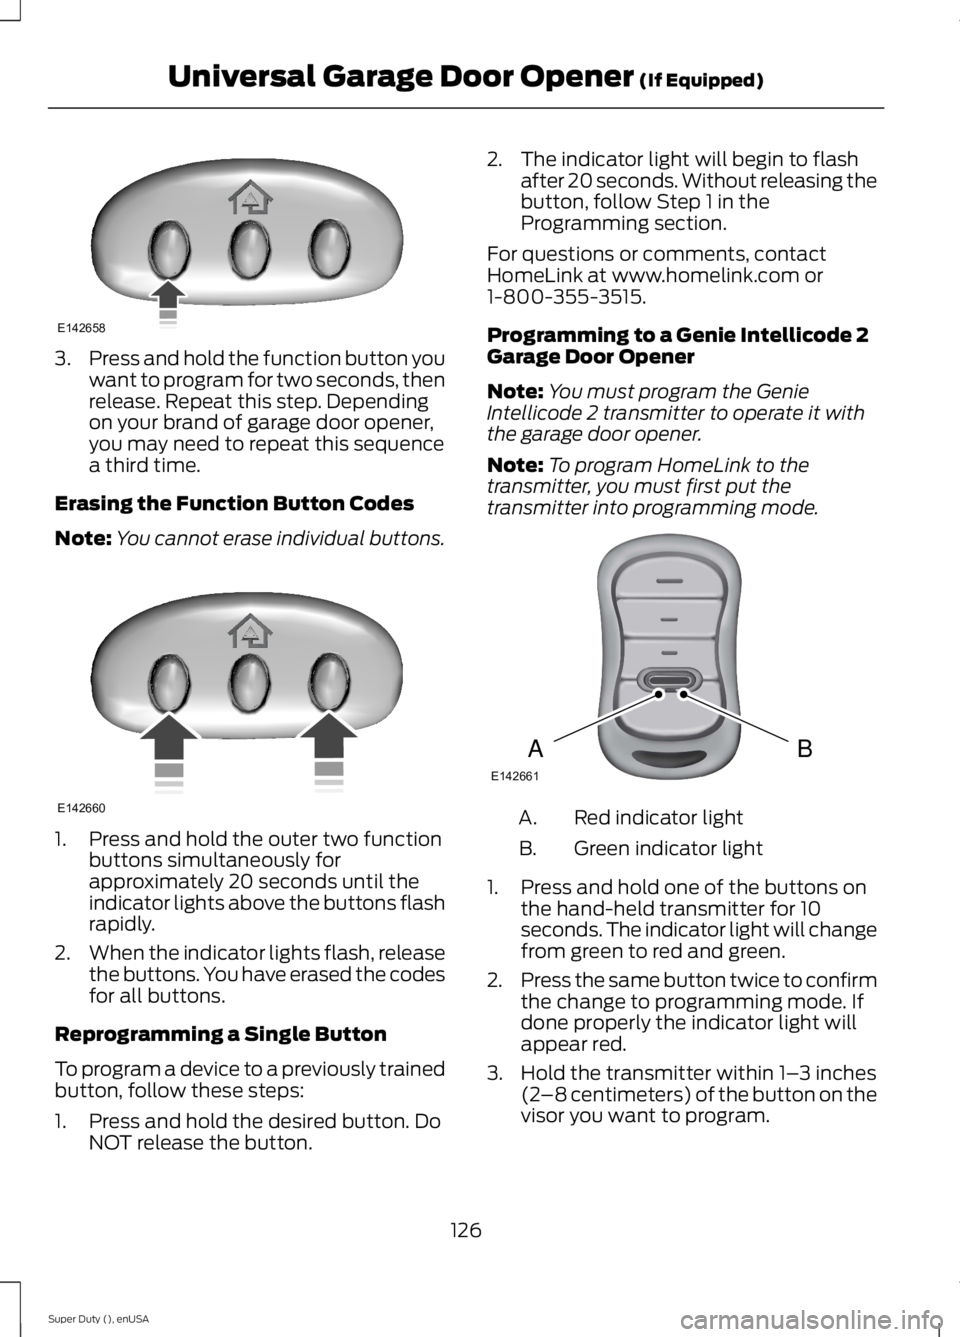
3.Press and hold the function button youwant to program for two seconds, thenrelease. Repeat this step. Dependingon your brand of garage door opener,you may need to repeat this sequencea third time.
Erasing the Function Button Codes
Note:You cannot erase individual buttons.
1. Press and hold the outer two functionbuttons simultaneously forapproximately 20 seconds until theindicator lights above the buttons flashrapidly.
2.When the indicator lights flash, releasethe buttons. You have erased the codesfor all buttons.
Reprogramming a Single Button
To program a device to a previously trainedbutton, follow these steps:
1. Press and hold the desired button. DoNOT release the button.
2. The indicator light will begin to flashafter 20 seconds. Without releasing thebutton, follow Step 1 in theProgramming section.
For questions or comments, contactHomeLink at www.homelink.com or1-800-355-3515.
Programming to a Genie Intellicode 2Garage Door Opener
Note:You must program the GenieIntellicode 2 transmitter to operate it withthe garage door opener.
Note:To program HomeLink to thetransmitter, you must first put thetransmitter into programming mode.
Red indicator lightA.
Green indicator lightB.
1. Press and hold one of the buttons onthe hand-held transmitter for 10seconds. The indicator light will changefrom green to red and green.
2.Press the same button twice to confirmthe change to programming mode. Ifdone properly the indicator light willappear red.
3. Hold the transmitter within 1–3 inches(2–8 centimeters) of the button on thevisor you want to program.
126
Super Duty (), enUSA
Universal Garage Door Opener (If Equipped)E142658 E142660 BAE142661
Page 130 of 470
4. Press and hold both the programmedGenie button on the hand-heldtransmitter and the button you wantto program. The indicator light on thevisor will flash rapidly when theprogramming is successful.
Note:The Genie transmitter will transmitfor up to 30 seconds. If HomeLink does notprogram within 30 seconds you will need topress the Genie transmitter again. If theGenie transmitter indicator light displaysgreen and red, release the button until theindicator light turns off before pressing thebutton again.
Once you have programmed HomeLinksuccessfully, you must change the Genietransmitter out of program mode. To dothis:
1. Press and hold the previouslyprogrammed Genie button on thehand-held transmitter for 10 seconds.The indicator light will change from redto red and green.
2.Press the same button twice to confirmthe change. If done correctly theindicator light will turn green.
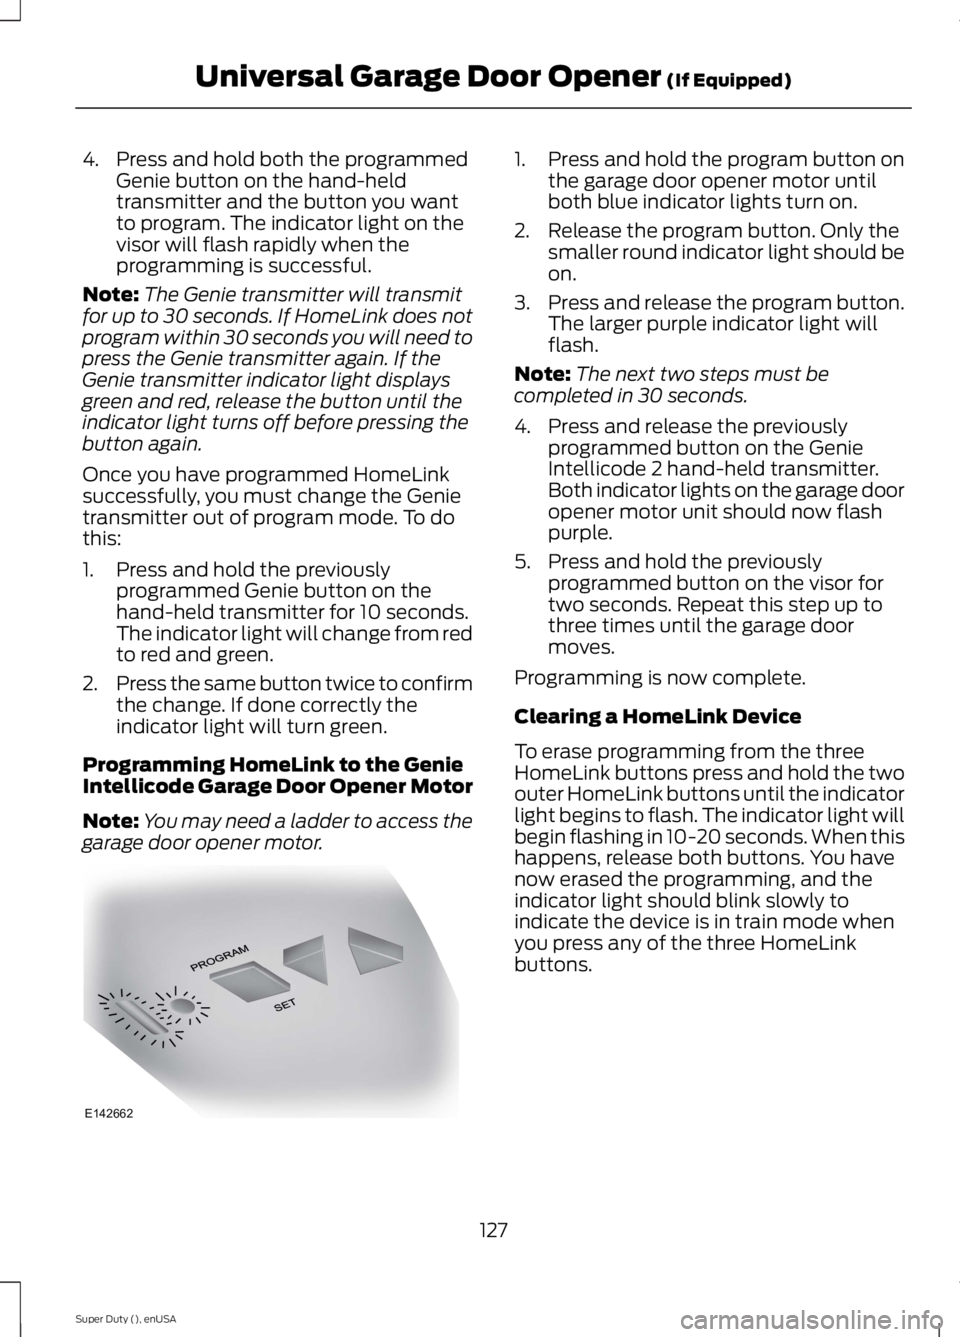
Programming HomeLink to the GenieIntellicode Garage Door Opener Motor
Note:You may need a ladder to access thegarage door opener motor.
1. Press and hold the program button onthe garage door opener motor untilboth blue indicator lights turn on.
2. Release the program button. Only thesmaller round indicator light should beon.
3.Press and release the program button.The larger purple indicator light willflash.
Note:The next two steps must becompleted in 30 seconds.
4. Press and release the previouslyprogrammed button on the GenieIntellicode 2 hand-held transmitter.Both indicator lights on the garage dooropener motor unit should now flashpurple.
5. Press and hold the previouslyprogrammed button on the visor fortwo seconds. Repeat this step up tothree times until the garage doormoves.
Programming is now complete.
Clearing a HomeLink Device
To erase programming from the threeHomeLink buttons press and hold the twoouter HomeLink buttons until the indicatorlight begins to flash. The indicator light willbegin flashing in 10-20 seconds. When thishappens, release both buttons. You havenow erased the programming, and theindicator light should blink slowly toindicate the device is in train mode whenyou press any of the three HomeLinkbuttons.
127
Super Duty (), enUSA
Universal Garage Door Opener (If Equipped)E142662