2015 FORD F250 SUPER DUTY door lock
[x] Cancel search: door lockPage 59 of 470
3. Enter your personal 5-digit code. Youmust enter each number within fiveseconds of each other.
4. Press 1·2 on the keypad to savepersonal code 1.
The doors will lock then unlock to confirmthat programming was successful.
To program additional personal entrycodes, repeat Steps 1-3, then for Step 4:
•press 3·4 to save personal code 2
•press 5·6 to save personal code 3
•press 7·8 to save personal code 4
•press 9·0 to save personal code 5.
You may also program a personal entrycode through the MyFord Touch system.
Tips:
•Do not set a code that uses five of thesame number.
•Do not use five numbers in sequentialorder.
•The factory-set code will work even ifyou have set your own personal code.
Recalling Memory Positions (IfEquipped)
The programmed entry codes will recalldriver memory positions as follows:
•Entry code 1 will recall driver 1 memorypositions.
•Entry code 2 will recall driver 2 memorypositions.
Note:Personal entry codes 3, 4 and 5 willnot recall memory positions.
Erasing a Personal Code
1. Enter the factory-set 5-digit code.
2. Press and release 1·2 on the keypadwithin five seconds.
3. Press and hold 1·2 for two seconds.You must do this within five secondsof completing Step 2.
All personal codes will erase and only thefactory-set 5-digit code will work.
Anti-Scan Feature
The keypad will go into an anti-scan modeif you enter the wrong code seven times(35 consecutive button presses). Thismode disables the keypad for one minuteand the keypad lamp will flash.
The anti-scan feature will turn off after:
•one minute of keypad inactivity
•pressing the unlock button on theremote control
•switching the ignition on.
Unlocking and Locking the Doors
To Unlock the Driver Door
Enter the factory-set 5-digit code or yourpersonal code. You must press eachnumber within five seconds of each other.The interior lamps will illuminate.
Note:All doors will unlock if you disablethe two-stage unlocking mode. SeeLocking and Unlocking (page 54).
To Unlock All Doors
Enter the factory-set code or your personalcode, then press 3·4 within five seconds.
To Lock All Doors
Press and hold 7·8 and 9·0 at the sametime (with the driver door closed). You donot need to enter the keypad code first.
Displaying the Factory Set Code
Note:You will need to have twoprogrammed passive anti-theft keys for thisprocedure.
To display the factory-set code in theinformation display:
1.Insert a key into the ignition and switchthe ignition on for a few seconds.
56
Super Duty (), enUSA
Locks
Page 61 of 470
PASSIVE ANTI-THEFT
SYSTEM (IF EQUIPPED)
Note:The system is not compatible withnon-Ford aftermarket remote start systems.Use of these systems may result in vehiclestarting problems and a loss of securityprotection.
Note:Metallic objects, electronic devicesor a second coded key on the same keychain may cause vehicle starting problemsif they are too close to the key when startingthe engine. Prevent these objects fromtouching the coded key while starting theengine. Switch the ignition off, move allobjects on the key chain away from thecoded key and restart the engine if aproblem occurs.
Note:Do not leave a duplicate coded keyin the vehicle. Always take your keys andlock all doors when leaving the vehicle.
SecuriLock™
The system is an engine immobilizationsystem. It helps prevent the engine fromstarting unless you use a coded keyprogrammed to your vehicle. Using thewrong key may prevent the engine fromstarting. A message may appear in theinformation display.
If you are unable to start the engine with acorrectly coded key, the system hasmalfunctioned. A message may appear inthe information display.
Automatic Arming
The system arms immediately after youswitch the ignition off.
Automatic Disarming
Switching the ignition on with a coded keydisarms the system.
Replacement Keys
Note:Your vehicle may have two integratedkeyhead transmitters.
The integrated keyhead transmitterfunctions as a programmed ignition key. Itoperates all the locks, starts the vehicleand acts as a remote control.
If your programmed transmitters orstandard SecuriLock coded keys are lostor stolen and you do not have an extracoded key, you will need to have yourvehicle towed to an authorized dealer. Youneed to erase the key codes from yourvehicle and program new coded keys.
Store an extra programmed key away fromyour vehicle in a safe place to help preventany inconveniences. See an authorizeddealer to purchase additional spare orreplacement keys.
Programming a Spare Key
Note:You can program a maximum of eightcoded keys to your vehicle. Only four ofthese can be integrated keyheadtransmitters.
You can program your own integratedkeyhead transmitter or standardSecuriLock coded keys to your vehicle. Thisprocedure will program both the engineimmobilizer keycode and the remote entryportion of the remote control to yourvehicle.
Only use integrated keyhead transmittersor standard SecuriLock keys.
You must have two previouslyprogrammed coded keys and the newunprogrammed key readily accessible. Seean authorized dealer to have the spare keyprogrammed if two previouslyprogrammed coded keys are not available.
Read and understand the entire procedurebefore you begin.
58
Super Duty (), enUSA
Security
Page 62 of 470

1.Insert the first previously programmedcoded key into the ignition.
2.Switch the ignition from off to on. Keepthe ignition on for at least threeseconds, but no more than 10 seconds.
3.Switch the ignition off and remove thefirst coded key from the ignition.
4. After three seconds but within 10seconds of switching the ignition off,insert the second previously coded keyinto the ignition.
5.Switch the ignition from off to on. Keepthe ignition on for at least threeseconds, but no more than 10 seconds.
6.Switch the ignition off and remove thesecond previously programmed codedkey from the ignition.
7. After three seconds but within 10seconds of switching the ignition offand removing the previouslyprogrammed coded key, insert the newunprogrammed key into the ignition.
8.Switch the ignition from off to on. Keepthe ignition on for at least six secondsuntil you hear the door locks cycle.
9.Remove the newly programmed codedkey from the ignition.
The key will start the engine ifprogramming is successful. You canoperate the remote entry system if the newkey is an integrated keyhead transmitter.
If programming was not successful, wait20 seconds and repeat Steps 1 through 8.If you are still unsuccessful, take yourvehicle to an authorized dealer.
ANTI-THEFT ALARM (IF EQUIPPED)
The system warns you of an unauthorizedentry to your vehicle. It triggers if any dooror the hood opens without using the key,remote control or keyless entry keypad.
The direction indicators flash and the hornsounds if the system triggers while thealarm is armed.
Take all remote controls to an authorizeddealer if there is any potential alarmproblem with your vehicle.
Arming the Alarm
The alarm is ready to arm when there isnot a key in the ignition. Electronically lockthe vehicle to arm the alarm.
The direction indicators flash once afteryou lock the vehicle. This indicates thealarm is in the pre-armed mode. It will fullyarm in 20 seconds.
Disarming the Alarm
Disarm the alarm by any of the followingactions:
•Press the power door unlock buttonwithin the 20-second pre-armed mode.
•Unlock the doors with the remotecontrol or keyless entry keypad.
•Switch the ignition on or start thevehicle.
•Use a key in the driver door to unlockthe vehicle, then switch the ignition onwithin 12 seconds.
Note:Pressing the panic button on theremote control will stop the horn and signalindicators, but will not disarm the system.
59
Super Duty (), enUSA
Security
Page 73 of 470

Window Lock (If Equipped)
UnlockA
LockB
Press the control to lock or unlock the rearwindow controls.
Power Sliding Back Window (If
Equipped)
WARNINGS
When operating the power slidingback window, you must make sureall rear seat occupants and cargo arenot in the proximity of the back window.
Do not leave children unattended inyour vehicle and do not let them playwith the power sliding back window.They may seriously injure themselves.
The control is on the overhead console.
Press and hold the control to open thewindow. Pull and hold the control to closethe window.
Accessory Delay (If Equipped)
You can use the window switches forseveral minutes after you switch theignition off or until you open either frontdoor.
GLOBAL OPENING (IF EQUIPPED)
You can use the remote control to operatethe windows with the ignition off.
Note:To operate this feature, accessorydelay must not be active.
Opening the Windows
You can only open the windows for a shorttime after you unlock your vehicle with theremote control. After you unlock yourvehicle, press and hold the remote controlunlock button to open the windows.Release the button once movement starts.Press the lock or unlock button to stopmovement.
EXTERIOR MIRRORS
Power Exterior Mirrors (If Equipped)
WARNING
Do not adjust the mirrors when yourvehicle is moving.
70
Super Duty (), enUSA
Windows and MirrorsE163057AB E163058
Page 74 of 470
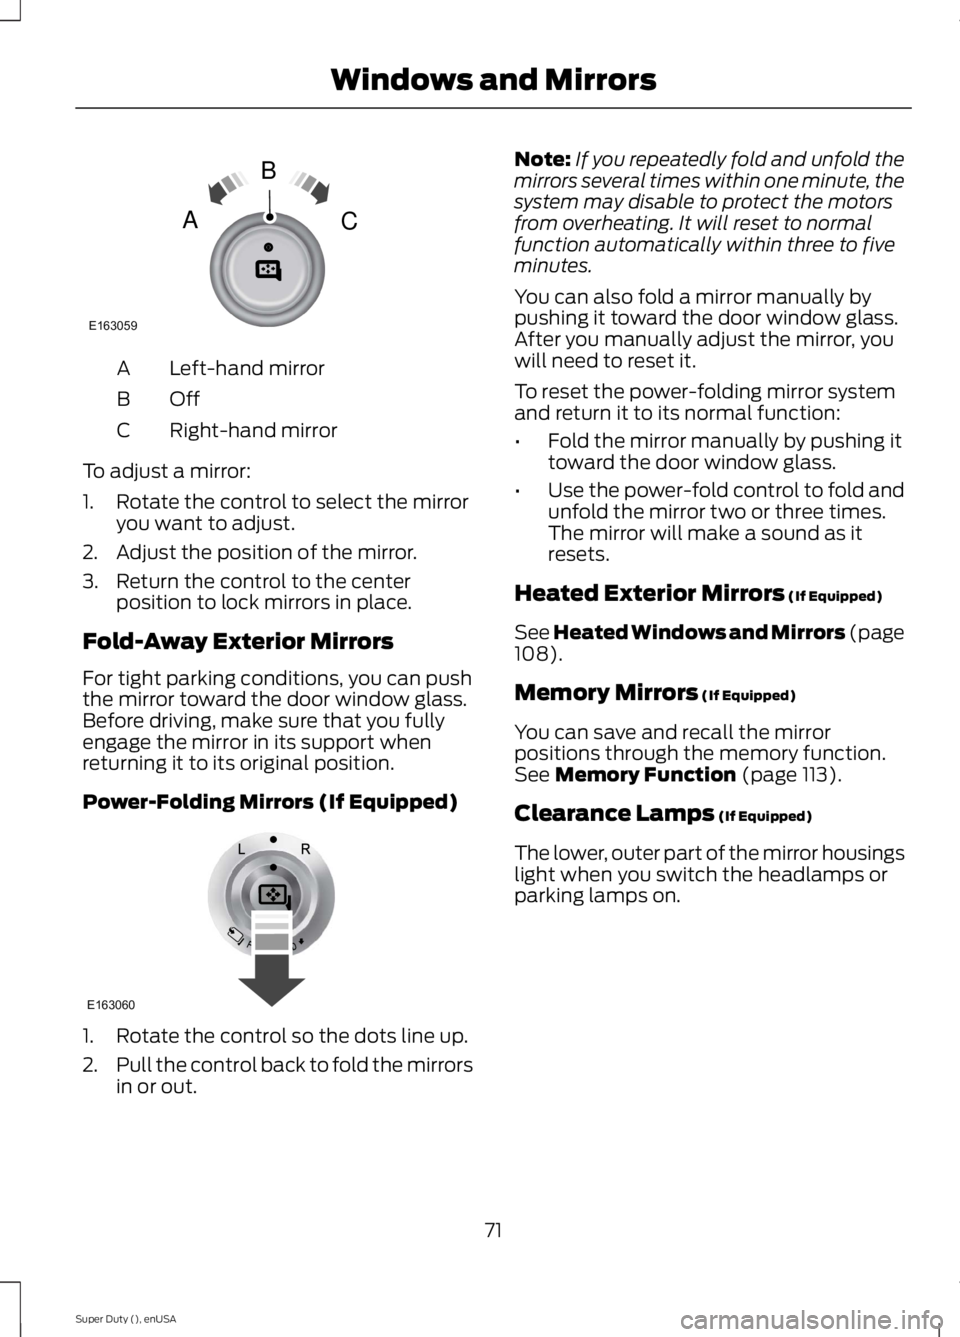
Left-hand mirrorA
OffB
Right-hand mirrorC
To adjust a mirror:
1. Rotate the control to select the mirroryou want to adjust.
2. Adjust the position of the mirror.
3. Return the control to the centerposition to lock mirrors in place.
Fold-Away Exterior Mirrors
For tight parking conditions, you can pushthe mirror toward the door window glass.Before driving, make sure that you fullyengage the mirror in its support whenreturning it to its original position.
Power-Folding Mirrors (If Equipped)
1. Rotate the control so the dots line up.
2.Pull the control back to fold the mirrorsin or out.
Note:If you repeatedly fold and unfold themirrors several times within one minute, thesystem may disable to protect the motorsfrom overheating. It will reset to normalfunction automatically within three to fiveminutes.
You can also fold a mirror manually bypushing it toward the door window glass.After you manually adjust the mirror, youwill need to reset it.
To reset the power-folding mirror systemand return it to its normal function:
•Fold the mirror manually by pushing ittoward the door window glass.
•Use the power-fold control to fold andunfold the mirror two or three times.The mirror will make a sound as itresets.
Heated Exterior Mirrors (If Equipped)
See Heated Windows and Mirrors (page108).
Memory Mirrors (If Equipped)
You can save and recall the mirrorpositions through the memory function.See Memory Function (page 113).
Clearance Lamps (If Equipped)
The lower, outer part of the mirror housingslight when you switch the headlamps orparking lamps on.
71
Super Duty (), enUSA
Windows and MirrorsE163059
B
AC E163060
Page 75 of 470
Telescoping Mirrors (If Equipped)
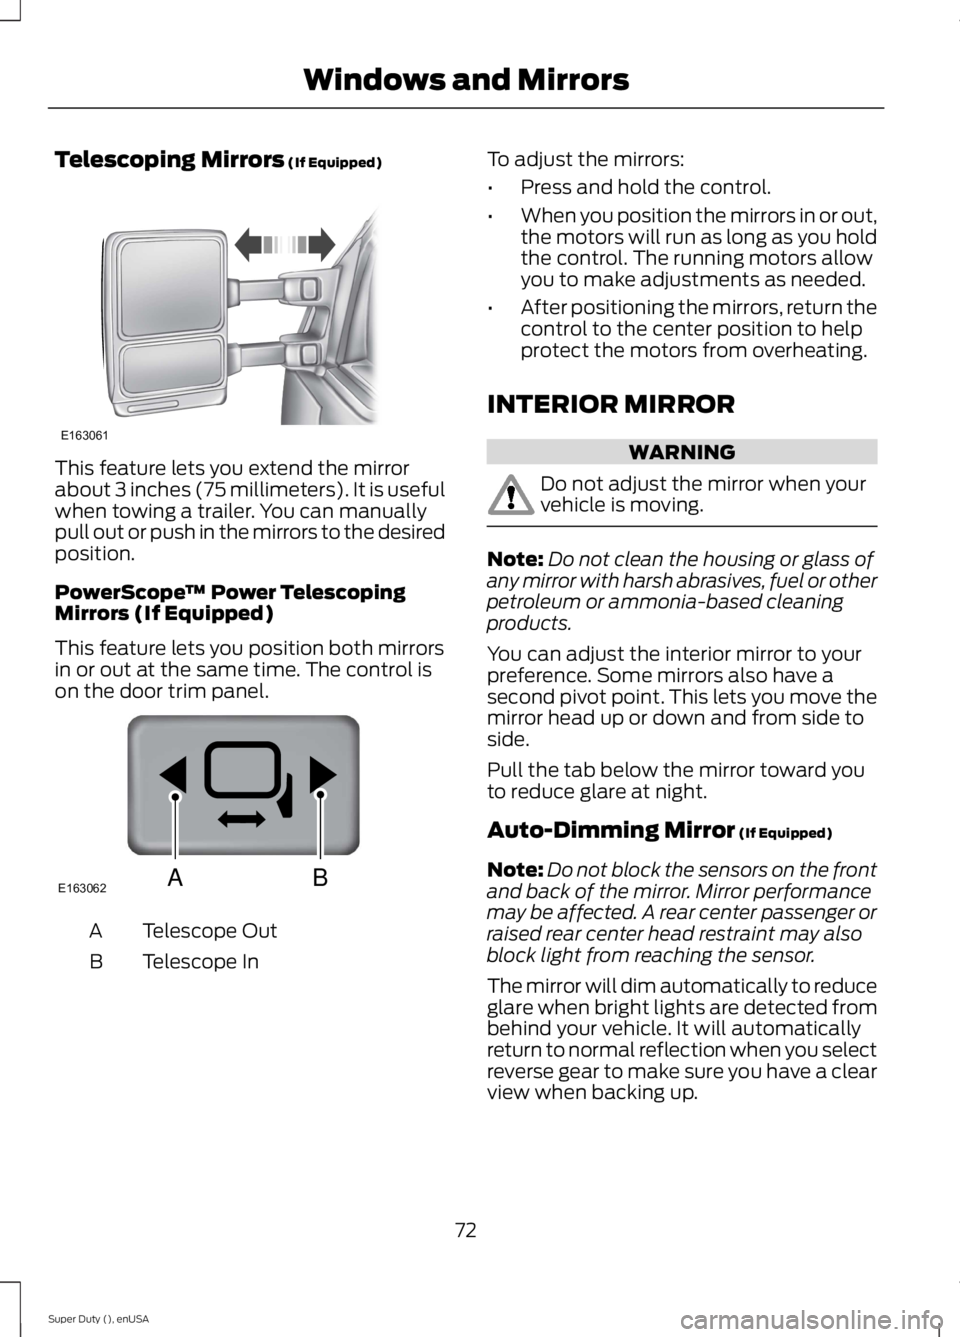
This feature lets you extend the mirrorabout 3 inches (75 millimeters). It is usefulwhen towing a trailer. You can manuallypull out or push in the mirrors to the desiredposition.
PowerScope™ Power TelescopingMirrors (If Equipped)
This feature lets you position both mirrorsin or out at the same time. The control ison the door trim panel.
Telescope OutA
Telescope InB
To adjust the mirrors:
•Press and hold the control.
•When you position the mirrors in or out,the motors will run as long as you holdthe control. The running motors allowyou to make adjustments as needed.
•After positioning the mirrors, return thecontrol to the center position to helpprotect the motors from overheating.
INTERIOR MIRROR
WARNING
Do not adjust the mirror when yourvehicle is moving.
Note:Do not clean the housing or glass ofany mirror with harsh abrasives, fuel or otherpetroleum or ammonia-based cleaningproducts.
You can adjust the interior mirror to yourpreference. Some mirrors also have asecond pivot point. This lets you move themirror head up or down and from side toside.
Pull the tab below the mirror toward youto reduce glare at night.
Auto-Dimming Mirror (If Equipped)
Note:Do not block the sensors on the frontand back of the mirror. Mirror performancemay be affected. A rear center passenger orraised rear center head restraint may alsoblock light from reaching the sensor.
The mirror will dim automatically to reduceglare when bright lights are detected frombehind your vehicle. It will automaticallyreturn to normal reflection when you selectreverse gear to make sure you have a clearview when backing up.
72
Super Duty (), enUSA
Windows and MirrorsE163061 E163062BA
Page 79 of 470
Engine Oil Pressure Gauge
Indicates engine oil pressure. The needleshould stay in the normal operating range(between L and H). If the needle fallsbelow the normal range, stop the vehicle,turn off the engine and check the engineoil level. Add oil if needed. If the oil level iscorrect, have your vehicle checked by yourauthorized dealer.
Engine Coolant TemperatureGauge
WARNING
Never remove the coolant reservoircap while the engine is running or hot.
Indicates engine coolant temperature. Atnormal operating temperature, the levelindicator will be in the normal range. If theengine coolant temperature exceeds thenormal range, stop the vehicle as soon assafely possible, switch off the engine andlet the engine cool.
Transmission Fluid TemperatureGauge
Indicates transmission fluid temperature.At normal operating temperature, the levelindicator will be in the normal range. If thetransmission fluid temperature exceedsthe normal range, stop the vehicle as soonas safely possible and verify the airflow isnot restricted such as snow or debrisblocking airflow through the grill. Also,higher than normal operating temperaturecan be caused by special operationconditions (i.e. snowplowing, towing oroff-road use). Refer to Special operatingconditions in the scheduled maintenanceinformation for instructions. Operating the
transmission for extended periods of timewith the gauge in the higher than normalarea may cause internal transmissiondamage. Altering the severity of the drivingconditions is recommended to lower thetransmission temperature into the normalrange. If the gauge continues to show hightemperatures, see your authorized dealer.
Fuel Gauge
Note:The fuel gauge may vary slightlywhen your vehicle is moving or on a gradient.
Switch the ignition on. The fuel gauge willindicate approximately how much fuel isleft in the fuel tank. The arrow adjacent tothe fuel pump symbol indicates on whichside of your vehicle the fuel filler door islocated.
The needle should move toward F whenyou refuel your vehicle. If the needle pointsto E after adding fuel, this indicates yourvehicle needs service soon.
After refueling some variability in needleposition is normal:
•It may take a short time for the needleto reach F after leaving the gas station.This is normal and depends upon theslope of pavement at the gas station.
•The fuel amount dispensed into thetank is a little less or more than thegauge indicated. This is normal anddepends upon the slope of pavementat the gas station.
•If the gas station nozzle shuts offbefore the tank is full, try a differentgas pump nozzle.
Low Fuel Reminder
A low fuel reminder triggers when the fuelgauge needle is at 1/16th.
76
Super Duty (), enUSA
Instrument Cluster
Page 81 of 470

WARNING
Driving your vehicle with the warninglamp on is dangerous. A significantdecrease in braking performancemay occur. It will take you longer to stopyour vehicle. Have your vehicle checked byyour authorized dealer immediately. Drivingextended distances with the parking brakeengaged can cause brake failure and therisk of personal injury.
Check Fuel Cap (If Equipped)
Illuminates when the fuel capmay not be properly installed.Continued driving with this lighton may cause the Service enginesoon warning indicator to come on.
Cruise Control (If Equipped)
Illuminates when you switch thisfeature on. See Using CruiseControl (page 176).
Direction Indicator
Illuminates when the left or rightturn signal or the hazard warningflasher is turned on. If theindicators stay on or flash faster, check fora burned out bulb.
Door Ajar
Displays when the ignition is onand any door is not completelyclosed.
Electronic Locking Differential
Illuminates when using theelectronic locking differential.
Engine Coolant Temperature
Illuminates when the enginecoolant temperature is high.Stop the vehicle as soon aspossible, switch off the engine and let cool.
Engine Oil
If it illuminates with the enginerunning or when you are driving,this indicates a malfunction.Stop your vehicle as soon as it is safe todo so and switch the engine off. Check theengine oil level. See Engine Oil Check(page 235).
Note:Do not resume your journey if itilluminates despite the level being correct.Have the system checked by your authorizeddealer immediately.
Fasten Safety Belt
It will illuminate and a chime willsound to remind you to fastenyour safety belt.
Front Airbag
If it fails to illuminate when youstart your vehicle, continues toflash or remains on, it indicatesa malfunction. Have the system checkedby your authorized dealer.
High Beam
Illuminates when you switch thehigh beam headlamps on. It willflash when you use theheadlamp flasher.
Hill Descent (If Equipped)
Illuminates when hill descent isswitched on.
78
Super Duty (), enUSA
Instrument Cluster E71340 E163170 E163171