2015 FORD F250 key
[x] Cancel search: keyPage 290 of 485

•
To reduce the chances of interference
from another vehicle, perform the
system reset procedure at least three
feet (one meter) away from another
Ford Motor Company vehicle
undergoing the system reset procedure
at the same time.
• Do not wait more than two minutes
between resetting each tire sensor or
the system will time-out and the entire
procedure will have to be repeated on
all four wheels.
• A double horn will sound indicating the
need to repeat the procedure.
Performing the System Reset Procedure
Read the entire procedure before
attempting.
1. Drive the vehicle above 20 mph (32 km/h) for at least two minutes, then
park in a safe location where you can
easily get to all four tires and have
access to an air pump.
2. Place the ignition in the off position and
keep the key in the ignition.
3. Cycle the ignition to the on position with the engine off.
4. Turn the hazard flashers on then off three times. You must accomplish this
within 10 seconds. If the reset mode
has been entered successfully, the horn
will sound once, the system indicator
will flash and a message is shown in
the information display. If this does not
occur, please try again starting at Step
2. If after repeated attempts to enter
the reset mode, the horn does not
sound, the system indicator does not
flash and no message is shown in the
information display, seek service from
your authorized dealer. 5. Train the tire pressure monitoring
system sensors in the tires using the
following system reset sequence
starting with the left front tire in the
following clockwise order: Left front
(driver's side front tire), Right front
(passenger's side front tire), Right rear
(passenger's side rear tire), Left rear
(driver's side rear tire).
6. Remove the valve cap from the valve stem on the left front tire. Decrease the
air pressure until the horn sounds.
Note: The single horn chirp confirms
that the sensor identification code has
been learned by the module for this
position. If a double horn is heard, the
reset procedure was unsuccessful, and
you must repeat it.
7. Remove the valve cap from the valve stem on the right front tire. Decrease
the air pressure until the horn sounds.
8. Remove the valve cap from the valve stem on the right rear tire. Decrease the
air pressure until the horn sounds.
9. Remove the valve cap from the valve stem on the left rear tire. Decrease the
air pressure until the horn sounds.
Training is complete after the horn
sounds for the last tire trained (driver's
side rear tire), the system indicator
stops flashing, and a message is shown
in the information display.
10. Turn the ignition off. If two short horn
beeps are heard, the reset procedure
was unsuccessful and you must
repeat it. If after repeating the
procedure and two short beeps are
heard when the ignition is turned to
off, seek assistance from your
authorized dealer.
287
Super Duty (), enUSA Wheels and Tires
Page 293 of 485
Location
Tool
SuperCab: Under rear bench seat onpassenger side
Regular cab: Fastened to floor behind driver seat
Jack handle, lug wrench, lug wrench exten-
sion (only available on dual rear wheel
vehicles) and wheel chock (only available
on single rear wheel vehicles equipped with a diesel engine) SuperCab: Fastened to floor under rear seat
Crew Cab: Fastened to floor behind rear seat at driver side
In the glove box
Key and spare tire lock
Removing the Spare Tire (With
Spare Tire Carrier Only)
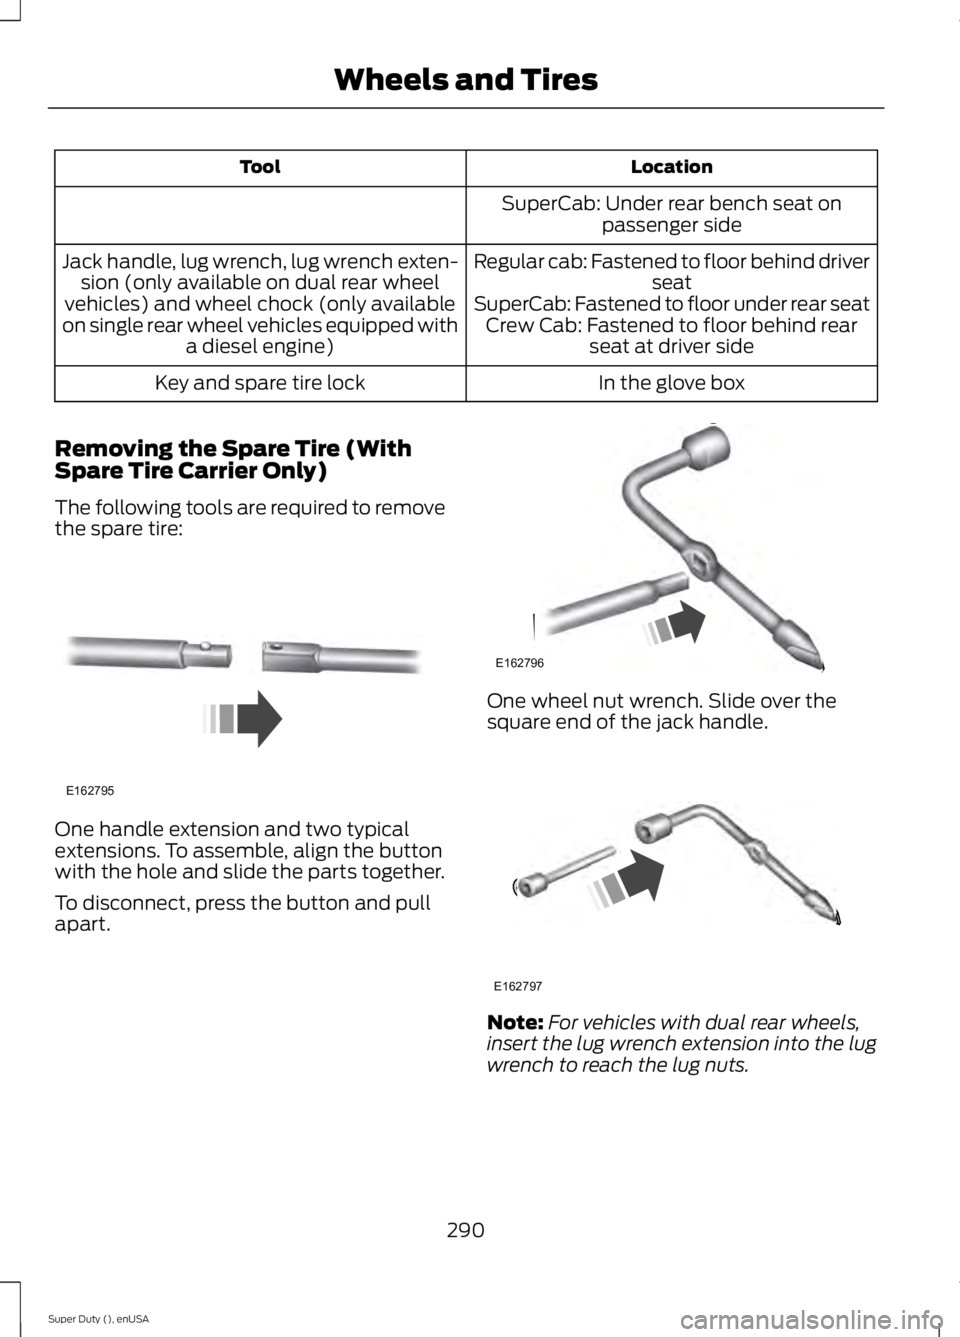
The following tools are required to remove
the spare tire: One handle extension and two typical
extensions. To assemble, align the button
with the hole and slide the parts together.
To disconnect, press the button and pull
apart. One wheel nut wrench. Slide over the
square end of the jack handle.
Note:
For vehicles with dual rear wheels,
insert the lug wrench extension into the lug
wrench to reach the lug nuts.
290
Super Duty (), enUSA Wheels and TiresE162795 E162796 E162797
Page 294 of 485
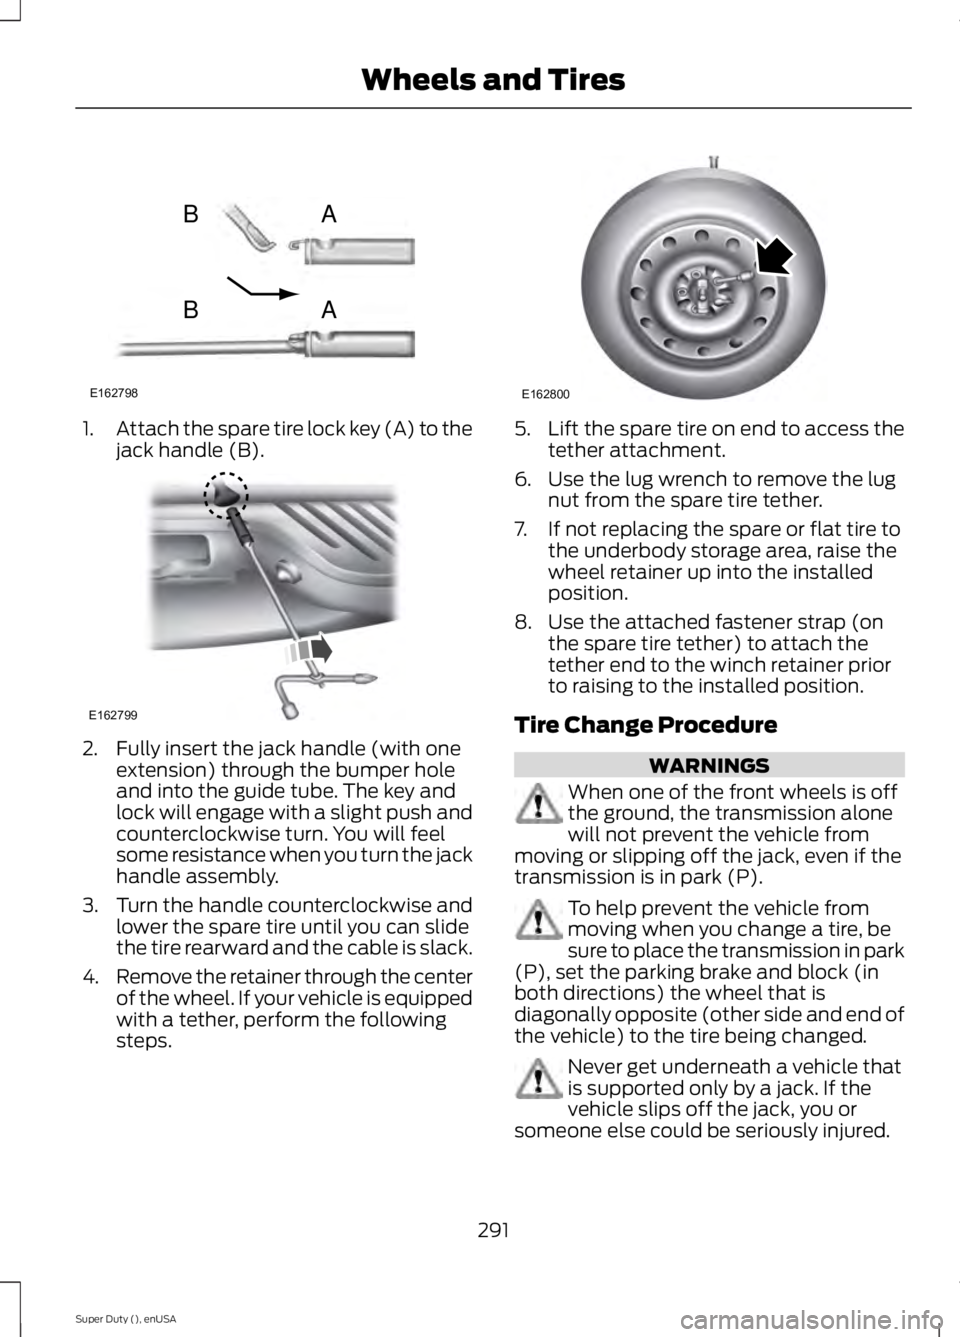
1.
Attach the spare tire lock key (A) to the
jack handle (B). 2. Fully insert the jack handle (with one
extension) through the bumper hole
and into the guide tube. The key and
lock will engage with a slight push and
counterclockwise turn. You will feel
some resistance when you turn the jack
handle assembly.
3. Turn the handle counterclockwise and
lower the spare tire until you can slide
the tire rearward and the cable is slack.
4. Remove the retainer through the center
of the wheel. If your vehicle is equipped
with a tether, perform the following
steps. 5.
Lift the spare tire on end to access the
tether attachment.
6. Use the lug wrench to remove the lug nut from the spare tire tether.
7. If not replacing the spare or flat tire to the underbody storage area, raise the
wheel retainer up into the installed
position.
8. Use the attached fastener strap (on the spare tire tether) to attach the
tether end to the winch retainer prior
to raising to the installed position.
Tire Change Procedure WARNINGS
When one of the front wheels is off
the ground, the transmission alone
will not prevent the vehicle from
moving or slipping off the jack, even if the
transmission is in park (P). To help prevent the vehicle from
moving when you change a tire, be
sure to place the transmission in park
(P), set the parking brake and block (in
both directions) the wheel that is
diagonally opposite (other side and end of
the vehicle) to the tire being changed. Never get underneath a vehicle that
is supported only by a jack. If the
vehicle slips off the jack, you or
someone else could be seriously injured.
291
Super Duty (), enUSA Wheels and TiresE162798
AB
AB E162799 E162800
Page 301 of 485
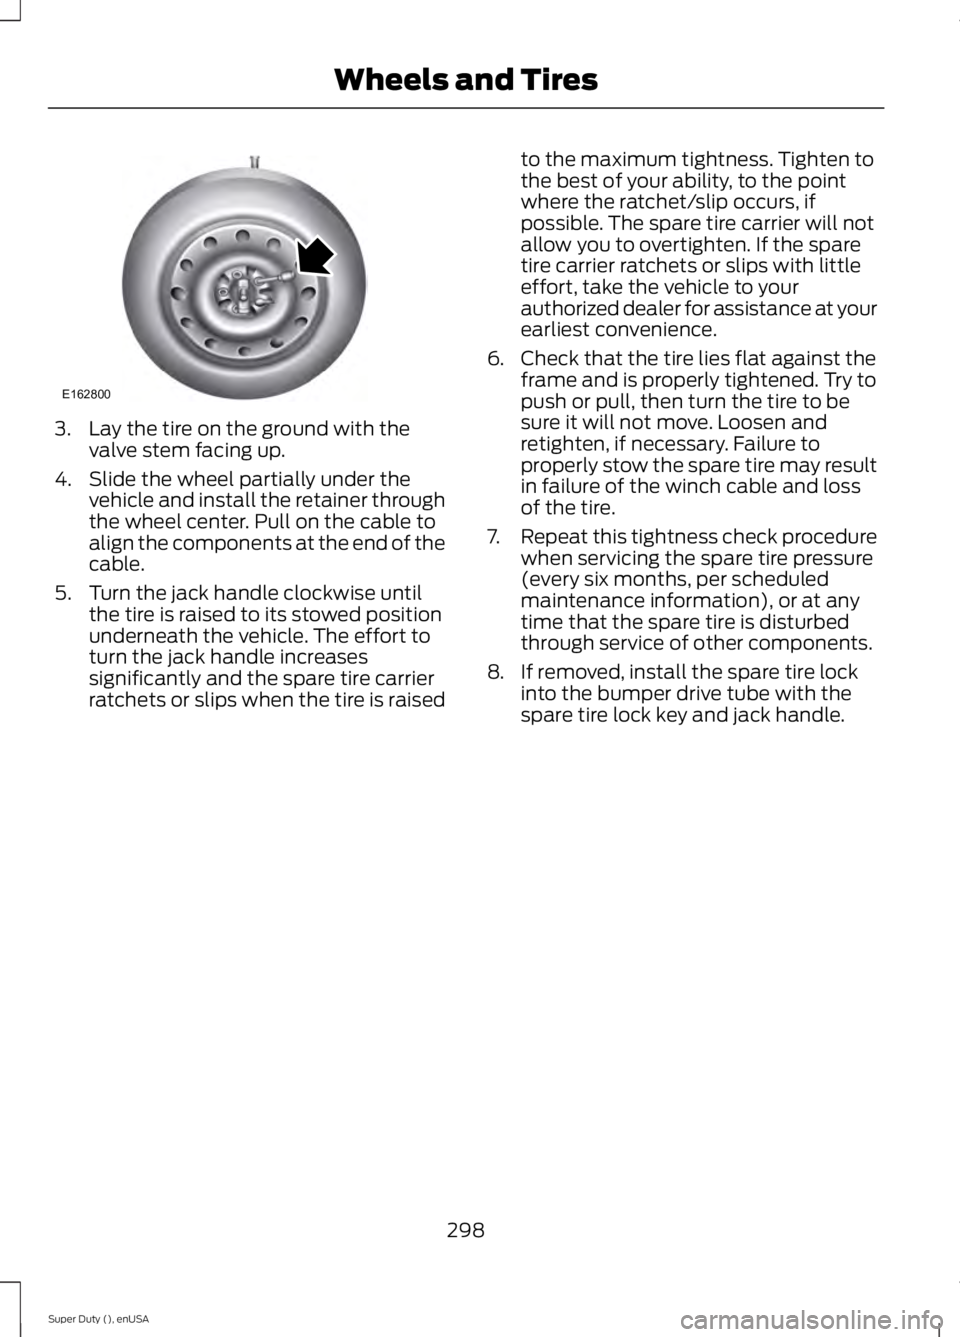
3. Lay the tire on the ground with the
valve stem facing up.
4. Slide the wheel partially under the vehicle and install the retainer through
the wheel center. Pull on the cable to
align the components at the end of the
cable.
5. Turn the jack handle clockwise until the tire is raised to its stowed position
underneath the vehicle. The effort to
turn the jack handle increases
significantly and the spare tire carrier
ratchets or slips when the tire is raised to the maximum tightness. Tighten to
the best of your ability, to the point
where the ratchet/slip occurs, if
possible. The spare tire carrier will not
allow you to overtighten. If the spare
tire carrier ratchets or slips with little
effort, take the vehicle to your
authorized dealer for assistance at your
earliest convenience.
6. Check that the tire lies flat against the frame and is properly tightened. Try to
push or pull, then turn the tire to be
sure it will not move. Loosen and
retighten, if necessary. Failure to
properly stow the spare tire may result
in failure of the winch cable and loss
of the tire.
7. Repeat this tightness check procedure
when servicing the spare tire pressure
(every six months, per scheduled
maintenance information), or at any
time that the spare tire is disturbed
through service of other components.
8. If removed, install the spare tire lock into the bumper drive tube with the
spare tire lock key and jack handle.
298
Super Duty (), enUSA Wheels and TiresE162800
Page 323 of 485
Troubleshooting
Action
Condition
Message
No action required. This
message should disappear
shortly.
Radio requires more than
two seconds to produce
audio for the selected
channel.
Acquiring…
If this message does not
clear shortly, or with an igni-
tion key cycle, your receiver
may have a fault. See an
authorized dealer for service.
There is an internal module
or system failure present.
Satellite antenna fault
SIRIUS system failure
Tune to another channel or
choose another preset.
The channel is no longer
available.
Invalid Channel
Contact SIRIUS at 1-888-
539-7474 to subscribe to
the channel, or tune to
another channel.
Your subscription does not
include this channel.
Unsubscribed Channel
The signal is blocked. When
you move into an open area,
the signal should return.
The signal is lost from the
SIRIUS satellite or SIRIUS
tower to your vehicle
antenna.
No Signal
No action required. The
process may take up to
three minutes.
Update of channel
programming in progress.
Updating…
Contact SIRIUS at 1-888-
539-7474 to resolve
subscription issues.
Your satellite service is no
longer available.
Questions? Call
1-888-539-7474
Use the channel guide to
turn off the Lock or Skip
function on that station.
All the channels in the
selected category are either
skipped or locked.
None found
Check Channel Guide
No action required.
SIRIUS has updated the
channels available for your
vehicle.
Subscription Updated
320
Super Duty (), enUSA Audio System
Page 368 of 485
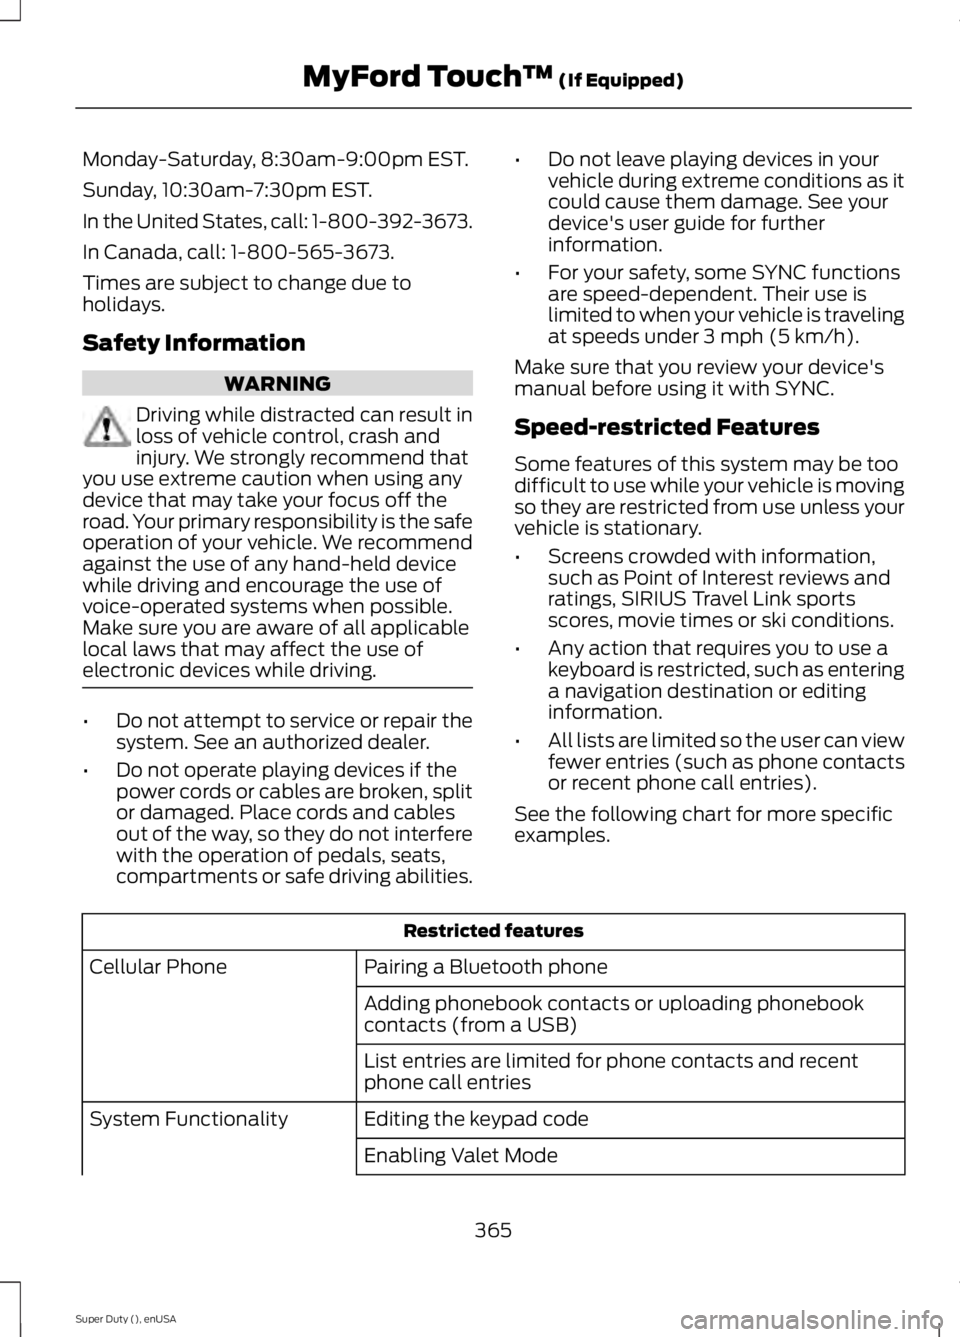
Monday-Saturday, 8:30am-9:00pm EST.
Sunday, 10:30am-7:30pm EST.
In the United States, call: 1-800-392-3673.
In Canada, call: 1-800-565-3673.
Times are subject to change due to
holidays.
Safety Information
WARNING
Driving while distracted can result in
loss of vehicle control, crash and
injury. We strongly recommend that
you use extreme caution when using any
device that may take your focus off the
road. Your primary responsibility is the safe
operation of your vehicle. We recommend
against the use of any hand-held device
while driving and encourage the use of
voice-operated systems when possible.
Make sure you are aware of all applicable
local laws that may affect the use of
electronic devices while driving. •
Do not attempt to service or repair the
system. See an authorized dealer.
• Do not operate playing devices if the
power cords or cables are broken, split
or damaged. Place cords and cables
out of the way, so they do not interfere
with the operation of pedals, seats,
compartments or safe driving abilities. •
Do not leave playing devices in your
vehicle during extreme conditions as it
could cause them damage. See your
device's user guide for further
information.
• For your safety, some SYNC functions
are speed-dependent. Their use is
limited to when your vehicle is traveling
at speeds under 3 mph (5 km/h).
Make sure that you review your device's
manual before using it with SYNC.
Speed-restricted Features
Some features of this system may be too
difficult to use while your vehicle is moving
so they are restricted from use unless your
vehicle is stationary.
• Screens crowded with information,
such as Point of Interest reviews and
ratings, SIRIUS Travel Link sports
scores, movie times or ski conditions.
• Any action that requires you to use a
keyboard is restricted, such as entering
a navigation destination or editing
information.
• All lists are limited so the user can view
fewer entries (such as phone contacts
or recent phone call entries).
See the following chart for more specific
examples. Restricted features
Pairing a Bluetooth phone
Cellular Phone
Adding phonebook contacts or uploading phonebook
contacts (from a USB)
List entries are limited for phone contacts and recent
phone call entries
Editing the keypad code
System Functionality
Enabling Valet Mode
365
Super Duty (), enUSA MyFord Touch
™ (If Equipped)
Page 369 of 485
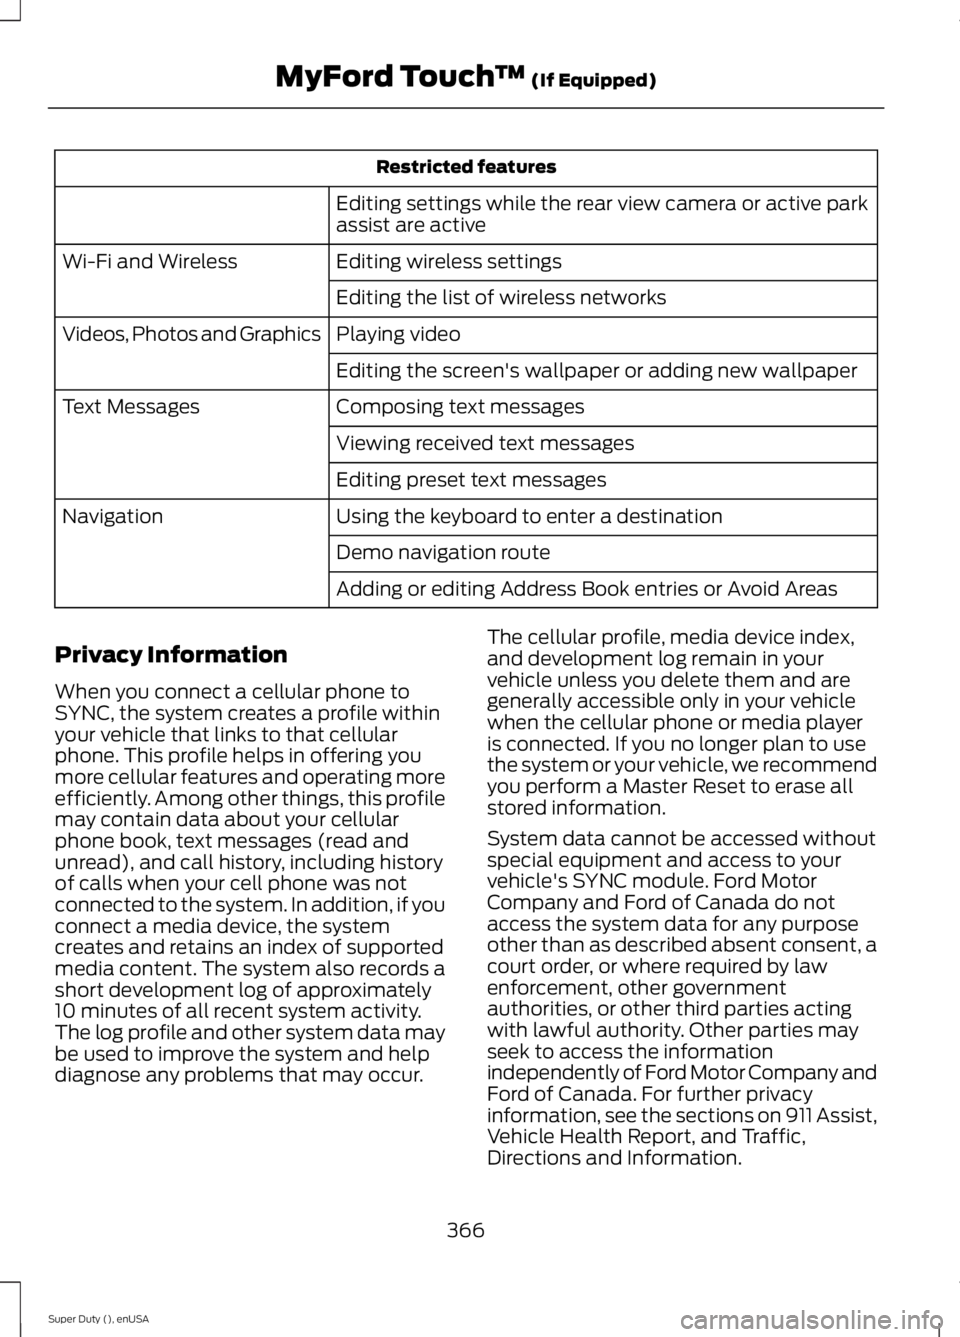
Restricted features
Editing settings while the rear view camera or active park
assist are active
Editing wireless settings
Wi-Fi and Wireless
Editing the list of wireless networks
Playing video
Videos, Photos and Graphics
Editing the screen's wallpaper or adding new wallpaper
Composing text messages
Text Messages
Viewing received text messages
Editing preset text messages
Using the keyboard to enter a destination
Navigation
Demo navigation route
Adding or editing Address Book entries or Avoid Areas
Privacy Information
When you connect a cellular phone to
SYNC, the system creates a profile within
your vehicle that links to that cellular
phone. This profile helps in offering you
more cellular features and operating more
efficiently. Among other things, this profile
may contain data about your cellular
phone book, text messages (read and
unread), and call history, including history
of calls when your cell phone was not
connected to the system. In addition, if you
connect a media device, the system
creates and retains an index of supported
media content. The system also records a
short development log of approximately
10 minutes of all recent system activity.
The log profile and other system data may
be used to improve the system and help
diagnose any problems that may occur. The cellular profile, media device index,
and development log remain in your
vehicle unless you delete them and are
generally accessible only in your vehicle
when the cellular phone or media player
is connected. If you no longer plan to use
the system or your vehicle, we recommend
you perform a Master Reset to erase all
stored information.
System data cannot be accessed without
special equipment and access to your
vehicle's SYNC module. Ford Motor
Company and Ford of Canada do not
access the system data for any purpose
other than as described absent consent, a
court order, or where required by law
enforcement, other government
authorities, or other third parties acting
with lawful authority. Other parties may
seek to access the information
independently of Ford Motor Company and
Ford of Canada. For further privacy
information, see the sections on 911 Assist,
Vehicle Health Report, and Traffic,
Directions and Information.
366
Super Duty (), enUSA MyFord Touch
™ (If Equipped)
Page 375 of 485
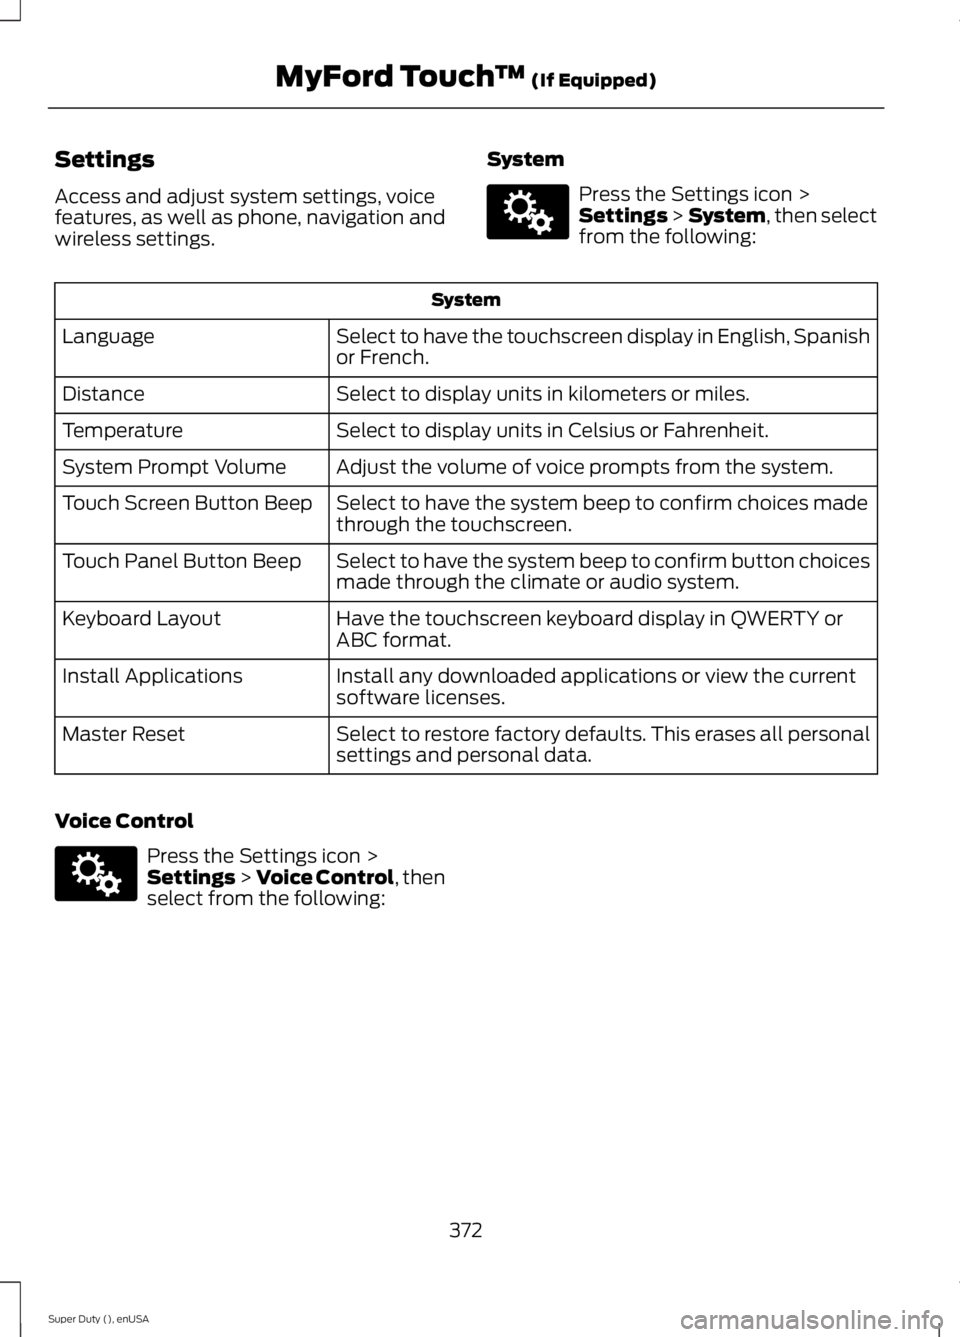
Settings
Access and adjust system settings, voice
features, as well as phone, navigation and
wireless settings.
System Press the Settings icon >
Settings > System, then select
from the following: System
Select to have the touchscreen display in English, Spanish
or French.
Language
Select to display units in kilometers or miles.
Distance
Select to display units in Celsius or Fahrenheit.
Temperature
Adjust the volume of voice prompts from the system.
System Prompt Volume
Select to have the system beep to confirm choices made
through the touchscreen.
Touch Screen Button Beep
Select to have the system beep to confirm button choices
made through the climate or audio system.
Touch Panel Button Beep
Have the touchscreen keyboard display in QWERTY or
ABC format.
Keyboard Layout
Install any downloaded applications or view the current
software licenses.
Install Applications
Select to restore factory defaults. This erases all personal
settings and personal data.
Master Reset
Voice Control Press the Settings icon >
Settings
> Voice Control, then
select from the following:
372
Super Duty (), enUSA MyFord Touch
™
(If Equipped)E142607 E142607