2015 FORD F250 mirror
[x] Cancel search: mirrorPage 109 of 485
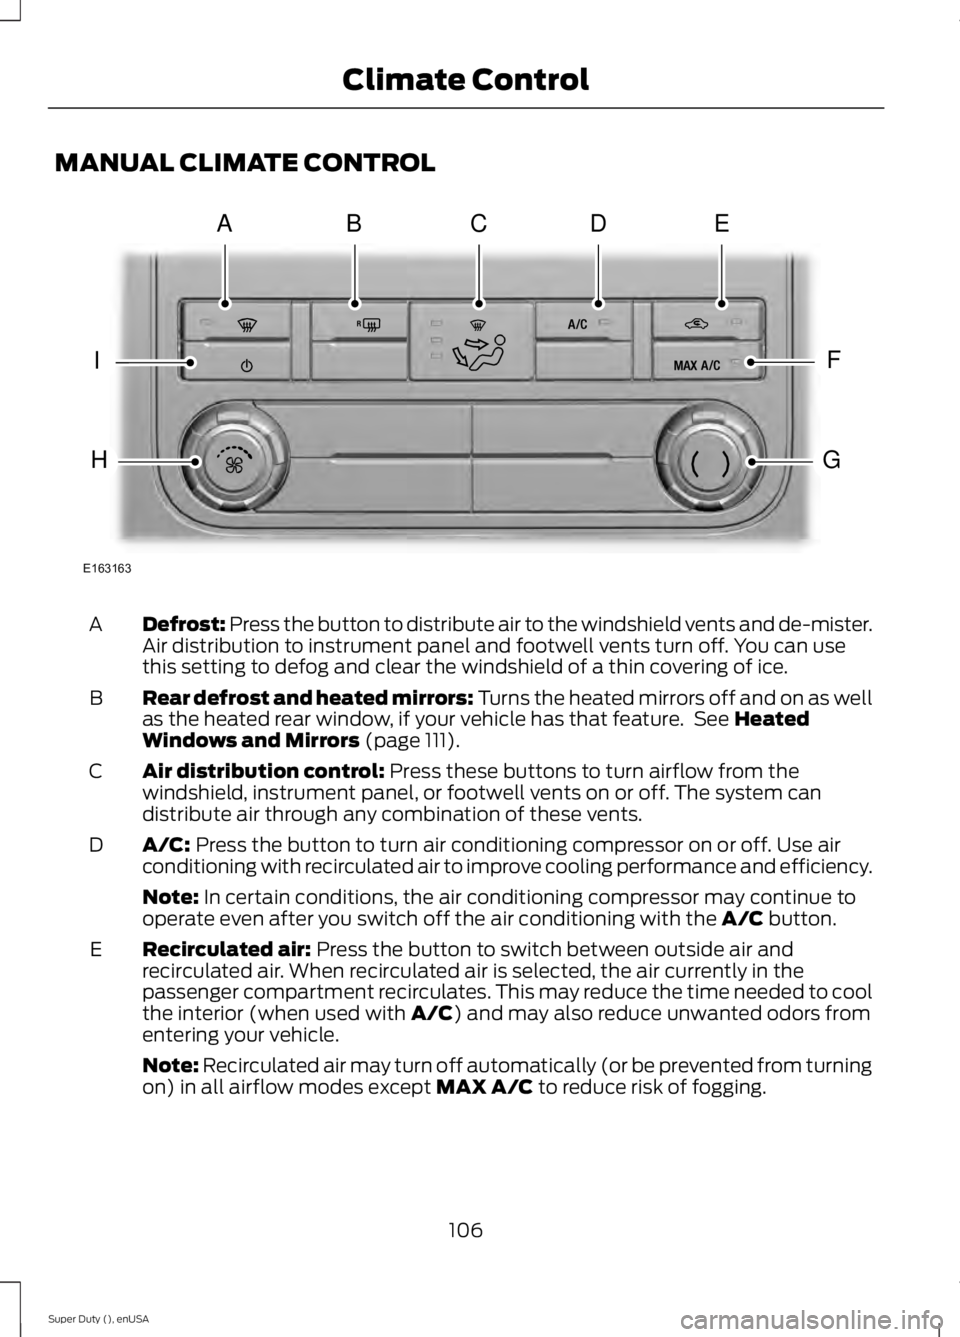
MANUAL CLIMATE CONTROL
Defrost: Press the button to distribute air to the windshield vents and de-mister.
Air distribution to instrument panel and footwell vents turn off. You can use
this setting to defog and clear the windshield of a thin covering of ice.
A
Rear defrost and heated mirrors: Turns the heated mirrors off and on as well
as the heated rear window, if your vehicle has that feature. See Heated
Windows and Mirrors (page 111).
B
Air distribution control:
Press these buttons to turn airflow from the
windshield, instrument panel, or footwell vents on or off. The system can
distribute air through any combination of these vents.
C
A/C:
Press the button to turn air conditioning compressor on or off. Use air
conditioning with recirculated air to improve cooling performance and efficiency.
D
Note:
In certain conditions, the air conditioning compressor may continue to
operate even after you switch off the air conditioning with the A/C button.
Recirculated air:
Press the button to switch between outside air and
recirculated air. When recirculated air is selected, the air currently in the
passenger compartment recirculates. This may reduce the time needed to cool
the interior (when used with
A/C) and may also reduce unwanted odors from
entering your vehicle.
E
Note:
Recirculated air may turn off automatically (or be prevented from turning
on) in all airflow modes except MAX A/C to reduce risk of fogging.
106
Super Duty (), enUSA Climate ControlE163163
ABDCE
F
G
I
H
Page 110 of 485
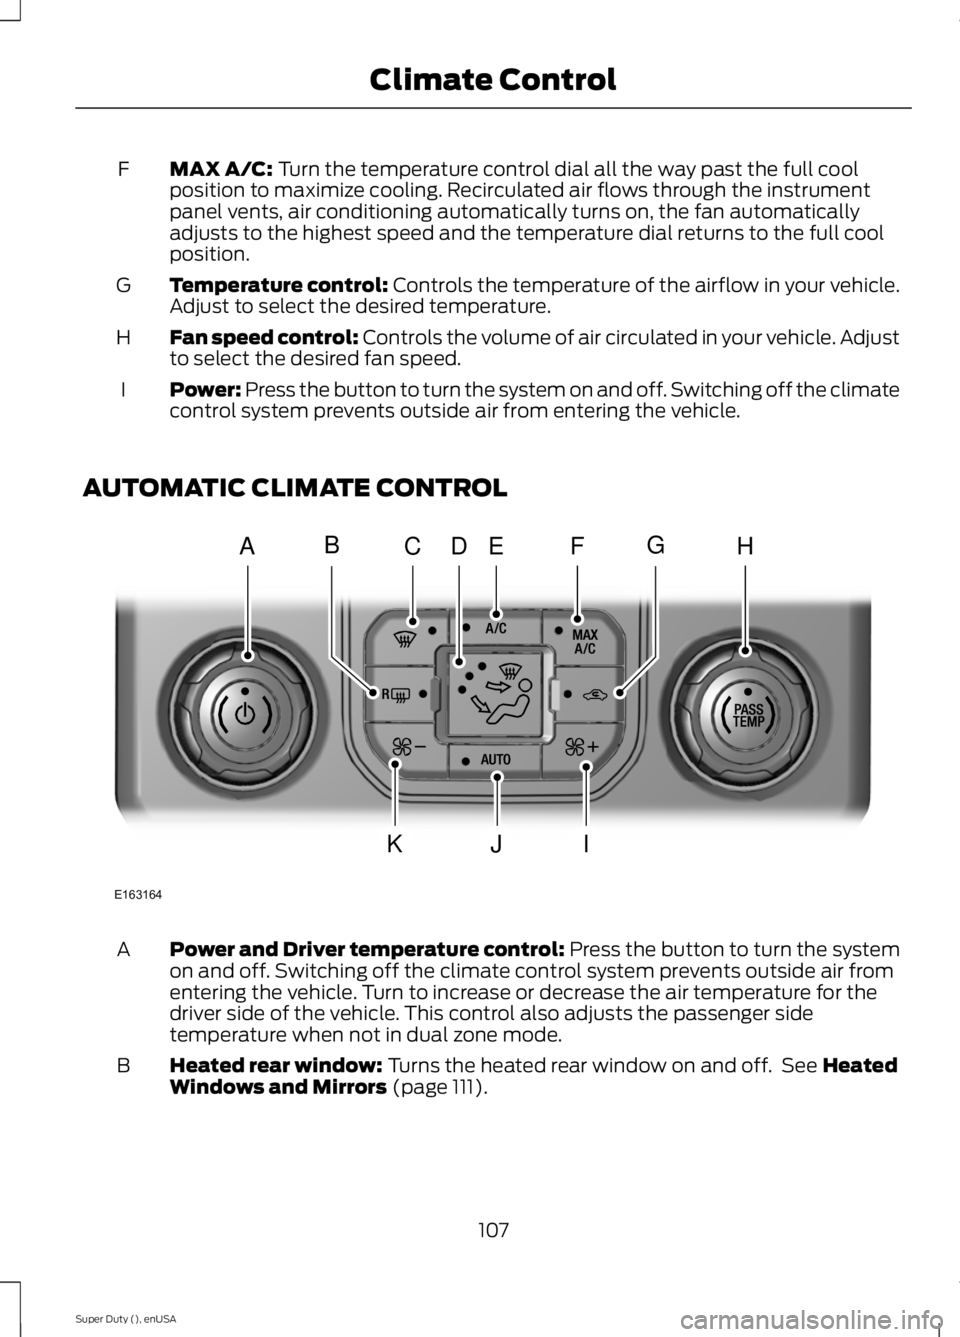
MAX A/C: Turn the temperature control dial all the way past the full cool
position to maximize cooling. Recirculated air flows through the instrument
panel vents, air conditioning automatically turns on, the fan automatically
adjusts to the highest speed and the temperature dial returns to the full cool
position.
F
Temperature control:
Controls the temperature of the airflow in your vehicle.
Adjust to select the desired temperature.
G
Fan speed control:
Controls the volume of air circulated in your vehicle. Adjust
to select the desired fan speed.
H
Power: Press the button to turn the system on and off. Switching off the climate
control system prevents outside air from entering the vehicle.
I
AUTOMATIC CLIMATE CONTROL Power and Driver temperature control: Press the button to turn the system
on and off. Switching off the climate control system prevents outside air from
entering the vehicle. Turn to increase or decrease the air temperature for the
driver side of the vehicle. This control also adjusts the passenger side
temperature when not in dual zone mode.
A
Heated rear window:
Turns the heated rear window on and off. See Heated
Windows and Mirrors (page 111).
B
107
Super Duty (), enUSA Climate ControlE163164
AHCEF
JIK
DBG
Page 114 of 485
Side Window Defogging in Cold Weather
Vehicle With Automatic Climate Control
Vehicle With Manual Climate Control
Press the defrost button.
Select the instrument panel and footwell
air vents positions through the air distri-
bution control.
1
Adjust the temperature control to the
desired setting. Use 72°F (22°C) as a
starting point, then adjust the setting as
necessary.
Press the A/C button.
2
Direct the instrument panel side air vents
toward the side windows.
Adjust the temperature control to the
desired setting.
3
Close the instrument panel center vents.
Adjust the fan speed to the highest
setting.
4
Direct the instrument panel side air vents
toward the side windows.
5
Close the instrument panel center vents.
6
HEATED WINDOWS AND
MIRRORS
Heated Rear Window
(If Equipped)
Note: The engine must be running to use
this feature.
Note: If your vehicle is equipped with a
sliding rear window, the feature still
operates when you open the window.
Press the button to clear the rear window
of thin ice and fog. Press the button again
within 10 minutes to switch it off. It
switches off automatically after 10
minutes, or when you switch the ignition
off. Do not use razor blades or other sharp
objects to clean the inside of the rear
window or to remove decals from the
inside of the rear window. This may
cause damage to the heated grid lines.
Your warranty does not cover this
damage.
Heated Exterior Mirror
(If Equipped)
Note: Do not remove ice from the mirrors
with a scraper or attempt to readjust the
mirror glass that has frozen in place. These
actions could cause damage to the glass
and mirrors.
Note: Do not clean the housing or glass of
any mirror with harsh abrasives, fuel or other
petroleum-based cleaning products.
The heated mirrors remove ice, mist and
fog when you switch on the heated rear
window.
111
Super Duty (), enUSA Climate Control
Page 115 of 485
REMOTE START (If Equipped)
The remote start feature allows you to
pre-condition the interior of your vehicle.
The climate control system works to
achieve comfort according to your previous
settings.
Note: You cannot adjust the system during
remote start operation.
Turn the ignition on to return the system
to its previous settings. You can now make
adjustments normally, but you need to turn
certain vehicle-dependent features back
on, such as:
• Heated seats.
• Cooled seats.
• Heated steering wheel.
• Heated mirrors.
• Heated rear window.
You can adjust the default remote start
settings using the information display
controls. See
Information Displays
(page 84).
Automatic Settings
In hot weather, the system is set to 72°F
(22°C). The cooled seats are set to high
(if available, and selected to AUTO in the
information display).
In moderate weather, the system either
heats or cools (based on previous
settings). The rear defroster, heated
mirrors and heated seats do not
automatically turn on.
In cold weather, the system is set to 72°F
(22°C). The heated seats are set to high
(if available, and selected to AUTO in the
information display). The rear defroster
and heated mirrors automatically turn on.
112
Super Duty (), enUSA Climate Control
Page 120 of 485

This feature will automatically recall the
position of the driver seat, power mirrors,
and adjustable pedals. The memory
control is located on the driver door.
To program position 1:
1. Move the memory features to the
desired positions using the associated
controls.
2. Press and hold button 1 for at least two
seconds. A tone will sound confirming
that a memory position has been set.
To program position 2, repeat the previous
procedure using button 2.
You can program the memory feature to
a remote entry transmitter. See Keys and
Remote Controls (page 47).
You can recall a programmed memory
position:
• In any gearshift position if the ignition
is not on.
• Only in park (P) or neutral (N) if the
ignition is on. You can recall the memory positions when
you press your remote entry transmitter
unlock control (if you programmed a
memory position to the transmitter) or,
when you enter a valid personal entry code
that is programmed to a memory position.
The mirror moves to the programmed
position and the seat moves to the easy
entry position. The seat will move to the
final position when the key is in the ignition
(if you enable the easy entry feature).
Easy Entry and Exit Feature
(If
Equipped)
If you enable the easy entry and exit
feature, it automatically moves the driver
seat rearward 2 inches (5 centimeters)
when you put the transmission in park (P)
and remove the key from the ignition.
If the seat is less than 2 inches (5
centimeters) from the rear of the seat
track, the seat travel will be less than 2
inches (5 centimeters) rearward.
The driver seat will return to the previous
position when you put the key in the
ignition.
You can enable or disable this feature
through the information display. See
Information Displays
(page 84).
REAR SEATS
Folding Up the Rear Seats (SuperCab)
117
Super Duty (), enUSA Seats21
E162734
Page 178 of 485
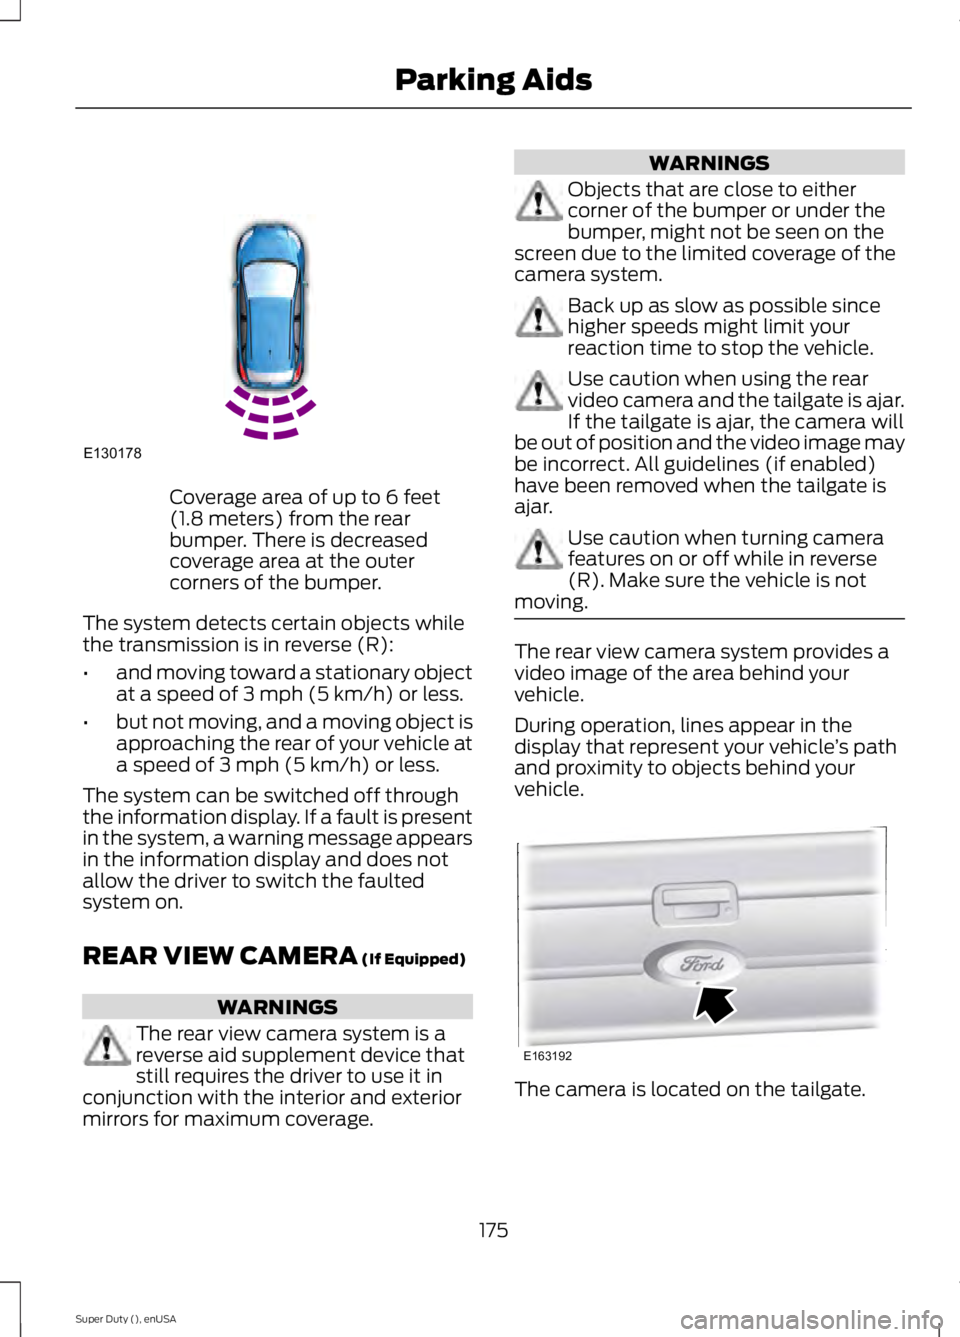
Coverage area of up to 6 feet
(1.8 meters) from the rear
bumper. There is decreased
coverage area at the outer
corners of the bumper.
The system detects certain objects while
the transmission is in reverse (R):
• and moving toward a stationary object
at a speed of 3 mph (5 km/h) or less.
• but not moving, and a moving object is
approaching the rear of your vehicle at
a speed of
3 mph (5 km/h) or less.
The system can be switched off through
the information display. If a fault is present
in the system, a warning message appears
in the information display and does not
allow the driver to switch the faulted
system on.
REAR VIEW CAMERA
(If Equipped) WARNINGS
The rear view camera system is a
reverse aid supplement device that
still requires the driver to use it in
conjunction with the interior and exterior
mirrors for maximum coverage. WARNINGS
Objects that are close to either
corner of the bumper or under the
bumper, might not be seen on the
screen due to the limited coverage of the
camera system. Back up as slow as possible since
higher speeds might limit your
reaction time to stop the vehicle.
Use caution when using the rear
video camera and the tailgate is ajar.
If the tailgate is ajar, the camera will
be out of position and the video image may
be incorrect. All guidelines (if enabled)
have been removed when the tailgate is
ajar. Use caution when turning camera
features on or off while in reverse
(R). Make sure the vehicle is not
moving. The rear view camera system provides a
video image of the area behind your
vehicle.
During operation, lines appear in the
display that represent your vehicle
’s path
and proximity to objects behind your
vehicle. The camera is located on the tailgate.
175
Super Duty (), enUSA Parking AidsE130178 E163192
Page 179 of 485
Using the Rear View Camera
System
The rear view camera system displays
what is behind your vehicle when you place
the transmission in reverse (R).
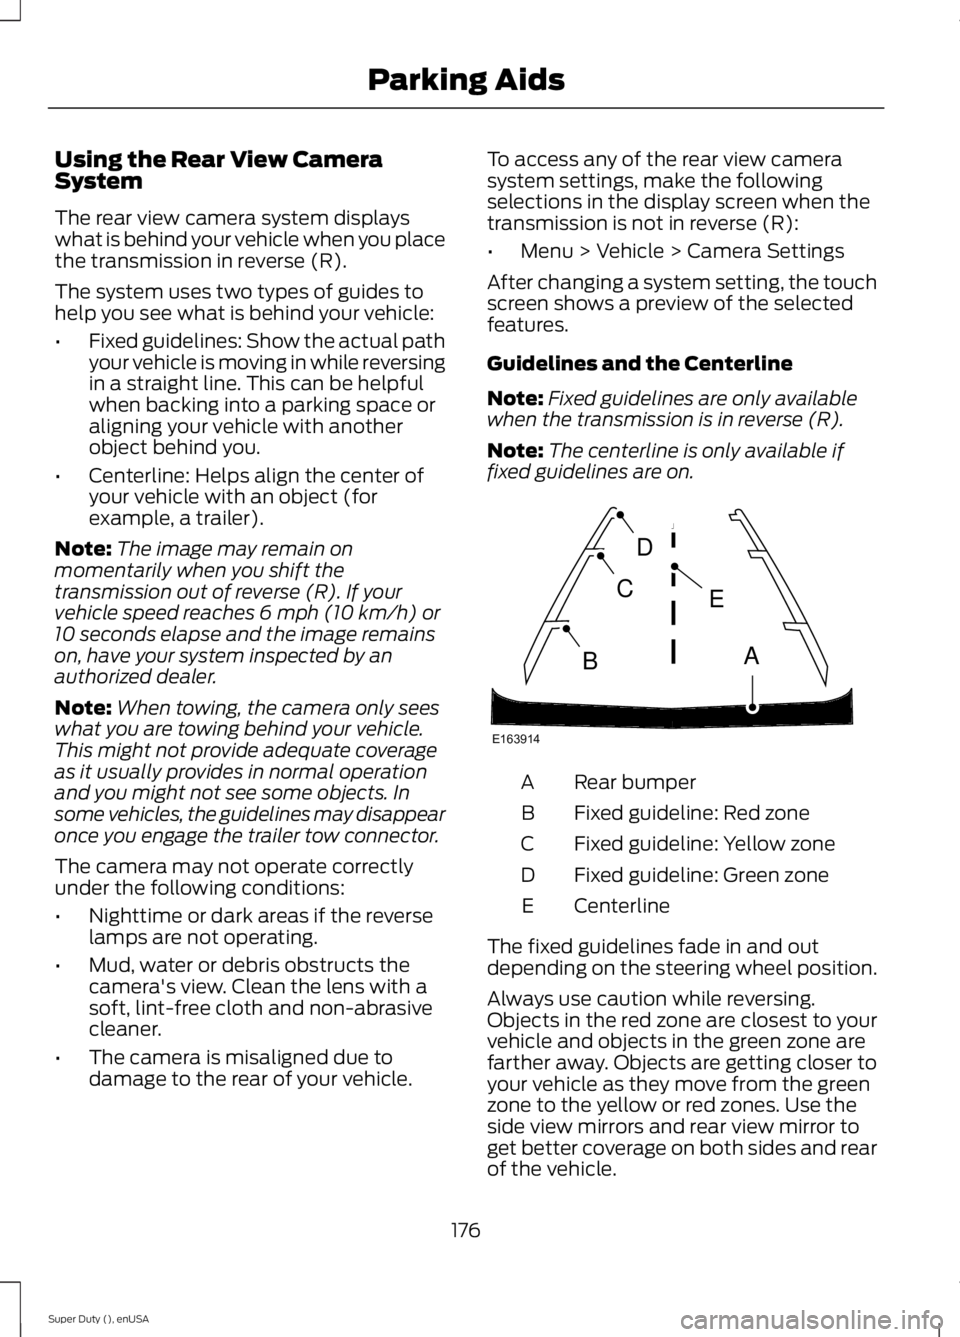
The system uses two types of guides to
help you see what is behind your vehicle:
•
Fixed guidelines: Show the actual path
your vehicle is moving in while reversing
in a straight line. This can be helpful
when backing into a parking space or
aligning your vehicle with another
object behind you.
• Centerline: Helps align the center of
your vehicle with an object (for
example, a trailer).
Note: The image may remain on
momentarily when you shift the
transmission out of reverse (R). If your
vehicle speed reaches 6 mph (10 km/h) or
10 seconds elapse and the image remains
on, have your system inspected by an
authorized dealer.
Note: When towing, the camera only sees
what you are towing behind your vehicle.
This might not provide adequate coverage
as it usually provides in normal operation
and you might not see some objects. In
some vehicles, the guidelines may disappear
once you engage the trailer tow connector.
The camera may not operate correctly
under the following conditions:
• Nighttime or dark areas if the reverse
lamps are not operating.
• Mud, water or debris obstructs the
camera's view. Clean the lens with a
soft, lint-free cloth and non-abrasive
cleaner.
• The camera is misaligned due to
damage to the rear of your vehicle. To access any of the rear view camera
system settings, make the following
selections in the display screen when the
transmission is not in reverse (R):
•
Menu > Vehicle > Camera Settings
After changing a system setting, the touch
screen shows a preview of the selected
features.
Guidelines and the Centerline
Note: Fixed guidelines are only available
when the transmission is in reverse (R).
Note: The centerline is only available if
fixed guidelines are on. Rear bumper
A
Fixed guideline: Red zone
B
Fixed guideline: Yellow zone
C
Fixed guideline: Green zone
D
Centerline
E
The fixed guidelines fade in and out
depending on the steering wheel position.
Always use caution while reversing.
Objects in the red zone are closest to your
vehicle and objects in the green zone are
farther away. Objects are getting closer to
your vehicle as they move from the green
zone to the yellow or red zones. Use the
side view mirrors and rear view mirror to
get better coverage on both sides and rear
of the vehicle.
176
Super Duty (), enUSA Parking AidsE163914
A
E
D
C
B
Page 199 of 485
Remember to account for the trailer
tongue weight as part of your vehicle load
when calculating the total vehicle weight.
Trailer Towing Connector
When attaching the trailer wiring connector
to your vehicle, only use a proper fitting
connector that works with the vehicle and
trailer functions. Some seven-position
connectors may have the SAE J2863 logo,
which confirms that it is the proper wiring
connector and works correctly with your
vehicle.
Function
Color
Left turn signal and stop lamp
Yellow
Ground (-)
White
Electric brakes
Blue
Right turn signal and stop
lamp
Green
Battery (+)
Orange
Running lights
Brown
Reverse lights
Grey Using the Rear View Camera To
Align Your Trailer Hitch
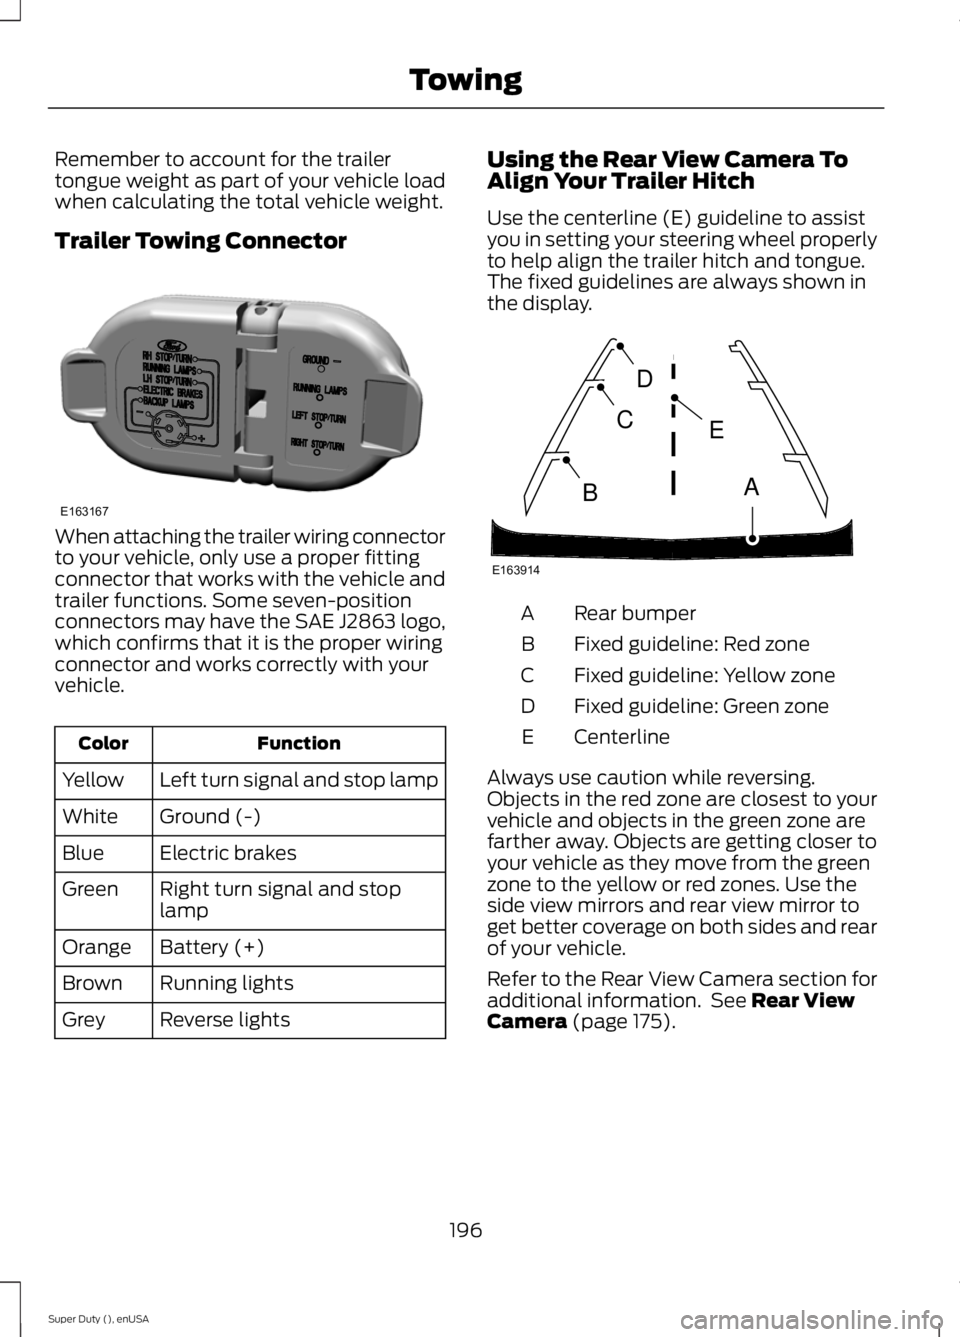
Use the centerline (E) guideline to assist
you in setting your steering wheel properly
to help align the trailer hitch and tongue.
The fixed guidelines are always shown in
the display.
Rear bumper
A
Fixed guideline: Red zone
B
Fixed guideline: Yellow zone
C
Fixed guideline: Green zone
D
Centerline
E
Always use caution while reversing.
Objects in the red zone are closest to your
vehicle and objects in the green zone are
farther away. Objects are getting closer to
your vehicle as they move from the green
zone to the yellow or red zones. Use the
side view mirrors and rear view mirror to
get better coverage on both sides and rear
of your vehicle.
Refer to the Rear View Camera section for
additional information. See Rear View
Camera (page 175).
196
Super Duty (), enUSA TowingE163167 E163914
A
E
D
C
B