2015 FORD F150 oil temperature
[x] Cancel search: oil temperaturePage 11 of 549

Brake system
Cabin air filter
Check fuel cap
Child safety door lock or unlock
Child seat lower anchor
Child seat tether anchor
Cruise control
Do not open when hot
Engine air filter
Engine coolant
Engine coolant temperature
Engine oil
Explosive gas
Fan warning Fasten safety belt
Front airbag
Front fog lamps
Fuel pump reset
Fuse compartment
Hazard warning flashers
Heated rear window
Heated windshield
Interior luggage compartment
release
Jack
Keep out of reach of children
Lighting control
Low tire pressure warning
Maintain correct fluid level
Note operating instructions
8
F-150 (), enUSA, First Printing Introduction E71340 E161353
Page 100 of 549

GAUGES
Type 1 and 2
Engine oil pressure gauge
A
Engine coolant temperature gauge
B
Fuel gauge
C
Transmission fluid temperature gauge
D
Speedometer
E
Information display See General Information (page 105).
F
Tachometer
G
97
F-150 (), enUSA, First Printing Instrument ClusterE176090
Page 101 of 549

Type 3
Engine oil pressure gauge
A
Engine coolant temperature gauge
B
Fuel gauge
C
Transmission fluid temperature or Turbo boost (Ecoboost engine only) gauge
D
Speedometer
E
Information display See General Information (page 105).
F
Tachometer
G
98
F-150 (), enUSA, First Printing Instrument ClusterE176091
Page 102 of 549

Engine Oil Pressure Gauge
Indicates engine oil pressure. The needle
should stay in the normal operating range
(between L and H). If the needle falls
below the normal range, stop your vehicle,
turn off the engine and check the engine
oil level. Add oil if needed. If the oil level is
correct, have your vehicle checked by an
authorized dealer.
Engine Coolant Temperature
Gauge
WARNING
Never remove the coolant reservoir
cap while the engine is running or hot.
Indicates engine coolant temperature. At
normal operating temperature, the level
indicator will be in the normal range. If the
engine coolant temperature exceeds the
normal range, stop your vehicle as soon as
safely possible, switch off the engine and
let the engine cool.
Fuel Gauge
Note:
The fuel gauge may vary slightly
when your vehicle is moving or on a gradient. Switch the ignition on. The fuel gauge will
indicate approximately how much fuel is
left in the fuel tank. The arrow adjacent to
the fuel pump symbol indicates on which
side of your vehicle the fuel filler door is
located.
The needle should move toward F when
you refuel your vehicle. If the needle points
to E after adding fuel, this indicates your
vehicle needs service soon.
After refueling some variability in needle
position is normal:
•
It may take a short time for the needle
to reach F after leaving the gas station.
This is normal and depends upon the
slope of pavement at the gas station.
• The fuel amount dispensed into the
tank is a little less or more than the
gauge indicated. This is normal and
depends upon the slope of pavement
at the gas station.
• If the gas station nozzle shuts off
before the tank is full, try a different
gas pump nozzle.
Low Fuel Reminder
A low fuel reminder triggers when the fuel
gauge needle is at 1/16th or about 35 miles
(56km) to empty, whichever occurs first.
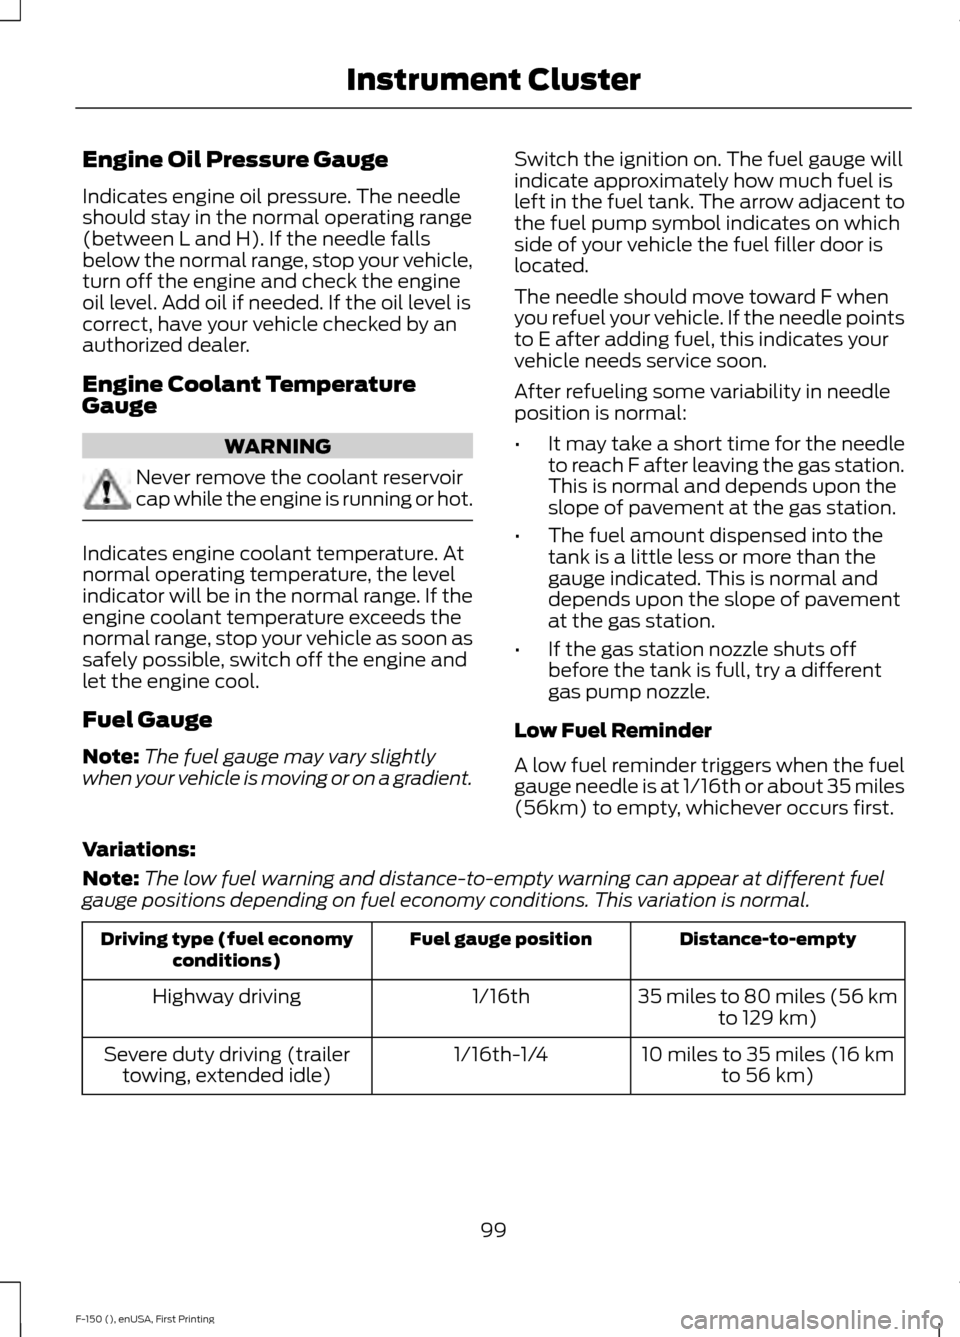
Variations:
Note: The low fuel warning and distance-to-empty warning can appear at different fuel
gauge positions depending on fuel economy conditions. This variation is normal. Distance-to-empty
Fuel gauge position
Driving type (fuel economy
conditions)
35 miles to 80 miles (56 kmto 129 km)
1/16th
Highway driving
10 miles to 35 miles (16 kmto 56 km)
1/16th-1/4
Severe duty driving (trailer
towing, extended idle)
99
F-150 (), enUSA, First Printing Instrument Cluster
Page 111 of 549

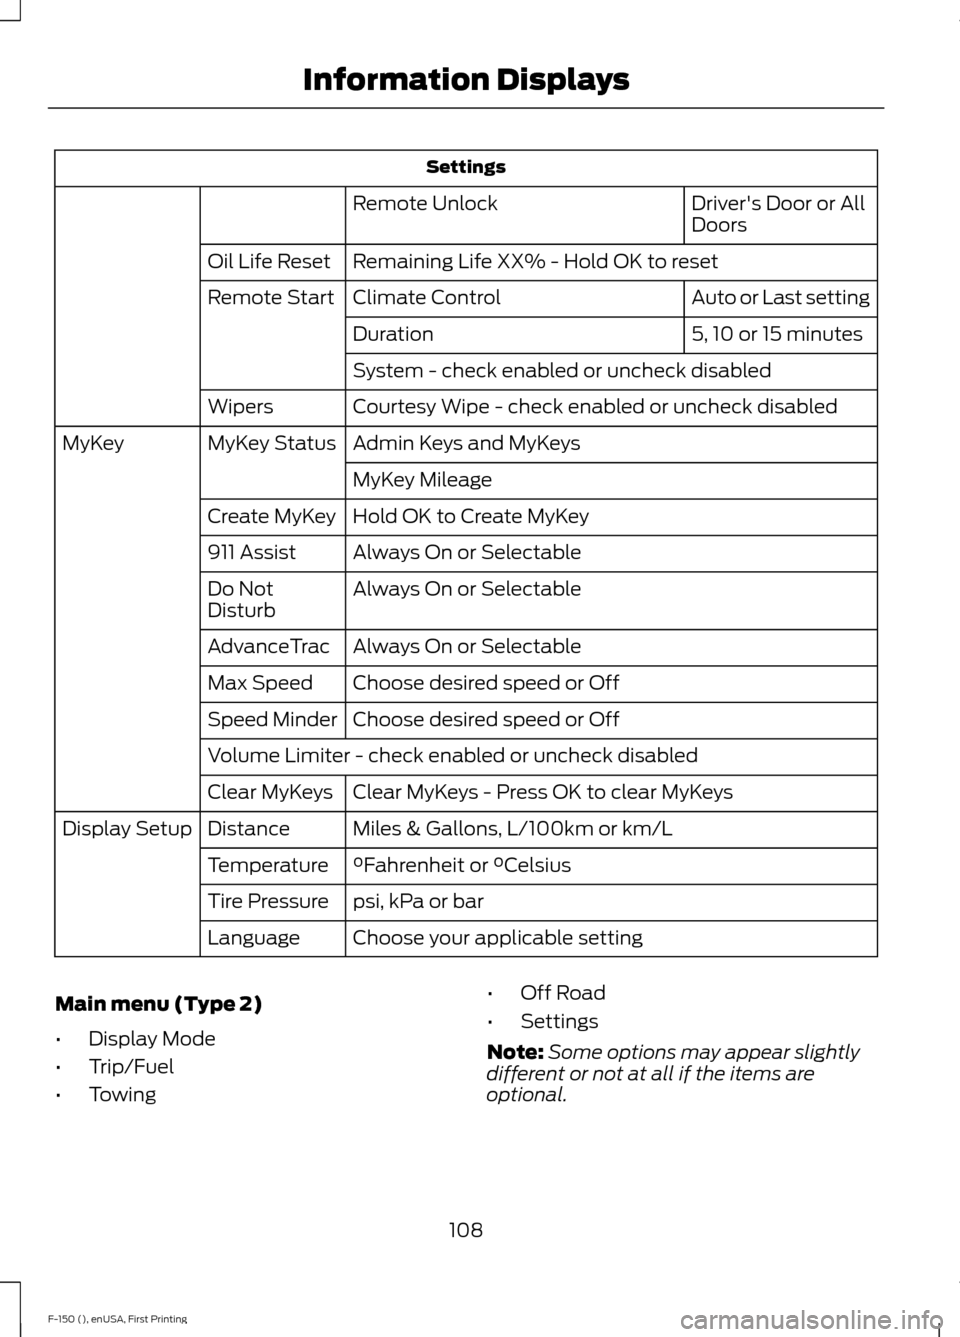
Settings
Driver's Door or All
Doors
Remote Unlock
Remaining Life XX% - Hold OK to reset
Oil Life Reset
Auto or Last setting
Climate Control
Remote Start
5, 10 or 15 minutes
Duration
System - check enabled or uncheck disabled
Courtesy Wipe - check enabled or uncheck disabled
Wipers
Admin Keys and MyKeys
MyKey Status
MyKey
MyKey Mileage
Hold OK to Create MyKey
Create MyKey
Always On or Selectable
911 Assist
Always On or Selectable
Do Not
Disturb
Always On or Selectable
AdvanceTrac
Choose desired speed or Off
Max Speed
Choose desired speed or Off
Speed Minder
Volume Limiter - check enabled or uncheck disabled
Clear MyKeys - Press OK to clear MyKeys
Clear MyKeys
Miles & Gallons, L/100km or km/L
Distance
Display Setup
°Fahrenheit or °Celsius
Temperature
psi, kPa or bar
Tire Pressure
Choose your applicable setting
Language
Main menu (Type 2)
• Display Mode
• Trip/Fuel
• Towing •
Off Road
• Settings
Note: Some options may appear slightly
different or not at all if the items are
optional.
108
F-150 (), enUSA, First Printing Information Displays
Page 275 of 549

BREAKING-IN
You need to break in new tires for
approximately 300 miles (480
kilometers). During this time, your vehicle
may exhibit some unusual driving
characteristics.
Avoid driving too fast during the first 1000
miles (1600 kilometers). Vary your speed
frequently and change up through the
gears early. Do not labor the engine.
Do not tow during the first 1000 miles
(1600 kilometers).
ECONOMICAL DRIVING
Your fuel economy is affected by several
things, such as how you drive, the
conditions you drive under, and how you
maintain your vehicle.
You may improve your fuel economy by
keeping these things in mind:
•
Accelerate and slow down in a smooth,
moderate fashion.
• Drive at steady speeds without
stopping.
• Anticipate stops; slowing down may
eliminate the need to stop.
• Combine errands and minimize
stop-and-go driving.
• Close the windows for high-speed
driving.
• Drive at reasonable speeds (traveling
at 55 mph [88 km/h] uses 15% less
fuel than traveling at 65 mph [105
km/h]).
• Keep the tires properly inflated and use
only the recommended size.
• Use the recommended engine oil.
• Perform all regularly scheduled
maintenance. Avoid these actions; they reduce your fuel
economy:
•
Sudden accelerations or hard
accelerations.
• Revving the engine before turning it off.
• Idle for periods longer than one minute.
• Warm up your vehicle on cold
mornings.
• Use the air conditioner or front
defroster.
• Use the speed control in hilly terrain.
• Rest your foot on the brake pedal while
driving.
• Drive a heavily loaded vehicle or tow a
trailer.
• Carry unnecessary weight
(approximately 1 mpg [0.4 km/L] is
lost for every 400 lb [180 kilogram] of
weight carried).
• Driving with the wheels out of
alignment.
Conditions
• Heavily loading a vehicle or towing a
trailer may reduce fuel economy at any
speed.
• Adding certain accessories to your
vehicle (for example bug deflectors,
rollbars, light bars, running boards, ski
racks or luggage racks) may reduce
fuel economy.
• To maximize the fuel economy, drive
with the tonneau cover installed (if
equipped).
• Using fuel blended with alcohol may
lower fuel economy.
• Fuel economy may decrease with lower
temperatures during the first 8– 10
miles (12 –16 kilometers) of driving.
• Driving on flat terrain offers improved
fuel economy as compared to driving
on hilly terrain.
272
F-150 (), enUSA, First Printing Driving Hints
Page 278 of 549

•
The tire air pressures recommended
for general driving are on the vehicle ’s
Safety Certification Label. The
maximum cold inflation pressure for
the tire and associated load rating are
on the tire sidewall. Tire air pressure
may require re-adjustment within these
pressure limits to accommodate the
additional weight of the snowplow
installation.
• Federal and some local regulations
require additional exterior lamps for
snowplow-equipped vehicles. Contact
an authorized dealer for additional
information.
Snowplow Mode (If Equipped)
Press the snowplow button on the
instrument panel to switch on snowplow
mode. The button illuminates when in
snowplow mode. A message appears in
the information display indicating that
features are turned off when in snowplow
mode.
The following features are disabled when
in snowplow mode:
• 110V inverter.
• Fog lamps.
• Heated steering wheel.
• Heated front and rear seats.
• Massaging seats.
The body module also activates the
snowplow relay that provides power to
aftermarket snowplow controls.
Switch off snowplow mode by pressing
the snowplow button or switching off the
ignition. The snowplow button is no longer
illuminated and features are turned on. Note:
The electrical system is designed to
support the addition of a residential
snowplow (up to 60 Amps continuous) and
snowplow lights (up to 20 Amps
continuous) using snowplow mode. The
system is not designed to support snowplow
usage with additional electrical aftermarket
accessories.
Operating the Vehicle with the
Snowplow Attached
Note: Drive the vehicle at least 500 miles
(800 kilometers) before using your vehicle
for snow removal.
We recommend vehicle speed does not
exceed 45 mph (72 km/h) when
snowplowing.
The attached snowplow blade restricts
airflow to the radiator, and may cause the
engine to run at a higher temperature.
Attention to engine temperature is
especially important when outside
temperatures are above freezing. Angle
the blade to maximize airflow to the
radiator and monitor engine temperature
to determine whether a left or right angle
provides the best performance.
Follow the severe duty schedule in your
Scheduled Maintenance information for
engine oil and transmission fluid change
intervals.
Snowplowing with your Airbag
Equipped Vehicle WARNINGS
Do not attempt to service, repair, or
modify the airbag supplemental
restraint system (SRS) or its fuses.
Contact a Ford or Lincoln dealer.
275
F-150 (), enUSA, First Printing Driving Hints
Page 315 of 549

4.
For halogen or LED headlamps: On
the wall or screen you will observe a
light pattern with a distinct horizontal
edge toward the right. If this edge is not
at the horizontal reference line, you will
need to adjust the beam so the edge
is at the same height as the horizontal
reference line. 5. Locate the vertical adjuster on each
headlamp. Use a #2 Phillips
screwdriver to turn the adjuster either
counterclockwise or clockwise in order
to adjust the vertical aim of the
headlamp.
6. Repeat Steps 3 through 7 to adjust the
other headlamp.
7. Close the hood and turn off the lamps.
Horizontal Aim Adjustment
Horizontal aim is not required for this
vehicle and is not adjustable. CHANGING A BULB WARNING
Handle a halogen headlamp bulb
carefully and keep out of children
’s
reach. Grasp the bulb only by its
plastic base and do not touch the glass.
The oil from your hand could cause the
bulb to break the next time the headlamps
are operated. Note:
If the bulb is accidentally touched,
clean it with rubbing alcohol before
installing it.
Lamp Assembly Condensation
Exterior lamps are vented to
accommodate normal changes in pressure.
Condensation can be a natural by-product
of this design. When moist air enters the
lamp assembly through the vents, there is
a possibility that condensation can occur
when the temperature is cold. When
normal condensation occurs, a thin film of
mist can form on the interior of the lens.
The thin mist eventually clears and exits
through the vents during normal operation.
Clearing time may take as long as 48 hours
under dry weather conditions.
Examples of acceptable condensation are:
• Presence of thin mist (no streaks, drip
marks or droplets).
• Fine mist covers less than 50% of the
lens.
Examples of unacceptable moisture
(usually caused by a lamp water leak) are:
• Water puddle inside the lamp.
• Large water droplets, drip marks or
streaks present on the interior of the
lens.
Take your vehicle to a dealer for service if
any of the above conditions of
unacceptable moisture are present.
312
F-150 (), enUSA, First Printing MaintenanceE167358 E163806