2015 FORD EXPLORER flat tire
[x] Cancel search: flat tirePage 375 of 596

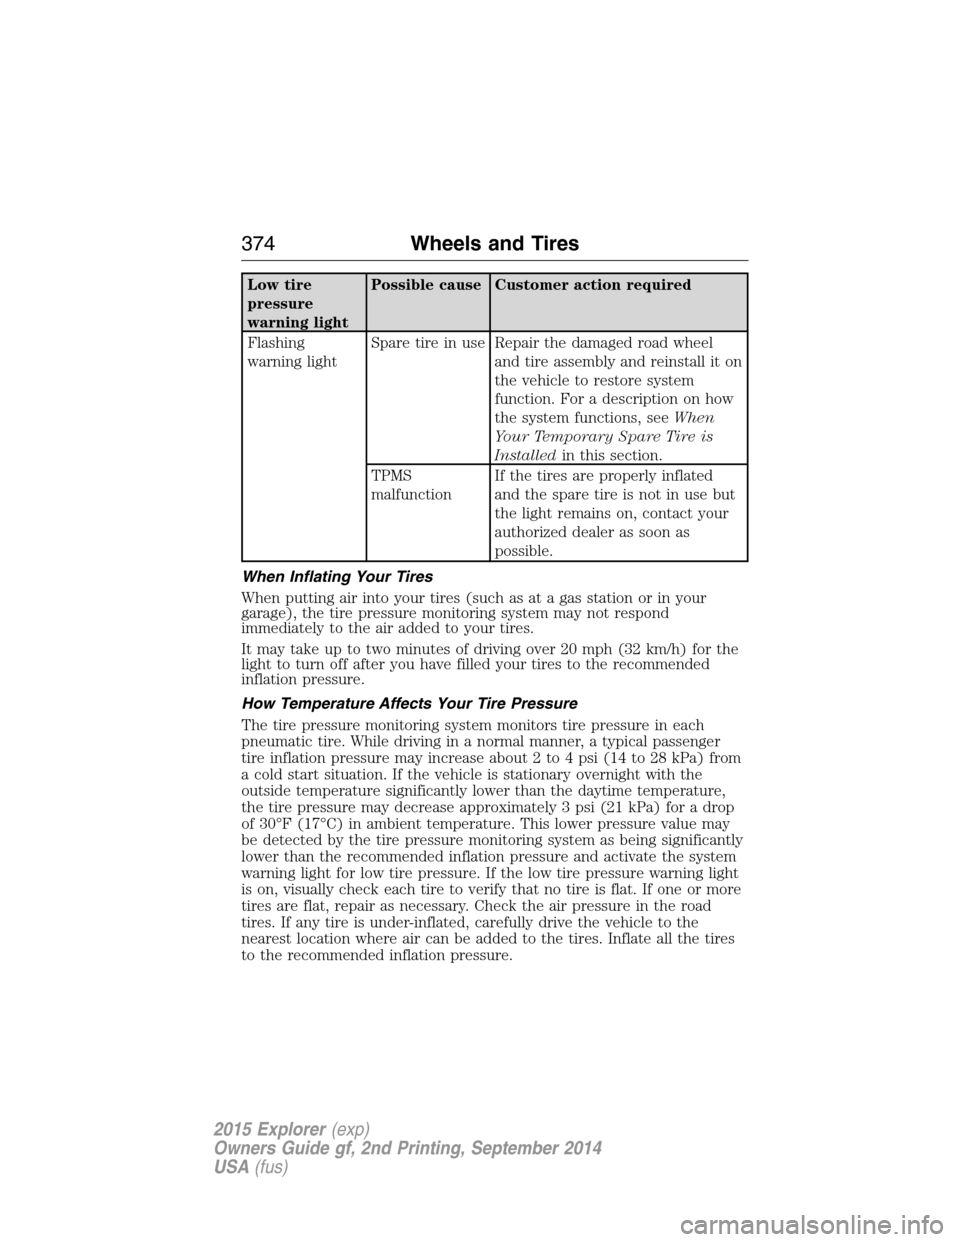
Low tire
pressure
warning lightPossible cause Customer action required
Flashing
warning lightSpare tire in use Repair the damaged road wheel
and tire assembly and reinstall it on
the vehicle to restore system
function. For a description on how
the system functions, seeWhen
Your Temporary Spare Tire is
Installedin this section.
TPMS
malfunctionIf the tires are properly inflated
and the spare tire is not in use but
the light remains on, contact your
authorized dealer as soon as
possible.
When Inflating Your Tires
When putting air into your tires (such as at a gas station or in your
garage), the tire pressure monitoring system may not respond
immediately to the air added to your tires.
It may take up to two minutes of driving over 20 mph (32 km/h) for the
light to turn off after you have filled your tires to the recommended
inflation pressure.
How Temperature Affects Your Tire Pressure
The tire pressure monitoring system monitors tire pressure in each
pneumatic tire. While driving in a normal manner, a typical passenger
tire inflation pressure may increase about 2 to 4 psi (14 to 28 kPa) from
a cold start situation. If the vehicle is stationary overnight with the
outside temperature significantly lower than the daytime temperature,
the tire pressure may decrease approximately 3 psi (21 kPa) for a drop
of 30°F (17°C) in ambient temperature. This lower pressure value may
be detected by the tire pressure monitoring system as being significantly
lower than the recommended inflation pressure and activate the system
warning light for low tire pressure. If the low tire pressure warning light
is on, visually check each tire to verify that no tire is flat. If one or more
tires are flat, repair as necessary. Check the air pressure in the road
tires. If any tire is under-inflated, carefully drive the vehicle to the
nearest location where air can be added to the tires. Inflate all the tires
to the recommended inflation pressure.
374Wheels and Tires
2015 Explorer(exp)
Owners Guide gf, 2nd Printing, September 2014
USA(fus)
Page 376 of 596

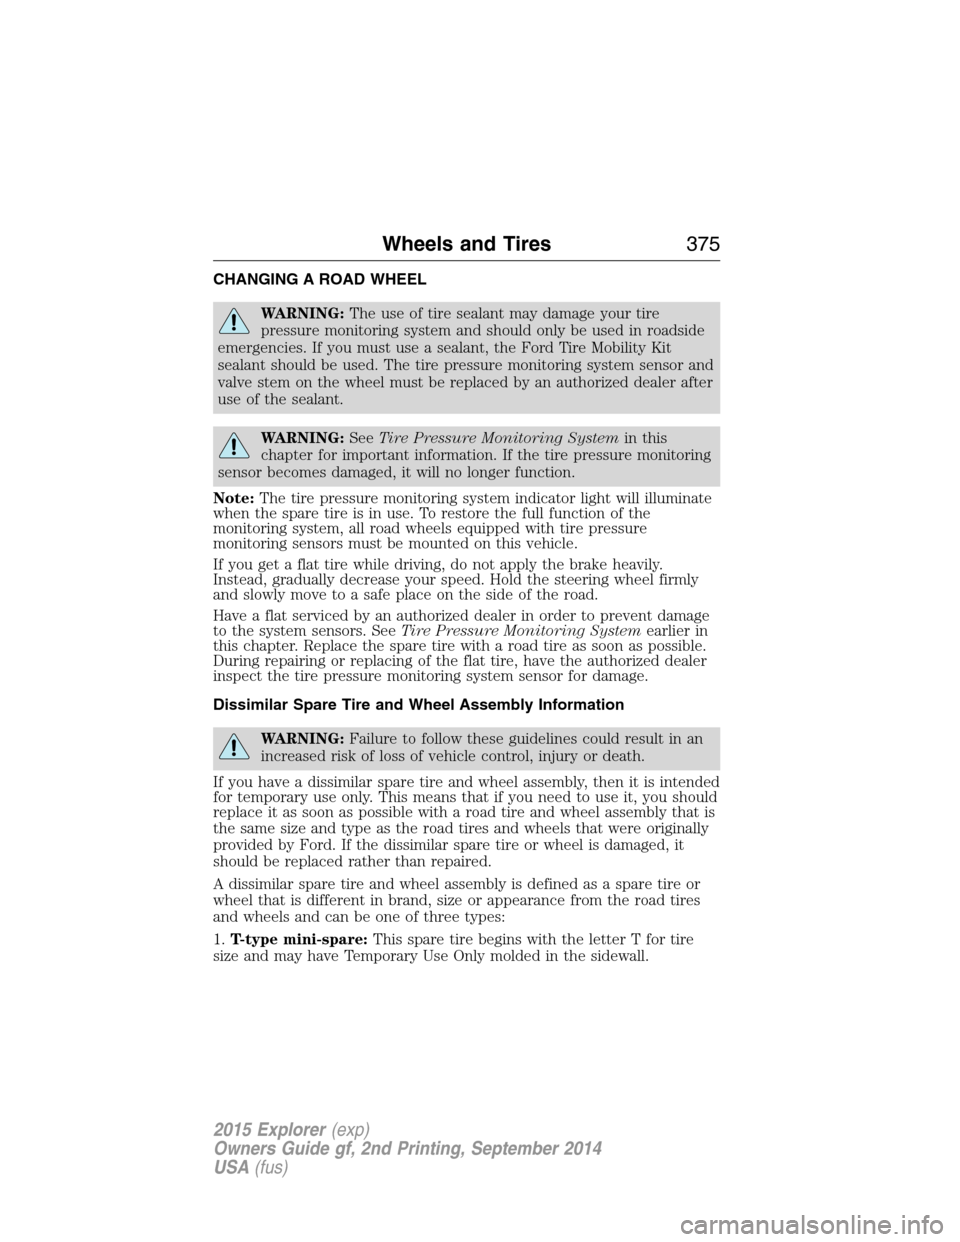
CHANGING A ROAD WHEEL
WARNING:The use of tire sealant may damage your tire
pressure monitoring system and should only be used in roadside
emergencies. If you must use a sealant, the Ford Tire Mobility Kit
sealant should be used. The tire pressure monitoring system sensor and
valve stem on the wheel must be replaced by an authorized dealer after
use of the sealant.
WARNING:SeeTire Pressure Monitoring Systemin this
chapter for important information. If the tire pressure monitoring
sensor becomes damaged, it will no longer function.
Note:The tire pressure monitoring system indicator light will illuminate
when the spare tire is in use. To restore the full function of the
monitoring system, all road wheels equipped with tire pressure
monitoring sensors must be mounted on this vehicle.
If you get a flat tire while driving, do not apply the brake heavily.
Instead, gradually decrease your speed. Hold the steering wheel firmly
and slowly move to a safe place on the side of the road.
Have a flat serviced by an authorized dealer in order to prevent damage
to the system sensors. SeeTire Pressure Monitoring Systemearlier in
this chapter. Replace the spare tire with a road tire as soon as possible.
During repairing or replacing of the flat tire, have the authorized dealer
inspect the tire pressure monitoring system sensor for damage.
Dissimilar Spare Tire and Wheel Assembly Information
WARNING:Failure to follow these guidelines could result in an
increased risk of loss of vehicle control, injury or death.
If you have a dissimilar spare tire and wheel assembly, then it is intended
for temporary use only. This means that if you need to use it, you should
replace it as soon as possible with a road tire and wheel assembly that is
the same size and type as the road tires and wheels that were originally
provided by Ford. If the dissimilar spare tire or wheel is damaged, it
should be replaced rather than repaired.
A dissimilar spare tire and wheel assembly is defined as a spare tire or
wheel that is different in brand, size or appearance from the road tires
and wheels and can be one of three types:
1.T-type mini-spare:This spare tire begins with the letter T for tire
size and may have Temporary Use Only molded in the sidewall.
Wheels and Tires375
2015 Explorer(exp)
Owners Guide gf, 2nd Printing, September 2014
USA(fus)
Page 381 of 596

4. Small arrow-shaped marks on the sills show the location of the jacking
points.
5. Remove the lug nuts with the lug wrench.
6. Replace the flat tire with the spare tire, making sure the valve stem is
facing outward. Reinstall the lug nuts until the wheel is snug against the
hub. Do not fully tighten the lug nuts until the wheel has been lowered.
7. Lower the wheel by turning the jack handle counterclockwise.
8. Remove the jack and fully tighten the lug
nuts in the order shown. SeeWheel Lug
Nut Torque Specificationslater in this
chapter for the proper lug nut torque
specification.
380Wheels and Tires
2015 Explorer(exp)
Owners Guide gf, 2nd Printing, September 2014
USA(fus)
Page 382 of 596

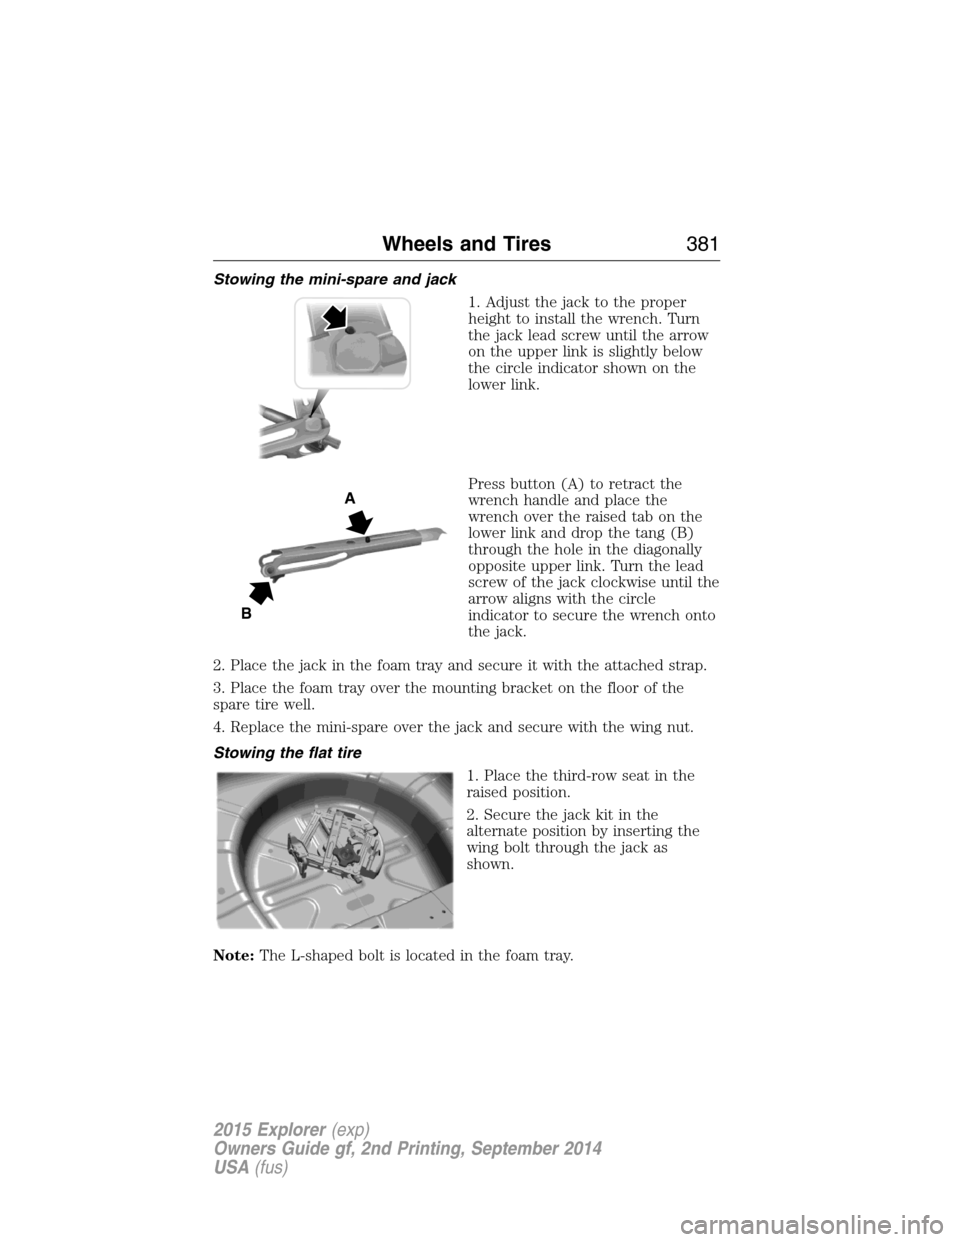
Stowing the mini-spare and jack
1. Adjust the jack to the proper
height to install the wrench. Turn
the jack lead screw until the arrow
on the upper link is slightly below
the circle indicator shown on the
lower link.
Press button (A) to retract the
wrench handle and place the
wrench over the raised tab on the
lower link and drop the tang (B)
through the hole in the diagonally
opposite upper link. Turn the lead
screw of the jack clockwise until the
arrow aligns with the circle
indicator to secure the wrench onto
the jack.
2. Place the jack in the foam tray and secure it with the attached strap.
3. Place the foam tray over the mounting bracket on the floor of the
spare tire well.
4. Replace the mini-spare over the jack and secure with the wing nut.
Stowing the flat tire
1. Place the third-row seat in the
raised position.
2. Secure the jack kit in the
alternate position by inserting the
wing bolt through the jack as
shown.
Note:The L-shaped bolt is located in the foam tray.
A
B
Wheels and Tires381
2015 Explorer(exp)
Owners Guide gf, 2nd Printing, September 2014
USA(fus)
Page 383 of 596

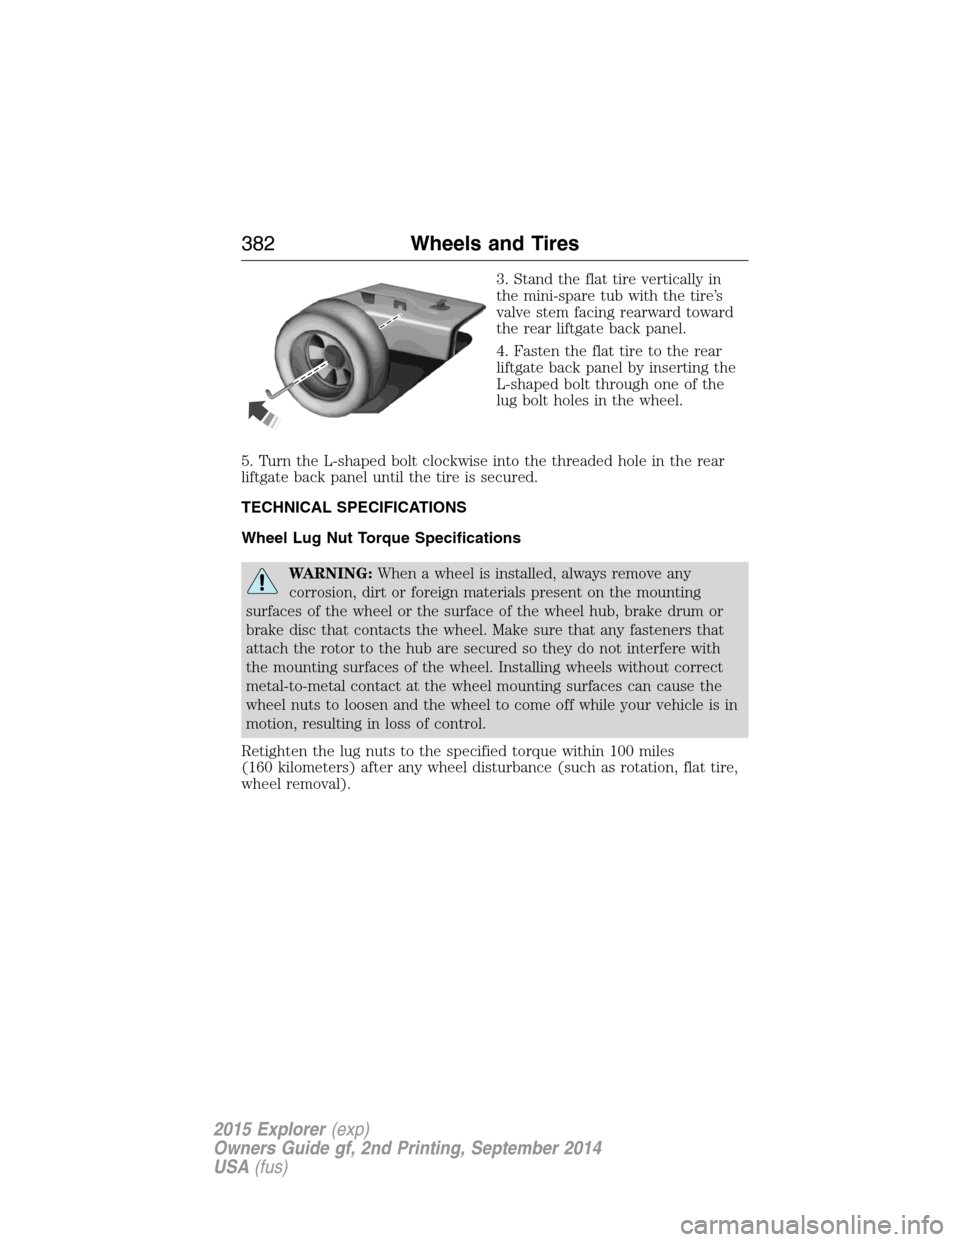
3. Stand the flat tire vertically in
the mini-spare tub with the tire’s
valve stem facing rearward toward
the rear liftgate back panel.
4. Fasten the flat tire to the rear
liftgate back panel by inserting the
L-shaped bolt through one of the
lug bolt holes in the wheel.
5. Turn the L-shaped bolt clockwise into the threaded hole in the rear
liftgate back panel until the tire is secured.
TECHNICAL SPECIFICATIONS
Wheel Lug Nut Torque Specifications
WARNING:When a wheel is installed, always remove any
corrosion, dirt or foreign materials present on the mounting
surfaces of the wheel or the surface of the wheel hub, brake drum or
brake disc that contacts the wheel. Make sure that any fasteners that
attach the rotor to the hub are secured so they do not interfere with
the mounting surfaces of the wheel. Installing wheels without correct
metal-to-metal contact at the wheel mounting surfaces can cause the
wheel nuts to loosen and the wheel to come off while your vehicle is in
motion, resulting in loss of control.
Retighten the lug nuts to the specified torque within 100 miles
(160 kilometers) after any wheel disturbance (such as rotation, flat tire,
wheel removal).
382Wheels and Tires
2015 Explorer(exp)
Owners Guide gf, 2nd Printing, September 2014
USA(fus)
Page 398 of 596

Roadside Assistance
Exclusive 24/7 roadside assistance, including:
•Towing, flat-tire change and battery jump starts
•Out of fuel and lock-out assistance
•Travel expense reimbursement for lodging, meals and rental car
•Destination assistance for taxi, shuttle, rental car coverage and
emergency transportation
Transferable Coverage
If you sell your vehicle before your Ford Extended Service Plan coverage
expires, you can transfer any remaining coverage to the new owner.
Whenever you sell your vehicle, prospective buyers may have a higher
degree of confidence that vehicle was properly maintained with Ford
ESP, thereby improving resale value.
Avoid the Rising Cost of Properly Maintaining Your Vehicle!
Ford Extended Service Plan also offers a Premium Maintenance Plan
that covers all scheduled maintenance, and selected wear items. The
coverage is prepaid, so you never have to worry about affording your
vehicle’s maintenance. It covers regular checkups, routine inspections,
preventive care and replacement of select items that require periodic
attention for normal wear:
•Windshield wiper blades
•Spark plugs (except in California)
•The clutch disc
•Brake pads and linings
•Shock absorbers
•Belts and hoses
•Diesel exhaust fluid replenishment
Contact your selling authorized Ford or Lincoln dealership today so they
can customize a Ford Extended Service Plan that fits your driving
lifestyle and budget.
Extended Service Plan397
2015 Explorer(exp)
Owners Guide gf, 2nd Printing, September 2014
USA(fus)
Page 595 of 596

SecuriLock passive anti-theft
system ..........................................85
Selecting your media source
(USB, Line in, BT audio) .........448
Sending new text messages .....503
Setting a destination ................533
Setting a destination by
voice ...........................................534
Settings ......................................518
Setting the clock ...............401, 518
Side air curtain ...........................58
Side-curtain airbags system .......58
SIRIUS® satellite radio ....401, 486
SIRIUS satellite radio voice
commands .................................488
SIRIUS Travel Link ...................510
SIRIUS Travel Link voice
commands .................................511
Snowplowing ...............................16
SOS Post Crash Alert .................51
Spark plugs,
specifications .....................384, 391
Special notice
ambulance conversions ............16
utility-type vehicles ..................16
Specification chart,
lubricants ...................................386
Stability system .........................224
Starting your vehicle ................189
jump starting ..........................289
push button start system .......188
Steering wheel ............................90
controls ......................................92
tilting ...................................90–91
Sun visor ....................................112Supplemental Restraint System
(SRS) (see airbags) ....................52
Supported media file types ......496
Supported player, media
formats and metadata
information ................................496
SYNC® AppLink™ ...................444
SYNC® customer
support ..............................418, 470
SYNC® Services ................441, 506
System settings .........................521
T
Temperature control
(see Climate control) ......144, 146,
148, 530
Text messaging .................429, 502
Text messaging (sending,
downloading, deleting) .....429, 431
Third-row power fold seat .......175
Tilt steering wheel ................90–91
Tires ...........................354–355, 375
alignment ................................368
care ..........................................353
changing ..........................375, 377
checking the pressure ............364
inflating ...................................362
label .........................................361
replacing ..................................366
rotating ....................................369
safety practices .......................368
sidewall information ...............357
snow tires and chains ............370
spare tire .................................375
terminology .............................356
tire grades ...............................355
treadwear ........................355, 364
594Index
2015 Explorer(exp)
Owners Guide gf, 2nd Printing, September 2014
USA(fus)