Page 112 of 596

Integrated Blind Spot Mirrors (If Equipped)
WARNING:Objects in the blind spot mirror are closer than they
appear.
Blind spot mirrors have an integrated convex mirror built into the upper
outboard corner of the exterior mirrors. They are designed to assist you
by increasing visibility along the side of your vehicle.
Check the main mirror first before a lane change, then check the blind
spot mirror. If no vehicles are present in the blind spot mirror and the
traffic in the adjacent lane is at a safe distance, signal that you are going
to change lanes. Glance over your shoulder to verify traffic is clear, and
carefully change lanes.
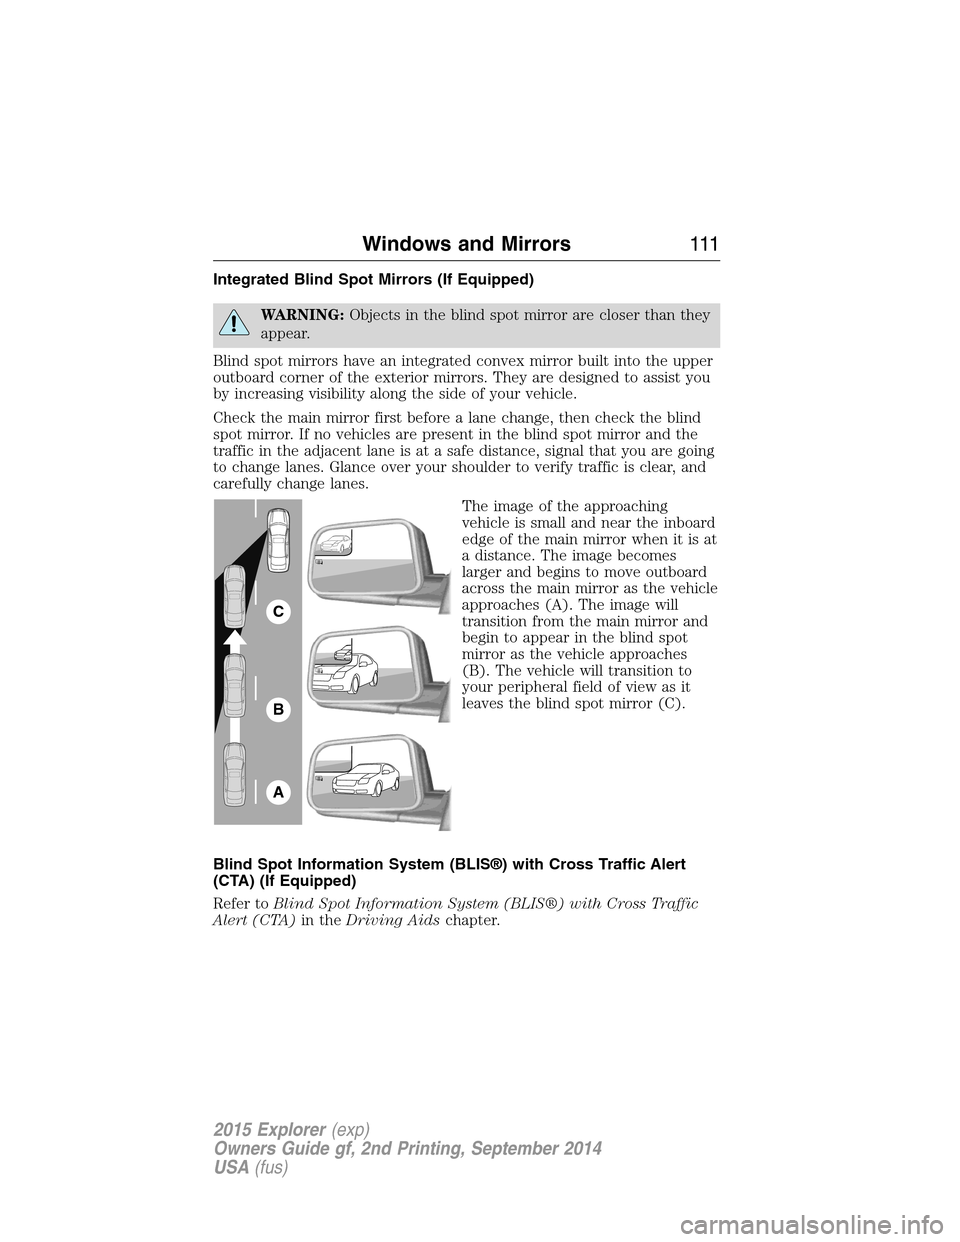
The image of the approaching
vehicle is small and near the inboard
edge of the main mirror when it is at
a distance. The image becomes
larger and begins to move outboard
across the main mirror as the vehicle
approaches (A). The image will
transition from the main mirror and
begin to appear in the blind spot
mirror as the vehicle approaches
(B). The vehicle will transition to
your peripheral field of view as it
leaves the blind spot mirror (C).
Blind Spot Information System (BLIS®) with Cross Traffic Alert
(CTA) (If Equipped)
Refer toBlind Spot Information System (BLIS®) with Cross Traffic
Alert (CTA)in theDriving Aidschapter.
A
B
C
Windows and Mirrors111
2015 Explorer(exp)
Owners Guide gf, 2nd Printing, September 2014
USA(fus)
Page 113 of 596

INTERIOR MIRROR
WARNING:Do not adjust the mirror when your vehicle is
moving.
Note:Do not clean the housing or glass of any mirror with harsh
abrasives, fuel or other petroleum or ammonia based cleaning products.
You can adjust the interior mirror to your preference. Some mirrors also
have a second pivot point. This lets you move the mirror head up or
down and from side to side.
Pull the tab below the mirror toward you to reduce glare at night.
Auto-Dimming Mirror (If Equipped)
Note:Do not block the sensors on the front and back of the mirror.
Mirror performance may be affected. A rear center passenger or raised
rear center head restraint may also block light from reaching the sensor.
The mirror will dim automatically to reduce glare when bright lights are
detected from behind your vehicle. It will automatically return to normal
reflection when you select reverse gear to make sure you have a clear
view when backing up.
SUN VISORS
Slide-On-Rod
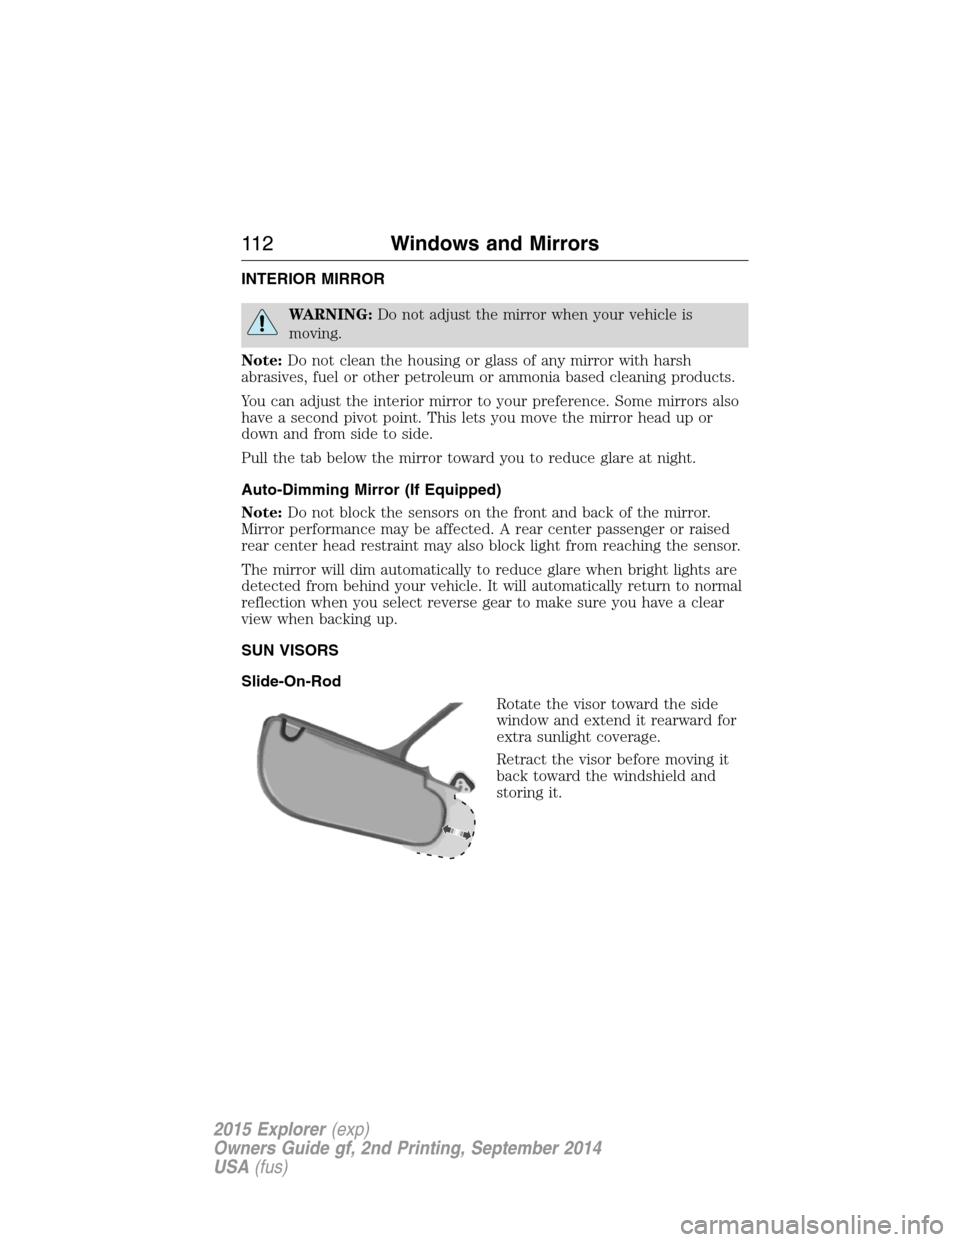
Rotate the visor toward the side
window and extend it rearward for
extra sunlight coverage.
Retract the visor before moving it
back toward the windshield and
storing it.
11 2Windows and Mirrors
2015 Explorer(exp)
Owners Guide gf, 2nd Printing, September 2014
USA(fus)
Page 114 of 596

Illuminated Visor Vanity Mirror (If Equipped)
Lift the cover to switch on the
lamp.
DUAL PANEL MOONROOF AND POWER SUNSCREEN
(IF EQUIPPED)
WARNING:Do not let children play with the moon roof or leave
children unattended in the vehicle. They may seriously hurt
themselves.
WARNING:When closing the dual panel moon roof, you should
verify that it is free of obstructions and ensure that children
and/or pets are not in the proximity of the roof opening.
The moonroof and sunscreen controls are located on the overhead
console.
The moonroof and sunscreen have a one-touch open and close feature.
To stop their motion during one-touch operation, press the control a
second time.
Opening and Closing the Sunscreen
Press and release the control to open
the sunscreen.
Note:The sunscreen stops at the
first panel for the dual panel moon
roof. Press and release again to
continue to open the sunscreen past
the second panel.
Pull and release the control to close the sunscreen. The moonroof, if
open, will automatically close prior to closing the sunscreen.
SLIDE TILT
Windows and Mirrors11 3
2015 Explorer(exp)
Owners Guide gf, 2nd Printing, September 2014
USA(fus)
Page 115 of 596

Opening and Closing the Moonroof
Press and release theSLIDEcontrol to open the moonroof. The
sunscreen, if closed, will automatically open prior to opening the
moonroof. The moonroof will stop short of the fully opened position.
Note:This position helps to reduce rumbling wind noise which may
happen with the roof fully open. Press and release theSLIDEcontrol
again to fully open the moonroof.
Pull and release theSLIDEcontrol to close the moonroof.
Bounce-Back
The moonroof automatically stops closing and reverses if an obstacle is
detected while closing.
Pull and hold theSLIDEcontrol within two seconds of a bounce-back
event to override the function. The closing force begins to increase each
of the next three times the moonroof is closed, with bounce-back active.
Venting the Moonroof
Press and release theTILTcontrol to vent the moonroof. Pull and
release theTILTcontrol to close the moonroof.
11 4Windows and Mirrors
2015 Explorer(exp)
Owners Guide gf, 2nd Printing, September 2014
USA(fus)
Page 127 of 596

Settings
Convenience Auto Highbeam — check enabled (default) / uncheck
disabled
Autolamp Delay Off or number of seconds
Compass Display Display — check enabled (default) /
uncheck disabled
Calibrate Hold OK to
calibrate
Circle slowly to
calibrate
Calibration
complete
Zone Zone 1 — 15
DTE Calculation Normal or Towing
Easy Entry/Exit — check enabled (default) / uncheck
disabled
Locks Autolock — check enabled (default) /
uncheck disabled
Autounlock — check enabled
(default) / uncheck disabled
Remote Unlock All Doors or
Driver First
Oil life Reset Percent Oil Life XXX% — Hold OK to
Reset
Power Liftgate Enable or Disable switch
Remote Start Climate Control Auto or Last
Settings
Seats and Wheel Auto or Off
Wheel Auto or Off
Duration 5, 10 or
15 minutes
System — check enabled (default) /
uncheck disabled
Windows Remote Open or Close
Wipers Courtesy Wipe — check enabled
(default) / uncheck disabled
Rain Sensing — check enabled
(default) / uncheck disabled
126Information Displays
2015 Explorer(exp)
Owners Guide gf, 2nd Printing, September 2014
USA(fus)
Page 133 of 596
Settings
In this mode, you can configure different driver setting choices.
Note:Some items are optional and may not appear.
Settings
Vehicle DTE Calculation Normal / Towing
Easy Entry/Exit — check enabled / uncheck disabled
Lighting Auto highbeam On / Off
Autolamp Delay Off or number of
seconds
Locks Autolock On / Off
Autounlock On / Off
Remote
UnlockingAll doors /
Driver’s door
Oil Life ResetPercent Oil Life XXX %
Hold OK to Reset
Power Liftgate Enabled or Disabled
Remote StartClimate Control
(using this
feature allows
you to select
different climate
control modes
when the vehicle
is started using
the remote start
feature)Auto / Last
Settings
Seats and Wheel
or SeatsAuto / Off
Duration5/10
/15 minutes
System Enable / Disable
Windows Remote Open or Close
WipersCourtesy Wipe On / Off
Rain Sensing On / Off
132Information Displays
2015 Explorer(exp)
Owners Guide gf, 2nd Printing, September 2014
USA(fus)
Page 146 of 596

E.MAX A/C:Turn the temperature control dial all the way past the full
cool position to maximize cooling. Recirculated air flows through the
instrument panel vents, air conditioning automatically turns on, and the
fan automatically adjusts to the highest speed.
F.Front temperature control:Controls the temperature of the airflow
in the front of your vehicle. Adjust to select the desired temperature.
G.Rear fan speed control:Controls the volume of air circulated in the
rear of your vehicle. Press+or-to select the desired fan speed.
H.Rear temperature control:Controls the temperature of the airflow
in the rear of your vehicle. PressTEMP +andTEMP -to select the
desired temperature.
I.REAR CTRL:Press to change control of the rear climate controls
system from the front controls to the rear controls.
J.Rear climate control system power:Press the button to turn the
rear climate system on and off.
K.Front fan speed control:Controls the volume of air circulated in
your vehicle. Adjust to select the desired fan speed.
L.Heated rear window:Turns the heated rear window on and off. See
Heated windows and mirrorslater in this chapter for more
information.
M.Defrost:Press the button to distribute air to the windshield vents
and de-mister. Air distribution to instrument panel and footwell vents
turn off. You can use this setting to defog and clear the windshield of a
thin covering of ice.
Climate Control145
2015 Explorer(exp)
Owners Guide gf, 2nd Printing, September 2014
USA(fus)
Page 147 of 596

AUTOMATIC CLIMATE CONTROL (WITH SONY® AUDIO SYSTEM)
Note:You can switch temperature units between Fahrenheit and Celsius.
SeeMenu featuresin theMyFord TouchorMyLincoln Touchchapter.
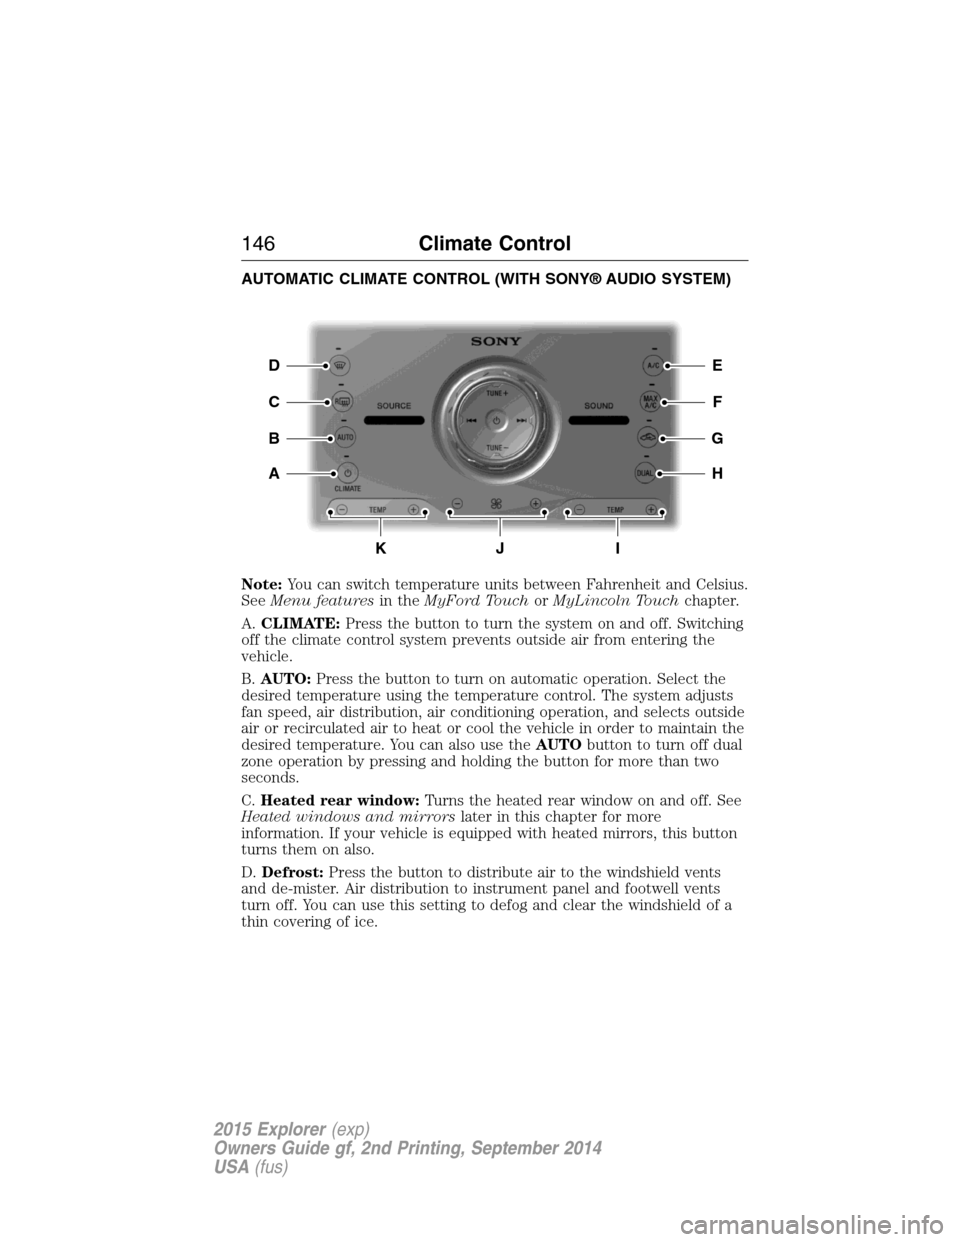
A.CLIMATE:Press the button to turn the system on and off. Switching
off the climate control system prevents outside air from entering the
vehicle.
B.AUTO:Press the button to turn on automatic operation. Select the
desired temperature using the temperature control. The system adjusts
fan speed, air distribution, air conditioning operation, and selects outside
air or recirculated air to heat or cool the vehicle in order to maintain the
desired temperature. You can also use theAUTObutton to turn off dual
zone operation by pressing and holding the button for more than two
seconds.
C.Heated rear window:Turns the heated rear window on and off. See
Heated windows and mirrorslater in this chapter for more
information. If your vehicle is equipped with heated mirrors, this button
turns them on also.
D.Defrost:Press the button to distribute air to the windshield vents
and de-mister. Air distribution to instrument panel and footwell vents
turn off. You can use this setting to defog and clear the windshield of a
thin covering of ice.
E
F
G
H
D
C
A
B
KJI
146Climate Control
2015 Explorer(exp)
Owners Guide gf, 2nd Printing, September 2014
USA(fus)