2015 FORD EXPLORER change time
[x] Cancel search: change timePage 125 of 596
Menu
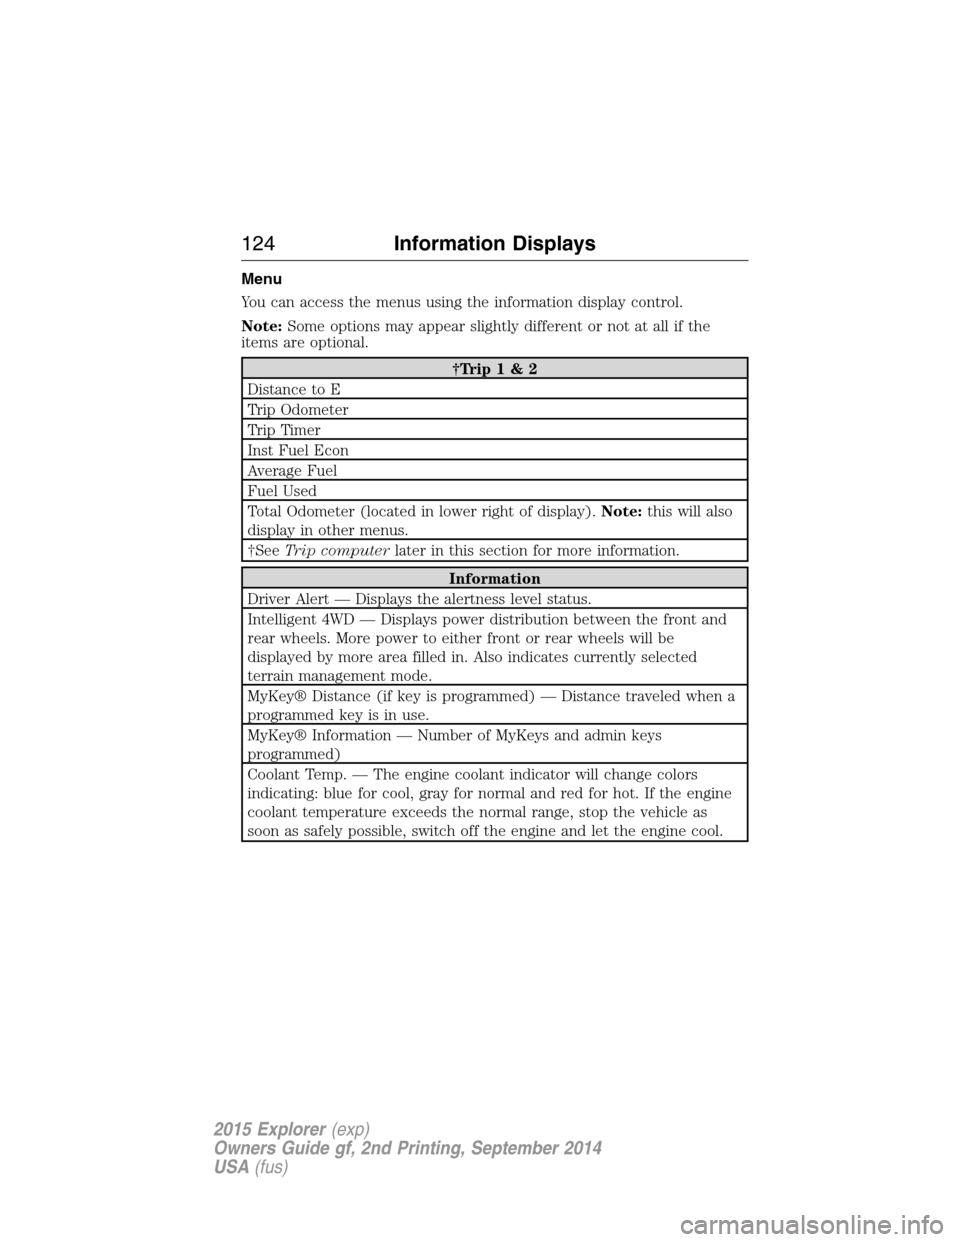
You can access the menus using the information display control.
Note:Some options may appear slightly different or not at all if the
items are optional.
†Trip 1 & 2
Distance to E
Trip Odometer
Trip Timer
Inst Fuel Econ
Average Fuel
Fuel Used
Total Odometer (located in lower right of display).Note:this will also
display in other menus.
†SeeTrip computerlater in this section for more information.
Information
Driver Alert — Displays the alertness level status.
Intelligent 4WD — Displays power distribution between the front and
rear wheels. More power to either front or rear wheels will be
displayed by more area filled in. Also indicates currently selected
terrain management mode.
MyKey® Distance (if key is programmed) — Distance traveled when a
programmed key is in use.
MyKey® Information — Number of MyKeys and admin keys
programmed)
Coolant Temp. — The engine coolant indicator will change colors
indicating: blue for cool, gray for normal and red for hot. If the engine
coolant temperature exceeds the normal range, stop the vehicle as
soon as safely possible, switch off the engine and let the engine cool.
124Information Displays
2015 Explorer(exp)
Owners Guide gf, 2nd Printing, September 2014
USA(fus)
Page 128 of 596

Settings
MyKey Create MyKey Hold OK to Create MyKey
911 Assist Always On / User Selectable
Traction Control Always On or User Selectable
Max Speed 80 MPH (130 km/h) or Off
Speed Warning 45 mph (75 km/h), 55 mph
(90 km/h), 65 mph (105 km/h) or Off
Volume Limiter
Do Not Disturb Always On / User Selectable
Clear MyKeys Hold OK to Clear MyKeys
Trip Computer
Resetting the Trip Computer
Press and hold OK on the current screen to reset the respective trip,
distance, time and fuel information.
Trip Odometer
Registers the mileage of individual journeys.
Distance to E
Indicates the approximate distance the vehicle will travel on the fuel
remaining in the tank. Changes in driving pattern may cause the value to
vary.
Average fuel
Indicates the average fuel consumption since the function was last reset.
Total Odometer
Registers the total mileage of the vehicle.
Information Messages
SeeInformation Messageslater in this chapter for more information.
Information Displays127
2015 Explorer(exp)
Owners Guide gf, 2nd Printing, September 2014
USA(fus)
Page 144 of 596
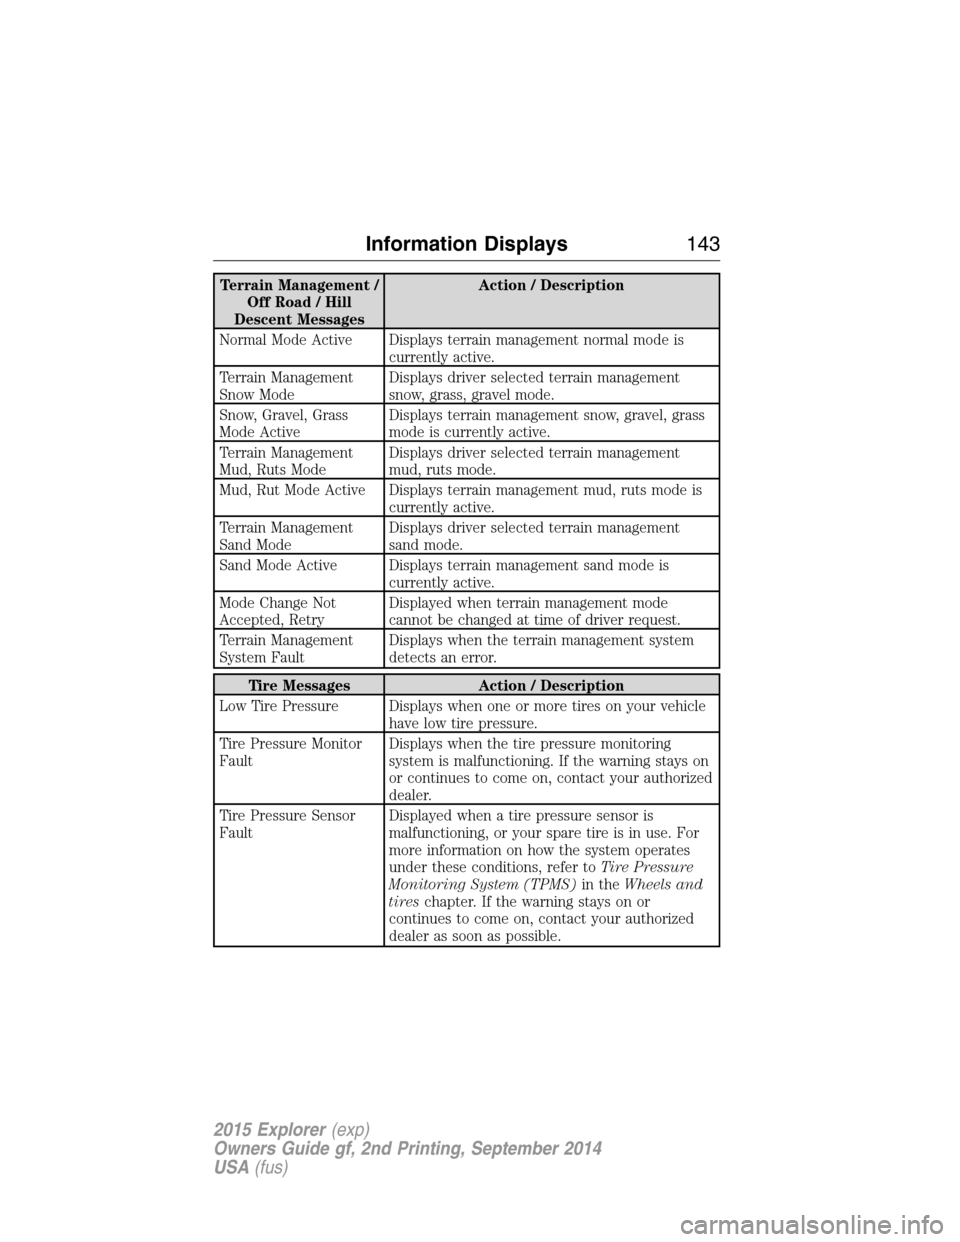
Terrain Management /
Off Road / Hill
Descent MessagesAction / Description
Normal Mode Active Displays terrain management normal mode is
currently active.
Terrain Management
Snow ModeDisplays driver selected terrain management
snow, grass, gravel mode.
Snow, Gravel, Grass
Mode ActiveDisplays terrain management snow, gravel, grass
mode is currently active.
Terrain Management
Mud, Ruts ModeDisplays driver selected terrain management
mud, ruts mode.
Mud, Rut Mode Active Displays terrain management mud, ruts mode is
currently active.
Terrain Management
Sand ModeDisplays driver selected terrain management
sand mode.
Sand Mode Active Displays terrain management sand mode is
currently active.
Mode Change Not
Accepted, RetryDisplayed when terrain management mode
cannot be changed at time of driver request.
Terrain Management
System FaultDisplays when the terrain management system
detects an error.
Tire Messages Action / Description
Low Tire Pressure Displays when one or more tires on your vehicle
have low tire pressure.
Tire Pressure Monitor
FaultDisplays when the tire pressure monitoring
system is malfunctioning. If the warning stays on
or continues to come on, contact your authorized
dealer.
Tire Pressure Sensor
FaultDisplayed when a tire pressure sensor is
malfunctioning, or your spare tire is in use. For
more information on how the system operates
under these conditions, refer toTire Pressure
Monitoring System (TPMS)in theWheels and
tireschapter. If the warning stays on or
continues to come on, contact your authorized
dealer as soon as possible.
Information Displays143
2015 Explorer(exp)
Owners Guide gf, 2nd Printing, September 2014
USA(fus)
Page 181 of 596
Programming HomeLink to a Genie Intellicode 2 garage door opener
Note:The Genie Intellicode 2 transmitter must already be programmed
to operate with the garage door opener.
Programing the transmitters
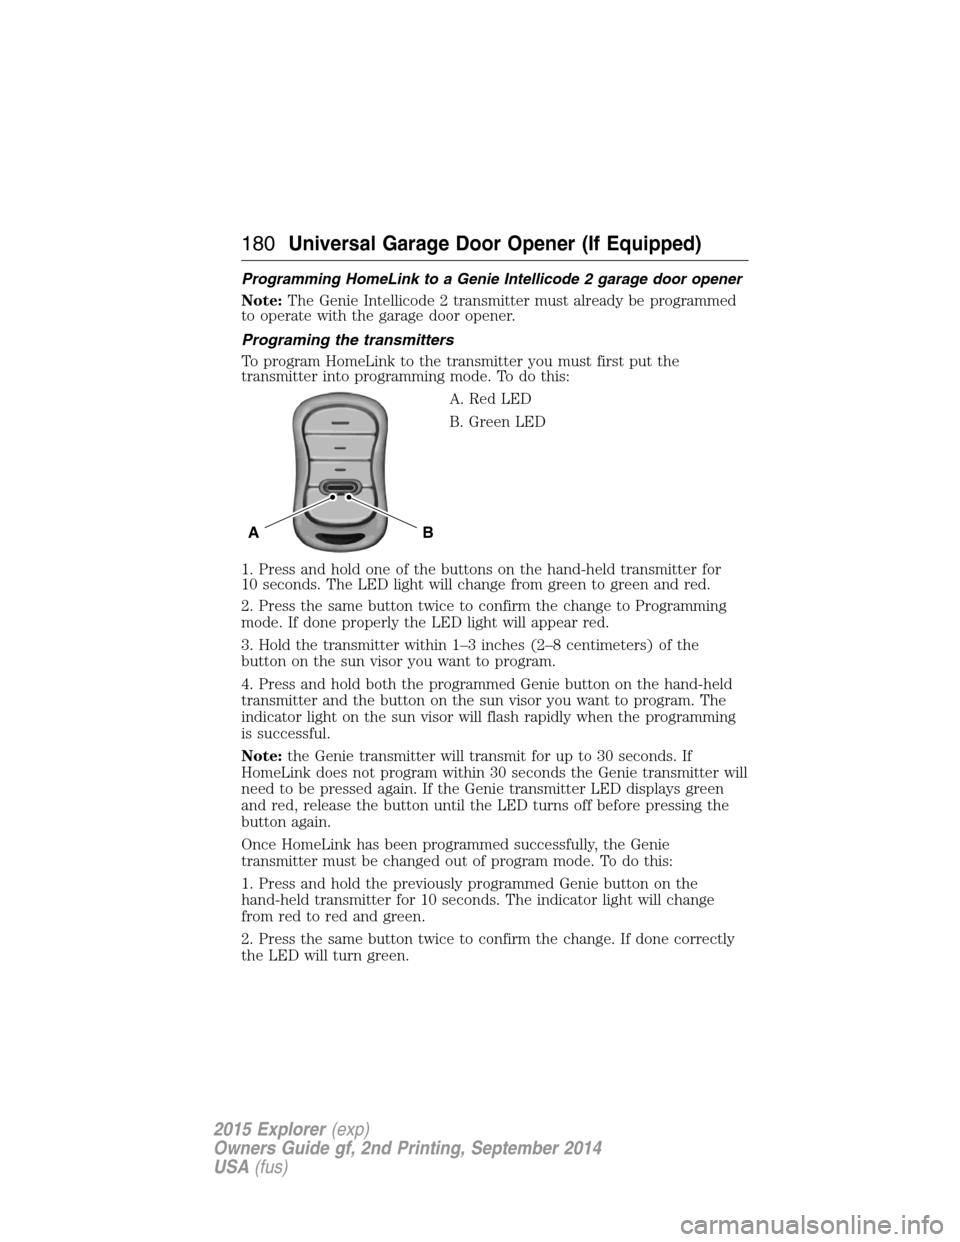
To program HomeLink to the transmitter you must first put the
transmitter into programming mode. To do this:
A. Red LED
B. Green LED
1. Press and hold one of the buttons on the hand-held transmitter for
10 seconds. The LED light will change from green to green and red.
2. Press the same button twice to confirm the change to Programming
mode. If done properly the LED light will appear red.
3. Hold the transmitter within 1–3 inches (2–8 centimeters) of the
button on the sun visor you want to program.
4. Press and hold both the programmed Genie button on the hand-held
transmitter and the button on the sun visor you want to program. The
indicator light on the sun visor will flash rapidly when the programming
is successful.
Note:the Genie transmitter will transmit for up to 30 seconds. If
HomeLink does not program within 30 seconds the Genie transmitter will
need to be pressed again. If the Genie transmitter LED displays green
and red, release the button until the LED turns off before pressing the
button again.
Once HomeLink has been programmed successfully, the Genie
transmitter must be changed out of program mode. To do this:
1. Press and hold the previously programmed Genie button on the
hand-held transmitter for 10 seconds. The indicator light will change
from red to red and green.
2. Press the same button twice to confirm the change. If done correctly
the LED will turn green.
BA
180Universal Garage Door Opener (If Equipped)
2015 Explorer(exp)
Owners Guide gf, 2nd Printing, September 2014
USA(fus)
Page 182 of 596
Programming HomeLink to the Genie Intellicode garage door
opener motor
Note:You may need a ladder to access the garage door opener motor.
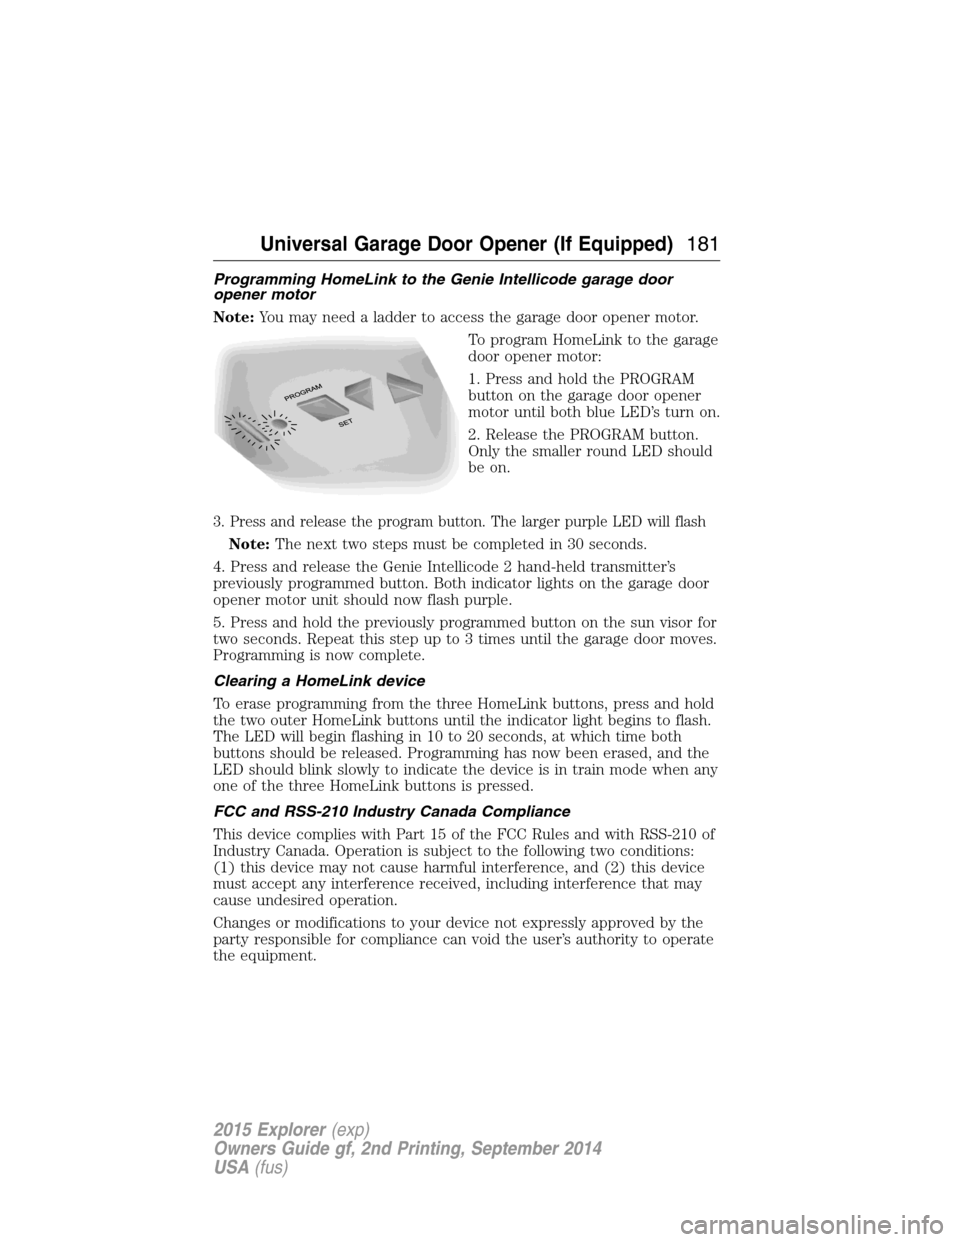
To program HomeLink to the garage
door opener motor:
1. Press and hold the PROGRAM
button on the garage door opener
motor until both blue LED’s turn on.
2. Release the PROGRAM button.
Only the smaller round LED should
be on.
3. Press and release the program button. The larger purple LED will flash
Note:The next two steps must be completed in 30 seconds.
4. Press and release the Genie Intellicode 2 hand-held transmitter’s
previously programmed button. Both indicator lights on the garage door
opener motor unit should now flash purple.
5. Press and hold the previously programmed button on the sun visor for
two seconds. Repeat this step up to 3 times until the garage door moves.
Programming is now complete.
Clearing a HomeLink device
To erase programming from the three HomeLink buttons, press and hold
the two outer HomeLink buttons until the indicator light begins to flash.
The LED will begin flashing in 10 to 20 seconds, at which time both
buttons should be released. Programming has now been erased, and the
LED should blink slowly to indicate the device is in train mode when any
one of the three HomeLink buttons is pressed.
FCC and RSS-210 Industry Canada Compliance
This device complies with Part 15 of the FCC Rules and with RSS-210 of
Industry Canada. Operation is subject to the following two conditions:
(1) this device may not cause harmful interference, and (2) this device
must accept any interference received, including interference that may
cause undesired operation.
Changes or modifications to your device not expressly approved by the
party responsible for compliance can void the user’s authority to operate
the equipment.
Universal Garage Door Opener (If Equipped)181
2015 Explorer(exp)
Owners Guide gf, 2nd Printing, September 2014
USA(fus)
Page 214 of 596
How Utility Vehicles Differ from Other Vehicles
Truck and utility vehicles can differ from some other vehicles. Your
vehicle may be higher to allow it to travel over rough terrain without
getting hung up or damaging underbody components.
The differences that make your vehicle so versatile also make it handle
differently than an ordinary passenger car.
Maintain steering wheel control at all times, especially in rough terrain.
Since sudden changes in terrain can result in abrupt steering wheel
motion, make sure you grip the steering wheel from the outside. Do not
grip the spokes.
Drive cautiously to avoid vehicle damage from concealed objects such as
rocks and stumps.
You should either know the terrain or examine maps of the area before
driving. Map out your route before driving in the area. To maintain
steering and braking control of your vehicle, you must have all four
wheels on the ground and they must be rolling, not sliding or spinning.
Driving In Special Conditions With Four-Wheel Drive (4WD)
Note:4WD vehicles are specially equipped for driving on sand, snow,
mud and rough terrain and have operating characteristics that are
somewhat different from conventional vehicles, both on and off the road.
Truck and utility vehicles can differ from some other vehicles. Your
vehicle may be higher to allow it to travel over rough terrain without
getting hung up or damaging underbody components. The differences
that make your vehicle so versatile also make it handle differently than
an ordinary passenger car. Maintain steering wheel control at all times,
especially in rough terrain. Since sudden changes in terrain can result in
abrupt steering wheel motion, make sure you grip the steering wheel
from the outside. Drive cautiously to avoid vehicle damage from
concealed objects such as rocks and stumps. You should either know the
terrain or examine maps of the area before driving. Map out your route
before driving in the area. To maintain steering and braking control of
your vehicle, you must have all four wheels on the ground and they must
be rolling, not sliding or spinning.
Basic Operating Principles in Special Conditions
•Drive slower in strong crosswinds which can affect the normal steering
characteristics of your vehicle.
•Be extremely careful when driving on pavement made slippery by
loose sand, water, gravel, snow or ice.
Four-Wheel Drive (If Equipped)213
2015 Explorer(exp)
Owners Guide gf, 2nd Printing, September 2014
USA(fus)
Page 227 of 596
If the system becomes inoperable, selecting some modes may not be
possible and a message is displayed. If it becomes inoperable due to a
system malfunction, all of the mode indicators on the control turn off
and one of the following messages appears in the information display:
TERRAIN MANAGEMENT SYSTEM FAULT:Cycling the key may
clear the fault. If key cycling does not work, have the system serviced by
an authorized dealer.
MODE CHANGE NOT ACCEPTED, RETRY:A mode change cannot
be made at the time of driver request. Try the mode change again.
HILL DESCENT CONTROL™ (IF EQUIPPED)
WARNING:Hill descent control cannot control descent in all
surface conditions and circumstances, such as ice or extremely
steep grades. Hill descent control is a driver assist system and cannot
substitute for good judgment by the driver. Failure to do so may result
in loss of vehicle control, crash or serious injury.
WARNING:Hill descent control does not provide hill hold at
zero mph (0 km/h). When stopped, the parking brake must be
applied and/or the vehicle must be placed in P (Park) or it may roll
away.
Hill descent control allows the driver to set and maintain vehicle speed
while descending steep grades in various surface conditions.
Hill descent control can maintain vehicle speeds on downhill grades
between 3 mph (5 km/h) and 20 mph (32 km/h). Above 20 mph
(32 km/h), the system remains armed, but descent speed cannot be set
or maintained.
Hill descent control requires a cooling down interval after a period of
sustained use. The amount of time that the feature can remain active
before cooling varies with conditions. The system will provide a warning
in the message center and a chime will sound when the system is about
to disengage for cooling. At this time, manually apply the brakes as
needed to maintain descent speed.
226Terrain Response
2015 Explorer(exp)
Owners Guide gf, 2nd Printing, September 2014
USA(fus)
Page 231 of 596
ACTIVE PARK ASSIST (IF EQUIPPED)
WARNING:This system is designed to be a supplementary park
aid. It may not work in all conditions and is not intended to
replace the driver’s attention and judgment. The driver is responsible
for avoiding hazards and maintaining a safe distance and speed, even
when the system is in use.
Note:The driver is always responsible for controlling the vehicle,
supervising the system and intervening if required.
The system detects an available parallel parking space and automatically
steers the vehicle into the space (hands-free) while you control the
accelerator, gearshift and brakes. The system visually and/or audibly
instructs the driver to park the vehicle.
The system may not function correctly if something passes between the
front bumper and the parking space (i.e. a pedestrian or cyclist) or if the
edge of the neighboring parked vehicle is high from the ground (i.e. a
bus, tow truck or flatbed truck).
Note:The sensors may not detect objects in heavy rain or other
conditions that cause disruptive reflections.
Note:The sensors may not detect objects with surfaces that absorb
ultrasonic waves.
Note:After a tire change the system will go through a relearning
procedure. During this time the system performance may deteriorate.
The system should not be used if:
•a foreign object (i.e. bike rack or trailer) is attached to the front or
rear of the vehicle or at another location close to the sensors.
•an overhanging object (i.e. surfboard) is attached to the roof.
•the front bumper or side sensors are damaged (i.e. in a collision) or
obstructed by a foreign object (i.e. front bumper cover).
•a mini-spare tire is in use.
230Parking Aids
2015 Explorer(exp)
Owners Guide gf, 2nd Printing, September 2014
USA(fus)