Page 379 of 596
WARNING:Always use the jack provided as original equipment
with your vehicle. If using a jack other than the one provided as
original equipment with your vehicle, make sure the jack capacity is
adequate for the vehicle weight, including any vehicle cargo or
modifications.
Note:Passengers should not remain in the vehicle when the vehicle is
being jacked.
Note:If the third-row seat is stowed in the floor, you will need to
unstow it (raised position) to access the spare tire and jack. SeeRear
Seatsin theSeatschapter for this procedure.
1. Park on a level surface, set the parking brake and activate the hazard
flashers.
2. Put the transmission in park (P) and turn the engine off.
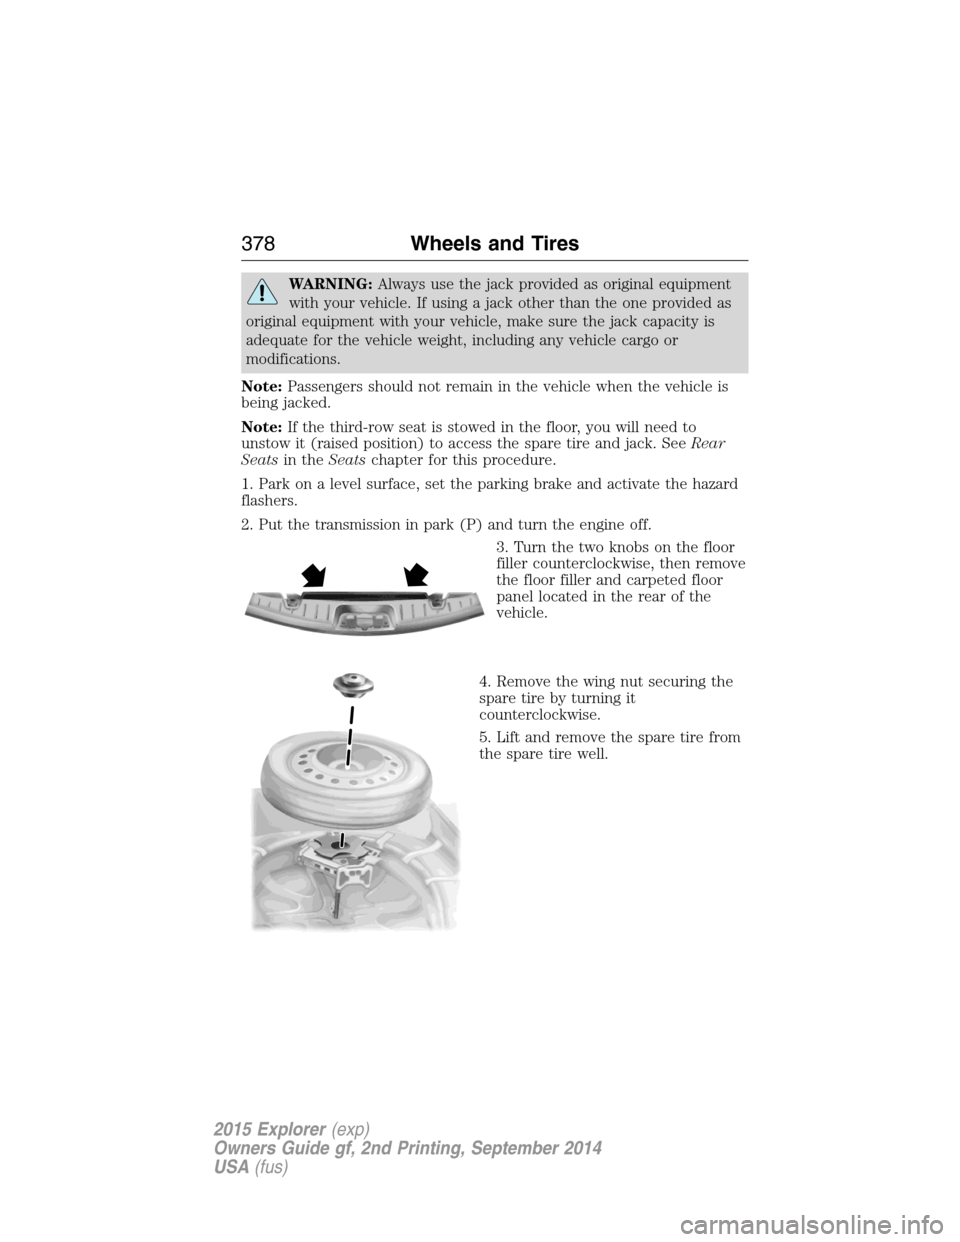
3. Turn the two knobs on the floor
filler counterclockwise, then remove
the floor filler and carpeted floor
panel located in the rear of the
vehicle.
4. Remove the wing nut securing the
spare tire by turning it
counterclockwise.
5. Lift and remove the spare tire from
the spare tire well.
378Wheels and Tires
2015 Explorer(exp)
Owners Guide gf, 2nd Printing, September 2014
USA(fus)
Page 380 of 596
6. Remove the wing bolt that secures the
jack kit by turning it counterclockwise.
7. Remove the jack kit which includes the
jack (D), wheel wrench (lug wrench) (C),
L-shaped bolt (A) and the tow recovery
hook (B).
8. Turn the lead screw (where the
lug wrench attaches) of the jack by
hand to release the wheel wrench
from the jack. Press the button on
the wrench to extend the handle.
Fold down the wrench socket.
Vehicle Jacking
1. Block the diagonally opposite
wheel.
2. Loosen each wheel lug nut
one-half turn counterclockwise but
do not remove them until the wheel
is raised off the ground.
3. The vehicle jacking points are shown here, and are depicted on the
warning label on the jack.
Note:Jack at the specified locations to avoid damage to the vehicle.
D
B
C
A
Wheels and Tires379
2015 Explorer(exp)
Owners Guide gf, 2nd Printing, September 2014
USA(fus)
Page 382 of 596
Stowing the mini-spare and jack
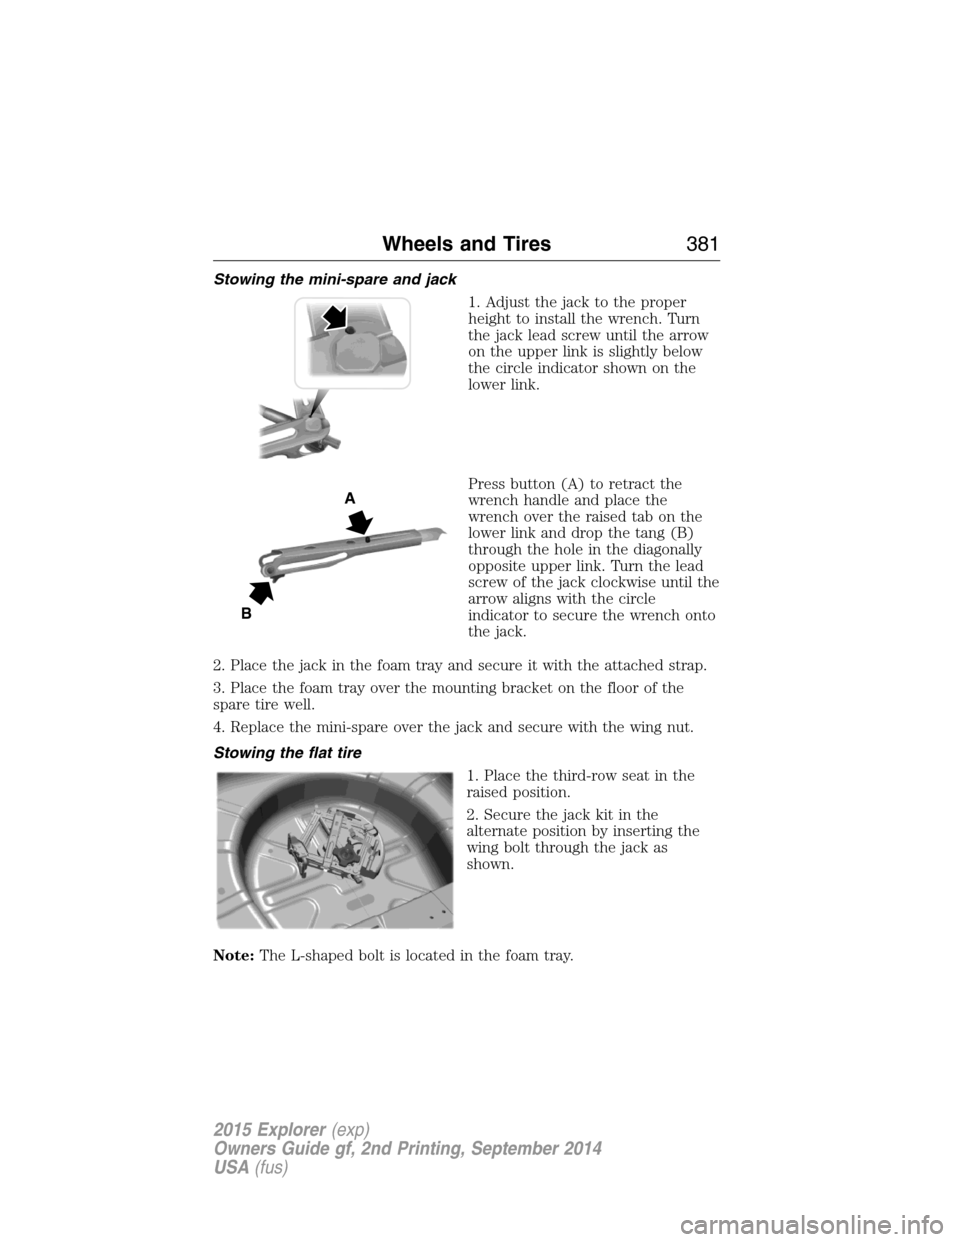
1. Adjust the jack to the proper
height to install the wrench. Turn
the jack lead screw until the arrow
on the upper link is slightly below
the circle indicator shown on the
lower link.
Press button (A) to retract the
wrench handle and place the
wrench over the raised tab on the
lower link and drop the tang (B)
through the hole in the diagonally
opposite upper link. Turn the lead
screw of the jack clockwise until the
arrow aligns with the circle
indicator to secure the wrench onto
the jack.
2. Place the jack in the foam tray and secure it with the attached strap.
3. Place the foam tray over the mounting bracket on the floor of the
spare tire well.
4. Replace the mini-spare over the jack and secure with the wing nut.
Stowing the flat tire
1. Place the third-row seat in the
raised position.
2. Secure the jack kit in the
alternate position by inserting the
wing bolt through the jack as
shown.
Note:The L-shaped bolt is located in the foam tray.
A
B
Wheels and Tires381
2015 Explorer(exp)
Owners Guide gf, 2nd Printing, September 2014
USA(fus)
Page 383 of 596
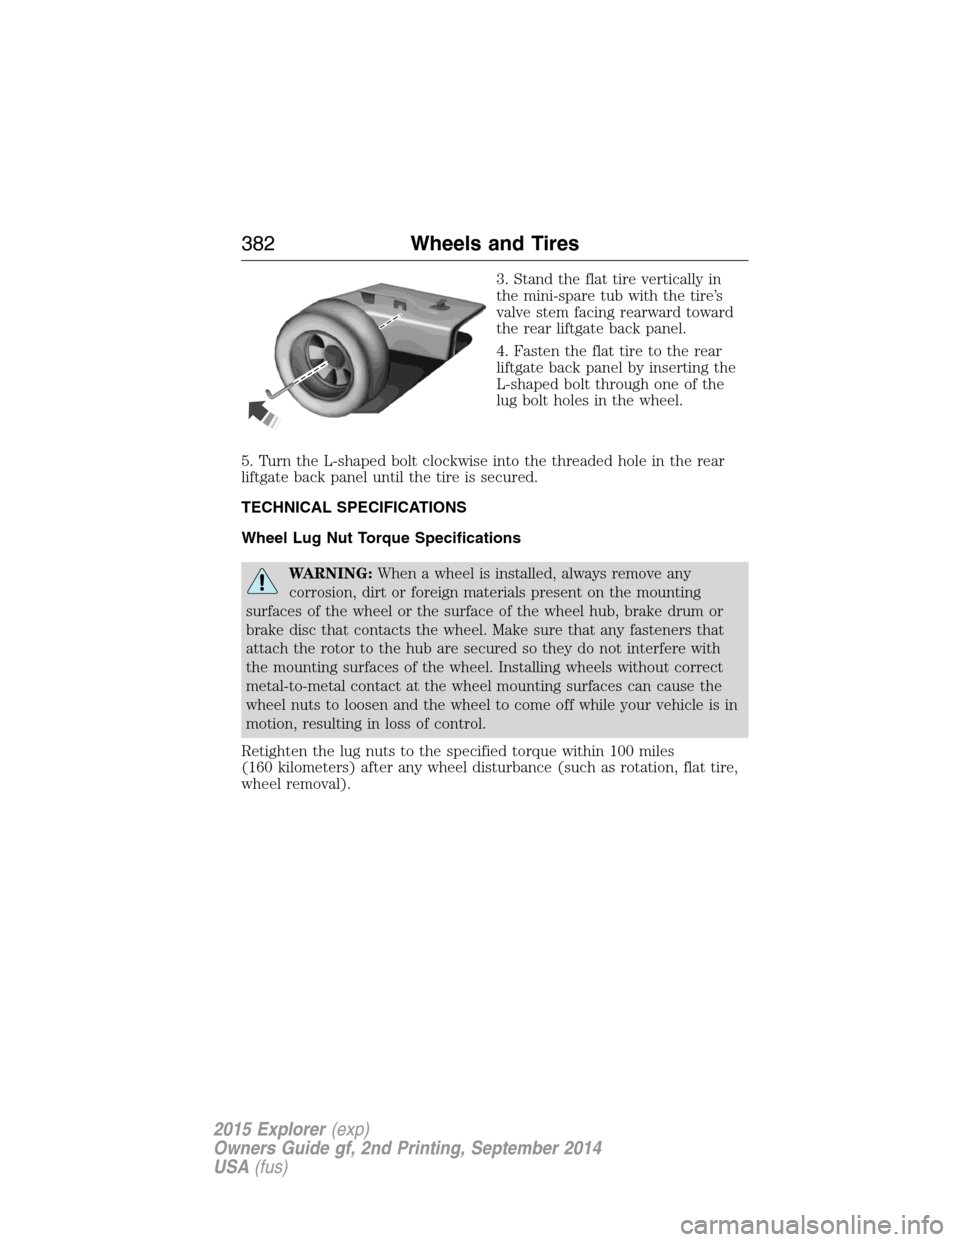
3. Stand the flat tire vertically in
the mini-spare tub with the tire’s
valve stem facing rearward toward
the rear liftgate back panel.
4. Fasten the flat tire to the rear
liftgate back panel by inserting the
L-shaped bolt through one of the
lug bolt holes in the wheel.
5. Turn the L-shaped bolt clockwise into the threaded hole in the rear
liftgate back panel until the tire is secured.
TECHNICAL SPECIFICATIONS
Wheel Lug Nut Torque Specifications
WARNING:When a wheel is installed, always remove any
corrosion, dirt or foreign materials present on the mounting
surfaces of the wheel or the surface of the wheel hub, brake drum or
brake disc that contacts the wheel. Make sure that any fasteners that
attach the rotor to the hub are secured so they do not interfere with
the mounting surfaces of the wheel. Installing wheels without correct
metal-to-metal contact at the wheel mounting surfaces can cause the
wheel nuts to loosen and the wheel to come off while your vehicle is in
motion, resulting in loss of control.
Retighten the lug nuts to the specified torque within 100 miles
(160 kilometers) after any wheel disturbance (such as rotation, flat tire,
wheel removal).
382Wheels and Tires
2015 Explorer(exp)
Owners Guide gf, 2nd Printing, September 2014
USA(fus)
Page 395 of 596
ACCESSORIES
For a complete listing of the accessories that are available for your
vehicle, please contact an authorized dealer or visit our online store at
www.Accessories.Ford.com (United States only).
Ford Motor Company will repair or replace any properly authorized
dealer-installed Ford Genuine Accessory found to be defective in
factory-supplied materials or workmanship during the warranty period, as
well as any component damaged by the defective accessories.
Ford Motor Company will warrant your accessory through the warranty
that provides the greatest benefit:
•24 months, unlimited mileage.
•The remainder of your new vehicle limited warranty.
Contact an authorized dealer for details and a copy of the warranty.
Exterior style
•Hood deflectors
•Bumper protector
•Side window deflectors
•Splash guards
Interior style
•Ambient lighting
•Floor mats
•Cargo area protector
•Rear console
Lifestyle
•Ash cup (smoker’s package)
•Trailer hitch balls
•Car covers*
•Rear seat entertainment*
•Cargo organization and management
•Trailer hitch drawbars, and towing accessories
•Camping tent*
•Racks and carriers*
•Roof crossbars
394Accessories
2015 Explorer(exp)
Owners Guide gf, 2nd Printing, September 2014
USA(fus)
Page 398 of 596

Roadside Assistance
Exclusive 24/7 roadside assistance, including:
•Towing, flat-tire change and battery jump starts
•Out of fuel and lock-out assistance
•Travel expense reimbursement for lodging, meals and rental car
•Destination assistance for taxi, shuttle, rental car coverage and
emergency transportation
Transferable Coverage
If you sell your vehicle before your Ford Extended Service Plan coverage
expires, you can transfer any remaining coverage to the new owner.
Whenever you sell your vehicle, prospective buyers may have a higher
degree of confidence that vehicle was properly maintained with Ford
ESP, thereby improving resale value.
Avoid the Rising Cost of Properly Maintaining Your Vehicle!
Ford Extended Service Plan also offers a Premium Maintenance Plan
that covers all scheduled maintenance, and selected wear items. The
coverage is prepaid, so you never have to worry about affording your
vehicle’s maintenance. It covers regular checkups, routine inspections,
preventive care and replacement of select items that require periodic
attention for normal wear:
•Windshield wiper blades
•Spark plugs (except in California)
•The clutch disc
•Brake pads and linings
•Shock absorbers
•Belts and hoses
•Diesel exhaust fluid replenishment
Contact your selling authorized Ford or Lincoln dealership today so they
can customize a Ford Extended Service Plan that fits your driving
lifestyle and budget.
Extended Service Plan397
2015 Explorer(exp)
Owners Guide gf, 2nd Printing, September 2014
USA(fus)
Page 399 of 596
Interest Free Finance Options Available
Take advantage of our interest free installment payment plan. Just a 10%
down payment will provide you with an affordable, no interest, no fee
payment program allowing you all the security and benefits Ford ESP
has to offer while paying over time. You are pre-approved with no credit
checks, no hassles! To learn more, call our Ford ESP specialists at
800-367-3377.
Ford ESP
P.O. Box 8072
Royal Oak, MI 48068-0039
SERVICE PLANS (CANADA ONLY)
You can get more protection for your vehicle by purchasing a Ford
Extended Service Plan. Ford Extended Service Plan is the only service
contract backed by Ford Motor Company of Canada, Limited. Depending
on the plan you purchase, Ford Extended Service Plan provides benefits
such as:
•Rental reimbursement
•Coverage for certain maintenance and wear items
•Protection against repair costs after your New Vehicle Limited
Warranty Coverage expires
•Roadside Assistance benefits
There are several Ford Extended Service Plans available in various time,
distance and deductible combinations. Each plan is tailored to fit your
own driving needs, including reimbursement for towing and rental. When
you purchase Ford Extended Service Plan, you receive added
peace-of-mind protection throughout Canada and the United States,
provided by a network of participating authorized Ford Motor Company
dealers.
Note:Repairs performed outside of Canada and the United States are
not eligible for Ford Extended Service Plan coverage.
This information is subject to change. For more information, visit your
local Ford of Canada dealer or www.ford.ca to find the Ford Extended
Service Plan that is right for you.
398Extended Service Plan
2015 Explorer(exp)
Owners Guide gf, 2nd Printing, September 2014
USA(fus)
Page 400 of 596

GENERAL INFORMATION
Radio Frequencies and Reception Factors
AM and FM frequencies are established by the Federal Communications
Commission (FCC) and the Canadian Radio and Telecommunications
Commission (CRTC). Those frequencies are:
AM: 530, 540–1700, 1710 kHz
FM: 87.9–107.7, 107.9 MHz
Radio reception factors
Distance and
strengthThe further you travel from an FM station,
the weaker the signal and the weaker the
reception.
TerrainHills, mountains, tall buildings, bridges,
tunnels, freeway overpasses, parking garages,
dense tree foliage and thunderstorms can
interfere with the reception.
Station overloadWhen you pass a ground-based broadcast
repeating tower, a stronger signal may
overtake a weaker one and result in the audio
system muting.
CD and CD Player Information
Note:CD units play commercially pressed 4.75-inch (12 centimeter)
audio compact discs only. Due to technical incompatibility, certain
recordable and re-recordable compact discs may not function correctly
when used in Ford CD players.
Note:Do not insert CDs with homemade paper (adhesive) labels into
the CD player as the label may peel and cause the CD to become
jammed. You should use a permanent felt tip marker rather than
adhesive labels on your homemade CDs. Ballpoint pens may damage
CDs. Please contact your authorized dealer for further information.
Note:Do not use any irregularly shaped discs or discs with a scratch
protection film attached.
Always handle discs by their edges only. Clean the disc with an approved
CD cleaner only. Wipe it from the center of the disc toward the edge. Do
not clean in a circular motion.
Do not expose discs to direct sunlight or heat sources for extended periods.
Audio System399
2015 Explorer(exp)
Owners Guide gf, 2nd Printing, September 2014
USA(fus)