2015 FORD EXPEDITION change wheel
[x] Cancel search: change wheelPage 259 of 564
connected, the problem is with your vehicle wiring between the trailer
brake controller and the 7–pin connector at the bumper. If the message
only displays with a trailer connected, the problem is with the trailer
wiring. Consult your trailer dealer for assistance. This can be a short to
ground (such as a chaffed wire), short to voltage (such as a pulled pin
on trailer emergency breakaway battery) or the trailer brakes may be
drawing too much current.
Points to Remember
Note:Do not attempt removal of the trailer brake controller without
consulting theWorkshop Manual.Damage to the unit may result.
•Adjust gain setting before using the trailer brake controller for the
first time.
•Adjust gain setting, using the procedure above, whenever road,
weather and trailer or vehicle loading conditions change from when
the gain was initially set.
•Only use the manual control lever for proper adjustment of the gain
during trailer setup. Misuse, such as application during trailer sway,
could cause instability of trailer or tow vehicle.
•Avoid towing in adverse weather conditions. The trailer brake
controller does not provide anti-lock control of the trailer wheels.
Trailer wheels can lock up on slippery surfaces, resulting in reduced
stability of trailer and tow vehicle.
•The trailer brake controller is equipped with a feature that reduces
output at vehicle speeds below 11 mph (18 km/h) so trailer and
vehicle braking is not jerky or harsh. This feature is only available
when applying the brakes using your vehicle’s brake pedal, not the
controller.
•The controller interacts with the brake control system and powertrain
control system of your vehicle to provide the best performance on
different road conditions.
•Your vehicle’s brake system and the trailer brake system work
independently of each other. Changing the gain setting on the
controller does not affect the operation of your vehicle’s brakes
whether you attach a trailer or not.
•When you turn the engine off, the controller output is disabled and
the display and module shut down. The controller module and display
turn on when you turn the ignition on.
•The trailer brake controller is only a factory-installed or
dealer-installed item. Ford is not responsible for warranty or
performance of the controller due to misuse or customer installation.
258Towing
2015 Expedition(exd)
Owners Guide gf, 1st Printing, July 2014
USA(fus)
Page 331 of 564
E.15:Indicates the wheel or rim diameter in inches. If you change your
wheel size, you will have to purchase new tires to match the new wheel
diameter.
F.95:Indicates the tire’s load index. It is an index that relates to how
much weight a tire can carry. You may find this information in your
owner’s manual. If not, contact a local tire dealer.
Note:You may not find this information on all tires because it is not
required by federal law.
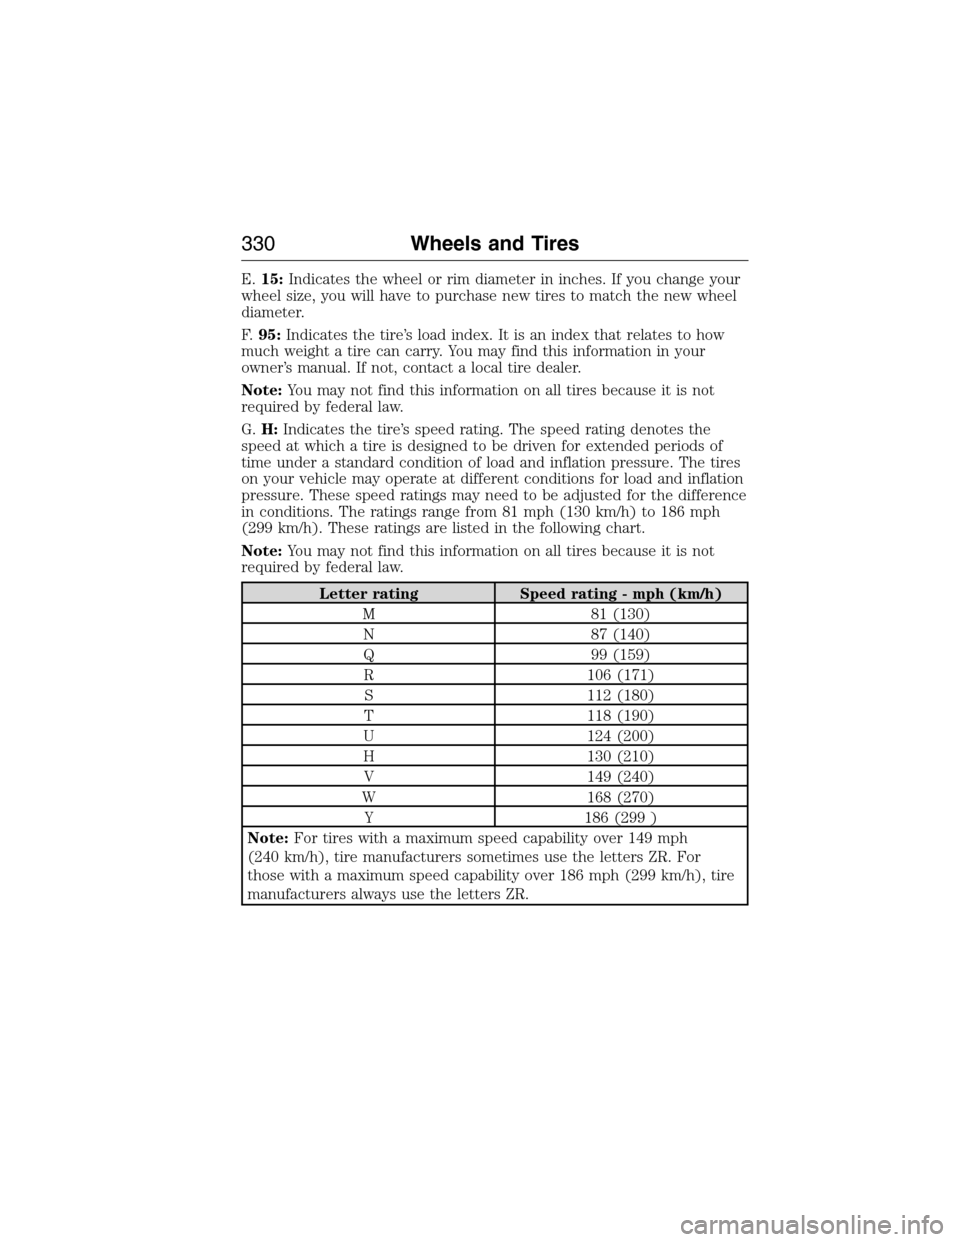
G.H:Indicates the tire’s speed rating. The speed rating denotes the
speed at which a tire is designed to be driven for extended periods of
time under a standard condition of load and inflation pressure. The tires
on your vehicle may operate at different conditions for load and inflation
pressure. These speed ratings may need to be adjusted for the difference
in conditions. The ratings range from 81 mph (130 km/h) to 186 mph
(299 km/h). These ratings are listed in the following chart.
Note:You may not find this information on all tires because it is not
required by federal law.
Letter rating Speed rating - mph (km/h)
M 81 (130)
N 87 (140)
Q 99 (159)
R 106 (171)
S 112 (180)
T 118 (190)
U 124 (200)
H 130 (210)
V 149 (240)
W 168 (270)
Y 186 (299 )
Note:For tires with a maximum speed capability over 149 mph
(240 km/h), tire manufacturers sometimes use the letters ZR. For
those with a maximum speed capability over 186 mph (299 km/h), tire
manufacturers always use the letters ZR.
330Wheels and Tires
2015 Expedition(exd)
Owners Guide gf, 1st Printing, July 2014
USA(fus)
Page 334 of 564
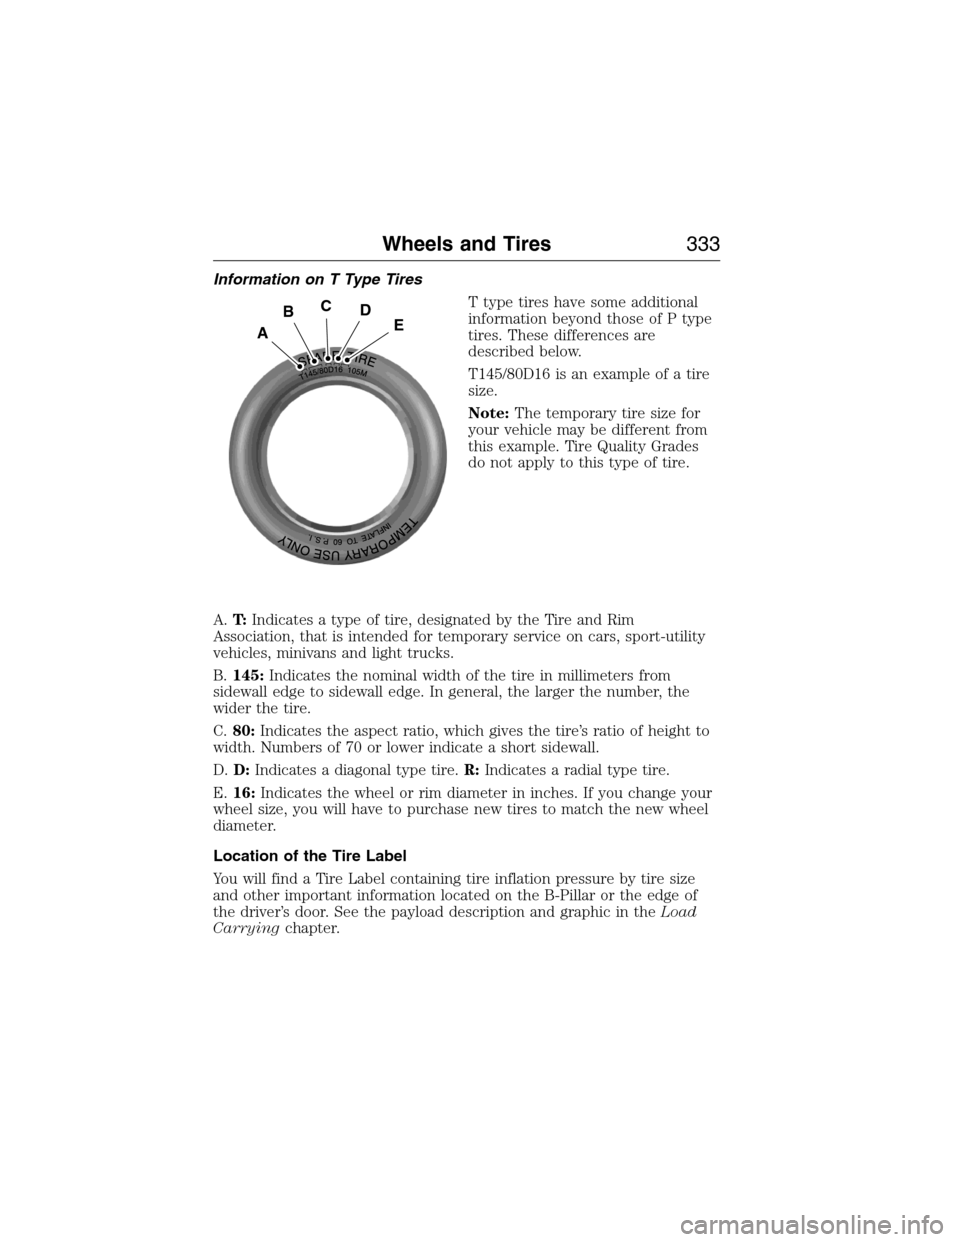
Information on T Type Tires
T type tires have some additional
information beyond those of P type
tires. These differences are
described below.
T145/80D16 is an example of a tire
size.
Note:The temporary tire size for
your vehicle may be different from
this example. Tire Quality Grades
do not apply to this type of tire.
A.T:Indicates a type of tire, designated by the Tire and Rim
Association, that is intended for temporary service on cars, sport-utility
vehicles, minivans and light trucks.
B.145:Indicates the nominal width of the tire in millimeters from
sidewall edge to sidewall edge. In general, the larger the number, the
wider the tire.
C.80:Indicates the aspect ratio, which gives the tire’s ratio of height to
width. Numbers of 70 or lower indicate a short sidewall.
D.D:Indicates a diagonal type tire.R:Indicates a radial type tire.
E.16:Indicates the wheel or rim diameter in inches. If you change your
wheel size, you will have to purchase new tires to match the new wheel
diameter.
Location of the Tire Label
You will find a Tire Label containing tire inflation pressure by tire size
and other important information located on the B-Pillar or the edge of
the driver’s door. See the payload description and graphic in theLoad
Carryingchapter.
A
BCDE
Wheels and Tires333
2015 Expedition(exd)
Owners Guide gf, 1st Printing, July 2014
USA(fus)
Page 336 of 564
Maximum Inflation Pressureis the tire manufacturer’s maximum
permissible pressure or the pressure at which the maximum load can be
carried by the tire. This pressure is normally higher than the
manufacturer’s recommended cold inflation pressure, which can be found
on the Safety Compliance Certification Label (affixed to either the door
hinge pillar, door-latch post, or the door edge that meets the door-latch
post, next to the driver’s seating position), or Tire Label which is located
on the B-Pillar or the edge of the driver’s door. The cold inflation
pressure should never be set lower than the recommended pressure on
the Safety Compliance Certification Label or Tire Label.
When weather temperature changes occur, tire inflation pressures also
change. A 10°F (6°C) temperature drop can cause a corresponding drop
of 1 psi (7 kPa) in inflation pressure. Check your tire pressures
frequently and adjust them to the proper pressure which can be found
on the Safety Compliance Certification Label or Tire Label.
To check the pressure in your tire(s):
1. Make sure the tires are cool, meaning they are not hot from driving
even a mile.
Note:If you are checking tire pressure when the tire is hot (for
example, driven more than 1 mile [1.6 kilometers]), never bleed or
reduce air pressure. The tires are hot from driving and it is normal for
pressures to increase above recommended cold pressures. A hot tire at
or below recommended cold inflation pressure could be significantly
under-inflated.
Note:If you have to drive a distance to get air for your tire(s), check
and record the tire pressure first and add the appropriate air pressure
when you get to the pump. It is normal for tires to heat up and the air
pressure inside to go up as you drive.
2. Remove the cap from the valve on one tire, then firmly press the tire
gauge onto the valve and measure the pressure.
3. Add enough air to reach the recommended air pressure.
Note:If you overfill the tire, release air by pressing on the metal stem in
the center of the valve. Then recheck the pressure with your tire gauge.
4. Replace the valve cap.
5. Repeat this procedure for each tire, including the spare.
Wheels and Tires335
2015 Expedition(exd)
Owners Guide gf, 1st Printing, July 2014
USA(fus)
Page 350 of 564
•Ground clearance and parking at curbs
•Winter weather driving capability
•Wet weather driving capability
•All-wheel driving capability (if applicable)
•Load leveling adjustment (if applicable)
When driving with the full-size dissimilar spare tire and wheel assembly,
additional caution should be given to:
•towing a trailer.
•driving vehicles equipped with a camper body.
•driving vehicles with a load on the cargo rack.
Drive cautiously when using a full-size dissimilar spare tire and wheel,
and seek service as soon as possible.
Tire Change Procedure
WARNING:When one of the front wheels is off the ground, the
transmission alone will not prevent the vehicle from moving or
slipping off the jack, even if the transmission is in park (P).
WARNING:To help prevent the vehicle from moving when you
change a tire, be sure to place the transmission in park (P), set
the parking brake and block (in both directions) the wheel that is
diagonally opposite (other side and end of the vehicle) to the tire being
changed.
WARNING:Never get underneath a vehicle that is supported
only by a jack. If the vehicle slips off the jack, you or someone
else could be seriously injured.
WARNING:Do not attempt to change a tire on the side of the
vehicle close to moving traffic. Pull far enough off the road to
avoid the danger of being hit when operating the jack or changing the
wheel.
Wheels and Tires349
2015 Expedition(exd)
Owners Guide gf, 1st Printing, July 2014
USA(fus)
Page 352 of 564
Note:Pay close attention to the orientation of the bag, because it will
have to be reinstalled after changing the tire.
3. Unsnap the wheel lug nut wrench, jack extension and handle from the
plastic tray.
4. Remove the jack from the tray assembly.
Removing the Spare Tire
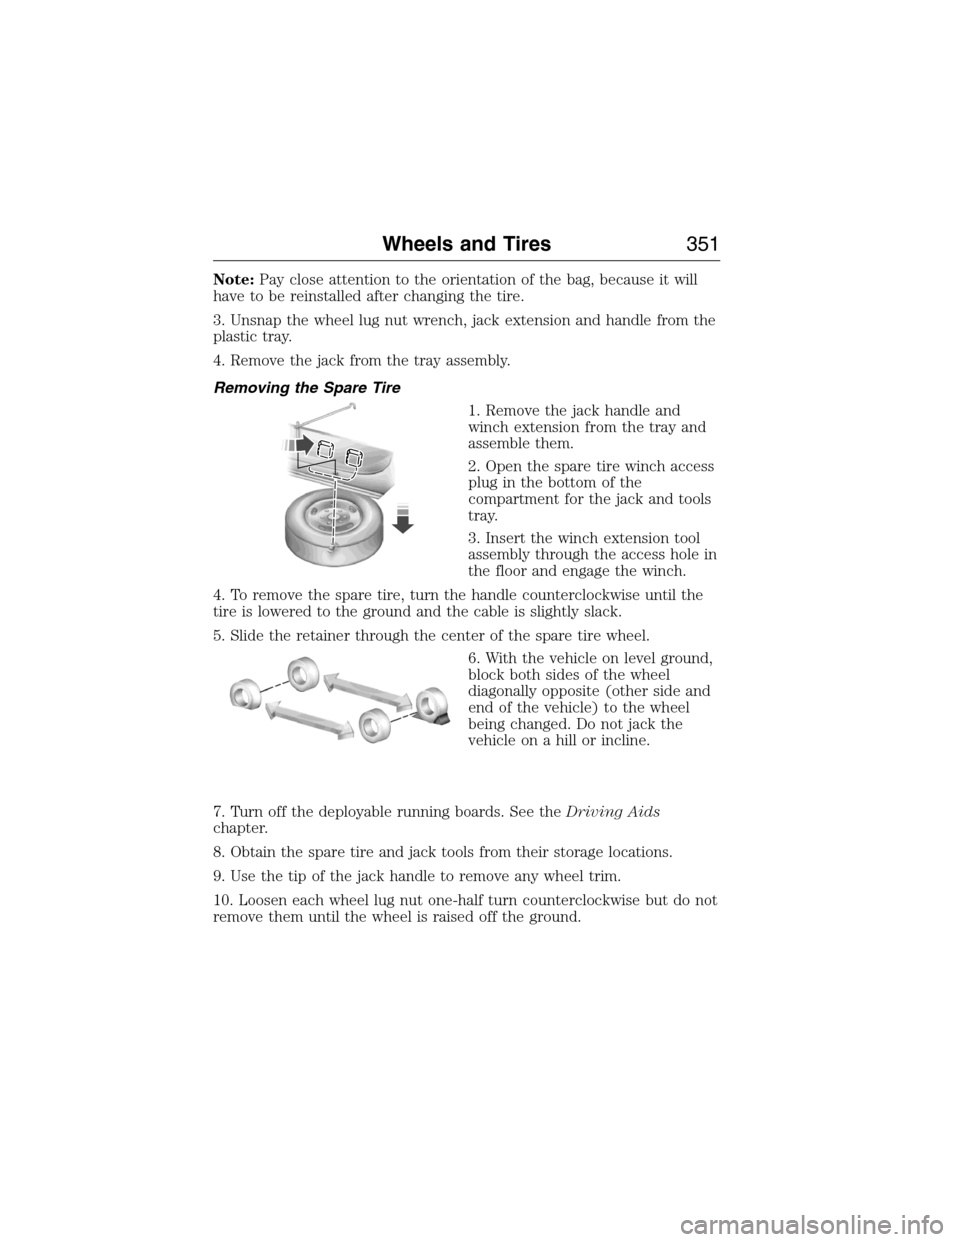
1. Remove the jack handle and
winch extension from the tray and
assemble them.
2. Open the spare tire winch access
plug in the bottom of the
compartment for the jack and tools
tray.
3. Insert the winch extension tool
assembly through the access hole in
the floor and engage the winch.
4. To remove the spare tire, turn the handle counterclockwise until the
tire is lowered to the ground and the cable is slightly slack.
5. Slide the retainer through the center of the spare tire wheel.
6. With the vehicle on level ground,
block both sides of the wheel
diagonally opposite (other side and
end of the vehicle) to the wheel
being changed. Do not jack the
vehicle on a hill or incline.
7. Turn off the deployable running boards. See theDriving Aids
chapter.
8. Obtain the spare tire and jack tools from their storage locations.
9. Use the tip of the jack handle to remove any wheel trim.
10. Loosen each wheel lug nut one-half turn counterclockwise but do not
remove them until the wheel is raised off the ground.
Wheels and Tires351
2015 Expedition(exd)
Owners Guide gf, 1st Printing, July 2014
USA(fus)
Page 390 of 564
USING VOICE RECOGNITION
This system helps you control many features using voice commands. This
allows you to keep your hands on the wheel and focus on what is in
front of you.
Initiating a Voice Session
Push the voice icon; a tone sounds and Listening appears in the
display. Say any of the following:
Say: If you want to:
“Phone” Make calls.
“USB” Access the device connected to your USB
port.
“Bluetooth Audio” Stream audio from your phone.
“Line in” Access the device connected to the auxiliary
input jack.
“Cancel” Cancel the requested action.
“SYNC” Return to the main menu.
“Voice settings” Adjust the level of voice interaction and
feedback.
“Vehicle Health Report” Run a vehicle health report.
*
“Services” Access the SYNC Services portal.*
“Mobile apps” Access mobile applications.*
“Help” Hear a list of voice commands available in the
current mode.
*If equipped, U.S. only.
System Interaction and Feedback
The system provides feedback through audible tones, prompts, questions
and spoken confirmations depending on the situation and the chosen
level of interaction (voice settings). You can customize the voice
recognition system to provide more or less instruction and feedback.
The default setting is to a higher level of interaction in order to help you
learn to use the system. You can change these settings at any time.
SYNC®389
2015 Expedition(exd)
Owners Guide gf, 1st Printing, July 2014
USA(fus)
Page 440 of 564
Using the Touchscreen
To turn a feature on and off, just touch the graphic with your finger. To
get the best performance from the touch-sensitive controls:
•Make sure your hands are clean and dry.
•Press firmly on the center of a control graphic or menu item.
•Keep metal and other conductive material away from the surface of
the touchscreen.
Using Your Audio and Climate Controls
Depending on your vehicle and option package, you may also have these
controls on your bezel:
•Power:Switch the media or climate features off and on.
•VOL:Control the volume of playing media.
•SeekandTune:Use as you normally would in media modes.
•PRESETS:Press and hold a numbered button to store a radio or
Sirius station. Press to recall the stored station.
•Eject:Eject a CD from the entertainment system.
•Climate control:Control the temperature, fan speed and settings of
the climate control system.
•
MEDIA:Touch repeatedly to see all available media sources. If not on
an audio screen, the media change appears in the lower left status bar.
Using Your Steering Wheel Controls
Depending on your vehicle and option package, you can use your
steering wheel controls to interact with the touchscreen system.
•VOL:Control the volume of audio output.
•VOICE:Press to start a voice session. Press again and hold to end a
voice session.
•SEEKandPHONE SEND:
•While in radio mode, press to seek between presets or press and
hold to seek between stations.
•While in USB or CD mode, press to seek between stations or press
and hold to fast seek.
•
While in phone mode, press to answer a call or switch between calls.
•SEEKandPHONE END:
•While in radio mode, press to seek between presets or press and
hold to seek between stations.
•While in USB or CD mode, press to seek between stations or press
and hold to fast seek.
•
While in phone mode, press to end a call or reject an incoming call.
See theSteering Wheelchapter for more information.
MyFord Touch® (If Equipped)439
2015 Expedition(exd)
Owners Guide gf, 1st Printing, July 2014
USA(fus)