2015 FIAT FREEMONT climate control
[x] Cancel search: climate controlPage 93 of 412

Rear Lock
Pressing the Rear Temperature Lock button on the
Uconnect® touchscreen, illuminates a lock symbol in
the rear display. The rear temperature and air source
are controlled from the front Uconnect® system.
Rear second row occupants can only adjust the rear
ATC control when the Rear Temperature Lock button
is turned off.The rear ATC is located in the headliner, near the
center of the vehicle.
• Press the Rear Temperature Lock button on the
Uconnect® touchscreen. This turns off the Rear
Temperature Lock icon in the rear temperature
knob.
• Rotate the Rear Blower, Rear Temperature and the Rear Mode Control knobs to suit your comfort
needs.
• ATC is selected by adjusting the rear blower knob counterclockwise to AUTO.
Once the desired temperature is displayed, the ATC
System will automatically achieve and maintain that
comfort level. When the system is set up for your
comfort level, it is not necessary to change the settings.
You will experience the greatest efficiency by simply
allowing the system to function automatically.
(fig. 55) Uconnect® 8.4 Automatic Rear Climate Button On The Touchscreen
1 — Rear Auto Button 2 — Rear Lock Button
3 — Front Climate Button 4 —Temperature Up Button5— Temperature Down
Button 6 — Blower Up Button
7 — Mode Button 8 — Blower Down Button
9 — Rear Off Button
87
KNOWING
YOUR
VEHICLE
SAFETY
STAR
TING
AND
DRIVING
WARNING
LIGHTS
AND
MESSAGES
IN AN
EMERGENCY
SERVICING
AND CARE
TECHNICAL
SPECIFICATIONS
CONTENTS
Page 96 of 412

Window Fogging
Interior fogging on the windshield can be quickly re-
moved by turning the mode selector to Defrost. The
Defrost/Floor mode can be used to maintain a clear
windshield and provide sufficient heating. If side win-
dow fogging becomes a problem, increase the blower
speed. Vehicle windows tend to fog on the inside in
mild but rainy or humid weather.
NOTE:
• Recirculation mode without A/C should not be usedfor long periods, as fogging may occur.
• Automatic Temperature Controls (ATC) will auto- matically adjust the climate control settings to re-
duce or eliminate window fogging on the front wind-
shield. When this occurs, recirculation will be
unavailable.
Outside Air Intake
Make sure the air intake, located directly in front of the
windshield, is free of obstructions such as leaves.
Leaves collected in the air intake may reduce airflow,
and if they enter the plenum, they could plug the water
drains. In winter months, make sure the air intake is
clear of ice, slush, and snow.
A/C Air Filter
The climate control system filters outside air contain-
ing dust, pollen and some odors. Strong odors cannot
be totally filtered out. Refer to “Maintenance Proce-
dures” in “Servicing and Care” for filter replacement
instructions.
90
KNOWING YOUR
VEHICLE
SAFETY
STAR
TINGAND
DRIVING
WARNING LIGHTSAND
MESSAGES
IN AN
EMERGENCY
SERVICINGAND CARE
TECHNICAL
SPECIFICATIONS
CONTENTS
Page 108 of 412

•Turn the rear wiper off when driving
through an automatic car wash. Damage
to the rear wiper may result if the rear
wiper switch is left in the ON position.
• In cold weather, always turn off the rear wiper
switch and allow the rear wiper to return to the
park position before turning off the engine. If the
rear wiper switch is left on and the rear wiper
freezes to the window, damage to the rear wiper
motor may occur when the vehicle is restarted.
• Always remove any buildup of snow that pre-
vents the rear wiper blade from returning to the
park position. If the rear wiper control is turned
off and the blade cannot return to the park
position, damage to the rear wiper motor may
occur.
REAR WINDOW DEFROSTER
The rear window defroster button is located on
the climate control panel. Press this button to
turn on the rear window defroster and the heated
outside mirrors (for versions/markets, where pro-
vided). An indicator in the button will illuminate when
the rear window defroster is on. The rear window
defroster automatically turns off after approximately
10 minutes. NOTE:
To prevent excessive battery drain, use the
rear window defroster only when the engine is oper-
ating.
Failure to follow these cautions can
cause damage to the heating elements:
• Use care when washing the inside of
the rear window. Do not use abrasive window
cleaners on the interior surface of the window.
Use a soft cloth and a mild washing solution,
wiping parallel to the heating elements. Labels
can be peeled off after soaking with warm water.
• Do not use scrapers, sharp instruments, or abra-
sive window cleaners on the interior surface of
the window.
• Keep all objects a safe distance from the win-
dow.
102
KNOWING YOUR
VEHICLE
SAFETY
STAR
TINGAND
DRIVING
WARNING LIGHTSAND
MESSAGES
IN AN
EMERGENCY
SERVICINGAND CARE
TECHNICAL
SPECIFICATIONS
CONTENTS
Page 113 of 412

NOTE:From the “observation mirror” position, the
door can only be closed.
To return to the full open position, the door must first
be closed and then opened by pressing the latch again
to release.
(fig. 71)
POWER SUNROOF SWITCH (for
versions/markets, where provided)
Refer to “Power Sunroof ” for further information.
HAZARD WARNING FLASHERS
The Hazard Warning flasher switch is located in the
instrument panel switch bank, above the climate
controls.
Press the switch to turn on the Hazard Warning
flasher. When the switch is activated, all direc-
tional turn signals will flash on and off to warn oncom-
ing traffic of an emergency. Press the switch a second
time to turn off the Hazard Warning flashers.
This is an emergency warning system and it should not
be used when the vehicle is in motion. Use it when your
vehicle is disabled and it is creating a safety hazard for
other motorists.
When you must leave the vehicle to seek assistance,
the Hazard Warning flashers will continue to operate
even though the ignition is placed in the OFF position.
NOTE: With extended use the Hazard Warning flash-
ers may wear down your battery.
(fig. 71)
Observation Mirror
107
KNOWING
YOUR
VEHICLE
SAFETY
STAR
TING
AND
DRIVING
WARNING
LIGHTS
AND
MESSAGES
IN AN
EMERGENCY
SERVICING
AND CARE
TECHNICAL
SPECIFICATIONS
CONTENTS
Page 137 of 412

WARNING!
• Driving with the liftgate open can al-
lo w
poisonous exhaust gases into your
vehicle. These fumes could injure you and your
passengers. Keep the liftgate closed when you are
operating the vehicle.
• If you are required to drive with the liftgate
open, make sure that all windows are closed, and
the blower switch on the climate control is set at
high speed. Do not use the recirculation mode.
CARGO AREA FEATURES
RECHARGEABLE FLASHLIGHT (for
versions/markets, where provided)
The rechargeable LED flashlight stores in its charging
station in the left rear quarter trim panel. To remove it,
press on the indent on the side of the flashlight and
release.
(fig. 103)
(fig. 103)
Rechargeable Flashlight
131
KNOWING
YOUR
VEHICLE
SAFETY
STAR
TING
AND
DRIVING
WARNING
LIGHTS
AND
MESSAGES
IN AN
EMERGENCY
SERVICING
AND CARE
TECHNICAL
SPECIFICATIONS
CONTENTS
Page 152 of 412

Partial Off
The “ESC OFF” button is located in the switch bank
above the climate control. To enter the “Partial Off ”
mode, momentarily press the “ESC OFF” button and
the “ESC OFF” Indicator Light will illuminate. To turn
the ESC on again, momentarily press the “ESC OFF”
button and the “ESC OFF” Indicator Light will turn off.
This will restore the normal “ESC On” mode of opera-
tion.
(fig. 112)
NOTE:To improve the vehicle's traction when driving
with snow chains, or when starting off in deep snow,
sand, or gravel, it may be desirable to switch to the
“Partial Off ” mode by momentarily pressing the “ESC
OFF” button. Once the situation requiring “Partial
Off ” mode is overcome, turn ESC back on by momen-
tarily pressing the “ESC OFF” button. This may be
done while the vehicle is in motion.
WARNING!
• When in “Partial Off ” mode, the TCS
fun ct
ionality of ESC (except for the lim-
ited slip feature described in the TCS section) has
been disabled and the “ESC Off Indicator Light”
will be illuminated.When in “Partial Off ” mode,
the engine power reduction of TCS is disabled,
and the enhanced vehicle stability offered by the
ESC system is reduced.
• Trailer Sway Control (TSC) is disabled when
the ESC system is in the “Partial Off ” mode.
(fig. 112)
ESC OFF Button
146
KNOWINGYOUR
VEHICLE
SAFETY
STAR
TINGAND
DRIVING
WARNING LIGHTSAND
MESSAGES
IN AN
EMERGENCY
SERVICINGAND CARE
TECHNICAL
SPECIFICATIONS
CONTENTS
Page 240 of 412

WARNING! (Continued)
• On seven passenger models, do not allow a
passenger to sit in a third row seat with the
second row seatback(s) folded flat . In a collision,
the passenger could slide underneath the seat
belt and be seriously or even fatally injured.
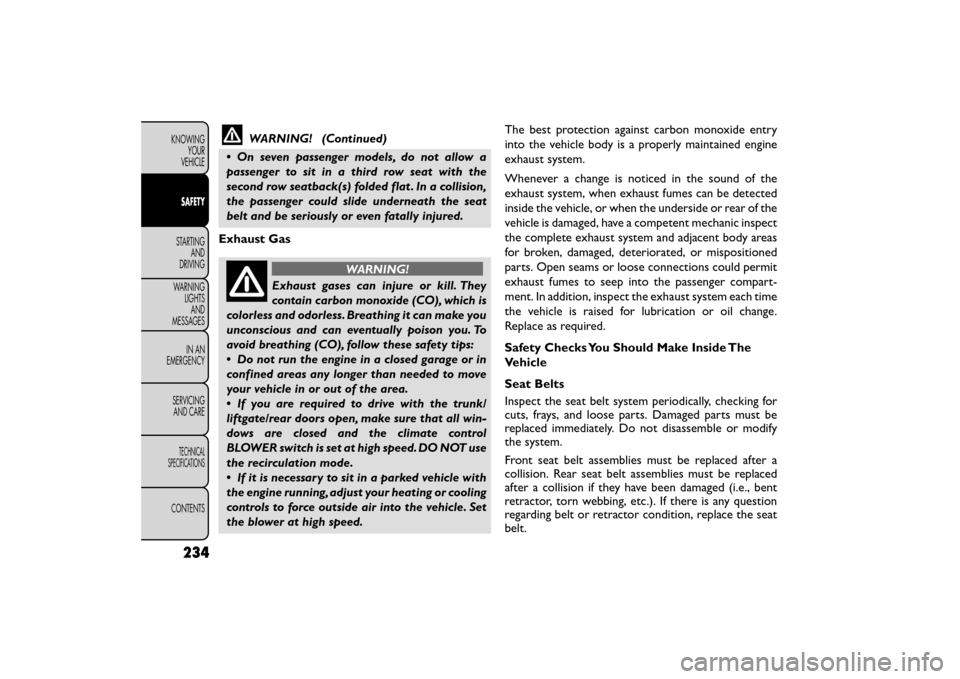
Exhaust Gas
WARNING!
Exhaust gases can injure or kill. They
con tain
carbon monoxide (CO), which is
colorless and odorless. Breathing it can make you
unconscious and can eventually poison you. To
avoid breathing (CO), follow these safety tips:
• Do not run the engine in a closed garage or in
confined areas any longer than needed to move
your vehicle in or out of the area.
• If you are required to drive with the trunk/
liftgate/rear doors open, make sure that all win-
dows are closed and the climate control
BLOWER switch is set at high speed. DO NOT use
the recirculation mode.
• If it is necessary to sit in a parked vehicle with
the engine running, adjust your heating or cooling
controls to force outside air into the vehicle. Set
the blower at high speed. The best protection against carbon monoxide entry
into the vehicle body is a properly maintained engine
exhaust system.
Whenever a change is noticed in the sound of the
exhaust system, when exhaust fumes can be detected
inside the vehicle, or when the underside or rear of the
vehicle is damaged, have a competent mechanic inspect
the complete exhaust system and adjacent body areas
for broken, damaged, deteriorated, or mispositioned
parts. Open seams or loose connections could permit
exhaust fumes to seep into the passenger compart-
ment. In addition, inspect the exhaust system each time
the vehicle is raised for lubrication or oil change.
Replace as required.
Safety Checks You Should Make Inside The
Vehicle
Seat Belts
Inspect the seat belt system periodically, checking for
cuts, frays, and loose parts. Damaged parts must be
replaced immediately. Do not disassemble or modify
the system.
Front seat belt assemblies must be replaced after a
collision. Rear seat belt assemblies must be replaced
after a collision if they have been damaged (i.e., bent
retractor, torn webbing, etc.). If there is any question
regarding belt or retractor condition, replace the seat
belt.
234
KNOWING
YOUR
VEHICLE
SAFETY
STARTING AND
DRIVING
WARNING LIGHTSAND
MESSAGES
IN
AN
EMERGENCY
SERVICINGAND CARE
TECHNICAL
SPECIFICATIONS
CONTENTS
Page 314 of 412

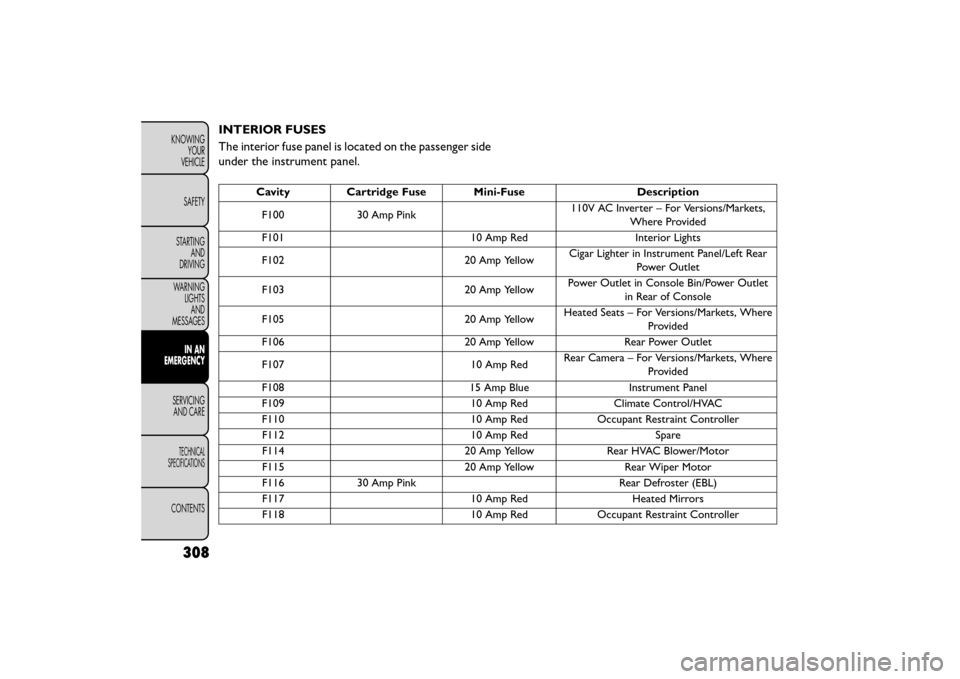
INTERIOR FUSES
The interior fuse panel is located on the passenger side
under the instrument panel.
CavityCartridge Fuse Mini-Fuse Description
F100 30 Amp Pink 110V AC Inverter – For Versions/Markets,
Where Provided
F101 10 Amp RedInterior Lights
F102 20 Amp YellowCigar Lighter in Instrument Panel/Left Rear
Power Outlet
F103 20 Amp YellowPower Outlet in Console Bin/Power Outlet
in Rear of Console
F105 20 Amp YellowHeated Seats – For Versions/Markets, Where
Provided
F106 20 Amp YellowRear Power Outlet
F107 10 Amp RedRear Camera – For Versions/Markets, Where
Provided
F108 15 Amp BlueInstrument Panel
F109 10 Amp RedClimate Control/HVAC
F110 10 Amp RedOccupant Restraint Controller
F112 10 Amp RedSpare
F114 20 Amp YellowRear HVAC Blower/Motor
F115 20 Amp YellowRear Wiper Motor
F116 30 Amp Pink Rear Defroster (EBL)
F117 10 Amp RedHeated Mirrors
F118 10 Amp RedOccupant Restraint Controller
308
KNOWING
YOUR
VEHICLE
SAFETY
STARTING AND
DRIVING
WARNING LIGHTSAND
MESSAGES
IN AN
EMERGENCY
SER VICING
AND
CARE
TECHNICAL
SPECIFICATIONS
CONTENTS