2015 FIAT DOBLO COMBI brake light
[x] Cancel search: brake lightPage 155 of 323

ACOUSTIC SIGNAL
When reverse gear is engaged an
intermittent acoustic signal is
automatically activated.
The frequency of the acoustic signal:
❒increases as the distance between
the vehicle and the obstacle
decreases;
❒becomes continuous when the
distance between the vehicle and the
obstacle is less than 30 cm and
stops immediately if the distance
increases;
❒is constant if the distance between
the vehicle and the obstacle is
unchanged;
❒whereas, if this situation occurs for
the side sensors, the indication will
stop after about 3 seconds to avoid,
for example, warning indications in
the event of manoeuvres alongside
walls.
Detection distances
If several obstacles are detected by
the sensors, only the nearest one
is considered.FAULT INDICATIONS
Any parking sensor faults will be
indicated when reverse is engaged
by the warning light in the
instrument panel switching on
together with the message in the
multifunction display, for
versions/markets, where provided
(see chapter "Warning lights and
messages”).
97)
OPERATION WITH
TRAILER
Parking sensor operation is
automatically deactivated when the
electric cable plug of the trailer is
inserted into the vehicle tow hook
socket. The sensors are
automatically reactivated when the
trailer's cable plug is removed.
IMPORTANT
If you wish to leave the tow hook
fitted without towing a trailer, it
is advisable to contact a Fiat
Dealership for the relevant system
update operations because the tow
hook could be detected as an
obstacle by the central sensors.GENERAL WARNINGS
98)
❒When parking, take the utmost care
over obstacles that may be above or
under the sensor.
❒Sometimes, objects located very
near the rear of the vehicle are not
detected and could therefore
damage the vehicle or be damaged
themselves.
The following conditions may
influence the performance of the
parking assistance system:
❒Reduced sensor sensitivity and a
reduction in the parking assistance
system performance could be due to
the presence on the surface of the
sensor of: ice, snow, mud, thick
paint.
❒The sensor may detect a non-
existent obstacle (echo noise) due to
mechanical noises, for example
when washing the vehicle, in case of
rain, strong wind, hail.
❒The signals sent out by the sensors
can be altered by dirt, snow or ice
deposited on the sensors or by
ultrasound systems (e.g. truck
pneumatic brakes or pneumatic drills)
near the vehicle.
151
Page 166 of 323

Bulbs
Use Type Power Ref. Figure
Main beam headlights H7 55 W E
Dipped headlights H7 55 W E
Daytime running lights / side lights W21W 13 W B
Front direction indicators WY21W 21 W B
Side direction indicators WY5W 5 W A
Rear direction indicators PY21W 21 W B
Rear fog light W16W 16 W A
Reverse W16W 16 W A
Rear side lights P21/5W 5 W B
Brake lights P21W 21 W B
3rd brake light wing W5W 5 W A
3rd brake light swinging W5W 5 W A
3rd brake light swinging (for privacy glass) Xenon 6 W 6 W A
Front fog lights (for versions/markets where
provided)H11 55 W E
162
IN AN EMERGENCY
Page 168 of 323

DIRECTION
INDICATORS
Front
To replace the bulb, proceed as
follows:
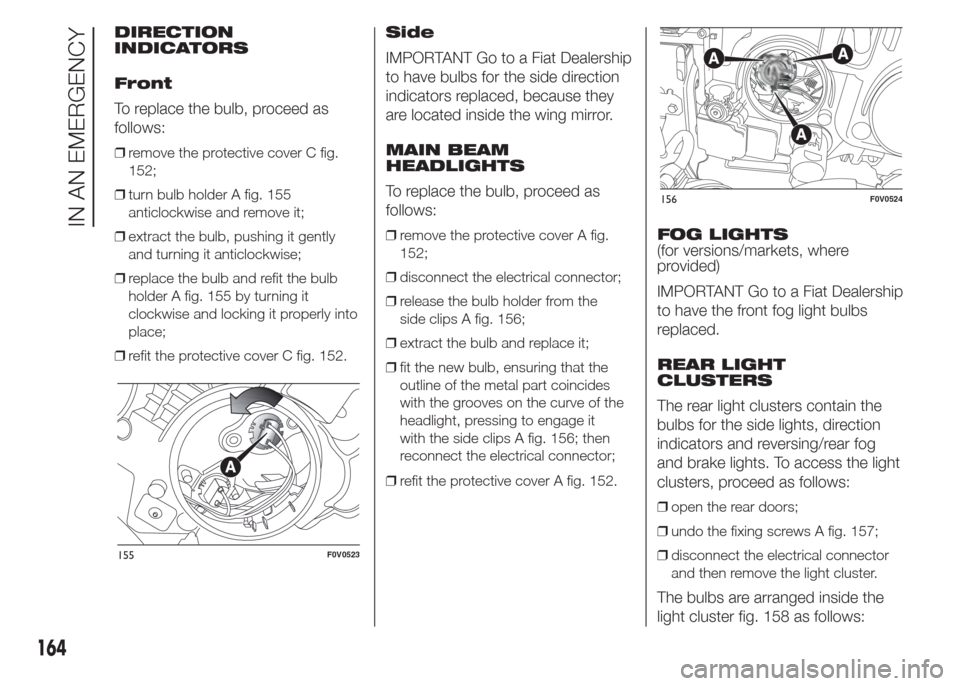
❒remove the protective cover C fig.
152;
❒turn bulb holder A fig. 155
anticlockwise and remove it;
❒extract the bulb, pushing it gently
and turning it anticlockwise;
❒replace the bulb and refit the bulb
holder A fig. 155 by turning it
clockwise and locking it properly into
place;
❒refit the protective cover C fig. 152.
Side
IMPORTANT Go to a Fiat Dealership
to have bulbs for the side direction
indicators replaced, because they
are located inside the wing mirror.
MAIN BEAM
HEADLIGHTS
To replace the bulb, proceed as
follows:
❒remove the protective cover A fig.
152;
❒disconnect the electrical connector;
❒release the bulb holder from the
side clips A fig. 156;
❒extract the bulb and replace it;
❒fit the new bulb, ensuring that the
outline of the metal part coincides
with the grooves on the curve of the
headlight, pressing to engage it
with the side clips A fig. 156; then
reconnect the electrical connector;
❒refit the protective cover A fig. 152.FOG LIGHTS
(for versions/markets, where
provided)
IMPORTANT Go to a Fiat Dealership
to have the front fog light bulbs
replaced.
REAR LIGHT
CLUSTERS
The rear light clusters contain the
bulbs for the side lights, direction
indicators and reversing/rear fog
and brake lights. To access the light
clusters, proceed as follows:
❒open the rear doors;
❒undo the fixing screws A fig. 157;
❒disconnect the electrical connector
and then remove the light cluster.
The bulbs are arranged inside the
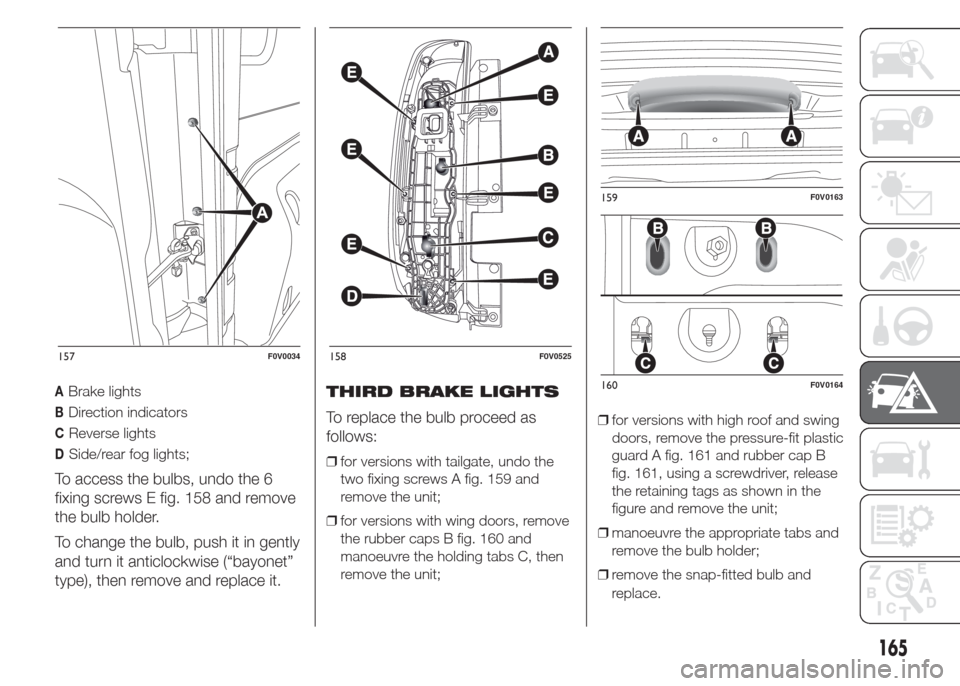
light cluster fig. 158 as follows:
155F0V0523
156F0V0524
164
IN AN EMERGENCY
Page 169 of 323

ABrake lights
BDirection indicators
CReverse lights
DSide/rear fog lights;
To access the bulbs, undo the 6
fixing screws E fig. 158 and remove
the bulb holder.
To change the bulb, push it in gently
and turn it anticlockwise (“bayonet”
type), then remove and replace it.THIRD BRAKE LIGHTS
To replace the bulb proceed as
follows:
❒for versions with tailgate, undo the
two fixing screws A fig. 159 and
remove the unit;
❒for versions with wing doors, remove
the rubber caps B fig. 160 and
manoeuvre the holding tabs C, then
remove the unit;❒for versions with high roof and swing
doors, remove the pressure-fit plastic
guard A fig. 161 and rubber cap B
fig. 161, using a screwdriver, release
the retaining tags as shown in the
figure and remove the unit;
❒manoeuvre the appropriate tabs and
remove the bulb holder;
❒remove the snap-fitted bulb and
replace.
157F0V0034158F0V0525
159F0V0163
160F0V0164
165
Page 179 of 323

CHANGING A WHEEL
The vehicle is originally equipped
with the Fix&Go automatic quick
tyre repair kit (see instructions in the
next section). As an alternative,
the vehicle may have a normal-sized
spare wheel.
Wheel changing and correct use of
the jack and spare wheel call for
some precautions, as listed below.
108) 109) 110) 111)
Note for one-way
tyres
One-way tyres have a few arrows on
the side indicating the rotation
direction. If a wheel is changed
(when punctured, for example) the
direction of the arrows on the spare
wheel tyre may not coincide with
the rotation direction of the wheel to
be replaced.
In these conditions, too, the tyre still
maintains its safety features.Anyway, it is recommended to have
the wheel repaired and refitted as
soon as possible, as the best
performance is achieved when the
rotation direction of all tyres
coincides with the one indicated by
the arrows.
Please note that:
❒the jack weight is 4 kg;
❒the jack requires no adjustment;
❒the jack cannot be repaired and in
the event of a fault it must be
replaced by another original one;
❒no tool other than its cranking device
may be fitted on the jack.
To change a wheel, proceed as
follows:
❒stop the vehicle in a position that is
not dangerous for oncoming traffic
where you can change the wheel
safely. The ground should be flat
if possible, and sufficiently firm;
❒stop the engine and pull the
handbrake;
❒engage first gear or reverse;
❒wear the reflective safety jacket
(compulsory by law in certain
countries) before getting out of the
vehicle;❒indicate that the vehicle has broken
down using the devices required by
the law in the current country (e.g.
warning triangle, hazard lights, etc.);
❒for Cargo versions fig. 180: move the
left front seat forward and operate
lever A to access the tool bag; take it
to the wheel that needs replacing;
❒for Doblò/Doblò Combi versions fig.
181: open the rear doors, inside the
compartment on the rear right side,
take the tool bag, unhooking the
elastic band from the buckle, and
take it next to the wheel to be
changed;
❒take wheel spanner B fig. 182 and
the extension with pentagonal fitting
C; inside the load area, fit extension
C on bolt A; use spanner B to lower
the wheel by unwinding the wire;
180F0V0149
175
Page 187 of 323

118) affix the adhesive label in an
easy-to-see position for the driver
as a reminder that the tyre has
been treated with the quick tyre
repair kit. Drive carefully,
particularly on bends. Do not
exceed 80 km/h. Do not
accelerate or brake suddenly.
119) If the pressure has fallen below
1.8 bar, do not drive any further:
the automatic Fix&Go automatic
quick tyre repair kit cannot
guarantee the correct hold
because the tyre is too damaged.
Contact a Fiat Dealership.
120) Inform the Dealership that the
tyre has been repaired using the
quick tyre repair kit. Give the
booklet to the personnel charged
with handling the treated tyre.
IMPORTANT
28) Punctures caused by foreign
bodies can be repaired if the
damage does not exceed 4 mm on
the tread and on the shoulder of
the tyre.
IMPORTANT
2) Do not dispose of the can or the
sealing fluid as household waste.
Have them disposed of in
compliance with national and
local regulations.
EMERGENCY
STARTING
Go to a Fiat Dealership immediately
if warning light
stays on
constantly on the instrument panel.
JUMP STARTING
If the battery is flat, it is possible to
start the engine using an auxiliary
battery with the same capacity or a
little higher than the flat one.
Proceed as follows to start the
vehicle fig. 204:
❒connect the positive terminals (+
mark near the terminal) of the two
batteries using a suitable lead;
❒with a second lead, connect the
negative terminal (–) of the auxiliary
battery to an earthing point
on the
engine or the gearbox of the vehicle
to be started;
❒start the engine;
❒when the engine has been started,
remove the cables reversing the
order above.
If after a few attempts the engine
does not start, do not persist but
contact the nearest Fiat Dealership.
183
Page 195 of 323

SCHEDULED SERVICING PLAN
PETROL VERSIONS
Thousands of miles 18 36 54 72 90 108
Thousands of kilometres 30 60 90 120 150 180
Months 24 48 72 96 120 144
Check battery charge status and recharge if necessary●●●●●●
Check tyre conditions/wear and adjust pressure, if necessary●●●●●●
Check operation of lighting system (headlights, direction
indicators, hazard warning lights, luggage compartment,
passenger compartment, glove compartment, instrument panel
warning lights, etc.)●●●●●●
Check operation of the wiper/washer system and adjust jets, if
necessary●●●●●●
Check the position/wear of the windscreen/rear window wiper
blades●●●●●●
Check front disc brake pad condition and wear and operation of
brake pad wear indicator●●●●●●
Check rear drum brake lining condition and wear●●●
Visually inspect condition of: exterior bodywork, underbody
protection, pipes and hoses (exhaust - fuel system - brakes),
rubber elements (boots, sleeves, bushes, etc.)●●●●●●
Check cleanliness of bonnet and luggage compartment locks, as
well as cleanliness and lubrication of linkages●●●●●●
Visually inspect conditions of the accessory drive belt(s)●●
191
Page 198 of 323

DIESEL VERSIONS WITHOUT DPF (1.3 MultiJet - 1.6 MultiJet)
Thousands of miles 18 36 54 72 90 108
Thousands of kilometres 30 60 90 120 150 180
Months 24 48 72 96 120 144
Check tyre conditions/wear and adjust pressure, if necessary●●●●●●
Check operation of lighting system (headlights, direction
indicators, hazard warning lights, luggage compartment,
passenger compartment, glove compartment, instrument panel
warning lights, etc.)●●●●●●
Check operation of the wiper/washer system and adjust jets, if
necessary●●●●●●
Check windscreen wiper blade position/wear●●●●●●
Check front disc brake pad condition and wear and operation of
brake pad wear indicator●●●●●●
Check rear drum brake lining condition and wear●●●
Visually inspect condition of: exterior bodywork, underbody
protection, pipes and hoses (exhaust - fuel system - brakes),
rubber elements (boots, sleeves, bushes, etc.)●●●●●●
Check cleanliness of bonnet and luggage compartment locks, as
well as cleanliness and lubrication of linkages●●●●●●
Check and, if necessary, top up fluid levels (brakes/hydraulic
clutch, windscreen washer, battery, engine cooling, etc.)●●●●●●
Check tension of accessory drive belt (versions without automatic
tensioner)●●
194
SERVICING AND MAINTENANCE