2015 FIAT 500X ESP
[x] Cancel search: ESPPage 182 of 240

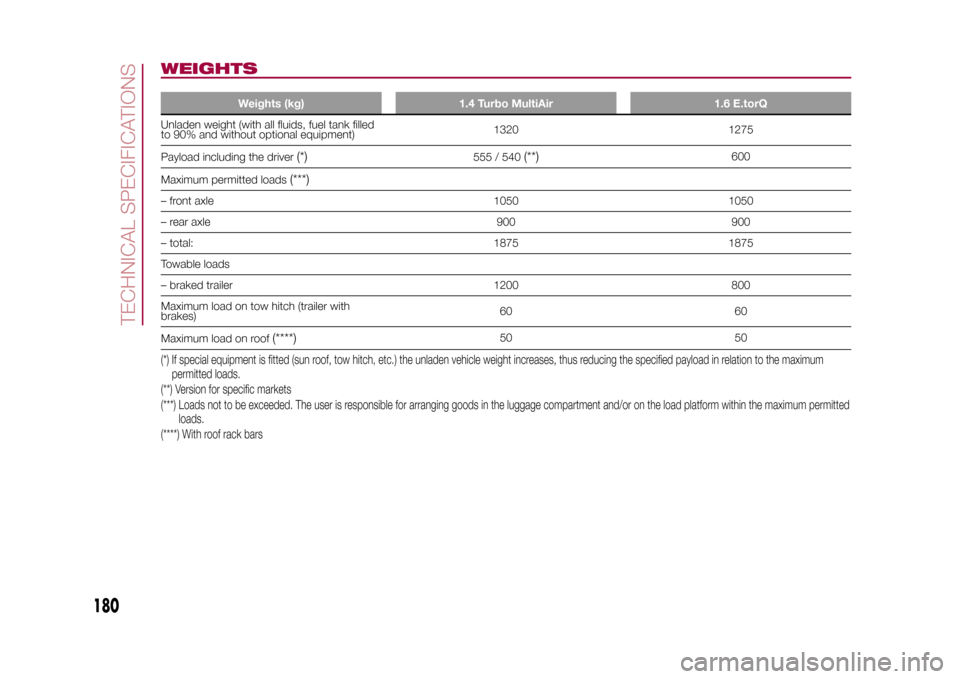
WEIGHTS
Weights (kg) 1.4 Turbo MultiAir 1.6 E.torQ
Unladen weight (with all fluids, fuel tank filled
to 90% and without optional equipment)1320 1275
Payload including the driver
(*)
555 / 540
(**)
600
Maximum permitted loads
(***)
– front axle 1050 1050
– rear axle 900 900
– total: 1875 1875
Towable loads
– braked trailer 1200 800
Maximum load on tow hitch (trailer with
brakes)60 60
Maximum load on roof
(****)
50 50
(*) If special equipment is fitted (sun roof, tow hitch, etc.) the unladen vehicle weight increases, thus reducing the specified payload in relation to the maximum
permitted loads.
(**) Version for specific markets
(***) Loads not to be exceeded. The user is responsible for arranging goods in the luggage compartment and/or on the load platform within the maximum permitted
loads.
(****) With roof rack bars
180
TECHNICAL SPECIFICATIONS
15-12-2014 8:23 Pagina 180
Page 183 of 240

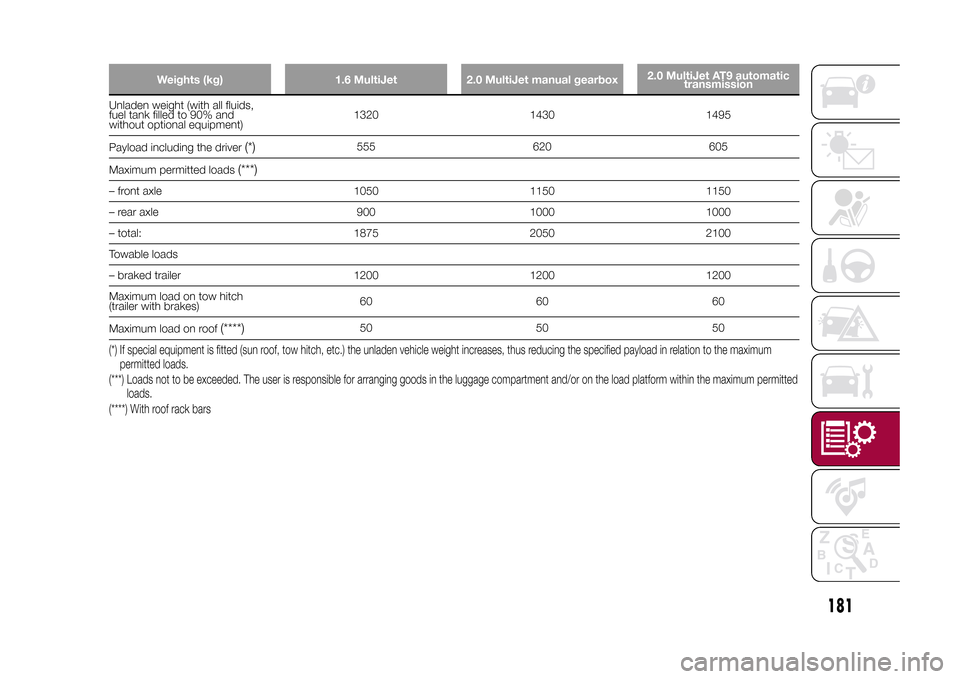
Weights (kg) 1.6 MultiJet 2.0 MultiJet manual gearbox2.0 MultiJet AT9 automatic
transmission
Unladen weight (with all fluids,
fuel tank filled to 90% and
without optional equipment)1320 1430 1495
Payload including the driver
(*)
555 620 605
Maximum permitted loads
(***)
– front axle 1050 1150 1150
– rear axle 900 1000 1000
– total: 1875 2050 2100
Towable loads
– braked trailer 1200 1200 1200
Maximum load on tow hitch
(trailer with brakes)60 60 60
Maximum load on roof
(****)
50 50 50
(*) If special equipment is fitted (sun roof, tow hitch, etc.) the unladen vehicle weight increases, thus reducing the specified payload in relation to the maximum
permitted loads.
(***) Loads not to be exceeded. The user is responsible for arranging goods in the luggage compartment and/or on the load platform within the maximum permitted
loads.
(****) With roof rack bars
181
15-12-2014 8:23 Pagina 181
Page 191 of 240

PRESCRIPTIONS FOR HANDLING THE VEHICLE AT THE END OF
ITS LIFEFCA has been committed for many years to safeguarding the environment through the constant improvement of its production
processes and manufacturing products that are increasingly "eco-compatible". To grant customers the best possible service
in terms of respecting environmental laws and in response to European Directive 2000/53/EC governing vehicles at the end of
their life, FCA is offering its customers the chance to hand over their vehicle at the end of its life without incurring any additional
costs. The European Directive sets out that when the vehicle is handed over, the last keeper or owner should not incur any
expenses as a result of it having a zero or negative market value.
To hand your vehicle over at the end of its life without extra cost, contact one of our dealerships if you are purchasing another
vehicle or an FCA-authorised collection and scrapping centre. These centres have been carefully chosen to offer high quality
service for the collection, treatment and recycling of vehicles at their end of life, respecting the surrounding environment.
You can find further information on these collection and scrapping centres either from an FCA dealership or by calling the
number in the Warranty Booklet or by consulting the websites of the various FCA brands.
189
15-12-2014 8:23 Pagina 189
Page 193 of 240

TIPS, CONTROLS
AND GENERAL
INFORMATIONROAD SAFETYLearn how to use the various system
functions before setting off.
Read the instructions for the system
carefully before setting off.
181) 182)
RECEPTION CONDITIONSReception conditions change
constantly while driving. Reception may
be interfered with by the presence of
mountains, buildings or bridges,
especially when you are far away from
the broadcaster.
IMPORTANT The volume may be
increased when receiving traffic alerts
and news.CARE AND
MAINTENANCEObserve the following precautions to
ensure the system is fully operational:
❒the display lens should not come into
contact with pointed or rigid objects
which could damage its surface; use a
soft, dry anti-static cloth to clean and
do not press.
❒never use alcohol, petrols and
derivatives to clean the display lens.❒prevent any liquid from entering the
system: this could damage it beyond
repair.
78) 79)
ANTI-THEFT
PROTECTIONThe system is equipped with an
anti-theft protection system based on
the exchange of information with the
electronic control unit (Body Computer)
on the vehicle.
This guarantees maximum safety and
prevents the secret code from being
entered after the power supply has
been disconnected.
If the check has a positive outcome, the
system will start to operate, whereas if
the comparison codes are not the
same or if the electronic control unit
(Body Computer) is replaced, the
system will ask the user to enter the
secret code according to the procedure
described in the paragraph below.Entering the secret code(Uconnect™Radio Nav 6.5" excluded)
When the system is switched on, if the
code is requested, the display will
show "Please enter Anti-Theft Code"
followed by the video page showing
a keypad to enter the secret code.The secret code is made up of four
digits, from 0 to 9: to insert the first digit
of the code, turn the "BROWSE
ENTER" right knob and press
to confirm.
After inserting the fourth digit, move the
cursor to "OK" and press the
"BROWSE ENTER" right knob: the
system will start to operate.
If an incorrect code is entered, the
system displays "Incorrect Code" to
notify the user of the need to enter the
correct code.
After the 3 available attempts to enter
the code, the system displays
"Incorrect Code. Radio locked. Wait for
30 minutes". Once the text has
disappeared you can start the code
entering procedure again.
Vehicle radio passport(Uconnect™Radio Nav 6.5" excluded)
This document certifies ownership of
the system. The vehicle radio passport
shows the system model, serial number
and secret code.
In the case of loss of the vehicle radio
passport, contact the Fiat Dealership,
taking an ID document and the vehicle
ownership documents.
191
15-12-2014 8:23 Pagina 191
Page 199 of 240

SWITCHING THE SYSTEM
ON/OFFThe system is switched on/off by
pressing the
button/knob.
Turn the button/knob clockwise to
increase the radio volume or
anticlockwise to decrease it.
RADIO (TUNER) MODEThe system features the following
tuners: AM, FM.Radio mode selectionPress the RADIO button on the front
panel to activate radio mode.Selecting a frequency
bandThe different tuning modes can be
selected by pressing the RADIO button
on the front panel.Indications on displayAfter the desired radio station is
selected on the display, the following
information is shown (INFO mode
activated):
In the upper part: the preset station, the
time and the other active radio settings
are highlighted.
In the central part: the name of the
current station, the frequency and the
radio text information (if any) are
highlighted.
FM station listPress the BROWSE ENTER button/
knob to display the complete list of the
FM stations that can be received.AM/FM radio station
storageThe preset stations are available in all
system modes and are selected by
touching one of the presetting buttons
1-2-3-4-5-6on the front panel.
If you are tuned to a radio station that
you wish to store, hold down the button
on the display which corresponds to
the desired preset until an acoustic
confirmation signal is emitted.AM/FM radio station
selectionTo search for the desired radio station
press the
or
button or use
the wheel of the steering wheel controls
, or turn the "BROWSE ENTER"
knob.
Previous/next radio
station searchPress briefly the
or
button or
use the wheel of the steering wheel
controls
: when the button is
released the previous or next
radio station is displayed.
Previous/next radio
station fast searchHold down the
or
button to
start the fast search: when the button is
released, the first tunable radio is
played.
MEDIA MODEInteraction modes for AUX, USB/iPod
operation.Track change
(next/previous)Briefly press the
button or turn the
BROWSE ENTER button/knob
clockwise to play the next track.
Briefly press thebutton or turn the
BROWSE ENTER button/knob
anticlockwise to return to the beginning
of the selected track or to the beginning
of the previous track (if this has been
played for less than 3 seconds).
Fast forward/rewind
through tracksHold down the
button to fast
forward the selected track.
Hold down thebutton to fast
rewind the track.
197
15-12-2014 8:23 Pagina 197
Page 200 of 240

Track selection
(browse)Use this function to scroll through and
select the tracks on the active device.
The choices available depend on the
device connected.
For example, on an USB/iPod device
you can also scroll through the list
of artists, genres and albums available
depending on the information present
on the tracks using the BROWSE
ENTER button/knob.
Within each alphabetical list, theA-B-C
button on the front panel allows the
user to skip to the desired letter in the
list.
NOTE This button might be disabled for
someApple® devices.
NOTE The BROWSE ENTER button
does not allow any operation on an
AUX device.
Press the BROWSE ENTER button to
activate this function on the source
being played.
Turn the BROWSE ENTER button/knob
to select the desired category and
then press the button/knob to confirm
the selection.
Press the
button to cancel the
function.
Audio source selectionPress theMEDIAbutton to select the
desired audio source among those
available: AUX or USB/iPod.Track information
displayPress theINFObutton to select the
information displayed while playing
(Artist, Album, Genre, Name, Folder,
File name).
Press the
button to exit the screen.
ShufflePress the
button to play the tracks
on USB/iPod in a random order.
Press again to deactivate the function.
RepeatTo listen to the track again, press the
button.
Press again to deactivate the function.
AUX SUPPORTTo activate AUX mode, insert an
appropriate device in the AUX socket
on the vehicle.
Adjust the volume using the
button/
knob on the front panel or using the
volume adjustment control on the
connected device.
For the "Audio source selection"
function, see the "Media mode"
chapter.
IMPORTANTThe functions of the device connected
with the AUX socket are directly
managed by the device itself: it is not
possible to change track/folder/playlist
or control playing start/end/pause
with the controls on the front panel or
on the steering wheel.
Do not leave the cable of your portable
player connected to the AUX socket
after disconnection, to avoid possible
hiss from the speakers.USB/iPod SOURCETo activate the USB/iPod mode insert
the corresponding device (USB or iPod)
in the USB port present on the vehicle.153
F1B0006C
198
MULTIMEDIA
15-12-2014 8:23 Pagina 198
Page 208 of 240

Making a phone callThe operations described below can
only be accessed if supported by
the mobile phone in use.
Proceed as follows:
❒selecting the
icon (mobile
phone phonebook);
❒selecting "Recent Calls";
❒selecting the
icon;
❒pressing the "Redial" button.
SMS message readerThe system can read the messages
received by the mobile phone.
To use this function the mobile phone
must support the SMS exchange
function throughBluetooth®.
If this function is not supported by the
phone, the corresponding
button is
deactivated (greyed out).
When a text message is received, the
display will show a screen where the
options "Listen", "Call" or "Ignore" can
be selected.
Press the
button to access the list
of SMS messages received by the
mobile phone (the list displays a
maximum of 60 messages received).
Uconnect™ LIVE
SERVICESPress the APPS button to access the
Radio menu, where all the system
application functions are present, such
as: Trip computer, Settings, Compass (if
the navigation system is available),
Uconnect™LIVE applications.
If theUconnect™icon is present, the
system is set up for the connected
services and allows the applications to
be used directly from the radio, for a
more efficient and advanced use of the
vehicle. The application functions are
present according to the vehicle
configuration and to the market.
To use theUconnect™LIVEservices
it is necessary to:
❒download theApp Uconnect™
LIVEfrom the "App Store" or "Google
play" on your compatible smartphone,
making sure that the data connection is
enabled
❒register on www.DriveUconnect.eu or
www.fiat.it through theApp
Uconnect™LIVE.
❒start theApp Uconnect™LIVEon
your smartphone and enter your details.
For further information about the
services available in your market, visit
www.DriveUconnect.eu.
First access to the
vehicleOnce you have launched theApp
Uconnect™LIVEand entered your
details, you have to pair the Bluetooth
with your smartphone and the radio, as
described in the "Pairing a mobile
phone" chapter, to access the
Uconnect™LIVEservices in your
vehicle. The list of supported mobile
phones is available on
www.DriveUconnect.eu.
When pairing is complete, the
connected services can be accessed
by pressing theUconnect™icon
on the radio.
When the activation process is
complete, a message will inform the
user. If a personal profile is necessary
for the services, your accounts can
be connected through theApp
Uconnect™LIVE, or in your personal
area on www.driveUconnect.eu.
IMPORTANT The my:Car application
does not replace the information in the
Owner Handbook of the vehicle.
206
MULTIMEDIA
15-12-2014 8:23 Pagina 206
Page 220 of 240

SWITCHING THE SYSTEM
ON/OFFThe system is switched on/off by
pressing the
(ON/OFF) button/knob.
Turn the button/knob clockwise to
increase the radio volume or
anticlockwise to decrease it.
RADIO (TUNER) MODEThe system has the following tuners:
AM, FM and DAB (where provided).Radio mode selectionPress the RADIO button on the front
panel to activate radio mode.
The different tuning modes can be
selected with the corresponding button
on the display.
Up to 12 favourite radio stations can be
stored in each mode.Selecting a frequency
bandPress one of the buttons at the left of
the display to select the frequency
band: AM, FM and DAB (where
provided).Indications on displayAfter the desired radio station is
selected, the following information is
shown on the display:At the top: display of the stored radio
station (preset) list. If the current station
is in the list of presets, it will be
highlighted on the display.
In the middle: the name of the radio
station being listened to and the
buttons to select the previous or the
next radio station are displayed.
At the bottom: display of the following
buttons:
❒"browse": search available radio
stations
❒"tune" : manual radio station tuning
(not available for DAB radios);
❒"audio": access to the "Audio
settings" screen
❒
and
: permit searching for
the desired radio station.
Select previous/next
radio stationThe previous/next radio station can be
selected using the following methods:
turning the BROWSE ENTER
button/knob, briefly pressing the
or
button on the display, pressing of
the buttons behind the steering wheel.
Holding down the
or
buttons
on the display activates rapid scrolling
through the active frequency band.
Previous/next radio
station fast searchTo start the fast search press the
or
button on the display, or use the
corresponding steering wheel controls.
AM/FM radio station
tuningPress the "tune" button, then select the
first digit of the desired radio station.
Press the
button to delete a wrong
number (and enter the correct station
number).
After entering the last digit of the station
the system will tune to the selected
one.
The screen disappears automatically
after 5 seconds or manually by pressing
the OK button.
DAB radio (where
provided)Once DAB radio mode is selected, the
information on the current station is
displayed and the following functions.
The "browse" button is used to display:
❒the list of all DAB stations;
❒the list of all the favourites;
❒the list of stations filtered by
"Ensembles" (broadcast group).
Within each list, the "ABC" button
allows the user to skip to the desired
letter in the list.
218
MULTIMEDIA
15-12-2014 8:23 Pagina 218