2015 FIAT 500X lock
[x] Cancel search: lockPage 78 of 240

To unfasten the seat belts, press button
C fig. 63 and guide the seat belt with
your hand while it is rewinding, to
prevent it from twisting.
68) 69)
The retractor may lock when the vehicle
is parked on a steep slope: this is
perfectly normal. Furthermore, the
retractor mechanism locks the belt if it
is pulled sharply or in the event of
sudden braking, collisions or
high-speed bends.
Once seated, wear the rear seat belts
as shown in fig. 64.
IMPORTANT When returning the rear
seat from the tilted position to the
normal operating position, take care to
refit the seat belt correctly, in order to
guarantee prompt availability every
time.
ADJUSTING THE SEAT
BELT HEIGHT
70) 71)
Five different adjustments in height are
possible.
To carry out window height adjustment,
from the top to the bottom, buttons A
fig. 65 (located on both sides of handle
B) must be pressed simultaneously
(towards each other), and the handle
must be slid downwards.
To carry out window height adjustment,
from the top to the bottom, handle B
must be slid (without pressing
anything).
Always adjust the height of the seat
belts to fit the person wearing it: this
precaution could greatly reduce the risk
of injury in the event of collision.
Correct adjustment is obtained when
the belt passes approximately half way
between the shoulder and the neck.
WARNING
68)Do not press button C fig. 63 while
travelling.
69)Remember that, in the event of a
violent collision, back-seat passengers not
wearing seat belts represent a serious
danger to the front-seat passengers as well
as to themselves.
70)The height of the seat belts must be
adjusted with the vehicle stationary.
71)After the adjustment, always check that
the handle is locked in one of the preset
positions. To do this, with buttons A fig. 65
released, exert further pressure
downwards to allow the locking device to
click if the grip has not been released in
one of the possible positions.
63
F1B0101C
64
F1B0102C
65
F1B0103C
76
SAFETY
15-12-2014 8:23 Pagina 76
Page 103 of 240
106)Do not start the engine by pushing,
towing or driving downhill. These
manoeuvres may damage the catalytic
converter.
WARNING
33)In the first period of use, i.e. in the first
1,600 km, we recommend not to demand
maximum performance from the vehicle
(for instance excessive accelerations,
extended travel at maximum speed,
sudden braking, etc.).
34)With the engine off, do not leave the
ignition device at MAR to prevent the
battery from draining.
35)A quick burst on the accelerator before
turning off the engine serves absolutely
no practical purpose; it wastes fuel and is
especially damaging to turbocharged
engines.
36)Warning light
will flash after
starting or during prolonged cranking to
indicate a fault with the glow plug heating
system. If the engine starts, the vehicle can
be used as normal, but a Fiat Dealership
must be contacted as soon as possible.
ELECTRIC PARKING
BRAKE (EPB)The vehicle is equipped with electric
parking brake (EPB) to guarantee better
use and optimal performance
compared to a manually operated
parking brake.
The electric parking brake features a
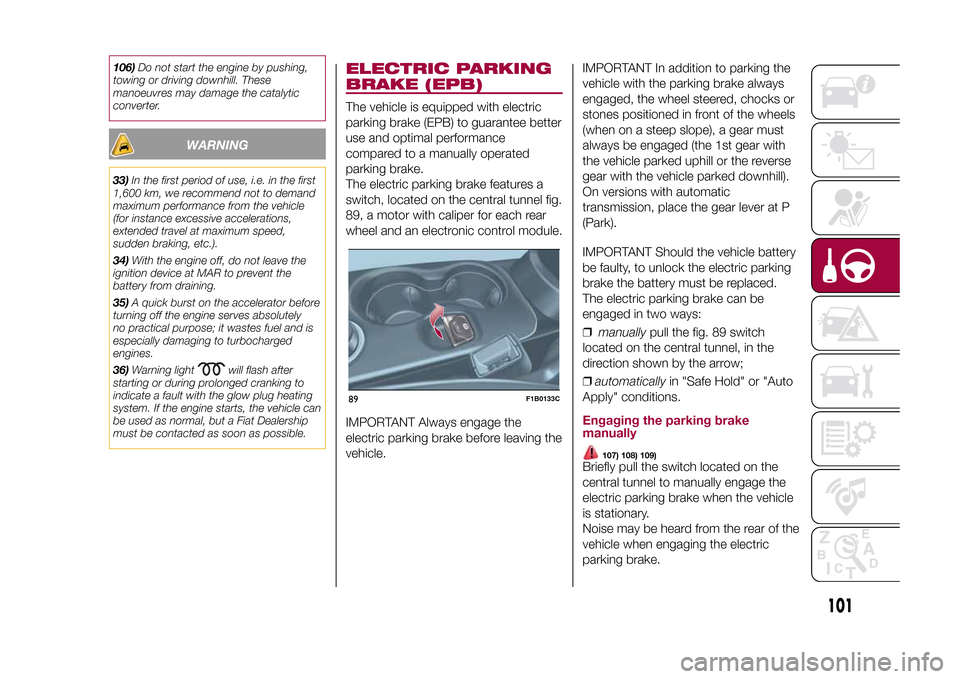
switch, located on the central tunnel fig.
89, a motor with caliper for each rear
wheel and an electronic control module.
IMPORTANT Always engage the
electric parking brake before leaving the
vehicle.IMPORTANT In addition to parking the
vehicle with the parking brake always
engaged, the wheel steered, chocks or
stones positioned in front of the wheels
(when on a steep slope), a gear must
always be engaged (the 1st gear with
the vehicle parked uphill or the reverse
gear with the vehicle parked downhill).
On versions with automatic
transmission, place the gear lever at P
(Park).
IMPORTANT Should the vehicle battery
be faulty, to unlock the electric parking
brake the battery must be replaced.
The electric parking brake can be
engaged in two ways:
❒manuallypull the fig. 89 switch
located on the central tunnel, in the
direction shown by the arrow;
❒automaticallyin "Safe Hold" or "Auto
Apply" conditions.
Engaging the parking brake
manually
107) 108) 109)
Briefly pull the switch located on the
central tunnel to manually engage the
electric parking brake when the vehicle
is stationary.
Noise may be heard from the rear of the
vehicle when engaging the electric
parking brake.
89
F1B0133C
101
12-1-2015 15:6 Pagina 101
Page 105 of 240
❒"Drive Away Release": the electric
parking brake will automatically
disengage with the driver side seat belt
fastened and the detection of an action
performed by the driver to move the
vehicle (forward gear or reverse gear);
❒"Safe Hold": if the vehicle speed
is lower than 3 km/h and, for the
versions with automatic transmission,
the gear lever is not in P (Park) position
and the driver intention of leaving the
vehicle is detected, the electric parking
brake will automatically engage to
hold the vehicle in safety conditions;
❒"Auto Apply": if the vehicle speed is
lower than 3 km/h, the electric parking
brake will automatically engage with the
gear lever moved to P (Park) position
(versions with automatic transmission),
or with the ignition device at STOP
(versions with manual gearbox). The
LED on the switch turns on together
with the
warning light on the
instrument panel when the parking
brake is engaged and applied to the
wheels. Each automatic parking brake
engagement can be cancelled by
pressing the switch on the central
tunnel and at the same time moving the
gear lever for the automatic
transmission to position P (Park) or the
ignition device to STOP (versions with
manual gearbox).
SAFE HOLDIt is a safety function that automatically
engages
the electric parking brake in
the event of a dangerous condition for
the vehicle.
If:
❒the vehicle speed is below 3 km/h;
❒the gear lever is not at P (Park)
(versions with automatic transmission);
❒the driver's seat belt is not fastened;
❒the driver side door is open;
❒no attempted operation of the brake
pedal or, on versions with manual
gearbox, the clutch pedal or the
accelerator pedal is detected;
the electric parking brake engages
automatically to prevent vehicle
movement.
The Safe Hold function can be
temporarily disabled by pressing the
switch located on the central tunnel
and the brake pedal at the same time,
with the vehicle stationary and the
driver side door open.
Once disabled, the function will activate
again when the vehicle speed reaches
20 km/h or the ignition device is moved
to STOP and then to MAR.
WARNING
107)In the case of parking manoeuvres on
roads on a gradient, steer the wheels,
engage the parking brake, the first gear if
uphill and the reverse if downhill; on
versions with automatic transmission, set
the lever to "P". If the vehicle is parked
on a steep slope, you need to block the
wheels with a wedge or stone.
108)Never leave children unattended in
the vehicle. Always remove the key when
leaving the vehicle and take it with you.
109)The electric parking brake must
always be engaged when leaving
the vehicle.
103
12-1-2015 15:6 Pagina 103
Page 108 of 240
IGNITION LOCK AND
PARK POSITIONVersions equipped with the Keyless
Go system: this function requires the
gear lever to be positioned at P (Park);
then bring the ignition device to STOP.
Versions equipped with key without
remote control: this function requires
the gear lever to be positioned at P
(Park) before extracting the key from
the ignition device.
If the vehicle battery is flat and the
ignition key is engaged, the latter is
locked in position.
To remove the key manually see
paragraph "Automatic transmission
lever unlock" in chapter "In an
emergency".GEAR ENGAGEMENT
DISABLING WITHOUT
BRAKE PEDAL PRESSEDThis system prevents you from moving
the gear lever from position P (Park) if
the brake pedal has not been previously
depressed.To bring the gear lever to a position
other than P (Park), the ignition device
must be in position MAR (engine on
or off) and the brake pedal must be
depressed. Button A fig. 91 on the gear
lever knob must also be pressed.
STEERING WHEEL
CONTROLS(where provided)
On some versions, the gearbox can be
managed sequentially using the
steering wheel controls fig. 92.
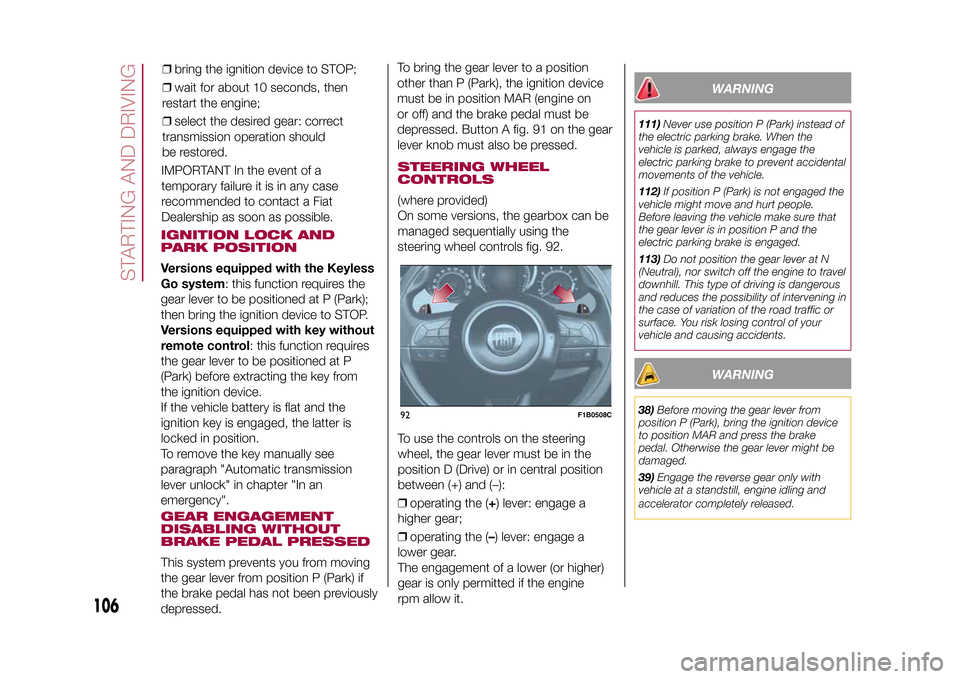
To use the controls on the steering
wheel, the gear lever must be in the
position D (Drive) or in central position
between (+) and (–):
❒operating the (+) lever: engage a
higher gear;
❒operating the (–) lever: engage a
lower gear.
The engagement of a lower (or higher)
gear is only permitted if the engine
rpm allow it.
WARNING
111)Never use position P (Park) instead of
the electric parking brake. When the
vehicle is parked, always engage the
electric parking brake to prevent accidental
movements of the vehicle.
112)If position P (Park) is not engaged the
vehicle might move and hurt people.
Before leaving the vehicle make sure that
the gear lever is in position P and the
electric parking brake is engaged.
113)Do not position the gear lever at N
(Neutral), nor switch off the engine to travel
downhill. This type of driving is dangerous
and reduces the possibility of intervening in
the case of variation of the road traffic or
surface. You risk losing control of your
vehicle and causing accidents.
WARNING
38)Before moving the gear lever from
position P (Park), bring the ignition device
to position MAR and press the brake
pedal. Otherwise the gear lever might be
damaged.
39)Engage the reverse gear only with
vehicle at a standstill, engine idling and
accelerator completely released.
92
F1B0508C
106
STARTING AND DRIVING
15-12-2014 8:23 Pagina 106
IMPORTANT In the event of a
temporary failure it is in any case
recommended to contact a Fiat
Dealership as soon as possible.❒bring the ignition device to STOP;
❒wait for about 10 seconds, then
restart the engine;
❒select the desired gear: correct
transmission operation should
be restored.
Page 113 of 240
"Auto" MODEThis mode is aimed at comfort and
safety in normal grip and driving
conditions. On 4x4 versions, this mode
also reduces fuel consumption, since
it automatically disconnects the
transmission from the rear wheels if the
road and driving conditions allow it, in
addition to changing drive torque
distribution between the front and rear
axles.ActivationStarting from the active "Traction/All
Weather" mode, turn the ring nut
anticlockwise, keeping it in this position
for at least half a second, and in any
case until the relevant LED turns on,
and the selected mode is shown on the
display. The LED for the previously set
mode will simultaneously turn off. Upon
release, the ring nut will return to the
central position.
Starting from the active "Sport" mode,
turn the ring nut clockwise, keeping it in
this position for at least half a second,
and in any case until the relevant LED
turns on, and the selected mode is
shown on the display. The LED for the
previously set mode will simultaneously
turn off. Upon release, the ring nut will
return to the central position.
"Traction"/"All Weather" MODEIt is a driving mode for safety in poor
vehicle grip conditions (wet/slippery
road surface, rain, snow). On the 4x4
versions use is also recommended
on unsurfaced roads or off-road.ActivationStarting from the active "Auto" mode,
turn the ring nut clockwise, keeping it in
this position for at least half a second,
and in any case until the relevant LED
turns on, and the selected mode is
shown on the display. The LED for the
previously set mode will simultaneously
turn off. Upon release, the ring nut will
return to the central position.
Starting from the active "Sport" mode,
turn the ring nut anticlockwise, keeping
it in this position for at least half a
second, and in any case until the
relevant LED turns on, and the selected
mode is shown on the display. The
LED for the previously set mode will
simultaneously turn off. Upon release,
the ring nut will return to the central
position.
"Sport" MODEIt is the mode that emphasises the
pleasure of sport driving; it increases
fuel consumption however. Traction
is optimised on 4x4 versions, allowing
the vehicle road-hold performance
to be improved, even on bends.ActivationStarting from the active "Auto" mode,
turn the ring nut anticlockwise, keeping
it in this position for at least half a
second, and in any case until the
relevant LED turns on, and the selected
mode is shown on the display. The
LED for the previously set mode will
simultaneously turn off. Upon release,
the ring nut will return to the central
position.
Starting from the active "Traction/All
Weather" mode, turn the ring nut
clockwise, keeping it in this position for
at least half a second, and in any case
until the relevant LED turns on, and
the selected mode is shown on the
display. The LED for the previously set
mode will simultaneously turn off. Upon
release, the ring nut will return to the
central position.
111
15-12-2014 8:23 Pagina 111
Page 121 of 240
REFUELLING THE
VEHICLE
122) 123) 124)
PETROL ENGINESOnly use unleaded petrol with a number
of octanes (R.O.N.) not lower than 95
(EN 228 specification).DIESEL ENGINES
50)
Only use Diesel for motor vehicles (EN
590 specification).
When using or parking the vehicle for a
long time in the mountains or cold
areas, it is advisable to refuel using
locally available diesel. In this case, it is
also advisable to keep the tank over
50% full.REFUELLING
PROCEDURE"Capless Fuel" is a device at the
opening for the fuel tank which opens
and recloses automatically when the
fuel supply gun is introduced/removed.
The "Capless Fuel" device is provided
with an inhibitor which prevents
refuelling with incorrect fuel.
Opening the flapTo refuel proceed as follows:
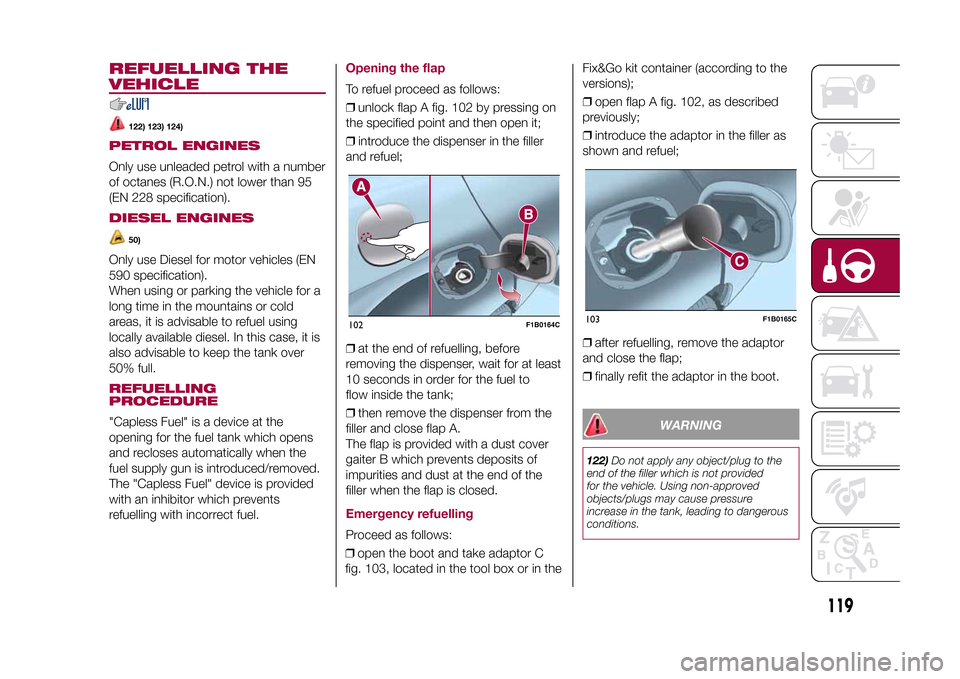
❒unlock flap A fig. 102 by pressing on
the specified point and then open it;
❒introduce the dispenser in the filler
and refuel;
❒at the end of refuelling, before
removing the dispenser, wait for at least
10 seconds in order for the fuel to
flow inside the tank;
❒then remove the dispenser from the
filler and close flap A.
The flap is provided with a dust cover
gaiter B which prevents deposits of
impurities and dust at the end of the
filler when the flap is closed.Emergency refuellingProceed as follows:
❒open the boot and take adaptor C
fig. 103, located in the tool box or in theFix&Go kit container (according to the
versions);
❒open flap A fig. 102, as described
previously;
❒introduce the adaptor in the filler as
shown and refuel;
❒after refuelling, remove the adaptor
and close the flap;
❒finally refit the adaptor in the boot.
WARNING
122)Do not apply any object/plug to the
end of the filler which is not provided
for the vehicle. Using non-approved
objects/plugs may cause pressure
increase in the tank, leading to dangerous
conditions.
102
F1B0164C
103
F1B0165C
119
15-12-2014 8:23 Pagina 119
Page 123 of 240
IN AN EMERGENCY
A punctured tyre or a burnt-out bulb?
At times, a problem may interfere
with our journey.
The pages on emergencies can help
you to deal with critical situations
independently and with calm.
In an emergency we recommend that
you call the freephone number found in
the Warranty Booklet.
It is also possible to call the national or
international universal freephone
number to search for the nearest Fiat
Dealership.HAZARD WARNING LIGHTS...........122
BULB REPLACEMENT....................122
REPLACING FUSES........................128
CHANGING A WHEEL ....................133
FIX&GO AUTOMATIC KIT ................136
EMERGENCY STARTING ................138
FUEL CUT-OFF SYSTEM ................140
AUTOMATIC TRANSMISSION
GEAR LEVER UNLOCKING.............140
TOWING THE VEHICLE ..................142
121
15-12-2014 8:23 Pagina 121
Page 125 of 240
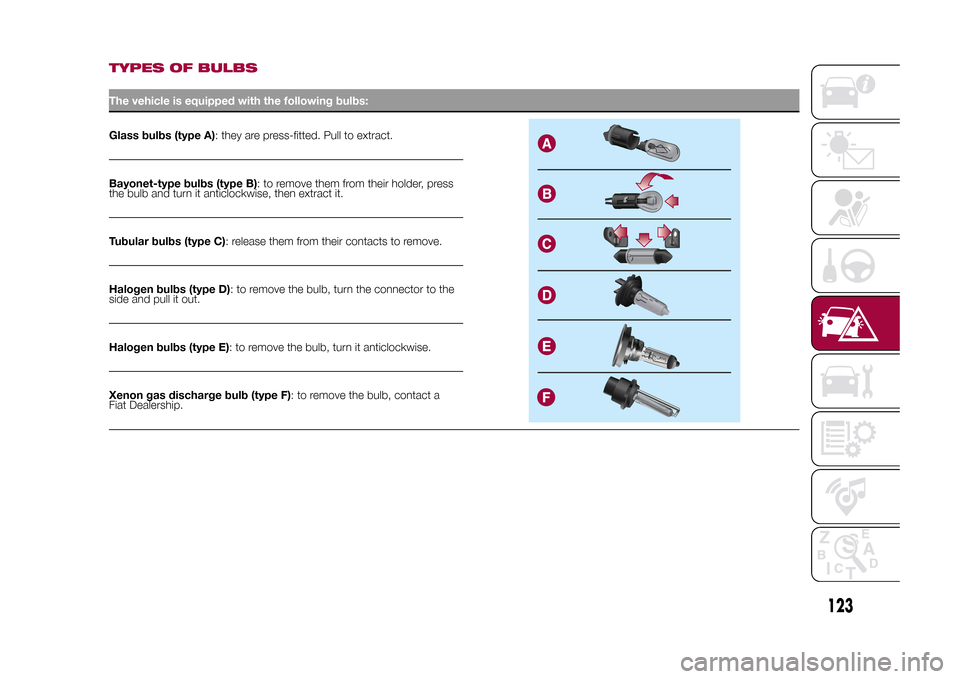
TYPES OF BULBSThe vehicle is equipped with the following bulbs:Glass bulbs (type A): they are press-fitted. Pull to extract.Bayonet-type bulbs (type B): to remove them from their holder, press
the bulb and turn it anticlockwise, then extract it.
Tubular bulbs (type C): release them from their contacts to remove.
Halogen bulbs (type D): to remove the bulb, turn the connector to the
side and pull it out.
Halogen bulbs (type E): to remove the bulb, turn it anticlockwise.
Xenon gas discharge bulb (type F): to remove the bulb, contact a
Fiat Dealership.
123
15-12-2014 8:23 Pagina 123