Page 32 of 240

Air distribution selection
Air flow to the windscreen and front side window diffusers to demist/defrost them.Air flow at central and side dashboard vents to ventilate the chest and the face during the hot season.Air flow to the front and rear footwell diffusers. This air distribution setting heats the passenger compartment most quickly,
giving a prompt sensation of warmth.+
Air flow distributed between footwell diffusers (hotter air) and central and side dashboard vents (cooler air). This
distribution setting is useful in spring and autumn on sunny days.
+
Air flow distributed between footwell vents and windscreen and front side vents. This distribution setting allows the
passenger compartment to be warmed up efficiently and prevents the windows from misting up.
+
Air flow distributed between central and side dashboard vents and windscreen and front side window vents. This
distribution allows air to be sent to the windscreen in conditions of strong sunlight.
+
+
Air flow distribution to all diffusers on the vehicle.
In AUTO mode, the climate control system automatically manages air distribution (the LEDs on buttons H are off). When set
manually, the air distribution is indicated by the LEDs on the selected buttons switching on. In combined function mode the
relevant function is enabled simultaneously with those already set by pressing the corresponding button. If a button whose
function is already active is pressed, its operation is cancelled and the corresponding LED switches off. To restore automatic
control of the air distribution after a manual selection, press the AUTO button.
Start&StopThe automatic dual zone climate control system manages the Start&Stop system (engine off when vehicle speed is 0 km/h) to
ensure adequate comfort inside the vehicle. When the Start&Stop system is on (engine off and vehicle at a standstill), the
automatic recirculation management is turned off always taking air in from outside, to reduce the probability of the windows
misting up (as the compressor is off).
WARNING
2)The system uses R1234YF coolant, which does not pollute the environment in the event of accidental leakage. Under no circumstances
use R134a and R12 fluids, which are incompatible with the components of the system.
30
GETTING TO KNOW YOUR CAR
15-12-2014 8:23 Pagina 30
Page 34 of 240

Front window anti-pinch safety
device(where provided)
This safety system can recognise the
presence of any obstacle during the
window closing movement. If this
occurs, the system stops the window's
movement and reverts it, depending
on its position. The window then lowers
by about 5 cm in relation to the first
stop position. The window cannot be
operated in any way during this time.Electric window system
initialisationIf power supply is interrupted, the
electric window automatic operation
must be reinitialised.
The initialisation procedure described
below must be carried out with the
doors closed and for each door:
❒close the window by keeping the
button pressed;
❒once the window is completely
closed, keep the button pressed for at
least 3 seconds.
WARNING
21)Incorrect use of the electric windows
may be dangerous. Before and during
operation, always check that nobody
is exposed to the risk of being injured
either directly by the moving window or
through objects getting caught or by being
hit. When leaving the vehicle (equipped
with mechanical key with remote control),
always remove the key from the ignition
device to prevent accidental operation of
the electric windows from being a hazard
for those still on board.
ELECTRIC SUN
ROOF
22)
The electric sun roof comprises two
glass panels (the front one is mobile
and the rear one fixed) and is fitted with
two manually operated sun blinds.
Operation of the sun roof is only
possible with the ignition device at
MAR.OPENINGPress button A fig. 38: the roof will
open up completely.
11)
The automatic motion can be
interrupted in any position by pressing
button A again.CLOSINGFrom the position of complete opening
pull button A fig. 38: the roof will close
completely.
The automatic motion can be
interrupted in any position by pressing
button A again.
32
GETTING TO KNOW YOUR CAR
15-12-2014 8:23 Pagina 32
Page 36 of 240

WARNING
22)When leaving the vehicle, always
remove the key (where present) from the
ignition to avoid the risk of injury due to
accidental operation of the sun roof.
Improper use of the roof can be
dangerous. Before and during operation,
always check that nobody is at risk of
being injured by the moving sun roof or by
objects getting caught or hit by it.
WARNING
11)Do not open the sun roof if a roof rack
or crossbars are fitted. Do not open the
sun roof if there is snow or ice on it: you
may damage it.
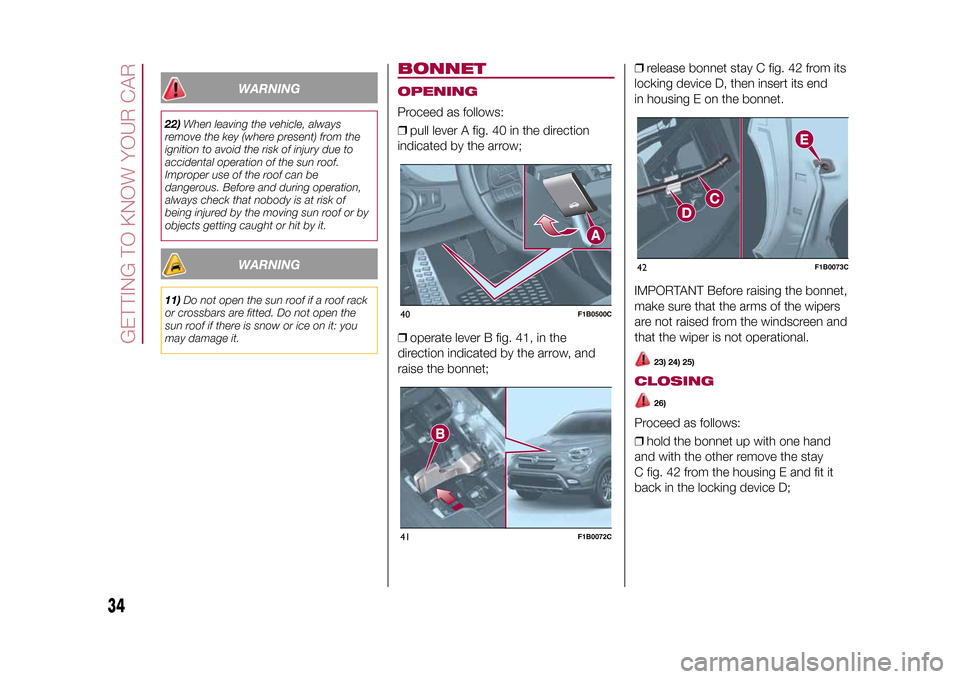
BONNETOPENINGProceed as follows:
❒pull lever A fig. 40 in the direction
indicated by the arrow;
❒operate lever B fig. 41, in the
direction indicated by the arrow, and
raise the bonnet;❒release bonnet stay C fig. 42 from its
locking device D, then insert its end
in housing E on the bonnet.
IMPORTANT Before raising the bonnet,
make sure that the arms of the wipers
are not raised from the windscreen and
that the wiper is not operational.
23) 24) 25)
CLOSING
26)
Proceed as follows:
❒hold the bonnet up with one hand
and with the other remove the stay
C fig. 42 from the housing E and fit it
back in the locking device D;
40
F1B0500C
41
F1B0072C
42
F1B0073C
34
GETTING TO KNOW YOUR CAR
15-12-2014 8:23 Pagina 34
Page 37 of 240

❒lower the bonnet to approximately 40
centimetres from the engine
compartment and let it drop. Make sure
that the bonnet is completely closed
and not only fastened by the locking
device by trying to open it. If it is not
perfectly closed, do not try to press the
bonnet lid down but open it and repeat
the procedure.
IMPORTANT Always check that the
bonnet is closed correctly to prevent it
from opening while the vehicle is
travelling.
WARNING
23)Perform these operations only when
the vehicle is stationary.
24)Wrong positioning of the bonnet stay
may cause the bonnet to fall abruptly.
25)Raise the bonnet using both hands.
Before raising the bonnet make sure that
the windscreen wipers are not lifted from
the windscreen, that the vehicle is at a
standstill and that the electric parking brake
is engaged.26)For safety reasons the bonnet must
always be correctly closed while driving.
Therefore, make sure that the bonnet
is properly closed and that the lock
is engaged. If you discover that the bonnet
is not perfectly closed during travel, stop
immediately and close the bonnet in the
correct manner.
BOOTThe boot unlocking is electrically
operated and is deactivated when the
vehicle is in motion.OPENING
27)
Opening from the outsideWhen unlocked, the tailgate can be
opened from outside the vehicle using
the electric opening handle A fig. 43
located under the handle until the
unlocking click is heard or by quickly
pressing button
on the remote
control twice.
43
F1B0074C
35
15-12-2014 8:23 Pagina 35
Page 39 of 240
The load platform can also be tilted,
and is equipped with a washable plastic
surface, useful for instance for
transporting wet or muddy items.
IMPORTANT Movements of the load
platform must take place in a central
position relative to the boot.
Securing your loadThere are four hooks at the corners of
the boot (two at the front A fig. 49
and two at the rear B), for attaching
cables which can secure the load
carried.
WARNING
27)Be careful not to hit objects on the
storage shelf when you open the tailgate.
WARNING
12)The dimensions of the platform permit
a maximum capacity of distributed weight
of 70 kg: do not load objects with a heavier
weight.
47
F1B0327C
48
F1B0328C
49
F1B0079C
37
15-12-2014 8:23 Pagina 37
Page 40 of 240
KNOWING THE INSTRUMENT PANEL
This section of the booklet gives you all
the information you need to
understand, interpret and use the
instrument panel correctly.CONTROL PANEL AND
ON-BOARD INSTRUMENTS ........... 39
DISPLAY ......................................... 41
TRIP COMPUTER ........................... 43
WARNING LIGHTS AND
MESSAGES .................................... 44
38
KNOWING THE INSTRUMENT PANEL
15-12-2014 8:23 Pagina 38
Page 41 of 240
CONTROL PANEL AND ON-BOARD INSTRUMENTSVERSIONS WITH SINGLE-COLOUR DISPLAYA. Speedometer (speed indicator) – B. Fuel level digital gauge with reserve warning light – C. Display – D. Digital engine coolant temperature gauge
with overheating warning light – E. Rev counter.
Warning light supplied on diesel versions only.
IMPORTANT The illumination of the instrument panel graphics may vary according to version.
50
F1B0177C
39
15-12-2014 8:23 Pagina 39
Page 42 of 240
VERSIONS WITH COLOUR DISPLAYA. Speedometer (speed indicator) – B. Fuel level digital gauge with reserve warning light – C. Display – D. Digital engine coolant temperature gauge
with overheating warning light – E. Rev counter.
Warning light supplied on diesel versions only.
IMPORTANT The illumination of the instrument panel graphics may vary according to version.
51
F1B0178C
40
KNOWING THE INSTRUMENT PANEL
15-12-2014 8:23 Pagina 40