2015 FIAT 500X buttons
[x] Cancel search: buttonsPage 35 of 240
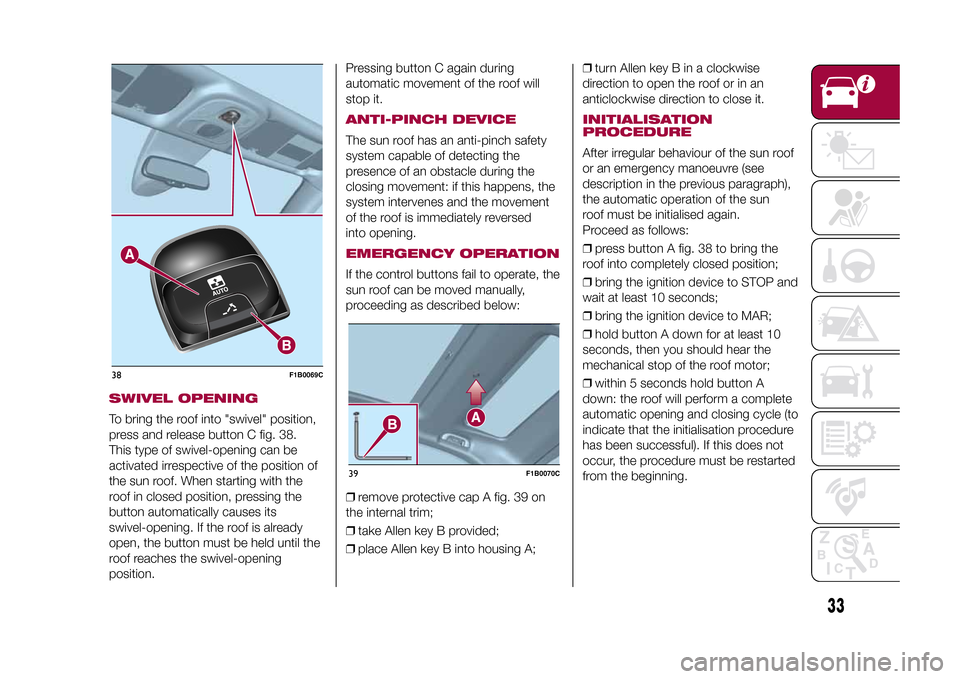
SWIVEL OPENINGTo bring the roof into "swivel" position,
press and release button C fig. 38.
This type of swivel-opening can be
activated irrespective of the position of
the sun roof. When starting with the
roof in closed position, pressing the
button automatically causes its
swivel-opening. If the roof is already
open, the button must be held until the
roof reaches the swivel-opening
position.Pressing button C again during
automatic movement of the roof will
stop it.
ANTI-PINCH DEVICEThe sun roof has an anti-pinch safety
system capable of detecting the
presence of an obstacle during the
closing movement: if this happens, the
system intervenes and the movement
of the roof is immediately reversed
into opening.EMERGENCY OPERATIONIf the control buttons fail to operate, the
sun roof can be moved manually,
proceeding as described below:
❒remove protective cap A fig. 39 on
the internal trim;
❒take Allen key B provided;
❒place Allen key B into housing A;❒turn Allen key B in a clockwise
direction to open the roof or in an
anticlockwise direction to close it.
INITIALISATION
PROCEDUREAfter irregular behaviour of the sun roof
or an emergency manoeuvre (see
description in the previous paragraph),
the automatic operation of the sun
roof must be initialised again.
Proceed as follows:
❒press button A fig. 38 to bring the
roof into completely closed position;
❒bring the ignition device to STOP and
wait at least 10 seconds;
❒bring the ignition device to MAR;
❒hold button A down for at least 10
seconds, then you should hear the
mechanical stop of the roof motor;
❒within 5 seconds hold button A
down: the roof will perform a complete
automatic opening and closing cycle (to
indicate that the initialisation procedure
has been successful). If this does not
occur, the procedure must be restarted
from the beginning.
38
F1B0069C
39
F1B0070C
33
15-12-2014 8:23 Pagina 33
Page 43 of 240
DISPLAYDESCRIPTIONThe vehicle is equipped with a display
that can show useful information to the
driver while driving.
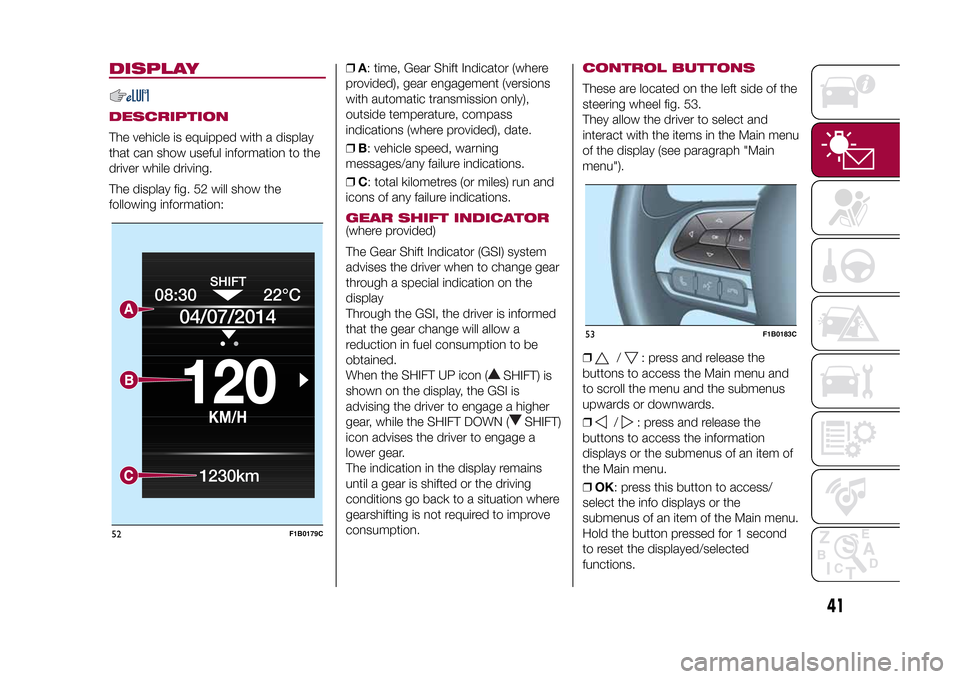
The display fig. 52 will show the
following information:❒A: time, Gear Shift Indicator (where
provided), gear engagement (versions
with automatic transmission only),
outside temperature, compass
indications (where provided), date.
❒B: vehicle speed, warning
messages/any failure indications.
❒C: total kilometres (or miles) run and
icons of any failure indications.
GEAR SHIFT INDICATOR(where provided)
The Gear Shift Indicator (GSI) system
advises the driver when to change gear
through a special indication on the
display
Through the GSI, the driver is informed
that the gear change will allow a
reduction in fuel consumption to be
obtained.
When the SHIFT UP icon (
SHIFT) is
shown on the display, the GSI is
advising the driver to engage a higher
gear, while the SHIFT DOWN (
SHIFT)
icon advises the driver to engage a
lower gear.
The indication in the display remains
until a gear is shifted or the driving
conditions go back to a situation where
gearshifting is not required to improve
consumption.
CONTROL BUTTONSThese are located on the left side of the
steering wheel fig. 53.
They allow the driver to select and
interact with the items in the Main menu
of the display (see paragraph "Main
menu").
❒
/
: press and release the
buttons to access the Main menu and
to scroll the menu and the submenus
upwards or downwards.
❒
/
: press and release the
buttons to access the information
displays or the submenus of an item of
the Main menu.
❒OK: press this button to access/
select the info displays or the
submenus of an item of the Main menu.
Hold the button pressed for 1 second
to reset the displayed/selected
functions.
08:30
KM/H
120
22°C
04/07/2014
1230km
52
F1B0179C
53
F1B0183C
41
15-12-2014 8:23 Pagina 41
Page 78 of 240

To unfasten the seat belts, press button
C fig. 63 and guide the seat belt with
your hand while it is rewinding, to
prevent it from twisting.
68) 69)
The retractor may lock when the vehicle
is parked on a steep slope: this is
perfectly normal. Furthermore, the
retractor mechanism locks the belt if it
is pulled sharply or in the event of
sudden braking, collisions or
high-speed bends.
Once seated, wear the rear seat belts
as shown in fig. 64.
IMPORTANT When returning the rear
seat from the tilted position to the
normal operating position, take care to
refit the seat belt correctly, in order to
guarantee prompt availability every
time.
ADJUSTING THE SEAT
BELT HEIGHT
70) 71)
Five different adjustments in height are
possible.
To carry out window height adjustment,
from the top to the bottom, buttons A
fig. 65 (located on both sides of handle
B) must be pressed simultaneously
(towards each other), and the handle
must be slid downwards.
To carry out window height adjustment,
from the top to the bottom, handle B
must be slid (without pressing
anything).
Always adjust the height of the seat
belts to fit the person wearing it: this
precaution could greatly reduce the risk
of injury in the event of collision.
Correct adjustment is obtained when
the belt passes approximately half way
between the shoulder and the neck.
WARNING
68)Do not press button C fig. 63 while
travelling.
69)Remember that, in the event of a
violent collision, back-seat passengers not
wearing seat belts represent a serious
danger to the front-seat passengers as well
as to themselves.
70)The height of the seat belts must be
adjusted with the vehicle stationary.
71)After the adjustment, always check that
the handle is locked in one of the preset
positions. To do this, with buttons A fig. 65
released, exert further pressure
downwards to allow the locking device to
click if the grip has not been released in
one of the possible positions.
63
F1B0101C
64
F1B0102C
65
F1B0103C
76
SAFETY
15-12-2014 8:23 Pagina 76
Page 111 of 240

ELECTRONIC
CRUISE CONTROLThis is an electronically controlled
driving assistance device that allows
the desired vehicle speed to be
maintained, without having to press the
accelerator pedal. This device can be
used at a speed above 30 km/h on
long stretches of dry, straight roads
with few variations (e.g. motorways).
It is therefore not recommended to use
this device on extra-urban roads with
traffic. Do not use it in town.ACTIVATING THE DEVICE
115) 116) 117)
To activate the device press button A
fig. 95.
Activation of the device is indicated by
the
warning light on the instrument
panel switching on and, on some
versions, by a message on the display.
If the Speed Limiter is activated, button
Afig. 95 must be pressed twice to
activate the Cruise Control.
The device cannot be engaged in 1
stor
reverse gear: it is advisable to engage
it in 3
rd
gear or higher.IMPORTANT It is dangerous to leave
the device on when it is not used. There
is a risk of inadvertently activating it
and losing control of the vehicle due to
unexpected excessive speed.
SETTING THE DESIRED
SPEEDProceed as follows:
❒to activate the device press button A
fig. 95;
❒when the vehicle has reached the
desired speed, press button SET + (or
SET –) and release it to activate the
device. When the accelerator is
released, the vehicle will keep the
selected speed automatically.
If needed (e.g. when overtaking), you
can increase speed simply by pressing
the accelerator; when you release the
pedal, the vehicle goes back to the
speed stored previously.When travelling downhill with the device
active, the vehicle speed may slightly
exceed the set one.
IMPORTANT Before pressing the SET +
or SET – buttons, the vehicle must be
travelling at a constant speed on a
flat surface.
SPEED INCREASEOnce the electronic Cruise Control has
been activated, the speed can be
increased by pressing button SET +.SPEED DECREASEWith the device activated, the speed
can be decreased by pressing button
SET–.RECALLING THE SPEEDFor versions with automatic
transmission operating in D mode (Drive
- automatic), press and release the
RES button to recall the previously set
speed.
For versions with manual gearbox or
automatic transmission in Autostick
(sequential) mode, before recalling the
previously set speed you should
accelerate until getting close to it, then
press and release the RES button.
95
F1B0140C
109
15-12-2014 8:23 Pagina 109
Page 198 of 240
Buttons InteractionButton A (left side, behind the steering wheel)
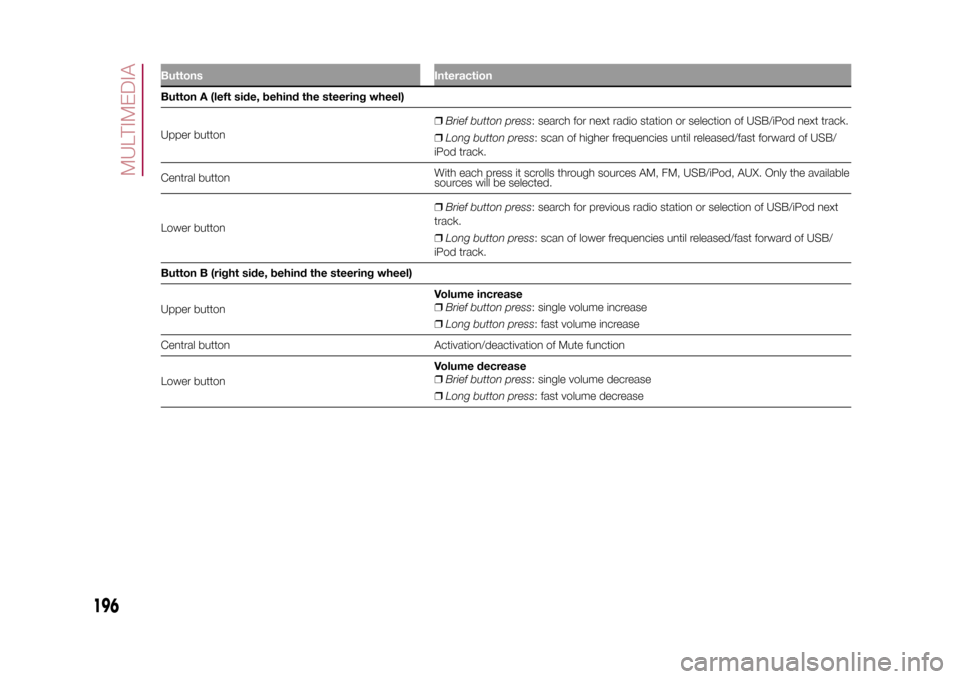
Upper button❒Brief button press: search for next radio station or selection of USB/iPod next track.
❒Long button press: scan of higher frequencies until released/fast forward of USB/
iPod track.
Central buttonWith each press it scrolls through sources AM, FM, USB/iPod, AUX. Only the available
sources will be selected.
Lower button❒Brief button press: search for previous radio station or selection of USB/iPod next
track.
❒Long button press: scan of lower frequencies until released/fast forward of USB/
iPod track.
Button B (right side, behind the steering wheel)
Upper buttonVolume increase
❒Brief button press: single volume increase
❒Long button press: fast volume increase
Central button Activation/deactivation of Mute function
Lower buttonVolume decrease
❒Brief button press: single volume decrease
❒Long button press: fast volume decrease
196
MULTIMEDIA
15-12-2014 8:23 Pagina 196
Page 199 of 240

SWITCHING THE SYSTEM
ON/OFFThe system is switched on/off by
pressing the
button/knob.
Turn the button/knob clockwise to
increase the radio volume or
anticlockwise to decrease it.
RADIO (TUNER) MODEThe system features the following
tuners: AM, FM.Radio mode selectionPress the RADIO button on the front
panel to activate radio mode.Selecting a frequency
bandThe different tuning modes can be
selected by pressing the RADIO button
on the front panel.Indications on displayAfter the desired radio station is
selected on the display, the following
information is shown (INFO mode
activated):
In the upper part: the preset station, the
time and the other active radio settings
are highlighted.
In the central part: the name of the
current station, the frequency and the
radio text information (if any) are
highlighted.
FM station listPress the BROWSE ENTER button/
knob to display the complete list of the
FM stations that can be received.AM/FM radio station
storageThe preset stations are available in all
system modes and are selected by
touching one of the presetting buttons
1-2-3-4-5-6on the front panel.
If you are tuned to a radio station that
you wish to store, hold down the button
on the display which corresponds to
the desired preset until an acoustic
confirmation signal is emitted.AM/FM radio station
selectionTo search for the desired radio station
press the
or
button or use
the wheel of the steering wheel controls
, or turn the "BROWSE ENTER"
knob.
Previous/next radio
station searchPress briefly the
or
button or
use the wheel of the steering wheel
controls
: when the button is
released the previous or next
radio station is displayed.
Previous/next radio
station fast searchHold down the
or
button to
start the fast search: when the button is
released, the first tunable radio is
played.
MEDIA MODEInteraction modes for AUX, USB/iPod
operation.Track change
(next/previous)Briefly press the
button or turn the
BROWSE ENTER button/knob
clockwise to play the next track.
Briefly press thebutton or turn the
BROWSE ENTER button/knob
anticlockwise to return to the beginning
of the selected track or to the beginning
of the previous track (if this has been
played for less than 3 seconds).
Fast forward/rewind
through tracksHold down the
button to fast
forward the selected track.
Hold down thebutton to fast
rewind the track.
197
15-12-2014 8:23 Pagina 197
Page 203 of 240
Button Functions Mode
Switching on/offBrief button press
Left/right rotation of knob
Volume adjustmentVolume activation/deactivation (Mute/Pause) Brief button pressDisplay on/off Brief button pressExit the selection/return to previous screen Brief button pressSettings Brief button press
BROWSE ENTERScrolling the list or tuning to a radio station Left/right rotation of knob
Confirmation of the option displayed Brief button press
APPSAccess to the additional functions [e.g.: display of time,
compass, outside temperature, Media/Radio, and
Uconnect™LIVEservices (where provided)]Brief button press
PHONEPhone data display Brief button press
TRIP(*) Access to the TRIP menu Brief button press
NAV(**) Access to the Navigation menu Brief button press
MEDIASource selection: USB/iPod or AUX,
Bluetooth
®, SD
(where provided)Brief button press
RADIOAccess to the Radio mode Brief button press
(*)Uconnect™5" Radio LIVE only
(**)Uconnect™5" Radio Nav LIVE only
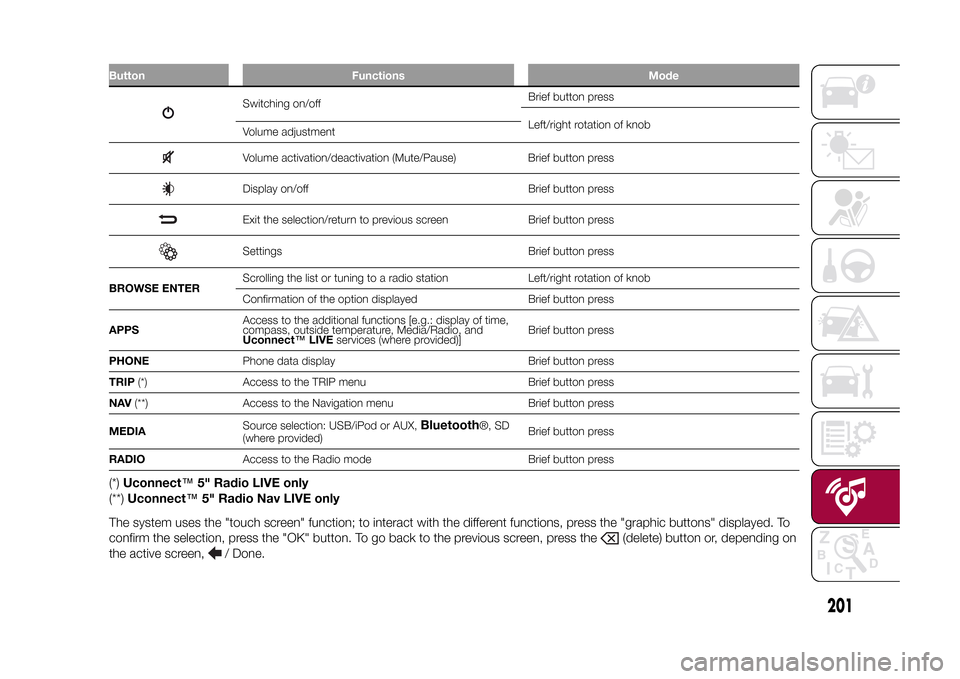
The system uses the "touch screen" function; to interact with the different functions, press the "graphic buttons" displayed. To
confirm the selection, press the "OK" button. To go back to the previous screen, press the
(delete) button or, depending on
the active screen,
/ Done.
.
201
15-12-2014 8:23 Pagina 201
Page 205 of 240
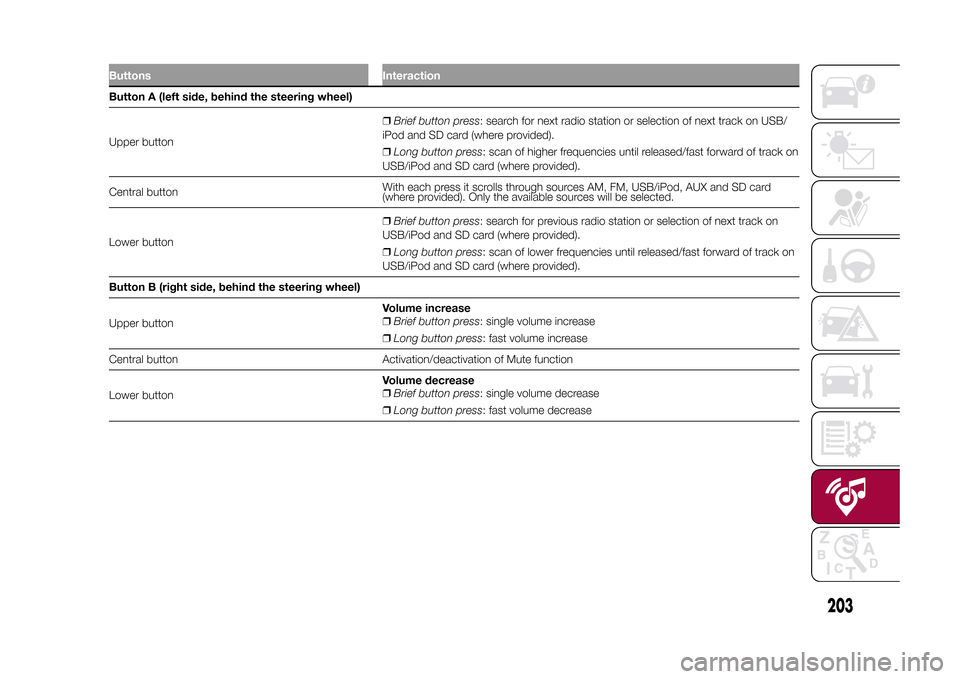
Buttons InteractionButton A (left side, behind the steering wheel)
Upper button❒Brief button press: search for next radio station or selection of next track on USB/
iPod and SD card (where provided).
❒Long button press: scan of higher frequencies until released/fast forward of track on
USB/iPod and SD card (where provided).
Central buttonWith each press it scrolls through sources AM, FM, USB/iPod, AUX and SD card
(where provided). Only the available sources will be selected.
Lower button❒Brief button press: search for previous radio station or selection of next track on
USB/iPod and SD card (where provided).
❒Long button press: scan of lower frequencies until released/fast forward of track on
USB/iPod and SD card (where provided).
Button B (right side, behind the steering wheel)
Upper buttonVolume increase
❒Brief button press: single volume increase
❒Long button press: fast volume increase
Central button Activation/deactivation of Mute function
Lower buttonVolume decrease
❒Brief button press: single volume decrease
❒Long button press: fast volume decrease
203
15-12-2014 8:23 Pagina 203