2015 FIAT 500L instrument cluster
[x] Cancel search: instrument clusterPage 3 of 148

INTRODUCTION/WELCOMEWELCOME FROM FIAT...............2
CONTROLS AT A GLANCEDRIVER COCKPIT..................4INSTRUMENT CLUSTER...............6
GETTING STARTEDKEY FOB.......................8VEHICLE SECURITY ALARM............9POWER DOOR LOCKS...............9SEAT BELT SYSTEMS................11SUPPLEMENTAL RESTRAINT SYSTEM (SRS) —AIR BAGS......................12CHILD RESTRAINTS................15HEAD RESTRAINTS.................19FRONT SEATS....................22REAR SEATS.....................23HEATED SEATS...................24TILT/TELESCOPING STEERING COLUMN...25
OPERATING YOUR VEHICLEENGINE BREAK-IN RECOMMENDATIONS...26TURN SIGNAL/LIGHTS/HIGH BEAM LEVER...26WIPER/WASHER LEVER..............28ELECTRONIC SPEED CONTROL.........29MANUAL CLIMATE CONTROLS.........31AUTOMATIC TEMPERATURE CONTROLS(ATC).........................32REAR PARK ASSIST.................33POWER SUNROOF.................33EURO TWIN CLUTCH SIX-SPEEDTRANSMISSION...................34ADDING FUEL...................37ELECTRONIC STABILITY CONTROL (ESC)...38
ELECTRONICSYO U R V E H I C L E ' S S O U N D S YS T E M.......40IDENTIFYING YOUR RADIO............42Uconnect® 5.0...................43Uconnect® 6.5N..................55Uconnect® PHONE.................74STEERING WHEEL AUDIO CONTROLS.....84ELECTRONIC VEHICLE INFORMATIONCENTER (EVIC)...................84PROGRAMMABLE FEATURES...........85UNIVERSAL GARAGE DOOR OPENER(HomeLink®)....................86POWER INVERTER — IF EQUIPPED.......88
POWER OUTLET..................89
UTILITY
TRAILER TOWING.................90RECREATIONAL TOWING (BEHINDMOTORHOME, ETC.)...............90
WHAT TO DO IN EMERGENCIES
ROADSIDE ASSISTANCE..............92INSTRUMENT CLUSTER WARNING LIGHTS..92INSTRUMENT CLUSTER INDICATOR LIGHTS..96IF YOUR ENGINE OVERHEATS..........98JACKING AND TIRE CHANGING.........99TIRE SERVICE KIT.................107JUMP-STARTING PROCEDURE..........113SHIFT LEVER OVERRIDE.............116TOW I N G A D I S A B L E D V E H I C L E.........116FREEING A STUCK VEHICLE...........118EVENT DATA RECORDER (EDR)........120CAP-LESS FUEL FILL FUNNEL..........120
MAINTAINING YOUR VEHICLEOPENING THE HOOD..............121ENGINE COMPARTMENT............122FLUID CAPACITIES................124FLUIDS, LUBRICANTS AND GENUINEPA RT S.......................124MAINTENANCE PROCEDURES.........126MAINTENANCE SCHEDULE...........126FUSES........................130TIRE PRESSURES.................133SPARE TIRES — IF EQUIPPED..........134WHEEL AND WHEEL TRIM CARE.......135REPLACEMENT BULBS..............136
CONSUMER ASSISTANCEFIAT CUSTOMER CENTER............137FIAT CANADA CUSTOMER CENTER......137ASSISTANCE FOR THE HEARING IMPAIRED..137PUBLICATIONS ORDERING...........137REPORTING SAFETY DEFECTS IN THEUNITED STATES..................138
MOPAR ACCESSORIESAUTHENTIC ACCESSORIES BY MOPAR®...139
FREQUENTLY ASKED QUESTIONSFREQUENTLY ASKED QUESTIONS.......140
INDEX......................141
TABLE OF CONTENTS
1
Page 6 of 148

DRIVER COCKPIT
1.Power Mirrors
2.Uconnect® Phone (Bluetooth® Hands Free Calling) pg.40
3.Turn Signals/Lights/High Beam Lever pg.26
4.Instrument Cluster pg.6
5.Electronic Vehicle Information Center (EVIC) Display pg.84
6.Speed Control pg.29
7.Wiper/Washer Lever (behind steering wheel) pg.28
8.Ignition Switch
9.Audio System pg.40
10.Switch Panel
•Power Door Lock Switch
•Hazard Switch
•Fog Lights Switch pg.27
•Electronic Vehicle Information Center (EVIC) Controls pg.85
CONTROLS AT A GLANCE
4
Page 8 of 148

INSTRUMENT CLUSTER
1.Speedometer
2.Fuel Gauge
3.Fuel Filler Door Location
(See page 92 for Instrument Cluster Warning Lights.)
CONTROLS AT A GLANCE
6
Page 9 of 148

4.Engine Temperature Gauge
5.Tachometer
6.Electronic Vehicle Information Center (EVIC)
(See page 96 for Instrument Cluster Indicator Lights.)
CONTROLS AT A GLANCE
7
Page 11 of 148

VEHICLE SECURITY ALARM
The Vehicle Security Alarm monitors the vehicle doors for unauthorized entry and the
Keyless Enter-N-Go™ START/STOP button for unauthorized operation.While the Vehicle
Security Alarm is armed, interior switches for door locks and decklid release are disabled.
If something triggers the alarm, the Vehicle Security Alarm will provide the following au-
dible and visible signals: the horn will pulse, the park lamps and/or turn signals will flash,
and the Vehicle Security Light in the instrument cluster will flash.
To Arm The System:
Push the Key Fob LOCK button.
To Disarm The System:
Push the Key Fob UNLOCK button or cycle the ignition to the ON/RUN position.
The Vehicle Security Alarm is designed to protect your vehicle.However, you can create
conditions where the Vehicle Security Alarm will give you a false alarm.If one of the pre-
viously described arming sequences has occurred, the Vehicle Security Alarm will arm re-
gardless of whether you are in the vehicle or not.If you remain in the vehicle and open
a door, the alarm will sound.If this occurs, disarm the Vehicle Security Alarm.
If the Vehicle Security Alarm is armed and the battery becomes disconnected, the Vehicle
Security Alarm will remain armed when the battery is reconnected.The exterior lights
will flash, and the horn will sound.If this occurs, disarm the Vehicle Security Alarm.
POWER DOOR LOCKS
•Push the central LOCK/UNLOCK button located on the instrument panel, in the
switch bank below the radio.The button has an LED that indicates whether the doors
are locked or unlocked.
•LED ON:doors locked.Pushing the central LOCK/UNLOCK button once will unlock
all doors.The LED will switch off once the doors are unlocked.
•LED OFF:doors unlocked.Pushing the central LOCK/UNLOCK button once will lock
all doors.The LED will switch on once the doors are locked.
•Once the doors have been locked with the RKE transmitter, it will no longer be pos-
sible to unlock them by pushing central LOCK/UNLOCK button.
NOTE:
With central locking active (LED ON), opening one of the front doors, it is possible to
perform a central unlocking (LED OFF).With central locking active (LED ON), in order
to open one of the rear passenger doors, it is necessary pulling the internal door handle
twice.With one of the rear door open (LED OFF), the unlocking is performed only for
that door, not for all the vehicle.
•To unlock the front doors, pull the inside door handle to the first detent.If the rear
doors are locked, you must pull the door handle once to unlock the door and pull the
door handle a second time to open the door.
GETTING STARTED
9
Page 29 of 148

High Beams
•Pull the lever rearward to activate the high beams.
•A high beam symbol will illuminate in the cluster to indicate the high beams are on.
NOTE:
For safe driving, turn off the high beams when oncoming traffic is present to prevent
headlight glare and as a courtesy to other motorists.
Flash To Pass
•Pull the lever toward you to activate the high beams.The high beams will remain on
until the lever is released.
Headlight Delay (Follow Me Home)
•Within two minutes of the ignition switch being turned to the OFF/LOCK position or
the ignition key being removed from the ignition, pull the turn signal lever toward the
steering wheel.
•Each movement of the lever toward the steering wheel will increase the illumination
period by 30 seconds, up to a maximum of 210 seconds.
•To deactivate, pull the multifunction lever toward the steering wheel and hold it for
more than two seconds.
NOTE:
Activation of Follow Me Home is only enabled once per key cycle and the steps outlined
above must be repeated each time you want to activate it.
Fog Lights
•Push the fog light button, located on the center stack of the instrument panel just be-
low the radio, once to turn on the fog lights.
•Push the button a second time to turn the fog lights off.
OPERATING YOUR VEHICLE
27
Page 31 of 148

ELECTRONIC SPEED CONTROL
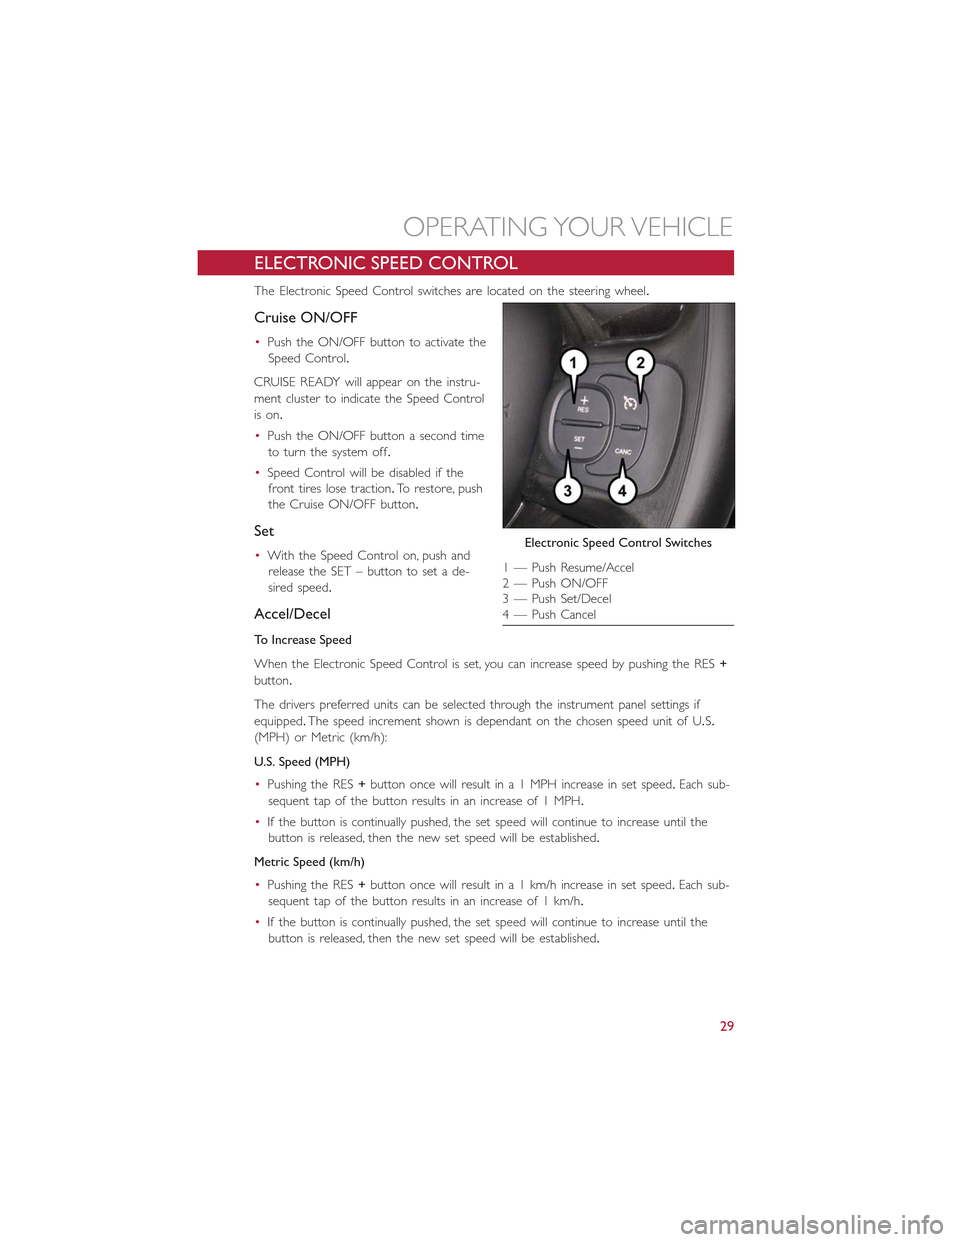
The Electronic Speed Control switches are located on the steering wheel.
Cruise ON/OFF
•Push the ON/OFF button to activate the
Speed Control.
CRUISE READY will appear on the instru-
ment cluster to indicate the Speed Control
is on.
•Push the ON/OFF button a second time
to turn the system off.
•Speed Control will be disabled if the
front tires lose traction.To restore, push
the Cruise ON/OFF button.
Set
•With the Speed Control on, push and
release the SET – button to set a de-
sired speed.
Accel/Decel
To Increase Speed
When the Electronic Speed Control is set, you can increase speed by pushing the RES+
button.
The drivers preferred units can be selected through the instrument panel settings if
equipped.The speed increment shown is dependant on the chosen speed unit of U.S.
(MPH) or Metric (km/h):
U.S. Speed (MPH)
•Pushing the RES+button once will result in a 1 MPH increase in set speed.Each sub-
sequent tap of the button results in an increase of 1 MPH.
•If the button is continually pushed, the set speed will continue to increase until the
button is released, then the new set speed will be established.
Metric Speed (km/h)
•Pushing the RES+button once will result in a 1 km/h increase in set speed.Each sub-
sequent tap of the button results in an increase of 1 km/h.
•If the button is continually pushed, the set speed will continue to increase until the
button is released, then the new set speed will be established.
Electronic Speed Control Switches
1 — Push Resume/Accel2 — Push ON/OFF3 — Push Set/Decel4 — Push Cancel
OPERATING YOUR VEHICLE
29
Page 35 of 148

Heated Mirrors
•The mirrors are heated to melt frost or ice.This feature is activated whenever you
turn on the rear window defroster.
REAR PARK ASSIST
If an object is detected behind the rear bumper while the vehicle is in REVERSE, a visual
warning will display in the instrument cluster and an audible tone will sound.The audible
tone rate will change depending on the distance of the object, getting faster as the object
gets closer to the bumper.The audible tone will become continuous when the distance
between the vehicle and the obstacle is less than 12 inches (30 cm).
POWER SUNROOF
The sunroof has two glass panels (the front one is operational and the rear one fixed)
and is equipped with an electrically operated sun blind.
The power sunroof and the power sun blind can be operated only with the ignition key
turned to the ON/RUN position.
The power sunroof and power sun blind switches are located in the overhead console.
WARNING!
•Never leave children alone in a vehicle, or with access to an unlocked vehicle.
Never leave the Key Fob in or near the vehicle or in a location accessible to chil-
dren.Occupants, particularly unattended children, can become entrapped by the
power sunroof while operating the power sunroof switch.Such entrapment may
result in serious injury or death.
•In a collision, there is greater risk of being thrown from a vehicle with an open
sunroof.You could also be seriously injured or killed.Always fasten your seat belt
properly and make sure all passengers are properly secured too.
•Do not allow small children to operate the sunroof.Never allow your fingers,
other body parts, or any object to project through the sunroof opening.Injury
may result.
To Open
•Pull the power sunroof switch for approximately one second and the sunroof will stop
at the vented position.Pull the power sunroof switch a second time for approximately
one second and release, the sunroof will open fully, then stop automatically.This is
called “Express Open”.
NOTE:
During Express Open operation, any movement of the sunroof switch will stop the sun-
roof.
OPERATING YOUR VEHICLE
33