Page 166 of 438
▫Player Operation......................189
!CD/DVD DISC MAINTENANCE...........190
!RADIO OPERATION AND MOBILE PHONES . .190
!CLIMATE CONTROLS...................191
▫Manual Climate Control System...........191
▫Automatic Dual Zone Climate Control System
(If Equipped).........................197
!Uconnect® VOICE RECOGNITION
QUICK TIPS..........................209
▫Introducing Uconnect®.................209
▫Get Started..........................211
▫Basic Voice Commands..................212
▫Radio..............................213
▫Media..............................215
▫Phone..............................216
▫Navigation (6.5A/6.5AN)................218
▫Voice Text Reply......................219
▫Additional Information.................220
164 UNDERSTANDING YOUR INSTRUMENT PANEL
Page 180 of 438

•Date or trip distance display in miles or kilometers
•Outside temperature
•Gear Indicator
•Odometer (display of distance travelled in miles/
kilometers)
•Car status indication (e.g. doors open, possible ice on
road, service, etc.)
EVIC Control Buttons
The EVIC control buttons are located on the instrument
panel below the radio.
Push and release theMENUbutton briefly to access the
menu and/or go to next screen or to confirm the required
menu option. Push and hold theMENUbutton (approxi-
mately one second) to return to the main screen.
Push and release the UPbutton to scroll upward
through the displayed menu and the related options
or to increase the displayed value.
Push and release the DOWNbutton to scroll down-
ward through the displayed menu and the related
options or to decrease the value displayed.
NOTE:UPand DOWNbuttons activate differ-
ent functions according to the following situations:
•To scroll the menu options upwards or downwards.
•To increase or decrease values during settings.
NOTE:When opening one of the front doors, the EVIC
display will turn on the clock, the external temperature
and the miles or kilometers covered (for versions/
markets, where provided) for a few seconds.
178 UNDERSTANDING YOUR INSTRUMENT PANEL
Page 189 of 438

Hill Start Assist
This function is used when starting a vehicle from a stop
on a hill. Hill Start Assist maintains the same level of
brake pressure the driver applied for a short period of
time after the foot has been removed from the brake
pedal.
Proceed as follows to switch this function on or off:
1. Briefly push and release theMENUbutton. “On” or
“Off” will flash on the display (according to previous
setting).
2. Push and release the UPor DOWNbutton for
setting.
3. Briefly push and release theMENUbutton to go back
to the menu screen, or push and hold the button
(approximately one second) to go back to the main
screen without storing the settings.
Exit Menu
This function closes the initial menu screen.
Briefly push and release theMENUbutton to go back to
the main screen.
Push and release thebutton to return to the first
menu option (Speed Beep).
Push and release thebutton to return to the last
menu option (Daylights).
Uconnect® RADIOS
For detailed information about your Uconnect® radio,
refer to your Uconnect® supplement Manual.
iPod®/USB/MEDIA PLAYER CONTROL
This feature allows an iPod® or external USB device to be
plugged into the AUX Jack or USB port.
4
UNDERSTANDING YOUR INSTRUMENT PANEL 187
Page 191 of 438

The right-hand control is a rocker-type switch with a
pushbutton in the center and controls the volume and
mode of the sound system. Pushing the top of the rocker
switch will increase the volume, and pushing the bottom
of the rocker switch will decrease the volume.
Pushing the center button will make the radio switch
between the various modes available (AM/FM/SAT/
AUX/Media Player, etc.) and can also be used to select/
enter an item while scrolling through menu.
The left-hand control is a rocker-type switch with a
pushbutton in the center. The function of the left-hand
control is different depending on which mode you are in.
The following describes the left-hand control operation in
each mode.
Radio Operation
Pushing the top of the switch will “Seek” up for the next
listenable station and pushing the bottom of the switch
will “Seek” down for the next listenable station.
The button located in the center of the left-hand control
will tune to the next preset station that you have pro-
grammed in the radio preset button.
Player Operation
Pushing the top of the switch once will go to the next
track on the Player. Pushing the bottom of the switch
once will go to the beginning of the current track, or to
the beginning of the previous track if it is within one
second after the current track begins to play.
If you push the switch up or down twice, it plays the
second track; three times, it will play the third, etc.
4
UNDERSTANDING YOUR INSTRUMENT PANEL 189
Page 192 of 438

CD/DVD DISC MAINTENANCE
To keep a CD/DVD in good condition, take the following
precautions:
1. Handle the disc by its edge; avoid touching the
surface.
2. If the disc is stained, clean the surface with a soft cloth,
wiping from center to edge.
3. Do not apply paper or tape to the disc; avoid scratch-
ing the disc.
4. Do not use solvents such as benzene, thinner, cleaners,
or anti-static sprays.
5. Store the disc in its case after playing.
6. Do not expose the disc to direct sunlight.
7. Do not store the disc where temperatures may become
too high.
NOTE:If you experience difficulty in playing a particular
disc, it may be damaged (i.e., scratched, reflective coating
removed, a hair, moisture or dew on the disc) oversized,
or have protection encoding. Try a known good disc
before considering disc player service.
RADIO OPERATION AND MOBILE PHONES
Under certain conditions, the mobile phone being on in
your vehicle can cause erratic or noisy performance from
your radio. This condition may be lessened or eliminated
by relocating the mobile phone antenna. This condition is
not harmful to the radio. If your radio performance does
not satisfactorily “clear” by the repositioning of the
antenna, it is recommended that the radio volume be
turned down or off during mobile phone operation.
190 UNDERSTANDING YOUR INSTRUMENT PANEL
Page 213 of 438

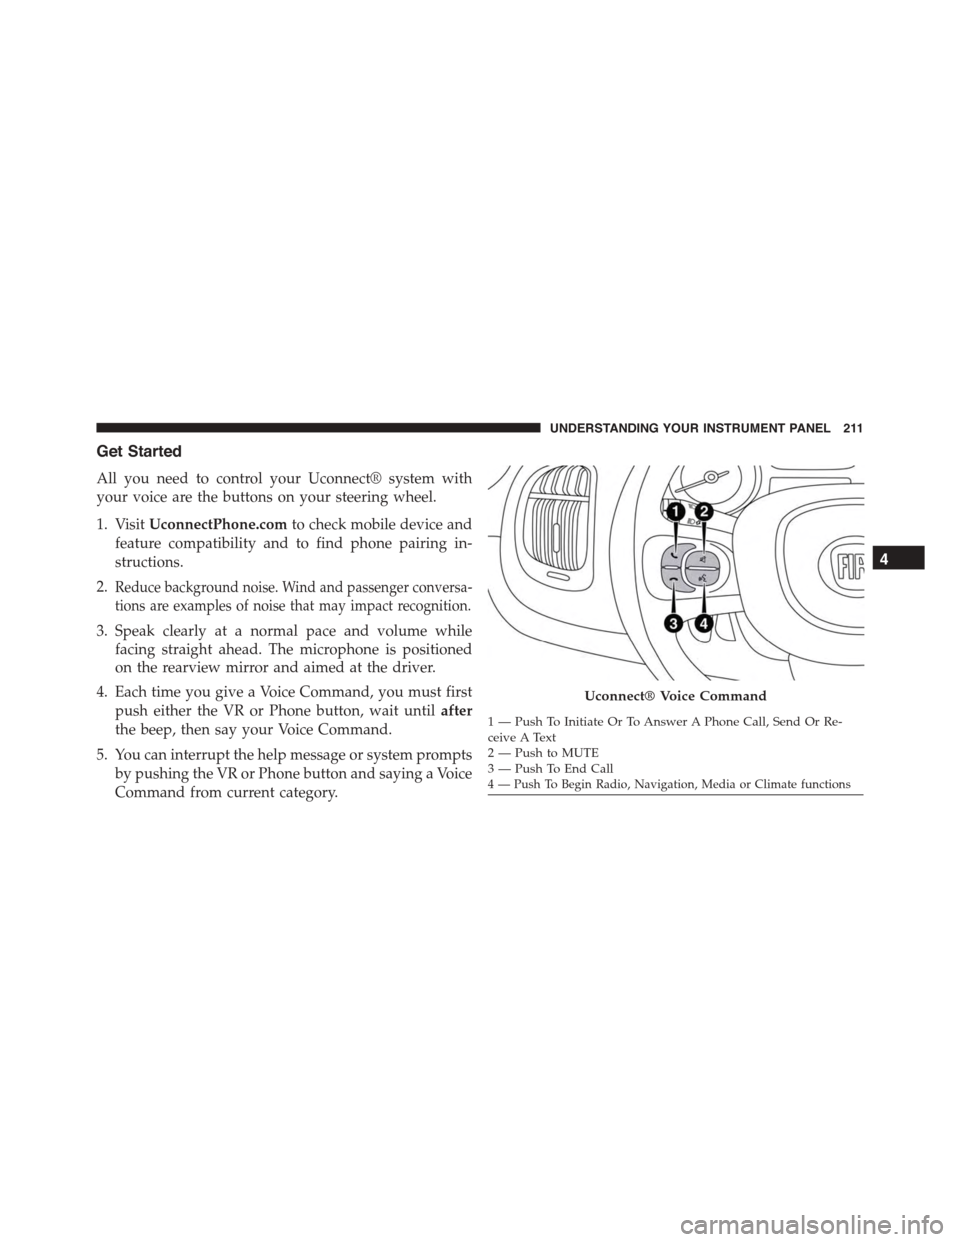
Get Started
All you need to control your Uconnect® system with
your voice are the buttons on your steering wheel.
1. VisitUconnectPhone.comto check mobile device and
feature compatibility and to find phone pairing in-
structions.
2.Reduce background noise. Wind and passenger conversa-
tions are examples of noise that may impact recognition.
3. Speak clearly at a normal pace and volume while
facing straight ahead. The microphone is positioned
on the rearview mirror and aimed at the driver.
4. Each time you give a Voice Command, you must first
push either the VR or Phone button, wait untilafter
the beep, then say your Voice Command.
5. You can interrupt the help message or system prompts
by pushing the VR or Phone button and saying a Voice
Command from current category.
Uconnect® Voice Command
1—PushToInitiateOrToAnswerAPhoneCall,SendOrRe-ceive A Text2—PushtoMUTE3—PushToEndCall4 — Push To Begin Radio, Navigation, Media or Climate functions
4
UNDERSTANDING YOUR INSTRUMENT PANEL 211
Page 215 of 438
Radio
Use your voice to quickly get to the AM, FM or SiriusXM
Satellite Radio® stations you would like to hear. (Sub-
scription or included SiriusXM Satellite Radio® trial
required.)
Push the VR button. After the beep, say$
•Tune toninety-five-point-five FM
•Tune toSatellite Channel Hits 1
Uconnect® 6.5A/6.5AN
4
UNDERSTANDING YOUR INSTRUMENT PANEL 213
Page 216 of 438
TIP:At any time, if you are not sure of what to say or
want to learn a Voice Command, press the VR button
and say“Help.”The system will provide you
with a list of commands.
Uconnect® 5.0 Radio
Uconnect® 6.5A/6.5AN Radio
214 UNDERSTANDING YOUR INSTRUMENT PANEL