2015 FIAT 500L LIVING fuse
[x] Cancel search: fusePage 18 of 224
CLIMATE CONTROL SYSTEM
2)
.
HEATING AND VENTILATION
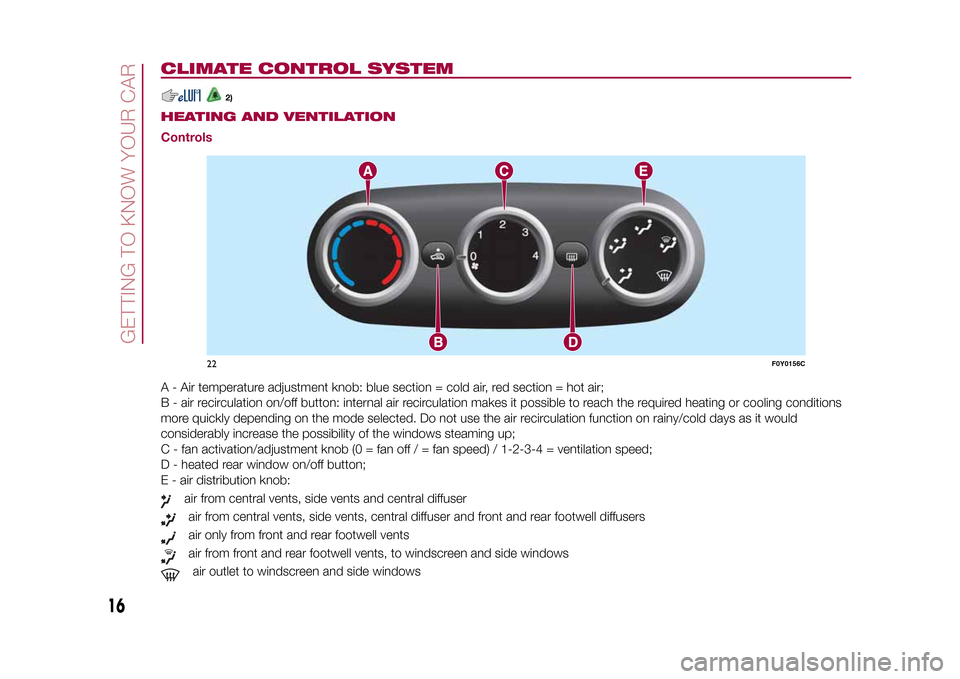
ControlsA - Air temperature adjustment knob: blue section = cold air, red section = hot air;
B - air recirculation on/off button: internal air recirculation makes it possible to reach the required heating or cooling conditions
more quickly depending on the mode selected. Do not use the air recirculation function on rainy/cold days as it would
considerably increase the possibility of the windows steaming up;
C - fan activation/adjustment knob (0 = fan off / = fan speed) / 1-2-3-4 = ventilation speed;
D - heated rear window on/off button;
E - air distribution knob:
air from central vents, side vents and central diffuserair from central vents, side vents, central diffuser and front and rear footwell diffusersair only from front and rear footwell ventsair from front and rear footwell vents, to windscreen and side windowsair outlet to windscreen and side windows
22
F0Y0156C
16
GETTING TO KNOW YOUR CAR
9-1-2015 12:9 Pagina 16
Page 19 of 224
MANUAL CLIMATE CONTROL SYSTEM
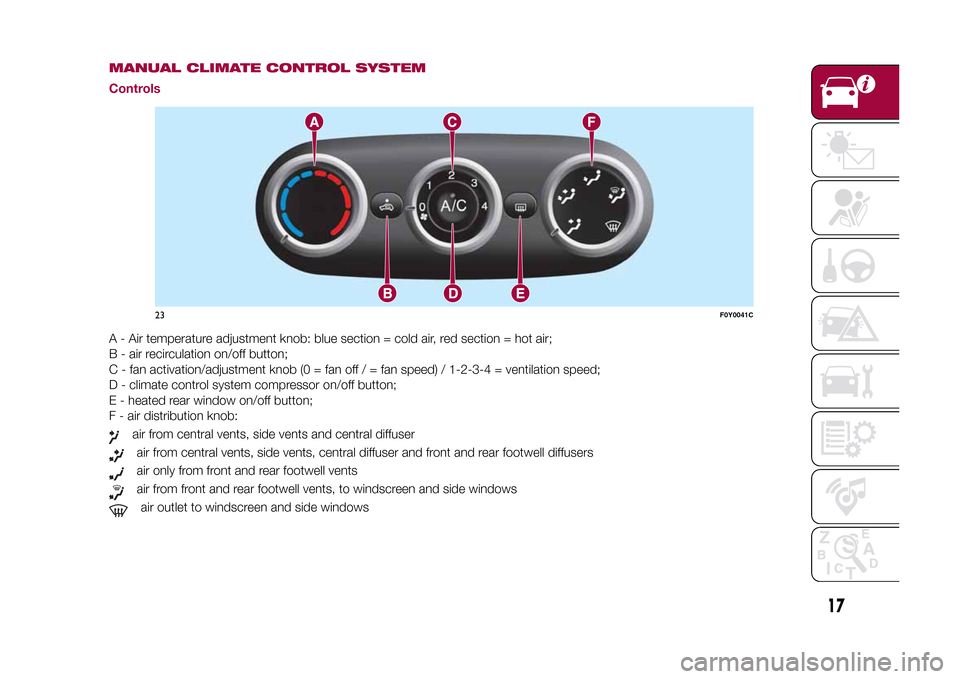
ControlsA - Air temperature adjustment knob: blue section = cold air, red section = hot air;
B - air recirculation on/off button;
C - fan activation/adjustment knob (0 = fan off / = fan speed) / 1-2-3-4 = ventilation speed;
D - climate control system compressor on/off button;
E - heated rear window on/off button;
F - air distribution knob:
air from central vents, side vents and central diffuserair from central vents, side vents, central diffuser and front and rear footwell diffusersair only from front and rear footwell ventsair from front and rear footwell vents, to windscreen and side windowsair outlet to windscreen and side windows
23
F0Y0041C
17
9-1-2015 12:9 Pagina 17
Page 29 of 224
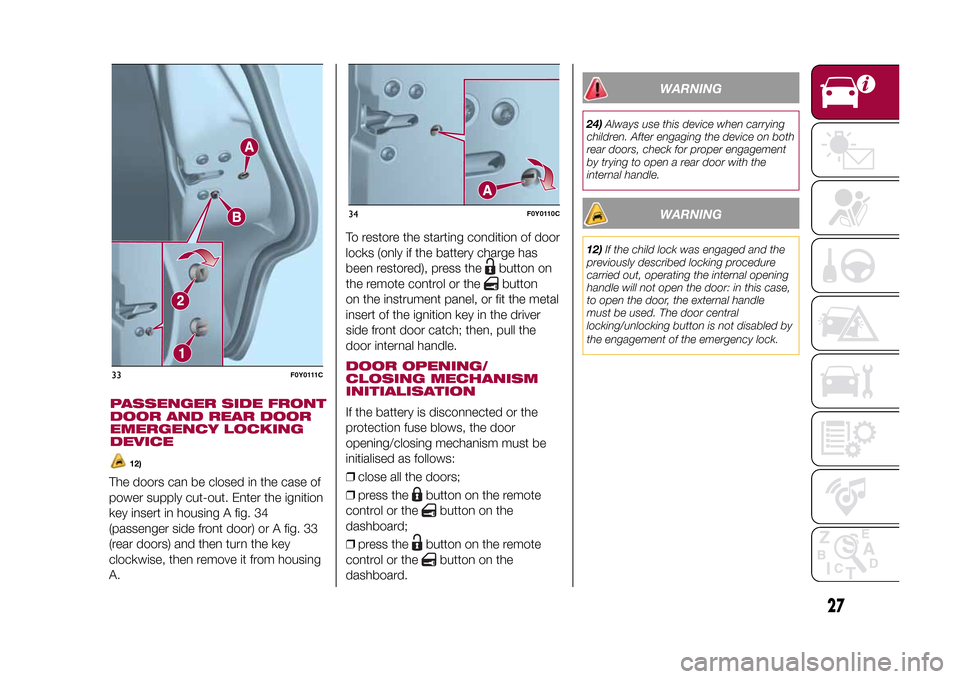
The doors can be closed in the case of
power supply cut-out. Enter the ignition
key insert in housing A fig. 34
(passenger side front door) or A fig. 33
(rear doors) and then turn the key
clockwise, then remove it from housing
A.To restore the starting condition of door
locks (only if the battery charge has
been restored), press the
button on
the remote control or thebutton
on the instrument panel, or fit the metal
insert of the ignition key in the driver
side front door catch; then, pull the
door internal handle.
DOOR OPENING/
CLOSING MECHANISM
INITIALISATIONIf the battery is disconnected or the
protection fuse blows, the door
opening/closing mechanism must be
initialised as follows:
❒close all the doors;
❒press the
button on the remote
control or the
button on the
dashboard;
❒press the
button on the remote
control or the
button on the
dashboard.
WARNING
24)Always use this device when carrying
children. After engaging the device on both
rear doors, check for proper engagement
by trying to open a rear door with the
internal handle.
WARNING
12)If the child lock was engaged and the
previously described locking procedure
carried out, operating the internal opening
handle will not open the door: in this case,
to open the door, the external handle
must be used. The door central
locking/unlocking button is not disabled by
the engagement of the emergency lock.
33
F0Y0111C
34
F0Y0110C
27
9-1-2015 12:9 Pagina 27
PASSENGER SIDE FRONT
DOOR AND REAR DOOR
EMERGENCY LOCKING
DEVICE
12)
Page 32 of 224
CLOSINGGrip the handle located inside the
tailgate and lower the latter, pressing
next to the lock until it clicks.
IMPORTANT Before closing the
luggage compartment make sure that
you have the keys since the luggage
compartment is automatically locked.LUGGAGE
COMPARTMENT
INITIALISATIONIMPORTANT If the battery is
disconnected or the protection fuse
blows, the luggage compartment
opening/closing mechanism must be
reinitialised as follows:
❒close all the doors and the luggage
compartment;
❒press the
button on the remote
control;
❒press thebutton on the remote
control.
"CARGO MAGIC SPACE"(for versions/markets, where provided)
14)
The adjustable load platform "Cargo
Magic Space" can be positioned on
three different height levels:
❒Position 0 (platform completely
lowered);❒Position 1 (platform at threshold
level);
❒Position 2 (platform completely
raised).
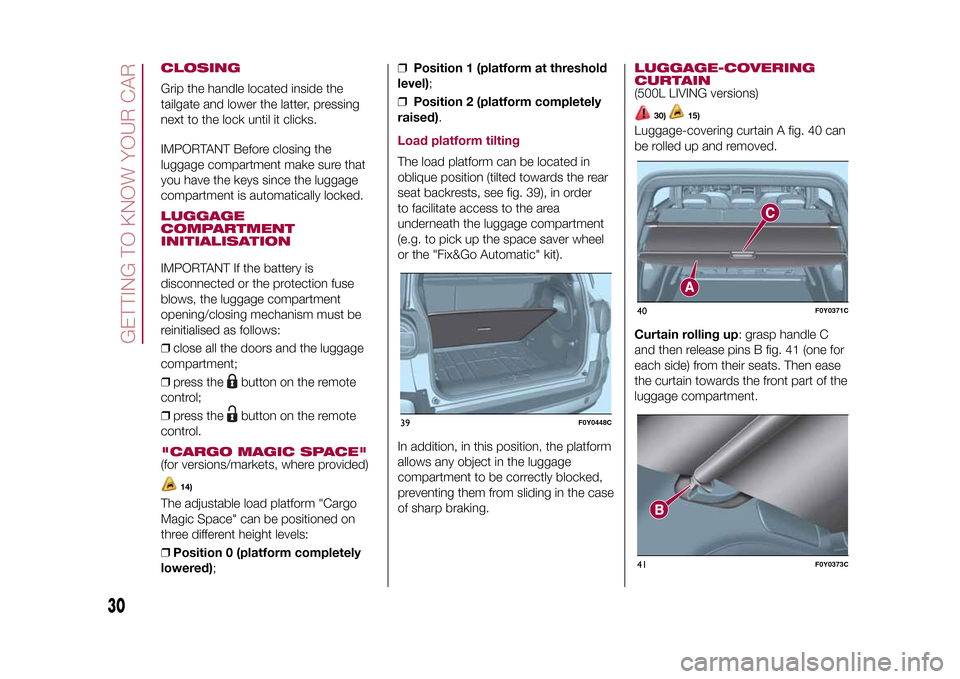
Load platform tiltingThe load platform can be located in
oblique position (tilted towards the rear
seat backrests, see fig. 39), in order
to facilitate access to the area
underneath the luggage compartment
(e.g. to pick up the space saver wheel
or the "Fix&Go Automatic" kit).
In addition, in this position, the platform
allows any object in the luggage
compartment to be correctly blocked,
preventing them from sliding in the case
of sharp braking.
LUGGAGE-COVERING
CURTAIN(500L LIVING versions)
30)
15)
Luggage-covering curtain A fig. 40 can
be rolled up and removed.
Curtain rolling up: grasp handle C
and then release pins B fig. 41 (one for
each side) from their seats. Then ease
the curtain towards the front part of the
luggage compartment.
39
F0Y0448C
40
F0Y0371C
41
F0Y0373C
30
GETTING TO KNOW YOUR CAR
9-1-2015 12:9 Pagina 30
Page 35 of 224
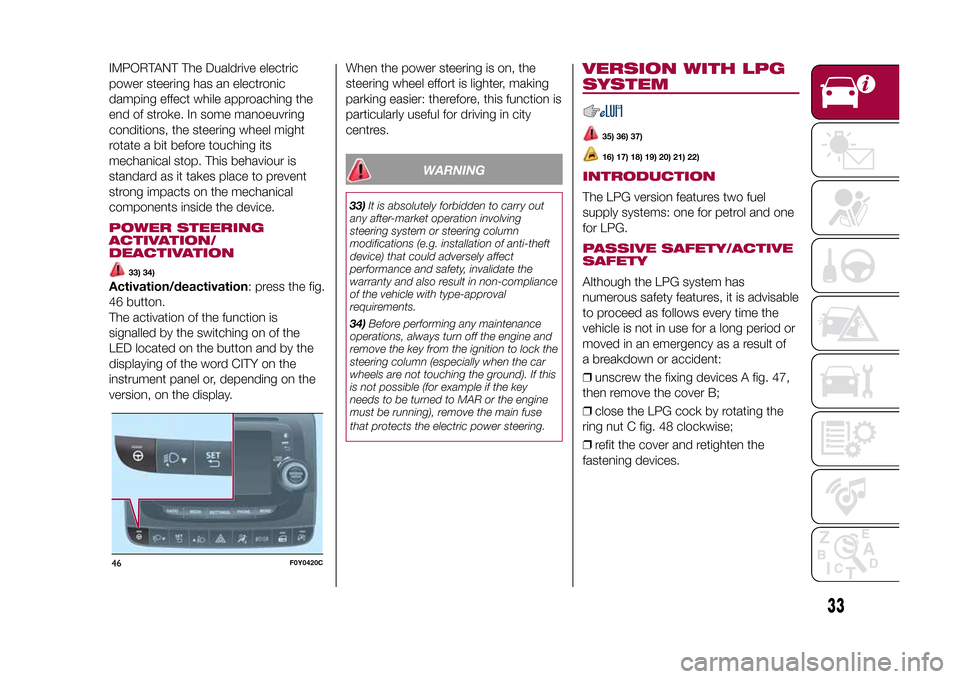
IMPORTANT The Dualdrive electric
power steering has an electronic
damping effect while approaching the
end of stroke. In some manoeuvring
conditions, the steering wheel might
rotate a bit before touching its
mechanical stop. This behaviour is
standard as it takes place to prevent
strong impacts on the mechanical
components inside the device.POWER STEERING
ACTIVATION/
DEACTIVATION
33) 34)
Activation/deactivation: press the fig.
46 button.
The activation of the function is
signalled by the switching on of the
LED located on the button and by the
displaying of the word CITY on the
instrument panel or, depending on the
version, on the display.When the power steering is on, the
steering wheel effort is lighter, making
parking easier: therefore, this function is
particularly useful for driving in city
centres.
WARNING
33)It is absolutely forbidden to carry out
any after-market operation involving
steering system or steering column
modifications (e.g. installation of anti-theft
device) that could adversely affect
performance and safety, invalidate the
warranty and also result in non-compliance
of the vehicle with type-approval
requirements.
34)Before performing any maintenance
operations, always turn off the engine and
remove the key from the ignition to lock the
steering column (especially when the car
wheels are not touching the ground). If this
is not possible (for example if the key
needs to be turned to MAR or the engine
must be running), remove the main fuse
that protects the electric power steering.
VERSION WITH LPG
SYSTEM
35) 36) 37)16) 17) 18) 19) 20) 21) 22)
INTRODUCTIONThe LPG version features two fuel
supply systems: one for petrol and one
for LPG.PASSIVE SAFETY/ACTIVE
SAFETYAlthough the LPG system has
numerous safety features, it is advisable
to proceed as follows every time the
vehicle is not in use for a long period or
moved in an emergency as a result of
a breakdown or accident:
❒unscrew the fixing devices A fig. 47,
then remove the cover B;
❒close the LPG cock by rotating the
ring nut C fig. 48 clockwise;
❒refit the cover and retighten the
fastening devices.
46
F0Y0420C
33
9-1-2015 12:9 Pagina 33
Page 59 of 224
Warning light What it means
GENERIC FAILURE INDICATION
The warning light switches on in the following circumstances. In these cases contact a Fiat Dealership to
have the fault fixed as soon as possible:
❒Limit speed exceeded: on some versions, when the limit speed is exceeded, a message and a symbol
are displayed, along with a buzzer;
❒Fuel cut-off system intervention/failure
❒External light failure: the warning light switches on when a failure is detected in one of the following lights:
daytime running lights (DRL) (where provided)/side lights/direction indicator/rear fog light/reversing light/
number plate light/brake lights (for versions with multifunction display only). The fault relating to these lights
could be: one or more blown bulbs, a blown protection fuse or a break in the electrical connection;
❒DST (Dynamic Steering Torque or steering corrector) system failure
❒Water in diesel fuel filter
❒Stop/Start system failure
❒Methane level sensor failure (or LPG level)
❒Temporary or permanent City Brake Control - "Collision Mitigation" system failure
❒Rain sensor failure
❒Assisted parking failure
❒Dusk sensor failure
❒Engine oil pressure sensor failure(on versions with reconfigurable multifunction display the failure is
indicated by the switching on of the icon in the display)
❒Warning light failureOn some versions, the warning light switches on along with the display of a message and a symbol.
57
9-1-2015 12:9 Pagina 57
Page 110 of 224
IN AN EMERGENCY
A punctured tyre or a burnt-out bulb?
At times, a problem may interfere
with our journey.
The pages on emergencies can help
you to deal with critical situations
independently and with calm.
In an emergency we recommend that
you call the freephone number found in
the Warranty Booklet.
It is also possible to call the national or
international universal freephone
number to search for the nearest
Dealership.HAZARD WARNING LIGHTS...........109
CHANGING A WHEEL ....................109
"FIX&GO AUTOMATIC" KIT .............113
REPLACING A BULB ......................115
REPLACING FUSES........................122
JUMP STARTING ............................128
FUEL CUT-OFF SYSTEM ................129
TOWING THE VEHICLE ..................130
108
IN AN EMERGENCY
9-1-2015 12:9 Pagina 108
Page 117 of 224
128)You must always indicate that the tyre
was repaired using the Fix&Go Automatic
kit. Give the leaflet to the technicians who
will be handling the tyre that was treated
using the Fix&Go Automatic kit.
129)Repair is not possible if the wheel rim
is damaged (tread is deformed, causing
air to escape). Do not remove foreign
bodies (screws or nails) from the tyre.
130)Do not operate the compressor for
longer than 20 minutes consecutively. Risk
of overheating. The Fix&Go Automatic kit
is not suitable for definitive repairs, so
the repaired tyres may only be used
temporarily.
131)The bottle contains ethylene glycol
and latex: it may cause an allergic reaction.
It is harmful if swallowed. It is irritant for
the eyes. It may cause sensitisation if
inhaled or on contact. Avoid contact with
eyes, skin and clothes. In the case of
contact, wash immediately with plenty of
water. In the event that it is swallowed, do
not induce vomiting. Rinse out your mouth,
drink large quantities of water and seek
immediate medical attention. Keep out of
the reach of children. The product must
not be used by asthmatics. Do not inhale
the vapours during insertion and suction.
Call a doctor immediately if allergic
reactions are noted. Store the bottle in its
proper compartment, away from sources
of heat. The sealant has an expiry date.
Replace the bottle containing out-of-date
sealant.
WARNING
64)In the event of a puncture caused by
foreign bodies, the kit may be used to
repair tyres showing damage on the tread
or shoulder up to max. 4 mm diameter.
WARNING
3)Dispose of the bottle and the sealant
properly. Dispose of the components
in compliance with national and local
regulations.
REPLACING A BULB
132) 133)
65) 66)
GENERAL
INSTRUCTIONS❒Before changing a bulb check the
contacts for oxidation;
❒burnt bulbs must be replaced by
others of the same type and power;
❒after replacing a headlight bulb,
always check the correct alignment of
the light beam;
❒when a light is not working, check
that the corresponding fuse is intact
before changing a bulb. For the location
of fuses, refer to the paragraph “If a
fuse blows” in this section;
115
9-1-2015 12:9 Pagina 115