2015 FIAT 500L LIVING ignition
[x] Cancel search: ignitionPage 115 of 224
120)Vehicle handling is modified with the
space-saver wheel fitted. Avoid violent
acceleration and braking, abrupt steering
and fast cornering. The overall duration
of the space-saver wheel is about 3000
km, after which the relevant tyre must be
replaced with another one of the same
type. Never install a standard tyre on a rim
that is designed for use with a space-saver
wheel. Have the wheel repaired and refitted
as soon as possible. Using two or more
space-saver wheels at the same time
is forbidden. Do not grease the threads of
the stud bolts before fitting them: they
might slip out when driving.
121)The jack shall only be used for raising
the car model it has been supplied with.
Never use the jack for other purposes,
such as raising other car models. Never
use the jack for repair operations under the
vehicle. Incorrect positioning of the jack
may cause the vehicle to fall. Do not use
the jack for loads higher than the one
shown on its label. The space-saver wheel
cannot be fitted with snow chains. If a
front (drive) tyre is punctured and chains
are needed, use a standard wheel from the
rear axle and install the space-saver wheel
on the rear axle. This way, with two
standard front driving wheels, you can
install the snow chains on them.
122)Incorrect hub cap assembly may
cause it to come off when the vehicle is
moving. Never tamper with the inflation
valve. Never introduce tools of any kind
between rim and tyre. Check tyre and
space-saver wheel pressures regularly,
complying with the values given in the
"Technical specifications" chapter.123)At the end of the operation of
raising/locking the spare wheel, the ignition
key must be extracted, taking care not to
turn it in the wrong direction to facilitate the
extraction of the key itself, to prevent the
attachment device from being released and
the wheel assembly not being securely
retained.
WARNING
63)Contact a Fiat Dealership as soon as
possible to have the correct tightening
of the wheel stud bolts checked.
"Fix&Go Automatic"
kit
124) 125) 126) 127) 128) 129) 130) 131)64)
3)
DESCRIPTIONThe "Fix&Go Automatic" kit is located in
the luggage compartment, inside a
dedicated container. Inside the
container there are also a screwdriver,
the tow ring and the funnel for
refuelling, in the event of an emergency.
To access the kit, open the tailgate,
remove the load platform and lift the
carpet.
LPG versions: a tool box secured to
the luggage compartment carpet with
dedicated fastenings contains the kit.
The kit includes:
❒a bottle A fig. 115 containing sealing
fluid and fitted with: filling tube B and
adhesive label C with the wording
“max. 80 km/h” to be placed in a
clearly visible position (e.g. on
the dashboard) after repairing the tyre;
❒a compressor D including a pressure
gauge and connections, found in the
compartment;
113
9-1-2015 12:9 Pagina 113
Page 129 of 224
FUSES LOCATED IN THE LUGGAGE COMPARTMENT FUSE BOXfig. 141DEVICESFUSE AMPEREFront seat electric lumbar regulator F1 15
Front seat electrical heater F2 15
Hi-Fi systemF3 20
Electric sun roof blindF5 20
Electric sun roofF6 20
WARNING
134)If the replaced fuse blows again, contact a Fiat Dealership.
135)Never replace a fuse with metal wires or other material.
136)Never replace a fuse with another with a higher amp rating; DANGER OF FIRE.
137)If a general protection fuse (MEGA-FUSE, MIDI-FUSE, MAXI-FUSE) blows, contact a Fiat Dealership.
138)Before replacing a fuse, make sure that the ignition key has been removed and that all the other devices are switched off and/or
deactivated.
139)If a general protection fuse for the safety systems (airbag system, braking system), power unit systems (engine system, gearbox system)
or driving system blows, contact a Fiat Dealership.
WARNING
67)If it is necessary to wash the engine compartment, take care not to directly hit the fuse box and the window wiper motors with the water
jet.
127
9-1-2015 12:9 Pagina 127
Page 130 of 224
JUMP STARTINGIf the battery is flat, a jump starting can
be performed using the battery and
the cables of another vehicle, or using a
booster battery.IMPORTANTWhen a booster battery is used, comply
with the utilisation and precaution
instructions specified by the producer.
Do not use the booster battery or
any other source of external supply with
a voltage above 12 V: the battery, the
starter, the alternator and the electrical
system of the vehicle could be
damaged.
Do not attempt jump starting if the
battery is frozen. The battery could
break and explode!PREPARATION TO JUMP
STARTING
140) 141) 142)
68)
IMPORTANT The positive terminal (+) of
the battery is shielded by a protective
cover. Lift the cover to access the
positive terminal.
Proceed as follows:
❒engage the handbrake, move the
Dualogic gear lever to P (Park) or,
for versions with manual gearbox, to
neutral and bring the ignition key to
STOP;❒switch off all the other electrical
devices in the vehicle;
❒if another vehicle is ready for jump
starting, park the vehicle within the
reach of the cables to be used for
starting, operate the handbrake and
make sure that the ignition is
deactivated.
IMPORTANT Avoid contact between
the two vehicles since this could cause
a connection to earth and may result
in serious injury to any people nearby.
PROCEDURE FOR JUMP
STARTINGIMPORTANT If the procedure below is
carried out incorrectly, it can cause
severe injury to people or damage the
recharging system of one or both
vehicles. Carefully follow the
instructions given below.Cable connectionProceed as follows to carry out a jump
starting:
❒connect one end of the cable used
for positive (+) to the positive terminal
(+) of the vehicle with flat battery;
❒connect the other end of the cable
used for positive (+) to the positive
terminal (+) of the auxiliary battery;❒connect one end of the cable used
for negative (–) to the negative terminal
(–) of the auxiliary battery;
❒connect the other end of the cable
used for negative (–) to an engine earth
(the visible metal part of the vehicle
engine with flat battery) away from the
battery and the fuel injection system;
❒start the vehicle engine with the
auxiliary battery, let it run for a
few minutes at idling. Start the engine
of the vehicle with flat battery.
Cable disconnectionOnce the engine has been started,
remove the cables proceeding as
follows:
❒disconnect the end of the cable used
for negative (–) from the engine earth
of the vehicle with flat battery;
❒disconnect the other end of the cable
used for negative (–) from the negative
terminal (–) of the auxiliary battery;
❒disconnect the end of the cable used
for positive (+) from the positive terminal
(+) of the auxiliary battery;
❒disconnect one end of the cable
used for positive (+) from the positive
terminal (+) of the vehicle with flat
battery.
128
IN AN EMERGENCY
9-1-2015 12:9 Pagina 128
Page 131 of 224
If it is often necessary to perform a
jump starting, have the vehicle battery
and the recharging system checked
by a Fiat Dealership.
IMPORTANT Any accessories (e.g.
mobile phones, etc.) connected to the
vehicle power sockets draw current
even if they are not used. These
devices, if left connected too much time
with engine off, may cause the battery
to drain with following reduction of
its life and/or failure to start the engine.
WARNING
140)Do not get too close to the radiator
cooling fan: the electric fan may start;
danger of injury. Scarves, ties and other
loose clothing may be pulled by moving
parts.
141)Remove any metal objects (e.g. rings,
watches, bracelets), that might cause an
accidental electrical contact and cause
serious injury.
142)Batteries contain acid which may burn
skin and eyes. Batteries produce
hydrogen, which is easily flammable and
explosive. Thus keep away flames or
devices which may cause sparks.
WARNING
68)Do not connect the cable to the
negative terminal (–) of the flat battery. The
following spark could lead to battery
explosion and cause serious harm. Only
use the specific earth point; do not use any
other exposed metallic part.
FUEL CUT-OFF
SYSTEM
143)
This intervenes in the event of an
impact causing:
❒the interruption of the fuel supply with
the engine consequently cutting out
❒the automatic unlocking of the doors
❒the automatic switching on of the
interior lights
❒the switching on of the hazard
warning lights.
On some versions, the intervention of
the system is indicated by a message
shown on the display.
IMPORTANT Carefully check the car for
fuel leaks, for instance in the engine
compartment, under the car or near the
tank area. After a collision, turn the
ignition key to STOP to prevent the
battery from running down.
To restore the correct operation of the
car, proceed as follows:
❒turn the ignition key to the MAR
position;
❒activate the right direction indicator
and then stop it;
❒activate the left direction indicator
and then stop it;
❒activate the right direction indicator
and then stop it;
129
9-1-2015 12:9 Pagina 129
Page 132 of 224
❒activate the left direction indicator
and then stop it;
❒turn the ignition key to the STOP
position and then to MAR.
LPG versions: in the event of an
impact, petrol supply is immediately
cut-off, the LPG safety valves are
closed and the injection is interrupted,
switching off the engine.
Natural Power versions: in the event
of an impact, the power supply is
immediately cut off, causing engine
switching off.
WARNING
143)If, after an impact, you smell fuel or
notice leaks from the fuel system, do
not reactivate the system to avoid the risk
of fire.
TOWING THE
VEHICLEATTACHING THE TOW
RING
144) 145) 146) 147)
The tow hook, which is supplied with
the car, is housed in the tool box, under
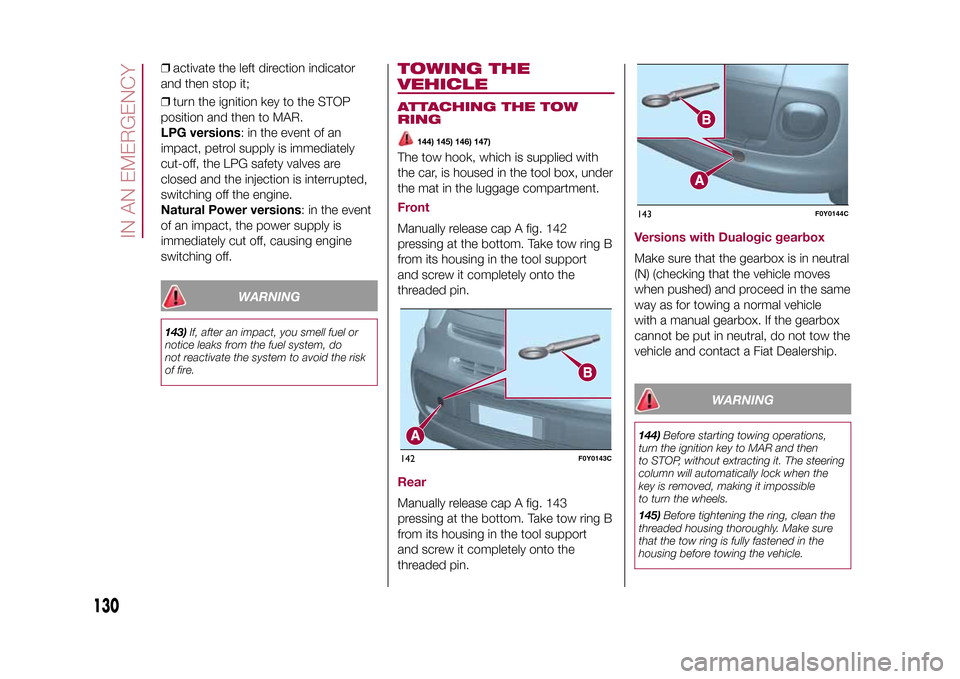
the mat in the luggage compartment.FrontManually release cap A fig. 142
pressing at the bottom. Take tow ring B
from its housing in the tool support
and screw it completely onto the
threaded pin.RearManually release cap A fig. 143
pressing at the bottom. Take tow ring B
from its housing in the tool support
and screw it completely onto the
threaded pin.
Versions with Dualogic gearboxMake sure that the gearbox is in neutral
(N) (checking that the vehicle moves
when pushed) and proceed in the same
way as for towing a normal vehicle
with a manual gearbox. If the gearbox
cannot be put in neutral, do not tow the
vehicle and contact a Fiat Dealership.
WARNING
144)Before starting towing operations,
turn the ignition key to MAR and then
to STOP, without extracting it. The steering
column will automatically lock when the
key is removed, making it impossible
to turn the wheels.
145)Before tightening the ring, clean the
threaded housing thoroughly. Make sure
that the tow ring is fully fastened in the
housing before towing the vehicle.
142
F0Y0143C
143
F0Y0144C
130
IN AN EMERGENCY
9-1-2015 12:9 Pagina 130
Page 155 of 224
6)Batteries contain substances which are
very dangerous for the environment. For
battery replacement, contact a Fiat
Dealership.
BATTERY
RECHARGING
160) 161)
IMPORTANT After turning the ignition
key to STOP and having closed the
driver side door, wait at least one
minute before disconnecting the
electrical supply from the battery. When
reconnecting the electrical supply to
the battery, make sure that the ignition
device is in the STOP position and
the driver side door is closed.
IMPORTANT Charging should be slow
at a low ampere rating for
approximately 24 hours. Charging for a
longer time may damage the battery.IMPORTANT Make sure that the cables
of the electrical system are correctly
reconnected to the battery, i.e. the
positive cable (+) to the positive
terminal and the negative cable (–) to
the negative terminal. The battery
terminals are marked with the positive
(+) and negative (–) symbols, and are
shown on the battery cover. The battery
terminals must also be corrosion-free
and firmly secured to the terminals. If a
"quick-type" battery charger is used
with the battery fitted on the vehicle,
before connecting it disconnect both
cables of the battery itself. Do not use a
"quick-type" battery charger to provide
the starting voltage.
IMPORTANT The battery recharging
procedure is given as information only.
You are advised to contact a Fiat
Dealership to have this operation
carried out.
VERSIONS WITHOUT
Start&Stop SYSTEM(for versions/markets, where provided)
Charge the battery as follows:
❒disconnect the negative battery
terminal;
❒connect the charger cables to the
battery terminals, observing the polarity;
❒turn on the charger;
153
9-1-2015 12:9 Pagina 153
Page 209 of 224
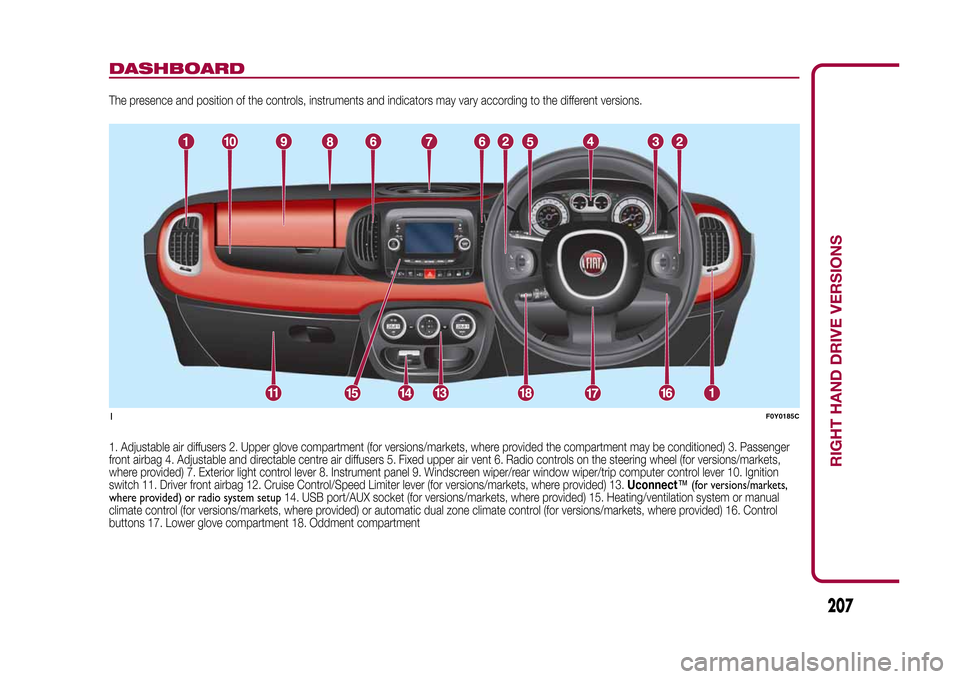
DASHBOARDThe presence and position of the controls, instruments and indicators may vary according to the different versions.
1. Adjustable air diffusers 2. Upper glove compartment (for versions/markets, where provided the compartment may be conditioned) 3. Passenger
front airbag 4. Adjustable and directable centre air diffusers 5. Fixed upper air vent 6. Radio controls on the steering wheel (for versions/markets,
where provided) 7. Exterior light control lever 8. Instrument panel 9. Windscreen wiper/rear window wiper/trip computer control lever 10. Ignition
switch 11. Driver front airbag 12. Cruise Control/Speed Limiter lever (for versions/markets, where provided) 13.Uconnect™ (for versions/markets,
where provided) or radio system setup14. USB port/AUX socket (for versions/markets, where provided) 15. Heating/ventilation system or manual
climate control (for versions/markets, where provided) or automatic dual zone climate control (for versions/markets, where provided) 16. Control
buttons 17. Lower glove compartment 18. Oddment compartment1
F0Y0185C
RIGHT HAND DRIVE VERSIONS
207
Page 220 of 224
INDEX
3rd brake light (changing bulbs)..... 121A
BS (system) ................................ 65
Active safety systems ..................... 65
ASR (system) ................................. 65
Automatic dual-zone climate
control system ............................. 18
B
attery (recharging)....................... 153
Bodywork (cleaning and
maintenance) ............................... 157
Bonnet ........................................... 31
Bulb (replacement) ......................... 115
C
argo Magic Space ...................... 30
Checking levels .............................. 145
Child protection systems ................ 76
City Brake Control - Collision
Mitigation System......................... 68
Climate control system ................... 16
CO2 emissions............................... 189
Control buttons .............................. 42
Control panel and on-board
instruments .................................. 40
Cornering lights .............................. 20
Cruise Control (constant speed
regulator)...................................... 99
D
ashboard.................................... 7
Daytime running lights (DRL) .......... 19
Dimensions .................................... 170Dipped headlights (bulb
replacement) ................................ 118
Direction indicators (bulb
replacement) ................................ 118
Direction indicators ........................ 20
Display ........................................... 42
Doors ............................................. 26
Driving assistance systems ............ 67
DST (system).................................. 66
Dualdrive (electric power
steering) ....................................... 32
Dusk sensor ................................... 20
E
lectric sun roof ............................ 24
Electric windows ............................ 28
Engine compartment...................... 145
ERM (system) ................................. 66
ESC (system) ................................. 65
Exterior lights ................................. 19
Fiat CODE (system) ....................... 8
Fixed glass roof .............................. 23
Fix&Go Automatic kit...................... 113
Flashing ......................................... 20
Fluids and lubricants ...................... 183
Fog lights (bulb replacement) ......... 120
Follow Me Home (device) ............... 21
Front airbags .................................. 86
Front seats ..................................... 11
Fuel consumption .......................... 186
Fuel cut-off system......................... 129
Fuses (replacement) ....................... 122
G
ear Shift Indicator (system) ......... 42
H
andbrake.................................... 94
Hazard warning lights..................... 109
Head restraints............................... 13
Heating and ventilation ................... 16
Hill Holder (system) ........................ 65
Identification data .......................... 160
Ignition device ................................ 10
Important information and
recommendations ........................ 206
iTPMS ............................................ 69Jump starting ................................ 128"Lane Change" function ................ 20Lifting the vehicle .......................... 156
Luggage compartment................... 29M
ain beam headlights (bulb
replacement) ................................ 118
Main beam headlights .................... 20
Manual climate control system ....... 17
Multifunction display....................... 42
N
umber plate lights (bulb
replacement) ................................ 121
O
ccupant protection systems ....... 71
On-board instruments
– multifunction display .................. 40
– reconfigurable multifunction
display....................................... 41
P
arking sensors ............................ 101
INDEX