Page 120 of 224

FRONT UPPER LIGHT
CLUSTERThis contains the bulbs for direction
indicators and dipped beam headlights.
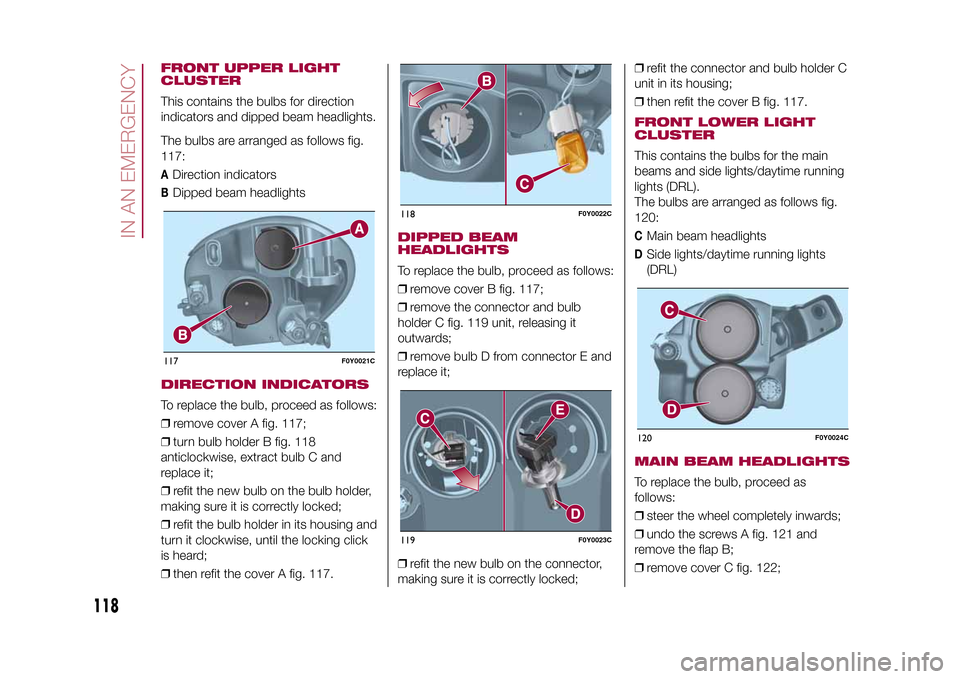
The bulbs are arranged as follows fig.
117:A
Direction indicators
B
Dipped beam headlights
DIRECTION INDICATORSTo replace the bulb, proceed as follows:
❒remove cover A fig. 117;
❒turn bulb holder B fig. 118
anticlockwise, extract bulb C and
replace it;
❒refit the new bulb on the bulb holder,
making sure it is correctly locked;
❒refit the bulb holder in its housing and
turn it clockwise, until the locking click
is heard;
❒then refit the cover A fig. 117.
DIPPED BEAM
HEADLIGHTSTo replace the bulb, proceed as follows:
❒remove cover B fig. 117;
❒remove the connector and bulb
holder C fig. 119 unit, releasing it
outwards;
❒remove bulb D from connector E and
replace it;
❒refit the new bulb on the connector,
making sure it is correctly locked;❒refit the connector and bulb holder C
unit in its housing;
❒then refit the cover B fig. 117.
FRONT LOWER LIGHT
CLUSTERThis contains the bulbs for the main
beams and side lights/daytime running
lights (DRL).
The bulbs are arranged as follows fig.
120:C
Main beam headlights
D
Side lights/daytime running lights
(DRL)
MAIN BEAM HEADLIGHTSTo replace the bulb, proceed as
follows:
❒steer the wheel completely inwards;
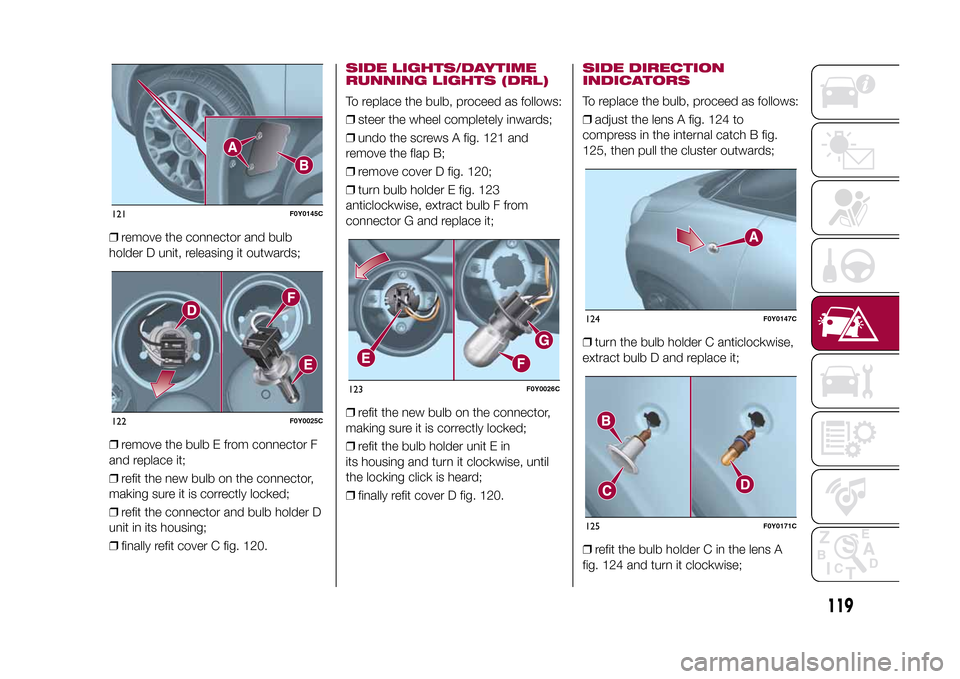
❒undo the screws A fig. 121 and
remove the flap B;
❒remove cover C fig. 122;
117
F0Y0021C
118
F0Y0022C
119
F0Y0023C
120
F0Y0024C
118
IN AN EMERGENCY
9-1-2015 12:9 Pagina 118
Page 121 of 224

❒remove the connector and bulb
holder D unit, releasing it outwards;
❒remove the bulb E from connector F
and replace it;
❒refit the new bulb on the connector,
making sure it is correctly locked;
❒refit the connector and bulb holder D
unit in its housing;
❒finally refit cover C fig. 120.
SIDE LIGHTS/DAYTIME
RUNNING LIGHTS (DRL)To replace the bulb, proceed as follows:
❒steer the wheel completely inwards;
❒undo the screws A fig. 121 and
remove the flap B;
❒remove cover D fig. 120;
❒turn bulb holder E fig. 123
anticlockwise, extract bulb F from
connector G and replace it;
❒refit the new bulb on the connector,
making sure it is correctly locked;
❒refit the bulb holder unit E in
its housing and turn it clockwise, until
the locking click is heard;
❒finally refit cover D fig. 120.
SIDE DIRECTION
INDICATORSTo replace the bulb, proceed as follows:
❒adjust the lens A fig. 124 to
compress in the internal catch B fig.
125, then pull the cluster outwards;
❒turn the bulb holder C anticlockwise,
extract bulb D and replace it;
❒refit the bulb holder C in the lens A
fig. 124 and turn it clockwise;
121
F0Y0145C
122
F0Y0025C
123
F0Y0026C
124
F0Y0147C
125
F0Y0171C
119
9-1-2015 12:9 Pagina 119
Page 123 of 224

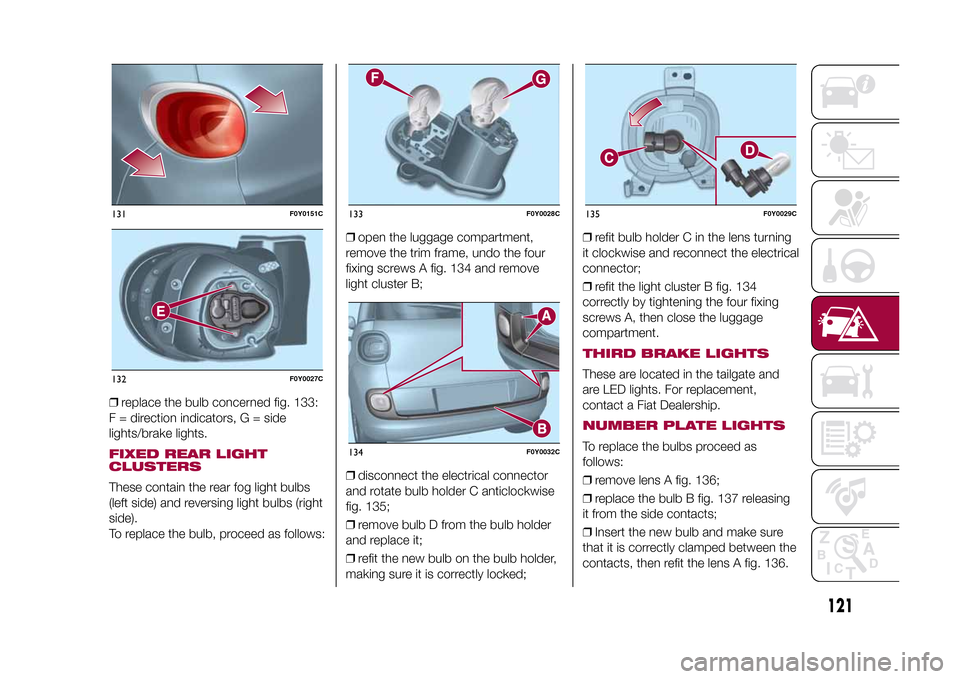
❒replace the bulb concerned fig. 133:
F = direction indicators, G = side
lights/brake lights.FIXED REAR LIGHT
CLUSTERSThese contain the rear fog light bulbs
(left side) and reversing light bulbs (right
side).
To replace the bulb, proceed as follows:❒open the luggage compartment,
remove the trim frame, undo the four
fixing screws A fig. 134 and remove
light cluster B;
❒disconnect the electrical connector
and rotate bulb holder C anticlockwise
fig. 135;
❒remove bulb D from the bulb holder
and replace it;
❒refit the new bulb on the bulb holder,
making sure it is correctly locked;❒refit bulb holder C in the lens turning
it clockwise and reconnect the electrical
connector;
❒refit the light cluster B fig. 134
correctly by tightening the four fixing
screws A, then close the luggage
compartment.
THIRD BRAKE LIGHTSThese are located in the tailgate and
are LED lights. For replacement,
contact a Fiat Dealership.NUMBER PLATE LIGHTSTo replace the bulbs proceed as
follows:
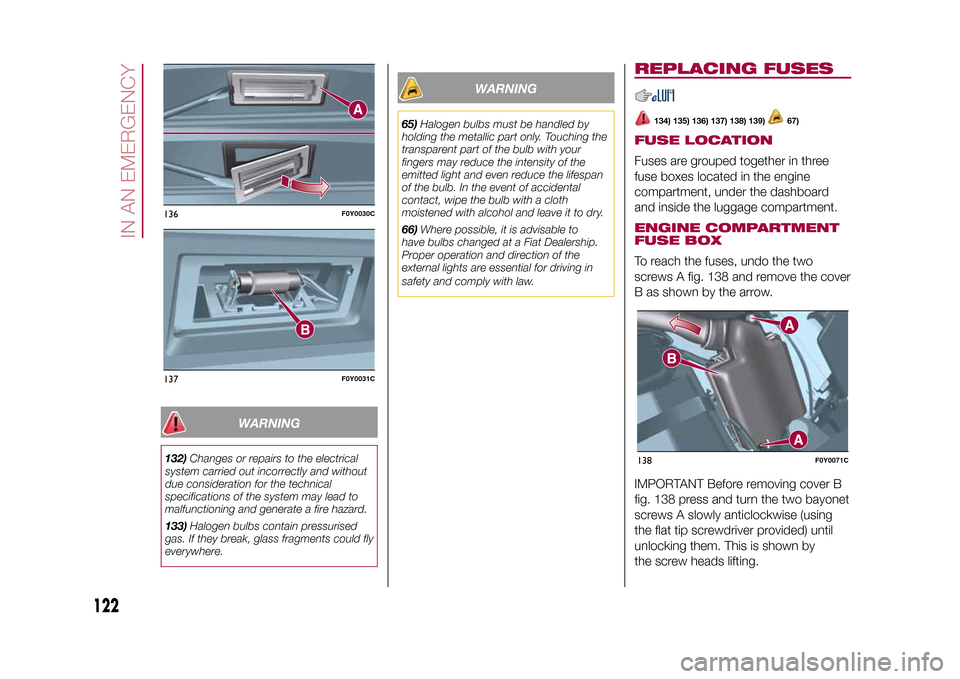
❒remove lens A fig. 136;
❒replace the bulb B fig. 137 releasing
it from the side contacts;
❒Insert the new bulb and make sure
that it is correctly clamped between the
contacts, then refit the lens A fig. 136.
131
F0Y0151C
132
F0Y0027C
133
F0Y0028C
134
F0Y0032C
135
F0Y0029C
121
9-1-2015 12:9 Pagina 121
Page 124 of 224

WARNING
132)Changes or repairs to the electrical
system carried out incorrectly and without
due consideration for the technical
specifications of the system may lead to
malfunctioning and generate a fire hazard.
133)Halogen bulbs contain pressurised
gas. If they break, glass fragments could fly
everywhere.
WARNING
65)Halogen bulbs must be handled by
holding the metallic part only. Touching the
transparent part of the bulb with your
fingers may reduce the intensity of the
emitted light and even reduce the lifespan
of the bulb. In the event of accidental
contact, wipe the bulb with a cloth
moistened with alcohol and leave it to dry.
66)Where possible, it is advisable to
have bulbs changed at a Fiat Dealership.
Proper operation and direction of the
external lights are essential for driving in
safety and comply with law.
REPLACING FUSES
134) 135) 136) 137) 138) 139)
67)
FUSE LOCATIONFuses are grouped together in three
fuse boxes located in the engine
compartment, under the dashboard
and inside the luggage compartment.ENGINE COMPARTMENT
FUSE BOXTo reach the fuses, undo the two
screws A fig. 138 and remove the cover
B as shown by the arrow.
IMPORTANT Before removing cover B
fig. 138 press and turn the two bayonet
screws A slowly anticlockwise (using
the flat tip screwdriver provided) until
unlocking them. This is shown by
the screw heads lifting.
136
F0Y0030C
137
F0Y0031C
138
F0Y0071C
122
IN AN EMERGENCY
9-1-2015 12:9 Pagina 122