2015 FIAT 500E warning
[x] Cancel search: warningPage 35 of 100

HEATED SEATS
Front Heated Seats
The heated seat switches are located on the center instrument panel area.
•Push the switch once to turn on the
heated seat.
•Push the switch a second time to turn
off the heated seat.
WARNING!
•Persons who are unable to feel pain to the skin because of advanced age, chronic
illness, diabetes, spinal cord injury, medication, alcohol use, exhaustion or other
physical conditions must exercise care when using the seat heater.It may cause
burns even at low temperatures, especially if used for long periods of time.
•Do not place anything on the seat that insulates against heat, such as a blanket or
cushion.This may cause the seat heater to overheat.Sitting in a seat that has been
overheated could cause serious burns due to the increased surface temperature of
the seat.
Heated Seat Switches
GETTING STARTED
33
Page 36 of 100

TILT STEERING
The tilt lever is located on the steering column, below the turn signal lever.
•Push down on the lever to unlock the
steering column.
•With one hand firmly on the steering
wheel, move the steering column up or
down as desired.
•Pull upward on the lever to lock the
column firmly in place.
WARNING!
Do not adjust the steering column while driving.Adjusting the steering column while
driving or driving with the steering column unlocked could cause the driver to lose con-
trol of the vehicle.Be sure the steering column is locked before driving your vehicle.
Failure to follow this warning may result in severe injury or death.
Tilt Steering Lever
GETTING STARTED
34
Page 42 of 100
Cancel
Push the CANCEL button, or apply the brakes to cancel the set speed and maintain the
set speed memory.
Push the ON/OFF button to turn the system off and erase the set speed memory.
WARNING!
•Leaving the Electronic Speed Control system on when not in use is dangerous.You
could accidentally set the system or cause it to go faster than you want.You could
lose control and have a collision.Always leave the Electronic Speed Control system
off when you are not using it.
•Electronic Speed Control can be dangerous where the system cannot maintain a
constant speed.Your vehicle could go too fast for the conditions, and you could
lose control.A collision could be the result.Do not use Electronic Speed Control
in heavy traffic or on roads that are winding, icy, snow-covered or slippery.
POWER WINDOWS
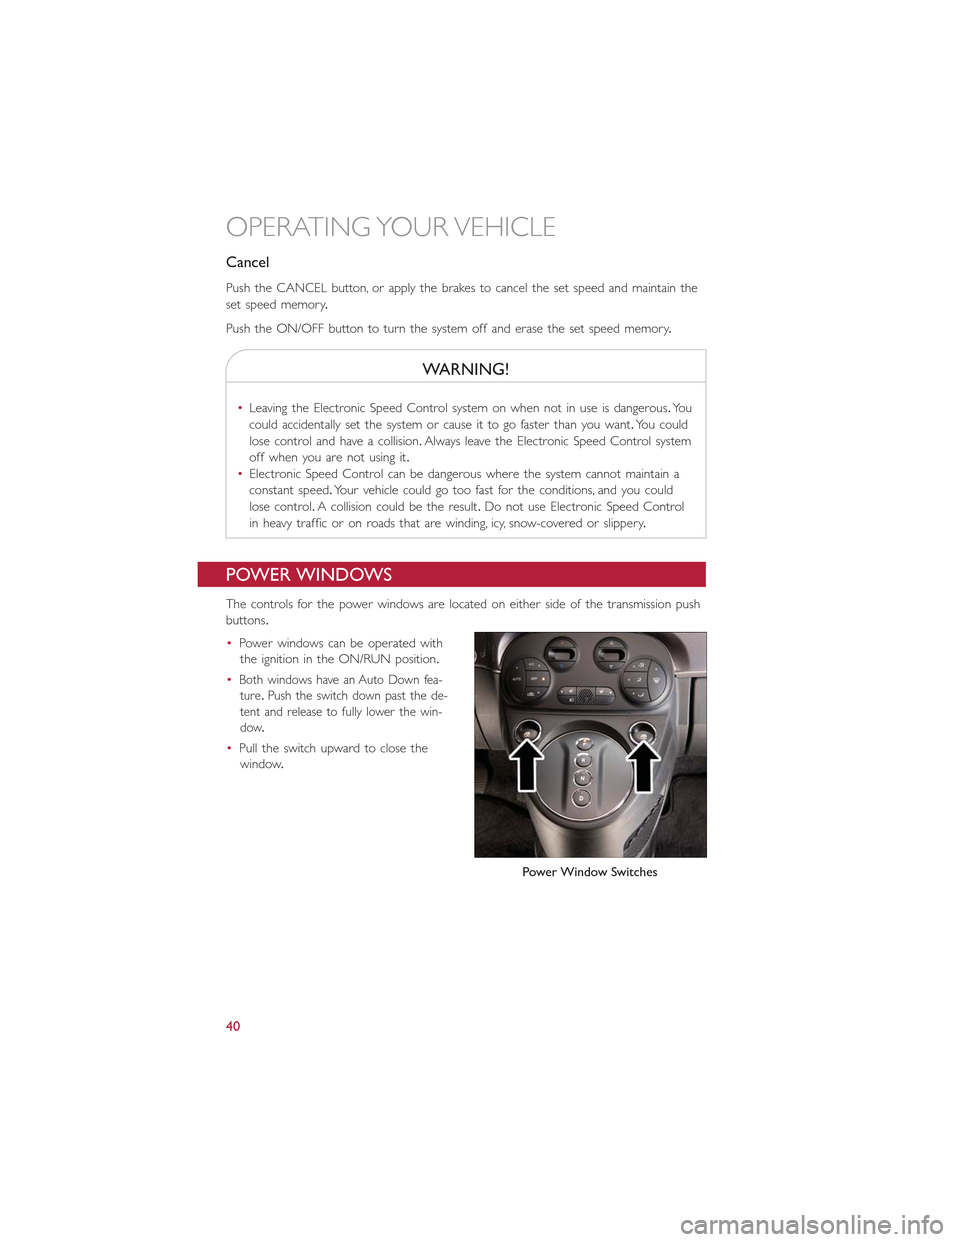
The controls for the power windows are located on either side of the transmission push
buttons.
•Power windows can be operated with
the ignition in the ON/RUN position.
•Both windows have an Auto Down fea-
ture.Push the switch down past the de-
tent and release to fully lower the win-
dow.
•Pull the switch upward to close the
window.
Power Window Switches
OPERATING YOUR VEHICLE
40
Page 45 of 100
Sun Shade
•For vehicles equipped with either a power sunroof or a fixed glass roof, there is a sun
shade that can be open or closed.To open the sun shade push the tab and move the
shade to a full open position.
WARNING!
•Do not let children play with the sunroof, or leave children unattended in the ve-
hicle, and do not leave the key in or near the vehicle (or in a location accessible
to children).Occupants, particularly unattended children, can become entrapped by
the power sunroof while operating the power sunroof switch.Such entrapment
may result in serious injury or death.
•In a collision, there is a greater risk of being thrown from a vehicle with an open
sunroof.You could also be seriously injured or killed.Always fasten your seat belt
properly and make sure all passengers are properly secured.
•Do not allow small children to operate the sunroof.Never allow your fingers,
other body parts, or any object to project through the sunroof opening.Injury
may result.
WIND BUFFETING
•Wind buffeting can be described as a helicopter-type percussion sound.If buffeting
occurs with the windows down, or top down (convertible models), adjust one or both
side windows up or down slightly.
OPERATING YOUR VEHICLE
43
Page 50 of 100
BLUE&ME™ HANDS-FREE OPERATION
•FIAT’s Windows Mobile™ based BLUE&ME™ Hands-Free Communication is a personal
telematics system that incorporates communication and entertainment applications that
are specifically designed for use in your car.
•The BLUE&ME™ Hands-Free Communication package installed in your car is equipped
with integral hands-free functionality, message reader, and media player.BLUE&ME™ is
designed to support the future installation of additional services.
•The BLUE&ME™ Hands-Free Communication package features integrated voice recogni-
tion, steering wheel controls and a multifunction electronic display that allows you to use
your Bluetooth® enabled wireless technology enabled mobile phone without having to
take your eyes off the road.You can even keep your phone in a pocket or a bag.You are
not required to train the voice recognition system to recognize your voice.The system is
“speaker independent” and performs equally well for different users.
•Bluetooth® wireless technology enables wireless connection between your mobile
phone and the hands-free kit installed on your car.
•To use the hands-free kit, you need a Bluetooth® wireless technology enabled mobile
phone.This hands-free kit gives you the possibility of interacting vocally with your mobile
phone while driving, even if your mobile device does not feature Voice Recognition.You
can also interact with your mobile phone manually and visually using the steering wheel
controls and the instrument panel multifunction display.Please refer to the Fiat Blue & Me
Radio Supplement for further information.
WARNING!
Driving while distracted can result in loss of vehicle control, accident and injury.It is
strongly recommended that you use extreme caution when using any device or feature
that may take your focus off the road or your hands off the steering wheel.Your pri-
mary responsibility is the safe operation of your vehicle.We recommend against the
use of any handheld device while driving, encourage the use of voice-operated systems
when possible and that you become aware of applicable laws that may affect the use of
electronic devices while driving.
ELECTRONICS
48
Page 55 of 100
How To Connect The USB Stick/iPod® To BLUE&ME™
•To connect your USB stick/iPod® to BLUE&ME™, proceed as follows:
•USB devices without USB wire: just connect the USB stick/iPod® (directly or by an
extension lead) to the USB port on the car.
•USB stick/iPod® with USB wire: use the wire to connect the USB stick/iPod® to
the USB port on the car.
•Turn the ignition key to ON.BLUE&ME™ will start automatically to play your digital
tracks selecting them from the library built at the moment the USB stick/iPod® is
connected.
•If AUTOPLAY is set to “ON,” BLUE&ME™ will start playback automatically.
•Refer to the iPod®/USB/MP3 CONTROL section in this manual and the BLUE&ME™
User's Manual on the DVD for more details.
WARNING!
Driving while distracted can result in loss of vehicle control, accident and injury.It is
strongly recommended that you use extreme caution when using any device or feature
that may take your focus off the road or your hands off the steering wheel.Your pri-
mary responsibility is the safe operation of your vehicle.We recommend against the
use of any handheld device while driving, encourage the use of voice-operated systems
when possible and that you become aware of applicable laws that may affect the use of
electronic devices while driving.
iPod®/USB/MP3 CONTROL — IF EQUIPPED
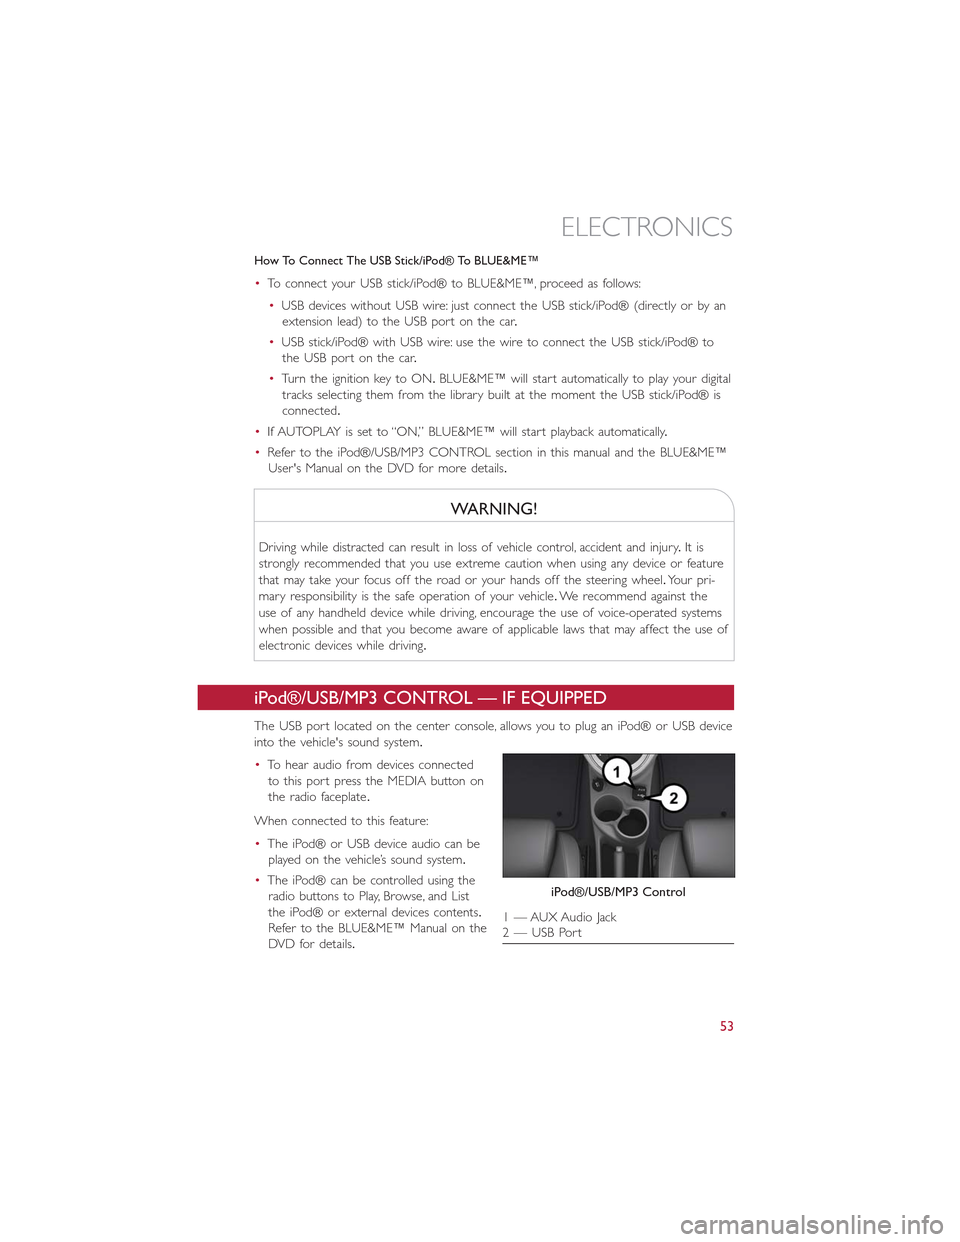
The USB port located on the center console, allows you to plug an iPod® or USB device
into the vehicle's sound system.
•To hear audio from devices connected
to this port press the MEDIA button on
the radio faceplate.
When connected to this feature:
•The iPod® or USB device audio can be
played on the vehicle’s sound system.
•The iPod® can be controlled using the
radio buttons to Play, Browse, and List
the iPod® or external devices contents.
Refer to the BLUE&ME™ Manual on the
DVD for details.
iPod®/USB/MP3 Control
1 — AUX Audio Jack2 — USB Port
ELECTRONICS
53
Page 56 of 100
•The iPod® battery charges when plugged into the USB port (if supported by the spe-
cific audio device).
•Compatible iPod® devices may also be controllable using voice commands.Refer to
the BLUE&ME™ Manual on the DVD for details.
NOTE:
The USB port supports certain Mini, Classic, Nano, Touch, and iPhone® devices.The USB
port also supports playing music from compatible external USB Mass Storage Class
memory devices.For supported audio file formats, refer to the USB Port section on the
Owner's Manual on the DVD.Some iPod® software versions may not fully support the
USB port features.Please visit Apple’s website for iPod® software updates.
WARNING!
Do not plug in or remove the iPod® or external device while driving.Failure to follow
this warning could result in a collision.
ELECTRONIC VEHICLE INFORMATION CENTER (EVIC)
•The EVIC features a driver interactive display that is located in the instrument cluster.
Pushing the controls on the right side of the Instrument Cluster allows the driver to
select vehicle information and Personal Settings.For additional information, refer to
“Programmable Features” in this guide.
•Push the MENU button to enter the menu mode.
•Push the UPor DOWNbuttons to scroll through the menu settings.
•Once the menu setting is shown in the EVIC display, push the MENU button to access
the setting and use the UP or DOWN buttons to change the current setting.Push the
MENU button a second time to save the setting and return to menu screen.
ELECTRONICS
54
Page 57 of 100
PROGRAMMABLE FEATURES
Electronic Vehicle Information Center (EVIC)
•Push the MENU button to enter the menu mode.
•Push the UPor DOWNbuttons to scroll through the menu settings.
•Once the menu setting is shown in the EVIC display push the MENU button to access
the setting and use the UP or DOWN buttons to change the current setting.Push the
MENU button a second time to save the setting and return to menu screen.
•Charging Schedule•Daytime Running Lights
•Set Date•Button Volume
•Set Time•Hill Start Assist
•Units•Stored Warning
•Languages•Tutorial
•Battery % Display•Connectivity ID
•Auto Door Lock•Restore Factory Settings
•Remote Unlock•Exit Menu
Selecting An Option Of The Main Menu Without Submenu:
•Briefly push the MENU button to select the main menu option to set.
•Push the UP or DOWN button to select the new setting.
•Briefly push the MENU button to store the new setting and go back to the main
menu option previously selected.
Selecting An Option Of The Main Menu With Submenu:
•Briefly push the MENU button to display the first submenu option.
•Push the UP or DOWN button to scroll through all the submenu options.
•Briefly push the MENU button to select the displayed submenu option and to open
the relevant setup menu.
•Push the UP or DOWN button to select the new setting for this submenu option.
•Briefly push the MENU button to store the new setting and go back to the previously
selected submenu option.
•Push and hold the MENU button to return to the main menu (short hold) or the
main screen (longer hold).
NOTE:
The charging schedule is based on the date and time programmed in the EVIC.
ELECTRONICS
55