Page 294 of 367

WARNING!(Continued)
longer than 30 seconds continuously without stop-
ping when you are stuck and do not let anyone near
a spinning wheel, no matter what the speed.
MANUAL PARK RELEASE
WARNING!
Always secure your vehicle by fully applying the
parking brake, before activating the Manual Park
Release. Activating the Manual Park Release will
allow your vehicle to roll away if it is not secured by
the parking brake or other means. Activating the
Manual Park Release on an unsecured vehicle could
lead to serious injury or death for those in or around
the vehicle.
In order to move the vehicle in cases where the transmis-
sion will not shift out of PARK (such as a dead battery),
a Manual Park Release is available. If a dead 12 volt
battery is the cause of the condition refer to “Jump Start
Procedure — 12 Volt Battery” before performing the
Manual Park Release.
To perform the Manual Park Release follow these steps:
•To prevent the vehicle from rolling unintentionally,
firmly apply the parking brake.
•If possible, raise the front driver’s side of the vehicle to
provide access to the transmission.
•Working from underneath the vehicle, remove the
black rubber plug from the front of the Park module (a
black canister mounted on the front of the transmis-
sion).
292 WHAT TO DO IN EMERGENCIES
Page 295 of 367
•Using a T25 driver bit, rotate the Manual Park Release
shaft (located just behind the rubber plug) clockwise,
at least 20 turns, to release the Park mechanism. The
vehicle is now out of PARK and can be moved.
•Reinstall the rubber plug.
•Release the parking brake only when a driver is in the
vehicle, or the vehicle is secured by other means. The
Manual Park Release will be reset automatically once
the vehicle is restarted.
TOWING A DISABLED VEHICLE
This section describes procedures for towing a disabled
vehicle using a commercial towing service.
Manual Park Release Location
6
WHAT TO DO IN EMERGENCIES 293
Page 298 of 367

▫Points To Remember...................306
▫Maintenance-Free Battery 12 Volt..........306
▫Air Conditioner Maintenance.............308
▫Body Lubrication.....................309
▫Wiper Blades........................309
▫Adding Washer Fluid..................311
▫Brake System........................312
▫Appearance Care And Protection From
Corrosion...........................314
!FUSES..............................321
▫Interior Fuses........................322
▫Power Distribution Center #1.............325
▫Power Distribution Center (PDC) #2........327
!VEHICLE STORAGE.....................329
!REPLACEMENT BULBS.................329
!BULB REPLACEMENT..................330
▫Headlamps Low Beam and High Beam......330
▫Front Turn Signal, Parking And Daytime
Running Lamps.......................331
▫Front Fog Lamps......................331
▫Front/Rear Side Marker Lamps............332
▫Rear Tail, Stop, Backup And Turn Signal
Lamps.............................332
▫Center High Mounted Stop Lamp (CHMSL) . . .333
!FLUID CAPACITIES....................333
!FLUIDS, LUBES, AND GENUINE PARTS.....334
296 MAINTAINING YOUR VEHICLE
Page 314 of 367

WARNING!
Commercially available windshield washer solvents
are flammable. They could ignite and burn you. Care
must be exercised when filling or working around
the washer solution.
Brake System
In order to assure brake system performance, all brake
system components should be inspected periodically.
Refer to the “Maintenance Schedule” for the proper
maintenance intervals.
WARNING!
Riding the brakes can lead to brake failure and
possibly a collision. Driving with your foot resting or
riding on the brake pedal can result in abnormally
(Continued)
WARNING!(Continued)
high brake temperatures, excessive lining wear, and
possible brake damage. Riding the brakes may also
reduce braking capacity in an emergency.
Brake Master Cylinder
The fluid level in the master cylinder should be checked
when performing under hood services, or immediately if
the “Brake Warning Light” is on and the parking brake is
not applied.
Be sure to clean the top of the master cylinder area before
removing the cap. If necessary, add fluid to bring the
fluid level up to the requirements described on the brake
fluid reservoir. Fluid level can be expected to fall as the
brake pads wear. The brake fluid level should be checked
when the pads are replaced. However, low fluid level
may be caused by a leak and a checkup may be needed.
312 MAINTAINING YOUR VEHICLE
Page 316 of 367
WARNING!(Continued)
•Do not allow petroleum-based fluid to contaminate
the brake fluid. Brake seal components could be
damaged, causing partial or complete brake failure.
This could result in a collision.
CAUTION!
Use of improper brake fluids will affect overall clutch
system performance. Improper brake fluids may dam-
age the clutch system resulting in loss of clutch func-
tion and the ability to shift the transmission.
Appearance Care And Protection From Corrosion
Protection Of Body And Paint From Corrosion
Vehicle body care requirements vary according to geo-
graphic locations and usage. Chemicals that make roads
passable in snow and ice and those that are sprayed on
trees and road surfaces during other seasons are highly
corrosive to the metal in your vehicle. Outside parking,
which exposes your vehicle to airborne contaminants,
road surfaces on which the vehicle is operated, extreme
hot or cold weather and other extreme conditions will
have an adverse effect on paint, metal trim, and under-
body protection.
The following maintenance recommendations will enable
you to obtain maximum benefit from the corrosion
resistance built into your vehicle.
314 MAINTAINING YOUR VEHICLE
Page 325 of 367
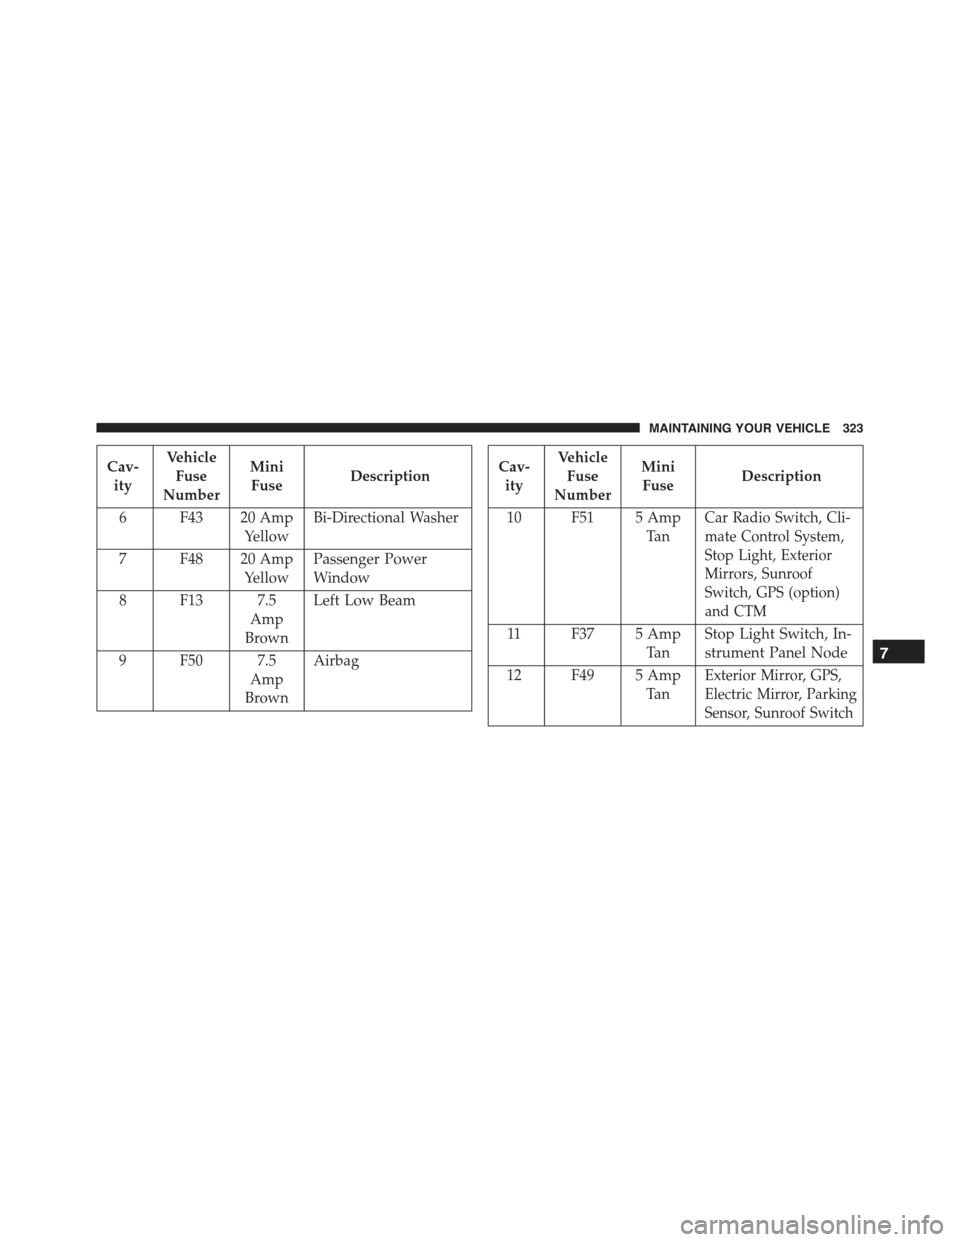
Cav-
ity
Vehicle
Fuse
Number
Mini
FuseDescription
6 F43 20 Amp
Yellow
Bi-Directional Washer
7 F48 20 Amp
Yellow
Passenger Power
Window
8 F13 7.5
Amp
Brown
Left Low Beam
9 F50 7.5
Amp
Brown
Airbag
Cav-
ity
Vehicle
Fuse
Number
Mini
FuseDescription
10 F51 5 Amp
Ta n
Car Radio Switch, Cli-
mate Control System,
Stop Light, Exterior
Mirrors, Sunroof
Switch, GPS (option)
and CTM
11 F37 5 Amp
Ta n
Stop Light Switch, In-
strument Panel Node
12 F49 5 Amp
Ta n
Exterior Mirror, GPS,
Electric Mirror, Parking
Sensor, Sunroof Switch
7
MAINTAINING YOUR VEHICLE 323
Page 331 of 367
VEHICLE STORAGE
The preferred way of storing your vehicle for a long
period of time is to leave it attached to a Level 1 or Level
2 charger. The vehicle has a wake-up feature that will
wake the system every 3 weeks and do a maintenance
charge on the 12 Volt battery and also top off the high
voltage battery if necessary.
Anytime you store your vehicle, or keep it out of service
(e.g., vacation) for two weeks or more, run the air
conditioning system at idle for about five minutes in the
fresh air and high blower setting. This will ensure
adequate system lubrication to minimize the possibility
of compressor damage when the air conditioning system
is started again.
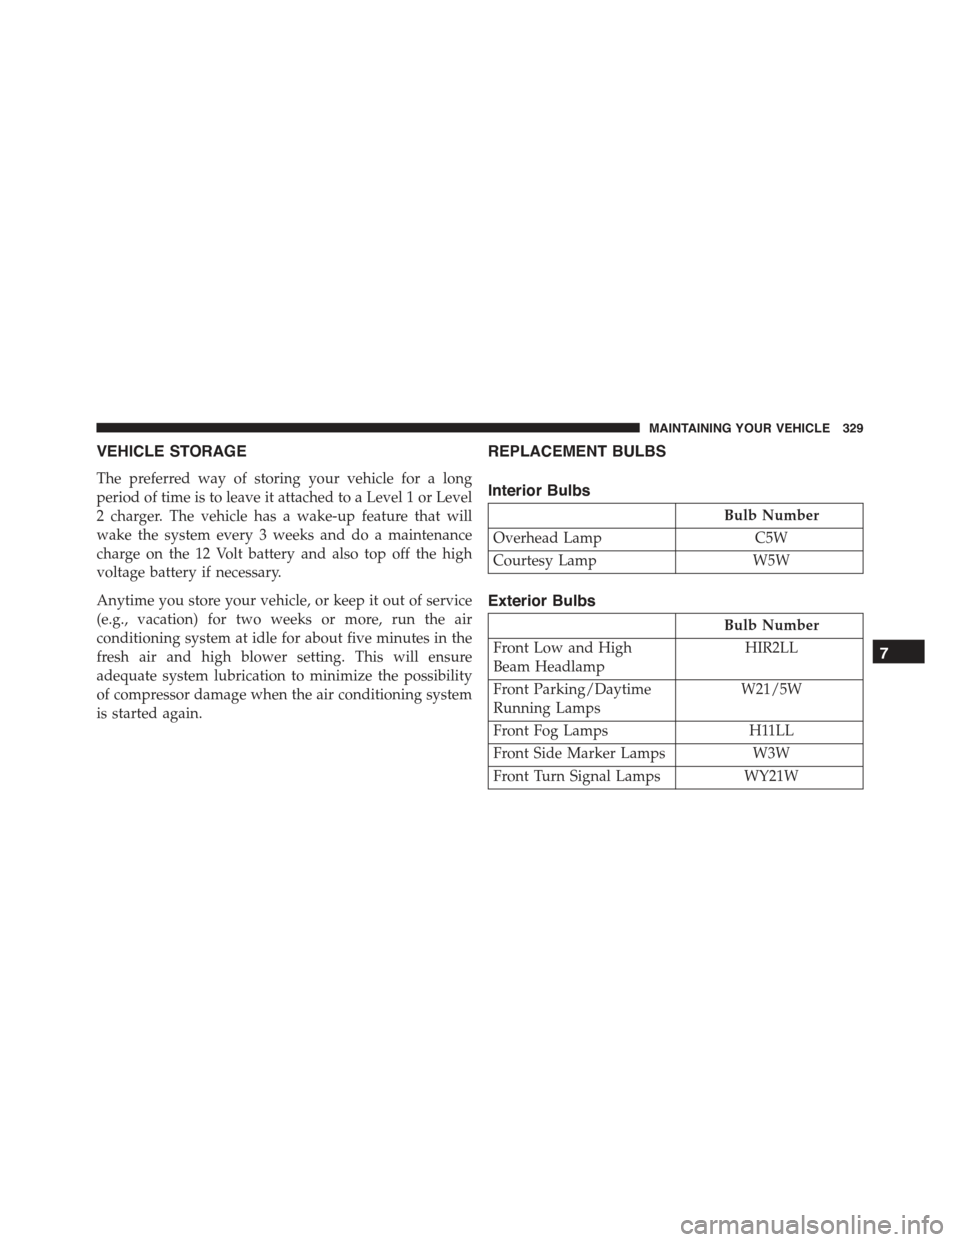
REPLACEMENT BULBS
Interior Bulbs
Bulb Number
Overhead LampC5W
Courtesy LampW5W
Exterior Bulbs
Bulb Number
Front Low and High
Beam Headlamp
HIR2LL
Front Parking/Daytime
Running Lamps
W21/5W
Front Fog Lamps H11LL
Front Side Marker Lamps W3W
Front Turn Signal Lamps WY21W
7
MAINTAINING YOUR VEHICLE 329
Page 333 of 367
Front Turn Signal, Parking And Daytime Running
Lamps
1. Turn the steering wheel completely to the left or right.
2. Open the wheel housing access door.
3. Remove the plastic cap from the back of the lamp
housing.
4. Rotate bulb/socket counter-clockwise.
5. Remove the bulb and replace as needed.
6. Install the bulb into socket, and rotate bulb/socket
clockwise into lamp locking it in place.
7. Reinstall the plastic cap.
Front Fog Lamps
To replace the front fog lights, see your authorized dealer.
Wheel Housing Access Door
7
MAINTAINING YOUR VEHICLE 331