Page 162 of 426

the light is flashing when the engine is running, imme-
diate service is required and you may experience reduced
performance, an elevated/rough idle or engine stall and
your vehicle may require towing. The light will come on
when the ignition is first turned to ON/RUN and remain
on briefly as a bulb check. If the light does not come on
during starting, have the system checked by an autho-
rized dealer.
27. Oil Pressure Warning Light
This light indicates low engine oil pressure. The
light should turn on momentarily when the engine is
started. If the light turns on while driving, stop the
vehicle and shut off the engine as soon as possible. A
chime will sound for four minutes when this light turns
on.
Do not operate the vehicle until the cause is corrected.
This light does not indicate how much oil is in the engine.
The engine oil level must be checked under the hood.
28. Engine Temperature Warning Light
This light warns of an overheated engine condi-
tion. The engine coolant temperature indicator
will illuminate and a single chime will sound after
reaching a set threshold.
If the light turns on while driving, safely pull over and
stop the vehicle. If the A/C system is on, turn it off. Also,
shift the transmission into NEUTRAL and idle the ve-
hicle. If the temperature reading does not return to
normal, turn the engine off immediately and call for
service. Refer to “If Your Engine Overheats” in “What To
Do In Emergencies” for further information.
160 UNDERSTANDING YOUR INSTRUMENT PANEL
Page 215 of 426
NOTE:
•Continuous use of the Recirculation mode may make
the inside air stuffy and window fogging may occur.
Extended use of this mode is not recommended.
•The use of the Recirculation mode in cold or damp
weather could cause windows to fog on the inside,
because of moisture buildup inside the vehicle. Se-
lect the outside air position for maximum defogging.
•Recirculation can be used in all modes except for
Defrost.
•The A/C can be deselected manually without dis-
turbing the mode control selection.
4. Mode Control
Rotate this control to change the system between Modes
(Panel, Bi-Level, Floor, Mix, Defrost).
•Panel
Air is directed through the outlets in the
instrument panel. These outlets can be ad-
justed to direct airflow.
NOTE:The center instrument panel outlets can be aimed
so that they are directed toward the rear seat passengers
for maximum airflow to the rear.
•Bi-Level
Air is directed through the panel and floor
outlets.
•Floor
Air is directed through the floor outlets with a
small amount flowing through the defrost and
side window demister outlets.
4
UNDERSTANDING YOUR INSTRUMENT PANEL 213
Page 219 of 426
and side window demist outlets. When the defrost but-
ton is selected, the blower level will increase. Use Defrost
mode with maximum temperature settings for best wind-
shield and side window defrosting and defogging. Per-
forming this function will cause the ATC to switch into
manual mode. If the front defrost mode is turned off the
climate system will return the previous setting.
7. Floor Mode
Air is directed through the floor outlets with a
small amount flowing through the defrost and
side window demister outlets. Performing this function
will cause the ATC to switch into manual mode.
8. Panel Mode
Air is directed through the outlets in the instru-
ment panel. These outlets can be adjusted to direct
airflow. Performing this function will cause the ATC to
switch into manual mode.
NOTE:The center instrument panel outlets can be aimed
so that they are directed toward the rear seat passengers
for maximum airflow to the rear.
9. Bi-Level
Air is directed through the panel and floor outlets.
Press and release the Panel mode button and Floor
mode button to enter Bi-Level mode, the indicators
illuminate when ON. Performing this function will cause
the ATC to switch into manual mode.
10. Temperature Control Down Button
Provides temperature down control. Push the button for
cooler temperature settings.
NOTE:If the temperature is lowered until#Lo#is dis-
played, all high voltage Heating, Ventilation, and Air
Conditioning (HVAC) systems are deactivated and am-
bient air is circulated according to the Heating, Ventila-
tion, and Air Conditioning (HVAC) control settings.
4
UNDERSTANDING YOUR INSTRUMENT PANEL 217
Page 228 of 426
▫Fuel System Cautions...................298
▫Carbon Monoxide Warnings.............299
!ADDING FUEL........................300
▫Fuel Filler Cap (Gas Cap)...............300
▫Loose Fuel Filler Cap Message............301
!TRAILER TOWING.....................301
!RECREATIONAL TOWING
(BEHIND MOTORHOME, ETC.)............302
▫Towing This Vehicle Behind Another Vehicle . . .302
226 STARTING AND OPERATING
Page 231 of 426
3. If the engine fails to start within ten seconds, cycle the
ignition to the STOP (OFF/LOCK) position, wait five
seconds to allow the starter to cool, then repeat the
Extended Park Starting procedure.
4. If the engine fails to start after eight attempts, allow
the starter to cool for at least 10 minutes, then repeat
the procedure.
CAUTION!
To prevent damage to the starter, do not continuously
crank the engine for more than 10 seconds at a time.
Wait 10 to 15 seconds before trying again.
If Engine Fails To Start
WARNING!
Never pour fuel or other flammable liquid into the
throttle body air inlet opening in an attempt to start
the vehicle. This could result in flash fire causing
serious personal injury.
CAUTION!
•Do not attempt to push or tow your vehicle to get it
started. Unburned fuel could enter the catalytic
converter and once the engine has started, ignite
and damage the converter and vehicle.
•To prevent damage to the starter, do not continu-
ously crank the engine for more than 15 seconds at
a time. Wait 10 to 15 seconds before trying again.
5
STARTING AND OPERATING 229
Page 239 of 426

Gear Ranges
DO NOT race the engine when shifting from PARK or
NEUTRAL into another gear range.
NOTE:After selecting any gear range, wait a moment to
allow the selected gear to engage before accelerating.
This is especially important when the engine is cold.
PARK (P)
This range supplements the parking brake by locking the
transmission. The engine can be started in this range.
Never attempt to use PARK while the vehicle is in
motion. Apply the parking brake when leaving the
vehicle in this range.
When parking on a level surface, you may shift the
transmission into PARK first, and then apply the parking
brake.
When parking on a hill, apply the parking brake before
shifting the transmission to PARK, otherwise the load on
the transmission locking mechanism may make it difficult
to move the shift lever out of PARK. As an added precau-
tion, turn the front wheels toward the curb on a downhill
grade and away from the curb on an uphill grade.
WARNING!
•Never use the PARK position as a substitute for the
parking brake. Always apply the parking brake
fully when parked to guard against vehicle move-
ment and possible injury or damage.
•Your vehicle could move and injure you and others
if it is not completely in PARK. Check by trying to
move the shift lever out of PARK with the brake
pedal released. Make sure the transmission is in
PARK before leaving the vehicle.
(Continued)
5
STARTING AND OPERATING 237
Page 242 of 426
WARNING!
Do not coast in NEUTRAL and never turn off the
ignition to coast down a hill. These are unsafe practices
that limit your response to changing traffic or road
conditions. You might lose control of the vehicle and
have a collision.
CAUTION!
Towing the vehicle, coasting, or driving for any other
reason with the transmission in NEUTRAL can cause
severe transmission damage. Refer to “Recreational
Towing” in “Starting And Operating” and “Towing A
Disabled Vehicle” in “What To Do In Emergencies”
for further information.
DRIVE (D)
This range should be used for most city and highway
driving. It provides the smoothest upshifts and down-
shifts, and the best fuel economy. The transmission
automatically upshifts through all forward gears. The
DRIVE position provides optimum driving characteris-
tics under all normal operating conditions.
When frequent transmission shifting occurs (such as
when operating the vehicle under heavy loading condi-
tions, in hilly terrain, or traveling into strong head
winds), use the AutoStick shift control (refer to AutoStick
in this section for further information) to select a lower
gear. Under these conditions, using a lower gear will
improve performance and extend transmission life by
reducing excessive shifting and heat buildup.
240 STARTING AND OPERATING
Page 250 of 426
NOTE:
•Even if the power steering assistance is no longer
operational, it is still possible to steer the vehicle.
Under these conditions there will be a substantial
increase in steering effort, especially at low speeds and
during parking maneuvers.
•If the condition persists, see your authorized dealer for
service.
PARKING BRAKE
Before leaving the vehicle, make sure that the parking
brake is fully applied. Also, be certain to leave the
manual transmission in REVERSE or first gear.
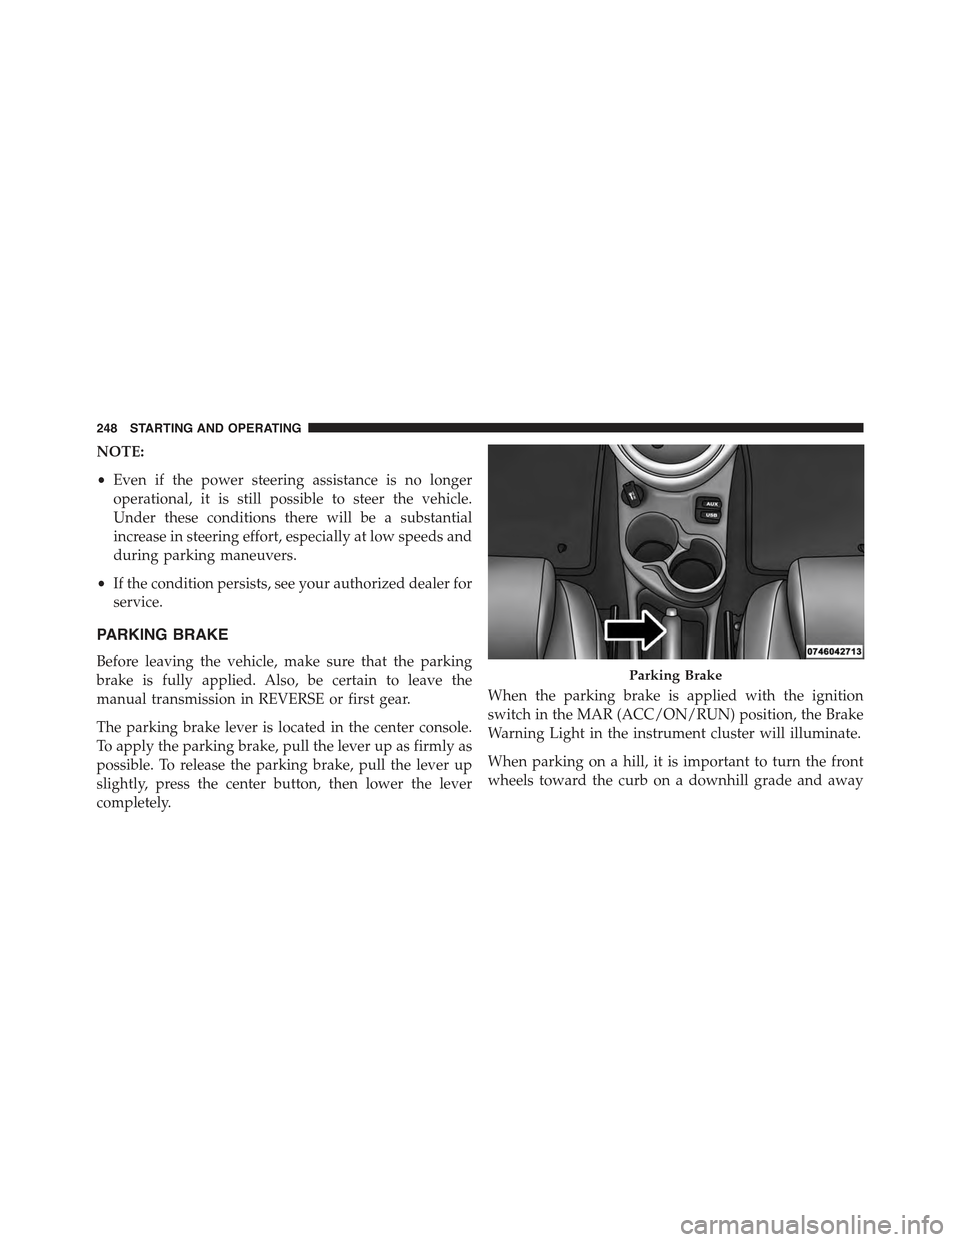
The parking brake lever is located in the center console.
To apply the parking brake, pull the lever up as firmly as
possible. To release the parking brake, pull the lever up
slightly, press the center button, then lower the lever
completely.
When the parking brake is applied with the ignition
switch in the MAR (ACC/ON/RUN) position, the Brake
Warning Light in the instrument cluster will illuminate.
When parking on a hill, it is important to turn the front
wheels toward the curb on a downhill grade and away
Parking Brake
248 STARTING AND OPERATING